


1.将seatunnel上传至服务器上。我之前已经解压并执行过install-plugin.sh,这里为了方便,我直接用的执行过install-plugin.sh脚本之后的seatunnel做演示。
执行过install-plugin后的lib目录包含如下

tar -zxvf apache-seatunnel-2.3.3-bin.tar.gz
sh apache-seatunnel-2.3.3/bin/install-plugin.sh
tar -czvf  apache-seatunnel-2.3.3-bin.tar.gz  apache-seatunnel-2.3.3
2.构建seatunnel镜像。在安装seatunnel的同级文件夹下创建Dockerfile。配置如下 可自行选择版本
FROM openjdk:8
ENV SEATUNNEL_HOME="/opt/seatunnel"
ENV SEATUNNEL_VERSION="2.3.3"
COPY /apache-seatunnel-${SEATUNNEL_VERSION}-bin.tar.gz /opt/apache-seatunnel-${SEATUNNEL_VERSION}-bin.tar.gz
WORKDIR /opt
RUN tar -xzvf apache-seatunnel-${SEATUNNEL_VERSION}-bin.tar.gz
RUN mv apache-seatunnel-${SEATUNNEL_VERSION} seatunnel
RUN rm -f /opt/apache-seatunnel-${SEATUNNEL_VERSION}-bin.tar.gz
WORKDIR /opt/seatunnel
执行命令
docker build -t seatunnel:2.3.3 -f Dockerfile .
3.查看镜像
docker images
如下所示镜像

4.将镜像load进k8s,这里用的minikube做演示
minikube image load seatunnel:2.3.3
上述可参考:local-mode模式
5.创建configmap如下
kubectl create configmap hazelcast-client  --from-file= config/hazelcast-client.yaml
kubectl create configmap hazelcast  --from-file=config/hazelcast.yaml
kubectl create configmap seatunnelmap  --from-file=config/seatunnel.yaml
5.使用Reloader实现更新configmap后自动重启pod
wget https://raw.githubusercontent.com/stakater/Reloader/master/deployments/kubernetes/reloader.yaml

kubectl apply -f reloader.yaml

6.创建seatunnel-cluster.yml如下
apiVersion: v1
kind: Service
metadata:
  name: seatunnel
spec:
  selector:
    app: seatunnel
  ports:
  - port: 5801
    name: seatunnel
  clusterIP: None
---
apiVersion: apps/v1
kind: StatefulSet
metadata:
  name: seatunnel
  annotations:
    configmap.reloader.stakater.com/reload: "hazelcast,hazelcast-client,seatunnelmap"
spec:
  serviceName: "seatunnel"
  replicas: 3
  selector:
    matchLabels:
      app: seatunnel
  template:
    metadata:
      labels:
        app: seatunnel
    spec:
      containers:
        - name: seatunnel
          image: seatunnel:2.3.3
          imagePullPolicy: IfNotPresent
          ports:
            - containerPort: 5801
              name: client
          command: ["/bin/sh","-c","/opt/seatunnel/bin/seatunnel-cluster.sh -DJvmOption=-Xms2G -Xmx2G"]
          resources:
            limits:
              cpu: "1"
              memory: 4G
            requests:
              cpu: "1"
              memory: 2G
          volumeMounts:
            - mountPath: "/opt/seatunnel/config/hazelcast.yaml"
              name: hazelcast
              subPath: hazelcast.yaml
            - mountPath: "/opt/seatunnel/config/hazelcast-client.yaml"
              name: hazelcast-client
              subPath: hazelcast-client.yaml
            - mountPath: "/opt/seatunnel/config/seatunnel.yaml"
              name: seatunnelmap
              subPath: seatunnel.yaml
      volumes:
        - name: hazelcast
          configMap:
            name: hazelcast
        - name: hazelcast-client
          configMap:
            name: hazelcast-client
        - name: seatunnelmap
          configMap:
            name: seatunnelmap
7.执行
kubectl apply -f seatunnel-cluster.yml


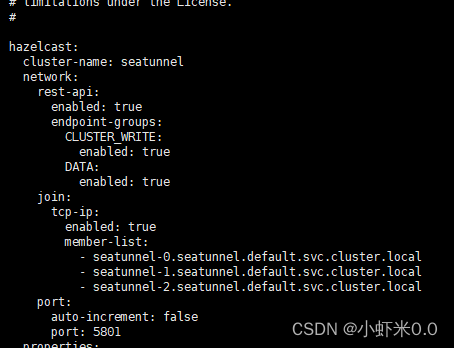
- 修改configmap中的配置
kubectl edit cm hazelcast
修改集群地址
这里采用的是headless service访问模式
一般pod之间访问其格式为 <pod-name>.<service-name>.<namespace>.svc.cluster.local
如下示例
- seatunnel-0.seatunnel.default.svc.cluster.local
- seatunnel-1.seatunnel.default.svc.cluster.local
- seatunnel-2.seatunnel.default.svc.cluster.local
友情提示:不要用tab,用空格 。不然会报错
kubectl edit cm hazelcast-client
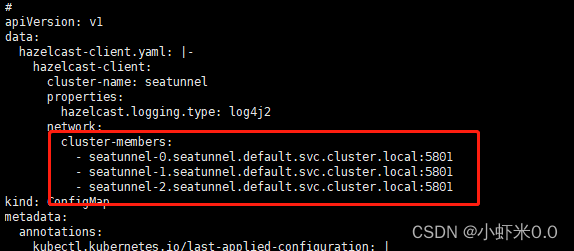
kubectl edit cm seatunnelmap

此处改为自己的hdfs地址
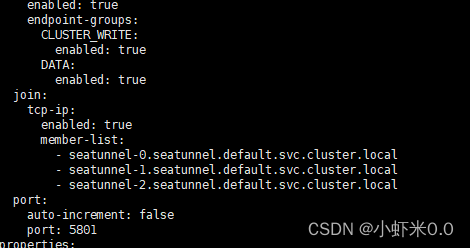
9.可以看到如下

10.待所有节点都更新完毕处于running状态后 可进入容器内查看路径是否已修改
kubectl exec -it seatunnel-0 /bin/bash
cat config/hazelcast.yaml
11.在容器内查看日志
tail -200f logs/seatunnel-engine-server.log
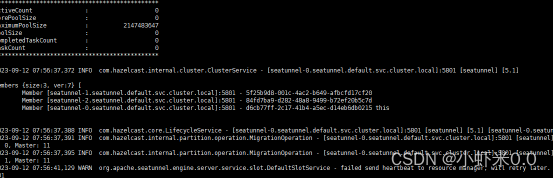
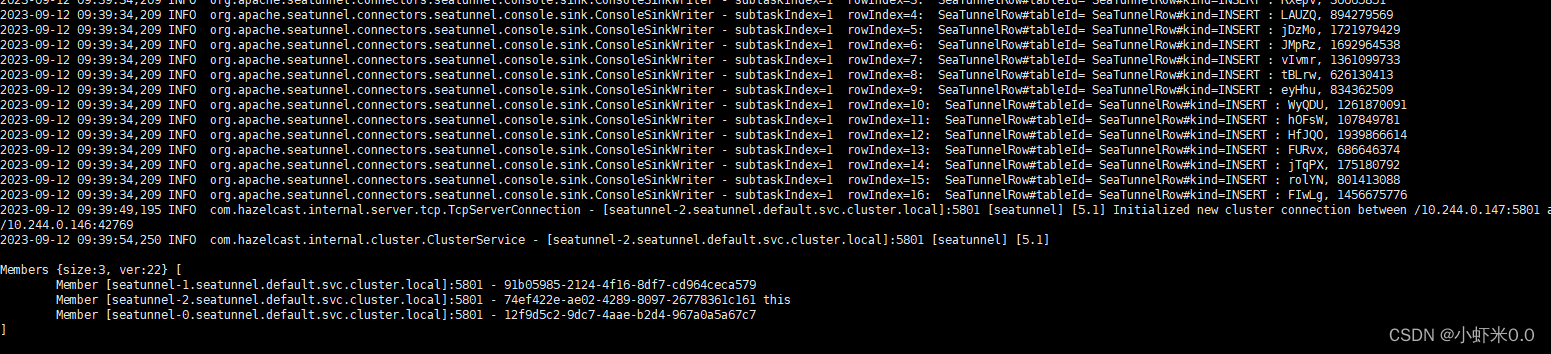
我们发现集群已经正常运行
12.运行任务
我们可以再新打开一个连接,登录另一个pod节点执行任务来测试集群
kubectl exec -it seatunnel-1 /bin/bash
bin/seatunnel.sh --config config/v2.streaming.conf.template
我们发现其他pod内也已经开始运行任务


 530
530


 被折叠的 条评论
为什么被折叠?
被折叠的 条评论
为什么被折叠?
 到【灌水乐园】发言


