


目录
1、解析/xl/cellimages.xml rid与图片编号ID关系
2、解析/xl/_rels/cellimages.xml.rels rid与图片文件地址关系
一 Excel的两种版本
目前世面上的Excel分为两个大的版本Excel2003和Excel2007及以上两个版本,两者之间的区别如下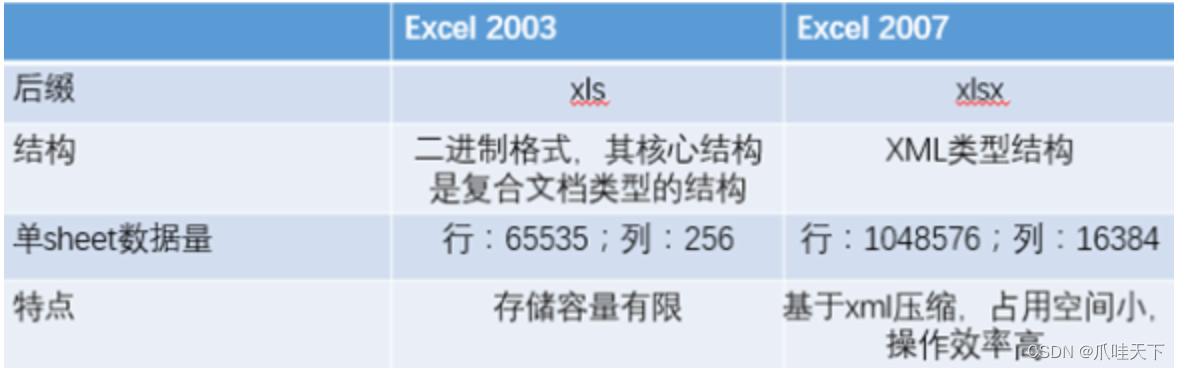
XSSF对应的文件后缀是:xlsx
HSSF对应的文件后缀是:xls
| 对应excel名称 | 低版本中的类名 | 高版本中的类名 |
|---|---|---|
| 工作簿 | HSSFWorkbook | XSSFWorkbook |
| 工作表 | HSSFSheet | XSSFSheet |
| 行 | HSSFRow | XSSFRow |
| 单元格 | HSSFCell | XSSFCell |
| 单元格样式 | HSSFCellStyle | XSSFCellStyle |
poi框架的依赖
       <dependency>
            <groupId>org.apache.poi</groupId>
            <artifactId>poi</artifactId>
            <version>4.1.2</version>
        </dependency>

        <dependency>
            <groupId>org.apache.poi</groupId>
            <artifactId>poi-ooxml</artifactId>
            <version>4.1.2</version>
        </dependency>

        <dependency>
            <groupId>org.apache.poi</groupId>
            <artifactId>poi-ooxml-schemas</artifactId>
            <version>4.1.2</version>
        </dependency>
二 poi中的基本操作
1、创建一个新的Workbook
大概有3种创建方式
//1 创建一个空的excel对象
Workbook workbookNew = new XSSFWorkbook();
//2 通过流的方式创建
org.apache.poi.xssf.usermodel.XSSFWorkbook#XSSFWorkbook(java.io.InputStream)
//3 通过文件的方式创建
org.apache.poi.xssf.usermodel.XSSFWorkbook#XSSFWorkbook(java.io.File)
2、创建一个sheet
//指定Sheet的名字
Sheet sheetNew = workbookNew.createSheet("导入计划失败下载");
3、创建一个Row
//指定行坐标来创建Row对象
//创建第一行
Row firstRowNew = sheetNew.createRow(0);
4、创建一个Cell
//1 指定行中Cell的坐标来创建一个Cell对象
org.apache.poi.ss.usermodel.Row#createCell(int)
//2 指定行中Cell的坐标和Cell的类型来创建一个Cell对象
org.apache.poi.ss.usermodel.Row#createCell(int, org.apache.poi.ss.usermodel.CellType)
5、遍历方式
两种方式
for (int i = 0; i <= sheetNew.getLastRowNum(); i++) {
    Row row = datatypeSheet.getRow(i);
    for (int j = 0; j < row.getLastCellNum(); j++) {
        //逻辑操作
    }
}

for (Row cells : sheetNew) {
    for (Cell cell1 : cells) {
        //逻辑操作
    }
}
6、判断Cell的类型
我们通过判断Cell的类型来识别对应的数据类型
private void setCellNewValue(Cell cellTmp, Cell cellNew) {
    switch (cellTmp.getCellTypeEnum()) {
        case STRING:
            String stringCellValue = cellTmp.getStringCellValue();
            cellNew.setCellType(CellType.STRING);
            cellNew.setCellValue(stringCellValue);
            break;
        case NUMERIC:
            BigDecimal bd1 = new BigDecimal(Double.toString(cellTmp.getNumericCellValue()));

            cellNew.setCellType(CellType.STRING);
            cellNew.setCellValue(bd1.toPlainString());
            break;
        case BOOLEAN:
            cellNew.setCellType(CellType.BOOLEAN);
            cellNew.setCellValue(cellTmp.getBooleanCellValue());
            break;
        case FORMULA:
            if (cellTmp.getCellType().equals(CellType.NUMERIC)) {
                cellNew.setCellValue(cellTmp.getNumericCellValue());
            } else if (cellTmp.getCellType().equals(CellType.STRING)) {
                cellNew.setCellValue(cellTmp.getStringCellValue());
            }
            break; // 公式类型
        case BLANK:
            break;
    }
}
三 poi中的进阶操作
场景一 Excel的移动
- 如果想在一个存在的Sheet中第一列创建一个列而不影响原有的数据,应该如何处理?
1、所有列整体向后移动一位
Row firstRow = sheet.createRow(0);
sheet.shiftColumns(firstRow.getFirstCellNum(),firstRow.getLastCellNum(),1);
2、在第一列的第一行创建一个表头
Cell firstCell = firstRow.createCell(0);
firstCell.setCellType(CellType.STRING);
firstCell.setCellValue("第一列的新表头");
3、将第一列的表头数据插入到Sheet中
//遍历sheet所有的row并且在所有的row的第一列创建一个新的Cell
for (int i = 0; i <= sheet.getLastRowNum(); i++) {
Row row = datatypeSheet.getRow(i);
Cell cellNew = row.createCell(0, CellType.STRING);
cellNew.setCellValue("新Cell数据");
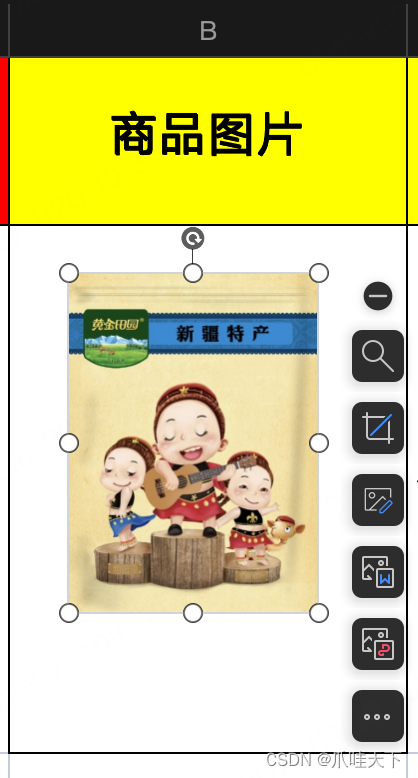
}场景二 Excel中创建图片
- 如果想在excel中某一个Cell中创建一张图片,应该如何处理?
POI主要提供了两个类来处理照片,这两个类是Patriarch和ClientAnchor前者负责在表中创建图片,后者负责设置图片的大小位置。
关于XSSFClientAnchor的8个参数说明:
dx1 - the x coordinate within the first cell.//定义了图片在第一个cell内的偏移x坐标,既左上角所在cell的偏移x坐标,一般可设0
dy1 - the y coordinate within the first cell.//定义了图片在第一个cell的偏移y坐标,既左上角所在cell的偏移y坐标,一般可设0
dx2 - the x coordinate within the second cell.//定义了图片在第二个cell的偏移x坐标,既右下角所在cell的偏移x坐标,一般可设0
dy2 - the y coordinate within the second cell.//定义了图片在第二个cell的偏移y坐标,既右下角所在cell的偏移y坐标,一般可设0

col1 - the column (0 based) of the first cell.//第一个cell所在列,既图片左上角所在列
row1 - the row (0 based) of the first cell.//图片左上角所在行
col2 - the column (0 based) of the second cell.//图片右下角所在列
row2 - the row (0 based) of the second cell.//图片右下角所在行
/**
* excel创建cell图片
* @param workbookNew
* @param sheetNew
* @param cellNew
*/
private void createCellImage(Workbook workbookNew,Sheet sheetNew, Cell cellNew, byte[] bytes){
try{
XSSFDrawing patriarch = (XSSFDrawing)sheetNew.createDrawingPatriarch();
int column = cellNew.getColumnIndex();
int row = cellNew.getRowIndex();
// XSSFClientAnchor|HSSFClientAnchor|...
int x1 = 20 * 1000;
// 单元格为标,以左上为起点,向下移
int y1 = 20 * 1000;
// 单元格为标,以右上为起点,向左移
int x2 = 1000 * 1000;
// 单元格为标,以右下为起点,向上移
int y2 = 1000 * 1000;
XSSFClientAnchor anchor = new XSSFClientAnchor(0, 0, 0, 0, (short) column, row, (short) column+1, row+1);
int pictureIndex = workbookNew.addPicture(bytes, XSSFWorkbook.PICTURE_TYPE_JPEG);
patriarch.createPicture(anchor, pictureIndex);
}catch (Exception e){
log.error("createCellImage e",e);
}
}场景三 导入文件空行的处理
- Excel 2007 最大的行数可以是1048576,如果在文件转换成Workbook的时候,一些空行都被识别导致了100w行的数据被写入内存中,从而引起了OOM,导致服务器的瘫痪。这种情况应该如何处理呢?
- XSSFWorkbook:使用XSSFWorkbook创建时,会把识别到的所有行都读到内存中,导致了OOM
XSSFWorkbook xssfWorkbook = new XSSFWorkbook(inputStream)- 解决办法:使用StreamingReader来创建Workbook,可以设置内存缓冲区,如果缓冲区放不下的情况下会创建临时文件处理。
Workbook workbook = StreamingReader.builder()
        .rowCacheSize(100)    // 缓存到内存中的行数(默认是10)
        .bufferSize(1024)     // 读取资源时,缓存到内存的字节大小(默认是1024)
        .open(inputStream);

Sheet sheet = workbook.getSheetAt(0);

int lastRowNum = sheet.getLastRowNum();
//根据业务判断如果行数超过了多少就进行报错处理
if (lastRowNum > 5000) {
    throw new BizException(CpsInventoryErrorEnum.IMPORT_ROW_NUM_ERROR.getCode(), CpsInventoryErrorEnum.IMPORT_ROW_NUM_ERROR.getMsg());
}- 这里的inputStream会自动关闭
场景四 如何判断空行
private boolean isBlankRow(Row row){
    boolean isBlankRow = true;
    for (Cell cell : row) {

        if (cell != null && cell.getCellType() != CellType.BLANK) {
            isBlankRow = false;
            break;
        }
    }
    return isBlankRow;
}
四 poi中的图片识别处理
1、浮动图片
在excel表中可以随意拖动,并且在一个单元格Cell中可以存在多张的浮动图片。
public void handleExcelPictures() throws IOException, InvalidFormatException {
File file = new File("文件地址");
XSSFWorkbook xssfWorkbook = new XSSFWorkbook(file);
XSSFSheet xssfSheet = xssfWorkbook.getSheetAt(0);
// 获取Excel中所有的图片
List<XSSFPictureData> pictures = xssfWorkbook.getAllPictures();
if (!org.springframework.util.CollectionUtils.isEmpty(pictures)) {
for (POIXMLDocumentPart part : xssfSheet.getRelations()) {
if (part instanceof XSSFDrawing) {
XSSFDrawing drawing = (XSSFDrawing) part;
//获取所有图像形状
List<XSSFShape> shapes = drawing.getShapes();
//遍历所有形状
for (XSSFShape shape : shapes) {
// 获取图片数据;
XSSFPictureData pictureData = null;
if (shape instanceof XSSFPicture) {
XSSFPicture picture = (XSSFPicture) shape;
//获取形状在工作表中的位置信息
XSSFClientAnchor anchor = (XSSFClientAnchor) picture.getAnchor();
try {
//获取对应的图片数据
pictureData = picture.getPictureData();
//图片形状在工作表中的位置, 所在行列起点和终点位置
short c1 = anchor.getCol1();
int r1 = anchor.getRow1();
String key = r1 + "行," + c1 + "列";
//图片的文件扩展名
String suggestedFileExtension = pictureData.suggestFileExtension();
//可以获取文件的字节流,可以上传文件生成url或者在本地生成文件
byte[] bytes = pictureData.getData();
InputStream inputStream = new ByteArrayInputStream(bytes);
} catch (Exception e) {
log.info("处理图片异常======>>>{}", anchor.getRow1() + "-" + anchor.getCol1());
}
}
}
}
}
}
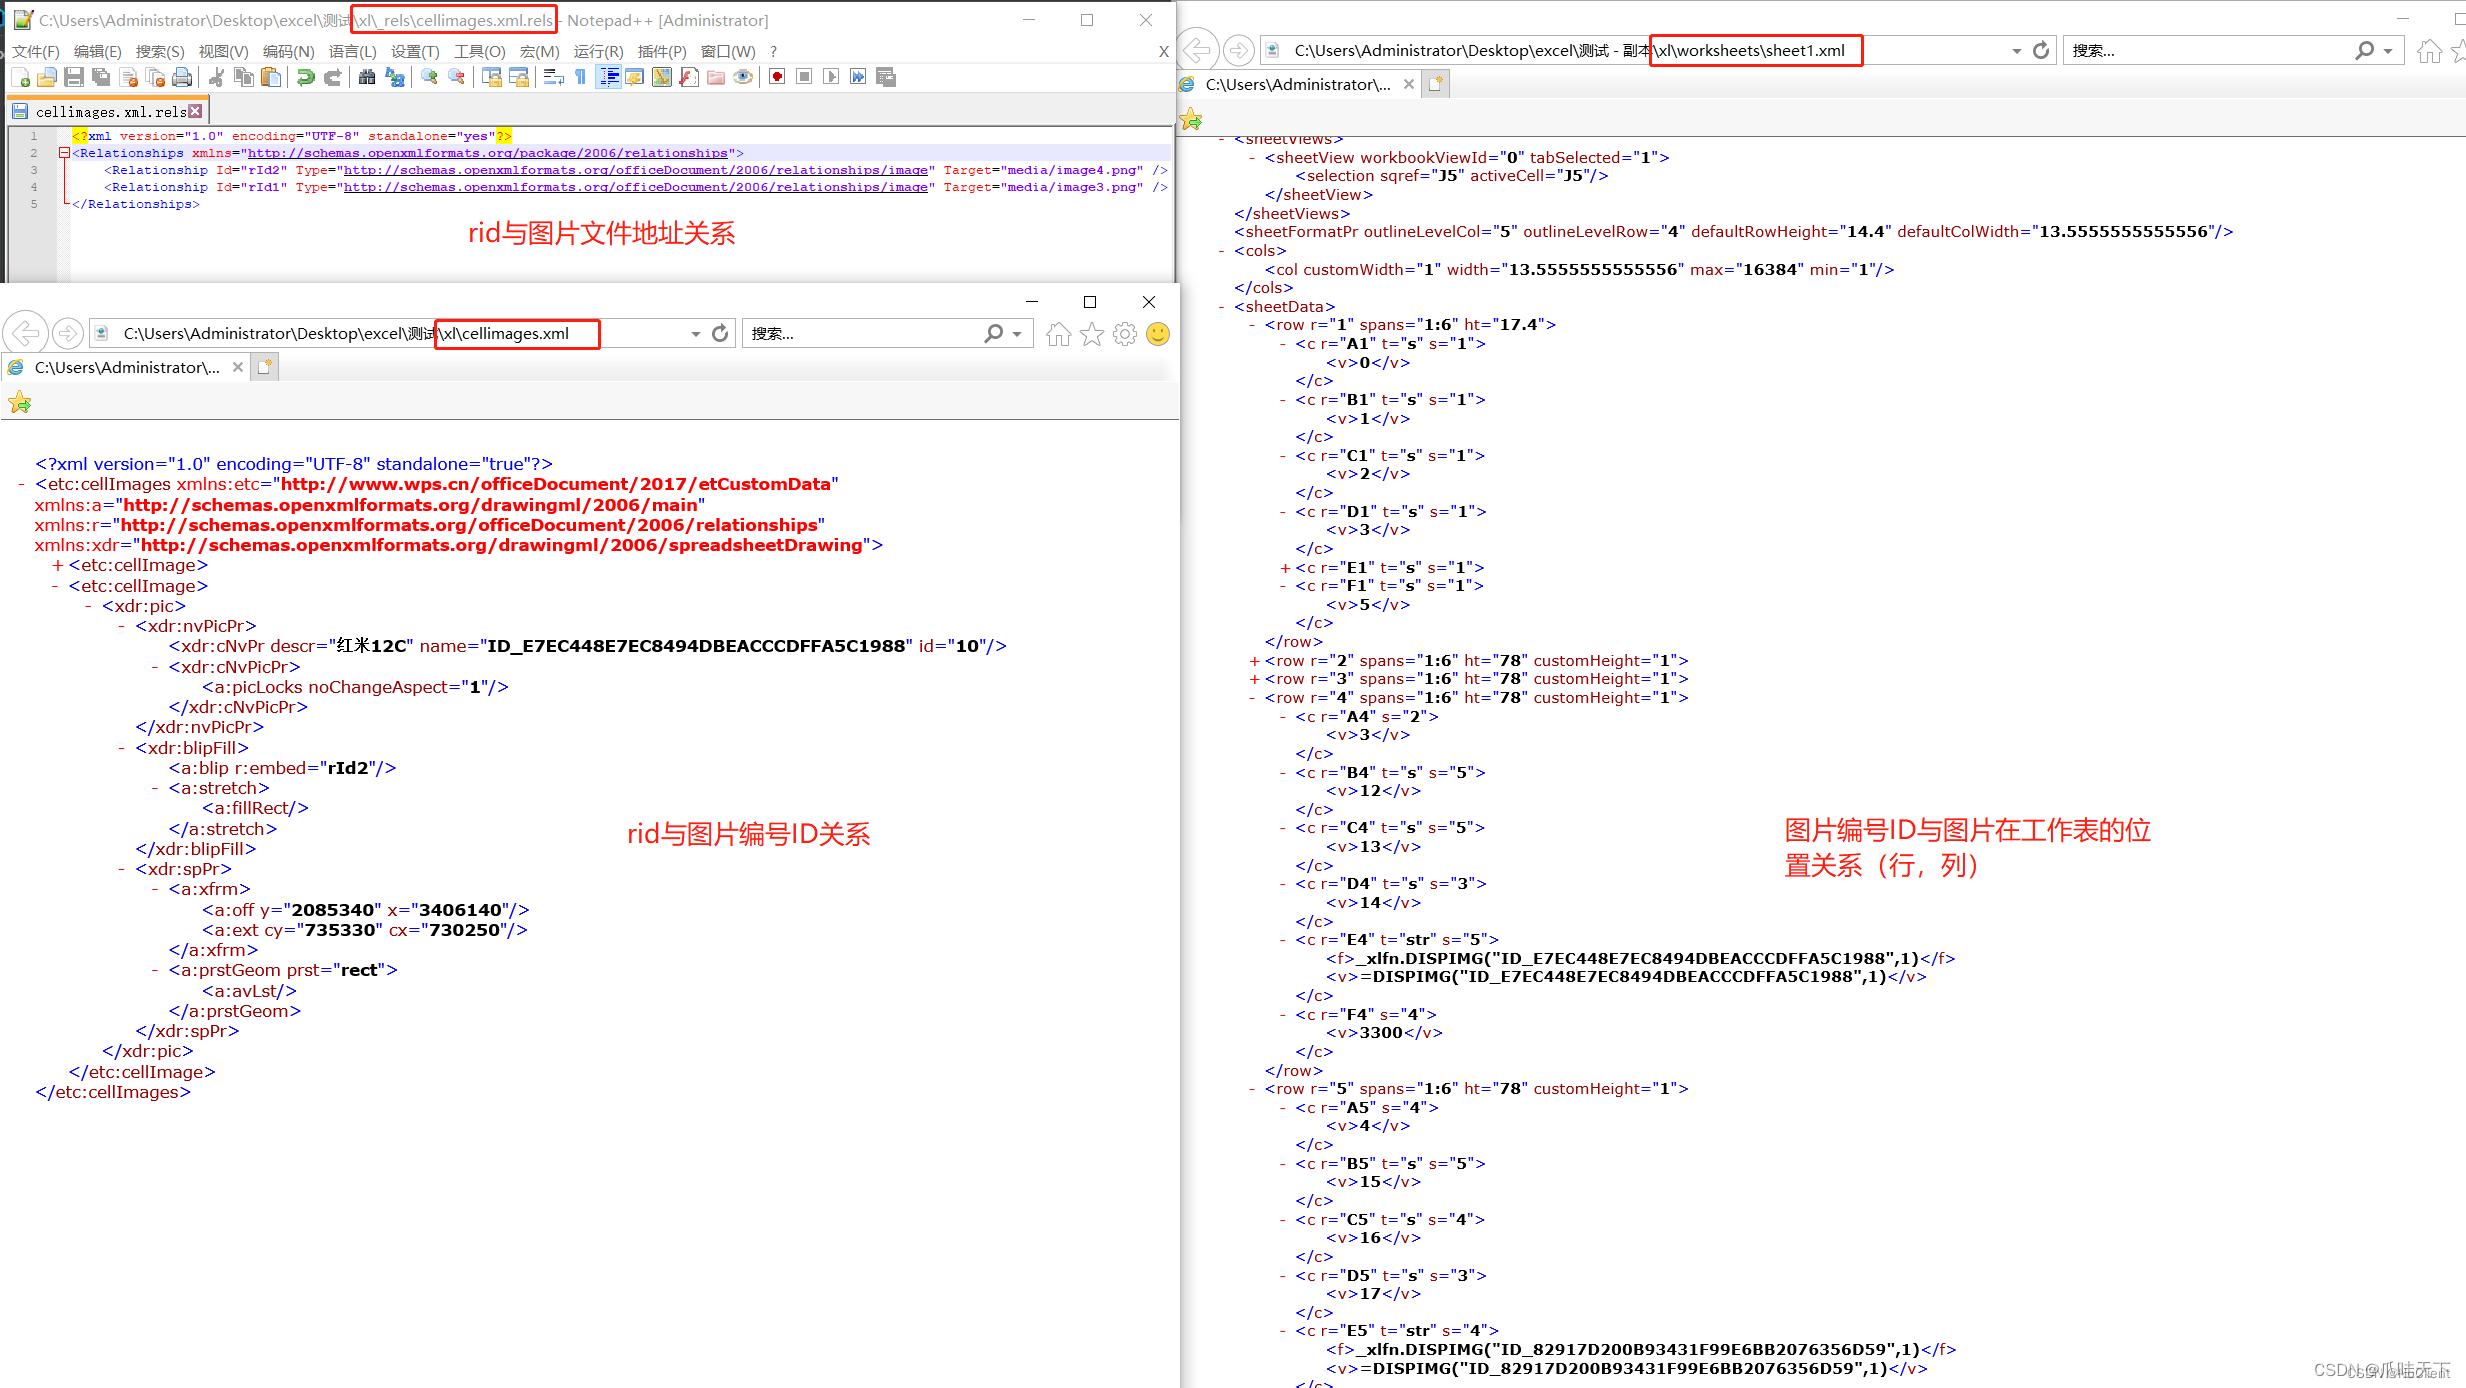
}2、嵌入式图片
原理解析
在一个单元格Cell中只能存在一张嵌入式图片

将xlsx文件扩展名改为zip,变成压缩文件,再解压,就会生成如下的一些关键文件
以下3个关键文件信息,定位表格单元格位置,图片ID,图片编号ID,图片文件地址,如下图。
- /xl/cellimages.xml rid与图片编号ID关系
- /xl/_rels/cellimages.xml.rels rid与图片文件地址关系
- /xl/worksheets/sheet1.xml 工作表与图片关系(/xl/worksheets/目录下有多个sheet.xml文件,分别代表不同的工作表,sheet1.xml表示是第一个工作表)
- /xl/media/ 下都是图片信息
代码实现
1、解析/xl/cellimages.xml rid与图片编号ID关系
参考上边图片一起理解,就是一个xml文件的解析过程
/**
 * 解析/xl/cellimages.xml rid与图片编号ID关系
 * @param file:excel源文件
 * @return:
 * @throws IOException
 */
private static Map<String,String> ridWithIDRelationShip(File file) throws IOException {
    Map<String, String> imageIdMappingMap = new HashMap<>();
    InputStream inputStream = null;
    try {

        //读取关系xml文件
        inputStream = openFile(file, "xl/cellimages.xml");
        if(inputStream == null){
            //导入的excel,也有可能没有这个文件(xl/cellimages.xml)
            return imageIdMappingMap;
        }
        // 创建SAXReader对象
        SAXReader reader = new SAXReader();
        // 加载xml文件
        Document dc = reader.read(inputStream);
        // 获取根节点
        Element rootElement = dc.getRootElement();
        //获取子节点 每一个图片节点
        List<Element> cellImageList = rootElement.elements();

        //循环处理每一个图片
        for (Element cellImage : cellImageList) {
            Element pic = cellImage.element("pic");
            Element nvPicPr = pic.element("nvPicPr");
            Element cNvPr = nvPicPr.element("cNvPr");
            //图片id
            String imageId = cNvPr.attribute("name").getValue().replace("ID_", "");

            Element blipFill = pic.element("blipFill");
            Element blip = blipFill.element("blip");
            //注意:防止空cell识别为图片
            if (blip == null) {
                continue;
            }
            //图片Rid
            String imageRid = blip.attribute("embed").getValue();
            //存入map中
            imageIdMappingMap.put(imageId, imageRid);
        }

    } catch (Exception e) {
        log.error("ridWithIDRelationShip 错误 file:{} :",file.getName(), e);
    } finally {
        if (inputStream != null) {
            inputStream.close();
        }
    }
    return imageIdMappingMap;
}
注意⚠️:可能会存在空Cell被识别为图片的情况
如: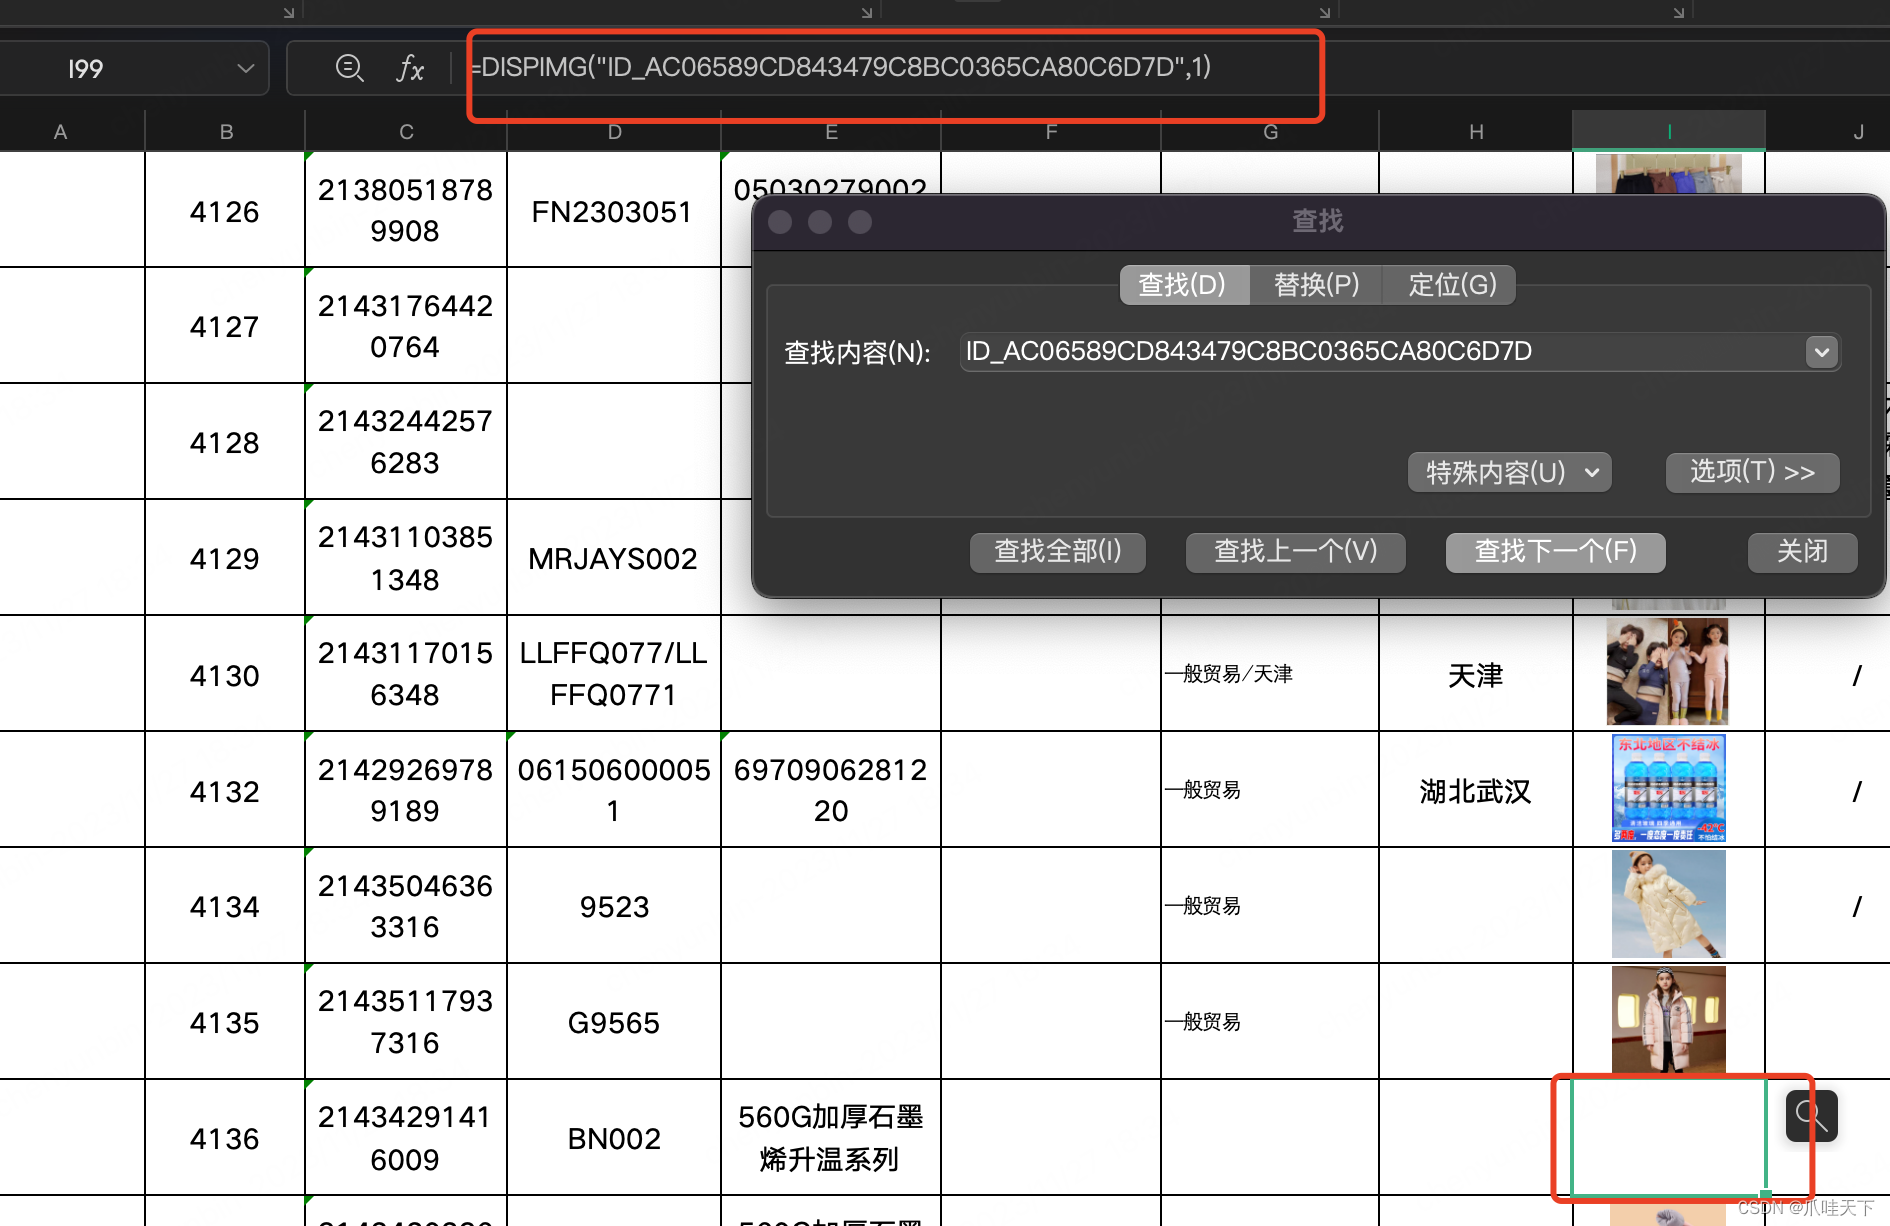
这样的话blip这个节点就获取不到了所以是null的
2、解析/xl/_rels/cellimages.xml.rels rid与图片文件地址关系
/**
 * 解析/xl/_rels/cellimages.xml.rels  rid与图片文件地址关系
 * @param file:excel源文件
 * @return
 * @throws IOException
 */
private static Map<String, String> ridWithImagePathRelationShip(File file) throws IOException {
    Map<String, String> imageMap = new HashMap<>();

    InputStream inputStream = null;
    try {
        //读取关系文件
        inputStream = openFile(file, "xl/_rels/cellimages.xml.rels");
        if(inputStream == null){
            //导入的excel,也有可能没有这个文件(xl/_rels/cellimages.xml.rels)
            return imageMap;
        }
        // 创建SAXReader对象
        SAXReader reader = new SAXReader();
        // 加载xml文件
        Document dc = reader.read(inputStream);
        // 获取根节点
        Element rootElement = dc.getRootElement();

        List<Element> imageRelationshipList = rootElement.elements();

        //处理每个关系
        for (Element imageRelationship : imageRelationshipList) {
            String imageRid = imageRelationship.attribute("Id").getValue();
            String imagePath = imageRelationship.attribute("Target").getValue();
            imageMap.put(imageRid, imagePath);
        }

    } catch (Exception e) {
        e.printStackTrace();
    } finally {
        if (inputStream != null) {
            inputStream.close();
        }
    }
    return imageMap;
}
3、根据文件路径获取压缩文件中的文件流
/**
 * 将excel转化成zip压缩文件,然后根据压缩文件中的文件路径filePath获取文件流
 * @param file:excel源文件
 * @param filePath:压缩文件中的文件路径
 * @return
 */
private static InputStream openFile(File file, String filePath) {
    try {

        ZipFile zipFile = new ZipFile(file);
        ZipInputStream zipInputStream = new ZipInputStream(new FileInputStream(file));

        ZipEntry nextEntry = null;
        while ((nextEntry = zipInputStream.getNextEntry()) != null) {
            String name = nextEntry.getName();
            if (name.equalsIgnoreCase(filePath)) {
                return zipFile.getInputStream(nextEntry);
            }
        }
    } catch (Exception e) {
        log.error("openFile error, file:{},filePath:{}", file.getName(), filePath);
    }
    return null;
}
4、excel文件中的图片逻辑
/**
 * excel文件中的图片逻辑
 * @param file:excel源文件
 * @param path:media/image1.png,就是图片在压缩包中的路径
 * @return
 */
public static String handlePathImage(File file, String path) {
    InputStream inputStream = null;
    log.info("handlePathImage,local图片路径,file:{},path:{}",file.getName(),path);
    try {

        //获取图片inputStream
        inputStream = openFile(file, "xl/" + path);
        String[] fileArr = path.split("\\.");
        //图片文件后缀
        String ext = fileArr[fileArr.length - 1];
        // 文件名
        String fileName = DateUtil.getNowTimestamp() + Math.random() * 100 + "." + ext;

        //文件逻辑处理
        //......

    }catch (Exception e){
        log.error("handlePathImage error,file:{},path:{}, e:",file.getName(),path,e);
    }finally {
        if(inputStream != null){
            try {
                inputStream.close();
            }catch (Exception ignore){}
        }
    }
    return "";
}
5、main方法测试
public static void main(String[] args) throws IOException, InvalidFormatException {
    File file =new File("xlsx excel文件路径");

    XSSFWorkbook workbook = new XSSFWorkbook(file);
    XSSFSheet sheet = workbook.getSheetAt(0);
    XSSFRow firstRow = sheet.getRow(0);
    XSSFCell firstCell = firstRow.getCell(0);

    //嵌入式图片ID存储
    //例如:{"4DEC1821A20149449744B7778CEB2CD0":"rId1"}
    Map<String, String> imageIdMappingMap = ridWithIDRelationShip(file);
    //嵌入式图片存储
    //例如:{"rId1":"media/image1.png"}
    Map<String, String> imageMap = ridWithImagePathRelationShip(file);

    System.out.println("imageIdMappingMap:"+ JSON.toJSONString(imageIdMappingMap));
    System.out.println("imageMap:"+ JSON.toJSONString(imageMap));

    //Cell中图片展示的信息:DISPIMG("ID_4DEC1821A20149449744B7778CEB2CD0",1)
    //获取
    String imageId =  firstCell.getStringCellValue().substring(firstCell.getStringCellValue().indexOf("ID_") + 3, firstCell.getStringCellValue().lastIndexOf("\""));
    System.out.println("imageId:"+imageId);

    //获取到rId
    String rId = imageIdMappingMap.get(imageIdMappingMap);

    //获取Excel压缩包中图片的位置,通过rId获取到图片路径,再通过这个path获取到图片文件
    String imagePath = imageMap.get(rId);
    //处理图片逻辑
    String imageUrl = handlePathImage(file, imagePath);

}


 367
367


 被折叠的 条评论
为什么被折叠?
被折叠的 条评论
为什么被折叠?
 到【灌水乐园】发言


