


路由守卫
钩子函数执行顺序
全局前置守卫:beforeEach
全局独享守卫:beforeEnter
组件内路由守卫:beforeRouteEnter(此时 this 并不指向该组件实例)
全局解析守卫:beforeResolve
全局后置守卫:afterEach
组件生命周期:beforeCreate;组件生命周期:created;组件生命周期:beforeMount;组件生命周期:mounted
组件路由守卫:beforeRouteEnter 的 next 回调
没见过的两个路由守卫
beforeResolve
在组件被解析后,这个钩子函数和 beforeEach 类似,也是在路由跳转前触发
参数也是 to,from,next 三个
在 beforeEach 之后执行,与 beforeEach 和 afterEach 同属于全局路由守卫
beforeRouteUpdate
在当前路由改变时,并且该组件被复用时调用,可以通过 this 访问实例
参数包括 to,from,next
当前路由 query 变更时,该守卫被调用
与 beforeRouteEnter 和 beforeRouteLeave 同属于组件内路由守卫
路由守卫钩子的三个参数
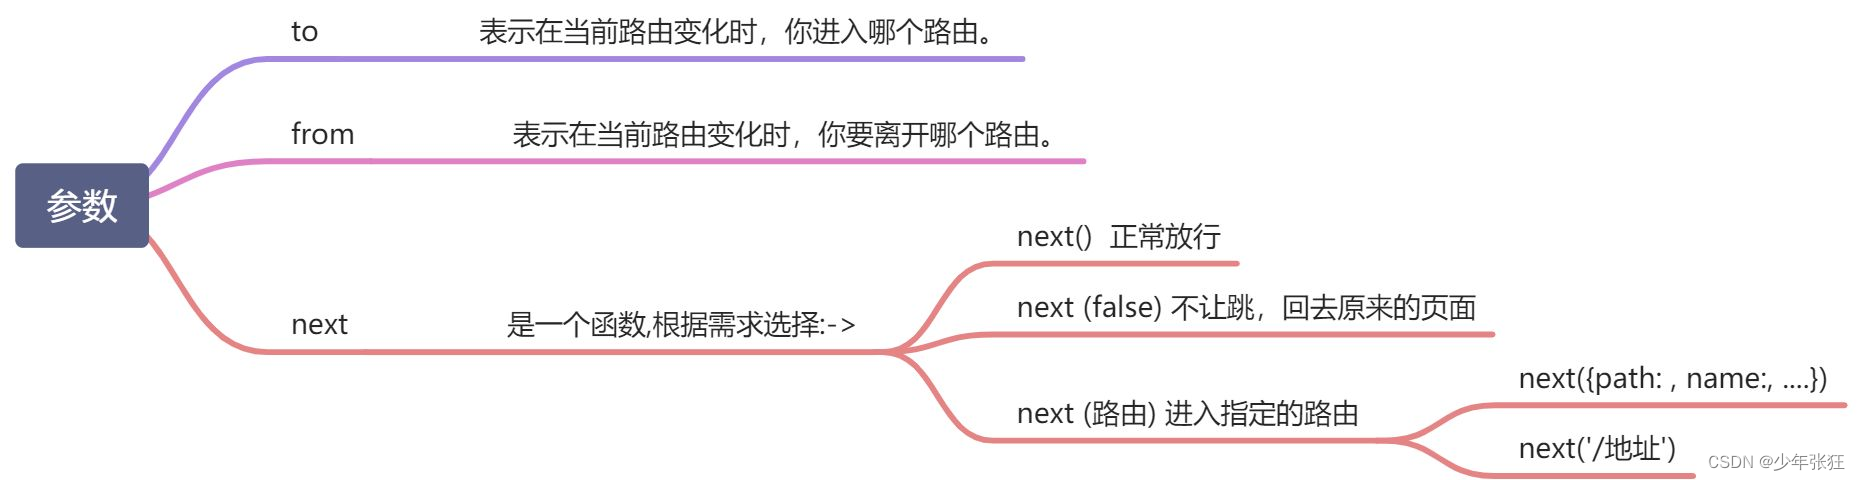
next():直接进 to 所指的路由
next(false):中断当前路由跳转,返回原来的页面
next('route'):跳转到指定路由
next('error'):跳转到错误路由
应用场景
beforeEach
权限校验
1. 如果一个用户没有登录(没有 token),除了特别设置的不需要 token 的页面,如果他想访问其他页面,直接跳转到登录页
如果已经登录了,已经获取到 token,则直接去访问首页
注意:获取 token 应该在每次路由跳转时都操作,代码写在 beforeEach 内
把需要权限的页面写在一个数组中,方便使用 includes 方法判断
import store from '@/store/index.js'
const tokenList = ['/setting']
router.beforeEach((to, from, next) => {
  const token = store.state.tokenInfo.token
  console.log(token)
  if (!token && tokenList.includes(to.path)) {
    console.log('没有权限,不能访问vip页面')
    next('/login)
  } else if (token && to.path === '/login') {
    console.log('已经登录了,就不能访问login了')
    next('/')
  } else {
    next()
  }
})
export default router
2. 从 a 页面出发,访问 b 页面,发现没有权限。路由守卫跳转到 login 页面,在 login 登录成功后,应该跳转到哪里
router.beforeEach((to, from, next) => {
  const token = store.state.tokenInfo.token
  console.log(token)
  if (!token && tokenList.includes(to.path)) {
    console.log(to.fullPath)
    // 用户想访问b页面,但是没登录就转到登录,登录了以后不是跳到主页,还是跳到想去的b页面
    next('/login?backto=' + encodeURIComponent(to.fullPath))
  } else if (token && to.path === '/login') {
    next('/')
  } else {
    next()
  }
})- 在跳到登录页时,传入要返回的页面地址
- to.fullPath 会包含路径中的查询参数
next('/login?backto=' + encodeURIComponent(to.fullPath))- 登录成功后,返回页面 a
- 在 login/index.vue 中要改进跳转目标
// 用户跳转
// 根据当前路由参数,决定跳到哪里
const backto = this.$route.query.backto || '/'
this.$router.push(backto)
beforeEnter
beforeRouteEnter
beforeResolve
afterEach
beforeRouteUpdate
动态路由跳转,比如文章详情页,跳转时需要携带参数 /foo/:id,在 /foo/1 和 /foo/2 之间跳转的时候
beforeRouteUpdate(to, from, next) {
    next()
    this.加载详情()
}
beforeRouteLeave
离开页面时,阻止跳转
beforeRouteLeave(to, from, next) {
  if (this.msg && window.confirm('确定要跳转')) {
    next() // 如果用户确定要跳转,就放行
  } else {
    next(false) // 如果用户不确定跳转,就不跳转
  }
}
$nextTick 原理
概括
vue 实现响应式并不是数据发生变化后 DOM 立即变化。vue 在修改数据后,要等到同一事件循环机制内所有数据变化完成后,再统一进行 DOM 更新
nextTick 可以让我们在下次 DOM 更新循环结束后执行延迟回调,用于获取更新后的 DOM
原理
Vue 中数据变化到 DOM 变化是异步过程,一旦观察到数据变化,Vue 就会开启一个任务队列,然后把在同一个事件循环中观察到的数据变化的 Watcher(Vue 源码中的 Watcher 类是用来更新 Dep 类收集到的依赖的)推送到这个队列中
如果这个 Watcher 被触发多次,只会被推送到队列一次。这种缓冲行为可以有效的去掉重复数据造成的不必要的计算和 DOM 操作。而在下一个事件循环时,Vue 会被清空队列,并进行必要的 DOM 更新
nextTick 的作用就是为了在数据变化之后等待 Vue 完成更新 DOM,可以在数据变化之后立即执行Vue.nextTick(callback) 中的回调函数
JS 是单线程的,拥有事件循环机制,nextTick 的实现就是利用了事件循环的宏任务和微任务
目前浏览器平台并没有实现 nextTick 方法,所以 Vue.js 源码中分别用 Promise、setTimeout、setImmediate 等方式在 microtask(或是 task)中创建一个事件,目的是在当前调用栈执行完毕以后(不一定立即)才会执行这个事件
nextTick 调用方式
- 回调函数方式:Vue.nextTick(callback)
- Promise 方式:Vue.nextTick().then(callback)
- 实例方式:vm.$nextTick(callback)
nextTick 应用
- created 生命周期中操作 DOM
- 修改数据,获取 DOM 值
事件循环机制
在浏览器环境中,我们可以将要执行的任务分为宏任务和微任务
宏任务:整体代码 script、setTimeout、setInterval、setImmediate
微任务:Promise.then、Promise.all
加载 js 代码,先执行同步任务,异步任务放入异步队列中
对于异步队列中的任务,先执行 script,然后执行微任务。当所有的微任务执行完毕,执行下一个宏任务
先同后异,先微后宏
由于 DOM 操作资源消耗大,因此并不是每次数据改变都触发 watcher 的回调,而是先将这些 watcher 添加到一个队列 queueWatcher(队列中) 中,然后在 nextTick 后执行 flushSchedulerQueue(刷新调度程序队列) 处理
computed 缓存
computed 是响应式的,读取时会触发 get,设置时会触发 set
computed 控制缓存
某个计算属性 C 依赖 data 中的 A,如果没有缓存,每次读取 C 时,C 都会读取 A,就会触发 A 的 get,多次触发 A 的 get 资源消耗大,所以 computed 设置了缓存
控制缓存的关键:脏数据标记 dirty,dirty 是 watcher 的属性
- dirty 为 true 时,读取 computed 值时重新计算
- dirty 为 false 时,读取 computed 值时会使用缓存
依赖数据发生改变,computed 更新
页面 P 中的计算属性 C,依赖于 data 里的 A,computed 的更新步骤:
- 因为 C 依赖于 A,所以 A 可以收集到 C 的 watcher
- 当 A 发生改变时,会将计算属性 C 的 watcher 的属性 dirty 设置为 true
- A 还会收集到页面 P 的 watcher,同时 A 会通知 P 进行更新,页面 P 重新读取计算属性 C。由于此时的 dirty 为 true,所以计算属性会重新计算
- computed 更新完成后,会将 dirty 设置为 false
- 如果依赖的 A 没有发生改变,那么下次就会读取缓存
function createComputedGetter(key) {
  // 获取到相应 key 的 computed-watcher
  let watcher = this._computedWatchers[key]
  // 如果 computed 依赖的数据变化,dirty 会变成 true
  // 从而重新计算,然后更新缓存值 watcher.value
  if (watcher.dirty) {
    watcher.evaluate()
  }
  // computed 的关键,让双方建立关系
  if (Dep.target) {
    watcher.depend()
  }
  return watcher.value
}
封装全局弹窗组件
<!-- Box.vue -->
<template>
  <div class="box" v-if="isShow">
    <div>
      <!-- 标题和描述 -->
      <div>{{ text.title }}</div>
      <div>{{ text.msg }}</div>
      <!-- 确认和取消 -->
      <div @click="confirm">
        <span>{{ text.btn.confirmVal }}</span>
      </div>
      <div @click="cancel">
        <span>{{ text.btn.cancelVal }}</span>
      </div>
    </div>
  </div>
</template>

<script>
export default {
  data() {
    return {
      isShow: true,
      text: {
        title: '提示',
        msg: '描述信息',
        cancelBtn: true,
        confirmBtn: true,
        btn: {
          confirmVal: '确定',
          cancelVal: '取消',
        },
      },
    }
  },
  methods: {
    confirm() {
      this.isShow = false
    },
    cancel() {
      this.isShow = false
    },
  },
}
</script>
// box.js
import Vue from 'vue'
import confirm from '../components/Box.vue'
let confirmConstructor = Vue.extend(confirm)
let theConfirm = function (text) {
return new Promise((resolve, reject) => {
let confirmDom = new confirmConstructor({
el: document.createElement('div'),
})
// new 一个对象,然后插入 body 中
document.body.appendChild(confirmDom.$el)
confirmDom.text = Object.assign({}, confirmDom.text, text)
confirmDom.confirm = function () {
confirmDom.isShow = false
resolve('确认')
}
confirm.cancel = function () {
confirmDom.isShow = false
reject('取消')
}
})
}
export default theConfirm// main.js
import myConfirm from '@/assets/box'
Vue.prototype.$myConfirm = myConfirm<!-- Home.vue -->
<template>
<div class="home">
<button @click="openConfirmBox">弹出弹窗</button>
</div>
</template>
<script>
export default {
methods: {
openConfirmBox() {
this.$myConfirm({
title: '退出',
msg: '确认要退出吗?',
btn: {
confirmVal: '确定',
cancelVal: '取消',
},
})
.then((res) => {
console.log('yes', res)
})
.catch((err) => {
console.log('no', err)
})
},
},
}
</script>实现组织架构图
安装依赖
npm install less
npm install --save-dev less-loader
npm install vue-tree-color
引入依赖
// main.js
import Vue2OrgTree from 'vue-tree-color'
Vue.use(Vue2OrgTree)
相关属性
修改排列方式
<!-- 默认值为 false,横向展示,值为 true 时纵向展示 -->
<vue2-org-tree :horizontal="true"/>
折叠展示效果
<!-- 开始折叠展示效果 -->
<vue2-org-tree collapsable/>
展开方式
<vue2-org-tree collapsable @on-expand="onExpand"/>
<script>
export default {
  methods: {
    // 判断子分类是否打开
    onExpand(e, data) {
      if ('expand' in data) {
        data.expand = !data.expand
        if (!data.expand && data.children) {
          this.collapse(data.children)
        }
      } else {
        this.$set(data, 'expand', true)
      }
    },
    collapse(list) {
      let _this = this
      list.forEach(function (child) {
        if (child.expand) {
          child.expand = false
        }
        child.children && _this.collapse(child.children)
      })
    },
  },
}
</script>
默认展开
在请求完数据后直接调用,或生命周期调用
第一个参数是资源 data,第二个参数是是否全部展开(true 展开,false 不展开)
created() {
  this.toggleExpand(this.obj, false)
},
methods: {
  toggleExpand(data, val) {
    let _this = this
    if (Array.isArray(data)) {
      data.forEach(function (item) {
        _this.$set(item, 'expand', val)
        if (item.children) {
          _this.toggleExpand(item.children, val)
        }
      })
    } else {
      this.$set(data, 'expand', val)
      if (data.children) {
        _this.toggleExpand(data.children, val)
      }
    }
  },
},
使用
<template>
  <div>
    <vue2-org-tree
      :data="obj"
      :horizontal="true"
      :label-class-name="labelClassName"
      collapsable
      @on-expand="onExpand"
    />
  </div>
</template>

<script>
export default {
  data() {
    return {
      labelClassName: 'bg-color-orange',
      obj: {
        id: 0,
        label: '神州行',
        children: [
          {
            id: 2,
            label: '产品研发部',
            children: [
              {
                id: 5,
                label: '研发-前端',
              },
              {
                id: 6,
                label: '研发-后端',
              },
              {
                id: 7,
                label: 'UI 设计',
              },
            ],
          },
        ],
      },
    }
  },
  created() {
    this.toggleExpand(this.obj, false)
  },
  methods: {
    onExpand(e, data) {
      if ('expand' in data) {
        data.expand = !data.expand
        if (!data.expand && data.children) {
          this.collapse(data.children)
        }
      } else {
        this.$set(data, 'expand', true)
      }
    },
    collapse(list) {
      let _this = this
      list.forEach(function (child) {
        if (child.expand) {
          child.expand = false
        }
        child.children && _this.collapse(child.children)
      })
    },
    toggleExpand(data, val) {
      let _this = this
      if (Array.isArray(data)) {
        data.forEach(function (item) {
          _this.$set(item, 'expand', val)
          if (item.children) {
            _this.toggleExpand(item.children, val)
          }
        })
      } else {
        this.$set(data, 'expand', val)
        if (data.children) {
          _this.toggleExpand(data.children, val)
        }
      }
    },
  },
}
</script>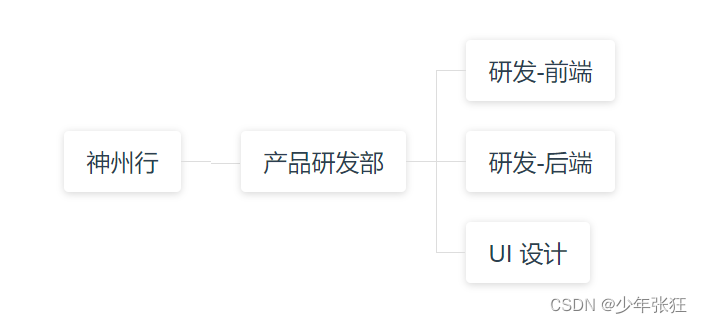


 952
952


 被折叠的 条评论
为什么被折叠?
被折叠的 条评论
为什么被折叠?
 到【灌水乐园】发言


