


对象流的使用
1.对象流
- ObjectInputStream 和 ObjectOutputStream
2.作用
- ObjectOutputStream:内存中的对象—>存储的文件,通过网络传输出去:序列化过程
- ObjectInputStream :存储中的文件,通过网络接收过来—>内存中的对象:反序列化过程
3.对象的序列化机制:
- 对象序列化机制允许把内存中的Java对象转换成平台无关的二进制流,从而允许把这种
- 二进制流持久地保存在磁盘上,或通过网络将这种二进制流传输到另一个网络节点。
- //当其他程序获取了这种二进制流,就可以恢复成原来的Java对象。
4.序列化过程
 @Test
    public void testObjectOutputStream(){
        ObjectOutputStream oos = null;
        try {
            oos = new ObjectOutputStream(new FileOutputStream("hello.bat"));

            //2.
            oos.writeObject(new String("我爱北京天安门"));

            //3.
            oos.flush();

            oos.writeObject(new Person("baobao",21));
            oos.flush();

        } catch (IOException e) {
            e.printStackTrace();
        } finally {
            //4.
            try {
                if (oos != null)
                    oos.close();
            } catch (IOException e) {
                e.printStackTrace();
            }

        }
    }
5.反序列化过程
@Test
    public void testObjectInputStream(){
        ObjectInputStream ois = null;
        try {
            ois = new ObjectInputStream(new FileInputStream("hello.bat"));

            Object obj = ois.readObject();
            String str = (String)obj;

            Person p = (Person) ois.readObject();

            System.out.println(str);
            System.out.println(p);
        } catch (IOException e) {
            e.printStackTrace();
        } catch (ClassNotFoundException e) {
            e.printStackTrace();
        } finally {

            try {
                if (ois != null)
                    ois.close();
            } catch (IOException e) {
                e.printStackTrace();
            }
        }

    }
6.实现序列化的对象所属的类需要满足
- 1.需要实现接口:Serializable
- 2.需要当前类提供一个全局常量:serivalVersionUID
- 3.除了当前Person类需要实现Serializable接口之外,还必须保证其内部所有属性
也必须是可序列化的。(默认情况下,基本数据类型可序列化) - 补充:ObjectOutputStream 和 ObjectInputStream不能序列化static和transient修饰的成员变量。
RandomAccessFile的使用
1.随机存取文件流
- 1.RandomAccessFile直接继承于java.lang.Object类,实现了DataInput和DataOutput接口
- 2.RandomAccessFile既可以作为一个输入流,又可以作为一个输出流。
- 3.如果RandomAccessFile作为输出流出现,写出到的文件如果不存在,则在执行过程中自动创建
- 如果写出到的文件存在,则会对原有文件进行覆盖
- 4.可以通过相关操作,实现RandomAccessFile"插入"数据的效果
2.典型代码1
@Test
    public void test1(){
        RandomAccessFile raf1 = null;
        RandomAccessFile raf2 = null;
        try {
            //1.
            raf1 = new RandomAccessFile(new File("微信图片_20200901160156.jpg"),"r");
            raf2 = new RandomAccessFile(new File("微信图片_202009011601561.jpg"),"rw");
            //2.
            byte[] buffer = new byte[1024];
            int len;
            while ((len = raf1.read(buffer)) != -1){
                raf2.write(buffer,0,len);

            }
        } catch (IOException e) {
            e.printStackTrace();
        } finally {
            //3.
            if (raf1 != null){

                try {
                    raf1.close();
                } catch (IOException e) {
                    e.printStackTrace();
                }
            }
            if (raf2 != null){

                try {
                    raf2.close();
                } catch (IOException e) {
                    e.printStackTrace();
                }
            }
        }

    }
3.典型代码2
@Test
    public void test2() throws IOException {
        RandomAccessFile raf1 = new RandomAccessFile("hello.txt","rw");

        raf1.seek(3);//将指针调到角标为3的位置
        raf1.write("xyz".getBytes());//覆盖数据的操作。

        raf1.close();
    }
4.使用RandomAccessFile实现数据的插入效果。
 @Test
    public void test3() throws IOException {
        RandomAccessFile raf1 = new RandomAccessFile("hello.txt","rw");
        raf1.seek(3);//将指针调到角标为3的位置。

        //保存指针3后面的所有数据到StringBuilder中
        StringBuilder builder = new StringBuilder((int) new File("hello.txt").length());
        byte[] buffer = new byte[20];
        int len;
        while ((len = raf1.read(buffer)) != -1){
            builder.append(new String(buffer,0,len));
        }

        //调回指针,写入"xyz"
        raf1.seek(3);
        raf1.write("xyz".getBytes());

        //将StringBuilder中的数据写入到文件中
        raf1.write(builder.toString().getBytes());

        raf1.close();
    }
Path,Paths,Files的使用
1.NIO使用说明:
- Java NIO (New IO,Non-Blocking IO)是从Java1.4版本开始引入的一套新的IO API.可以替代标准的Java IO API;
- NIO与原来的IO同样的作用和目的,但是使用的方式完全不同,NIO支持面向缓冲区的(IO是面向流的),基于通道的IO操作。
- NIO将以更高效的方式进行文件的读写操作
- 随着JDK7的发布,Java对NIO进行了极大的扩展,增强了对文件处理和文件系统特性的支持,以至于我们称他们为NIO.2。
2.Path的使用 —jdk7提供
2.1Path的说明
- Path替换原有的File类。
2.2如何实例化
- Paths类提供的静态get()方法用来获取Path对象:
- static Path get(String first,String … more):用于将多个字符串串联成路径
- static Path get(URL url):返回指定url对应的Path路径
2.3常用方法
- String toString():返回调用Path对象的字符串表示形式
- boolean startsWith(String path):判断是否以path路径开始
- boolean endsWith(String path):判断是否以path路径结束
- boolean isAbsolute():判断是否是绝对路径
- Path getParent():返回Path对象包含整个路径,不包含Path对象指定的文件路径
- Path getRoot():返回调用Path对象的根路径
- Path getFileName():返回与调用Path对象关联的文件名
- int getNameCount():返回Path根目录后面元素的数量
- Path getName(int idx):返回指定索引位置idx的路径名称
- Path toAbsolutePath():作为绝对路径返回调用Path对象
- Path resolve(Path p):合并两个路径,返回合并后的路径对应的Path对象
- File toFile():将Path转化为File类的对象
3.File工具类 —jdk7提供
3.1作用
- 操作文件或文件目录的工具类
3.2常用方法
- Path copy(Path src,Path dest,CopyOption … how):文件的复制
- Path createDirectory(Path path,FileAttribute<?> … attr):创建一个目录
- Path createFile(Path path,FileAttribute<?> … arr):创建一个文件
- void delete(Path path):删除一个文件/目录,如果不存在,执行报错
- void deleteIfExists(Path path):Path对应的文件/目录如果存在,执行删除
- path move(Path src,Path dest,CopyOption…how):将src移动到dest位置
- long size(Path path):返回path指定文件的大小。
3.3File常用方法:用于判断
- boolean exists(Path path,LinkOption…opts):判断文件是否存在
- boolean isDirectory(Path path,LinkOption…opts):判断是否是目录
- boolean isRegularFile(Path path,LinkOption…opts):判断是否是文件
- boolean isHidden(Path path):判断是否是隐藏文件
- boolean isReadable(Path path):判断文件是否可读
- boolean isWritable(Path path):判断文件是否可写
- boolean notExists(Path path,LinkOption…opts):判断文件是否不存在
3.4File常用方法,用于操作内容
- SeekableByteChannel newByteChannel(Path path,OpenOption…how):获取与指定文件的连接,how指定打开方式。
- DirectoryStream<Path.> newDirectoryStream(Path path):打开path指定的目录
- InputStream newInputStream(Path path,OpenOption…how):获取InputStream对象
- OutputStream newOutputStream(Path path,OpenOption…how):获取OutputStream对象
网络编程—>InetAddress类的使用
一,实现网络通信需要解决的两个问题
- 1.如何准确地定位网络上一台或多台主机;定位主机上的特定的应用
- 2.找到主机后如何可靠高效地进行数据传输
二,网络通信的两个要素:
- 对应问题一:IP和端口号
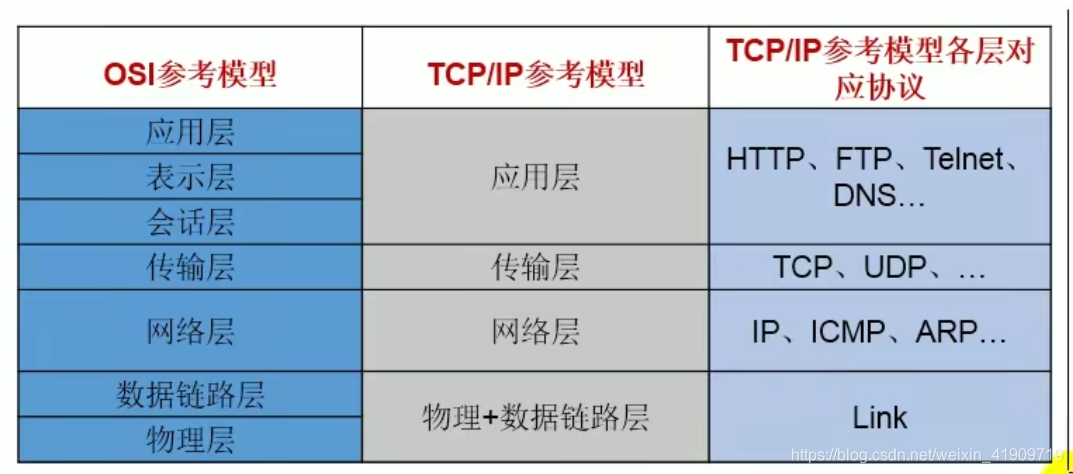
- 对应问题二:提供网络通信协议:TCP/IP参考模型(应用层,传输层,网络层,物理+链路层)
三,通信要素一:IP和端口号
-
IP的理解
- IP:唯一的标识Internet上的计算机(通信实体)
- 在Java中使用InetAddress类代表IP
- Ip分类:IPV4 和 IPV6;万维网和局域网。
- 域名:www.baidu.com www.mi.com www.sina.com www.jd.com www.vip.com
- 本地回路地址:127.0.0.1 对应着:localhost
2.InetAddress类:此类的一个对象代表着一个具体的IP地址
2.1实例化
- getName(String host),getLocalHost()
2.2常用方法
- getHostName() / getHostAddress()
2.3端口号
- 正在计算机上运行的程序。
- 要求:不同的进程有不同的端口号。
- 范围:被规定为一个16位的整数0-65535.
- 端口号与IP地址的组合得出一个网络套接字:Socket
网络编程—>网络通信协议
1.分型模型
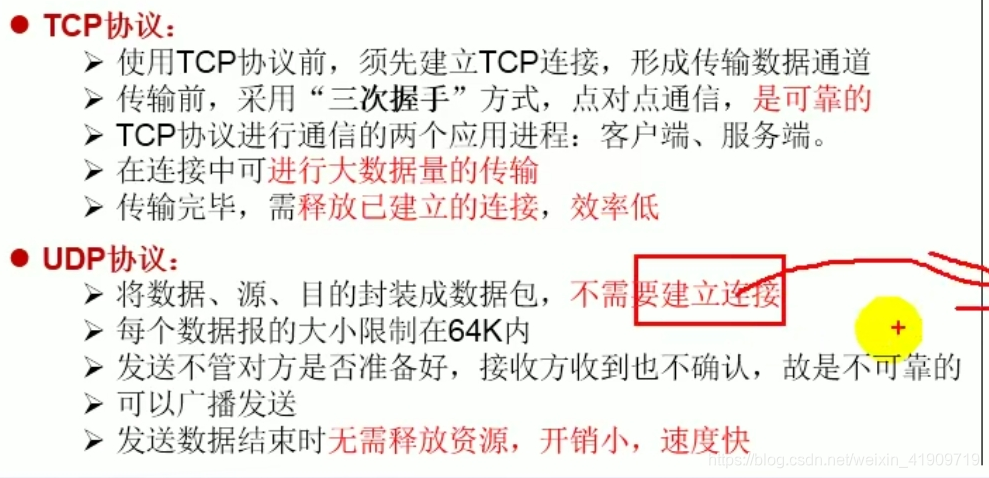
 2.TCP和UDP的区别
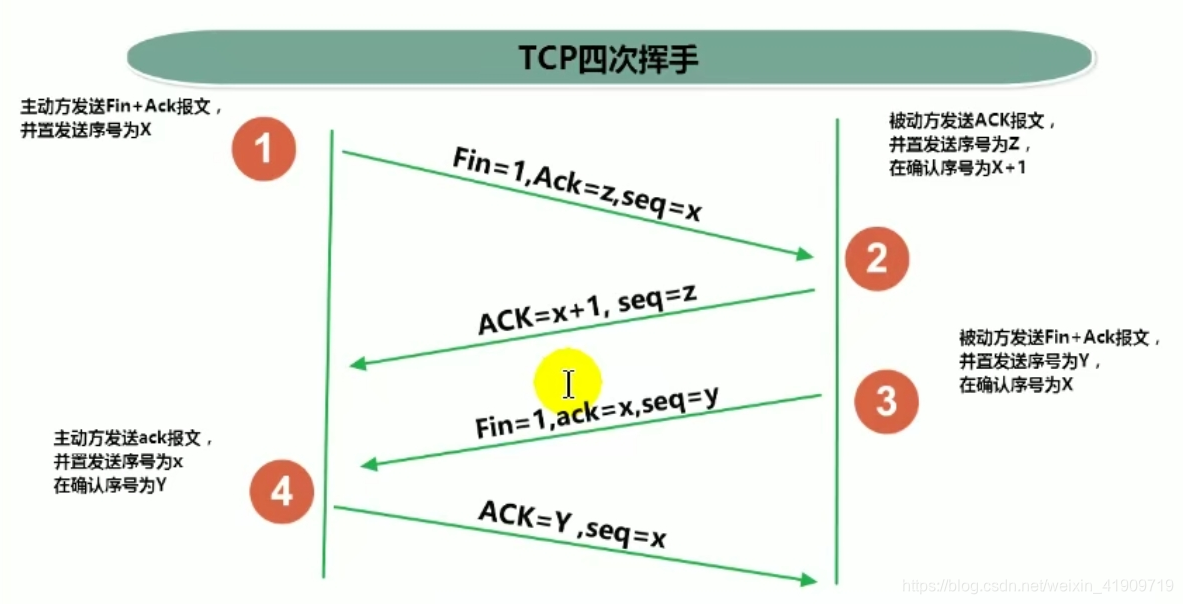
 3.TCP三次握手和四次挥手

 4.TCP网络编程
代码示例1:客户端发送信息给服务端,服务端将数据显示在控制台上。
@Test
    public void client(){
        Socket socket = null;
        OutputStream os = null;
        try {
            //1,创建Socket对象,指明服务器端的ip和端口号
            InetAddress inet = InetAddress.getByName("127.0.0.1");
            socket = new Socket(inet,8899);

            //2.获取一个输出流,用于输出数据
            os = socket.getOutputStream();
            //3.写出数据的操作
            os.write("你好,我是客户端大俊".getBytes());
        } catch (IOException e) {
            e.printStackTrace();
        } finally {
            //4.资源的关闭
            if (os != null){

                try {
                    os.close();
                } catch (IOException e) {
                    e.printStackTrace();
                }
            }
            if (socket != null){

                try {
                    socket.close();
                } catch (IOException e) {
                    e.printStackTrace();
                }
            }
        }

        //资源关闭
    }

    //服务端
    @Test
    public void server() {
        ServerSocket ss = null;
        Socket socket = null;
        InputStream is = null;
        ByteArrayOutputStream baos = null;
        try {
            //1.创建服务器端的ServerScket,指明自己的端口号
            ss = new ServerSocket(8899);


            //2.调用accept()表示接收来自客户端的socket
            socket = ss.accept();

            //3.获取输入流
            is = socket.getInputStream();

//        byte[] buffer = new byte[200];
//        int len;
//        while ((len = is.read(buffer)) != -1){
//            String str = new String(buffer,0,len);
//            System.out.println(str);
//        }

            //4.读取输入流中的数据
            baos = new ByteArrayOutputStream();
            byte[] buffer = new byte[200];
            int len;
            while ((len = is.read(buffer)) != -1){
                baos.write(buffer,0,len);
            }

            System.out.println(baos.toString());
            System.out.println("收到了来自于:" + socket.getInetAddress().getHostAddress() + "的数据");
        } catch (IOException e) {
            e.printStackTrace();
        } finally {
            //5.关闭资源
            if (baos != null){

                try {
                    baos.close();
                } catch (IOException e) {
                    e.printStackTrace();
                }
            }
            if (is != null){

                try {
                    is.close();
                } catch (IOException e) {
                    e.printStackTrace();
                }
            }
            if (socket != null){

                try {
                    socket.close();
                } catch (IOException e) {
                    e.printStackTrace();
                }
            }
            if (ss != null){

                try {
                    ss.close();
                } catch (IOException e) {
                    e.printStackTrace();
                }
            }
        }

        //关闭资源

    }
代码示例二:客户端发送文件给服务端,服务端将文件保存在本地,
@Test
    public void client() throws IOException {
        //1.
        Socket socket = new Socket(InetAddress.getByName("127.0.0.1"),9090);

        //2.获取一个输出流
        OutputStream os = socket.getOutputStream();
        //3.获取一个输入流
        FileInputStream fis = new FileInputStream(new File("微信图片_20200901160156.jpg"));
        //4.读取过程
        byte[] buffer = new byte[1024];
        int len;
        while ((len = fis.read(buffer)) != -1){
            os.write(buffer,0,len);
        }
        //5.资源关闭
        fis.close();
        os.close();
        socket.close();
    }

    @Test
    public void server() throws IOException {
        //1.
        ServerSocket ss = new ServerSocket(9090);
        //2,获取客户端的socket
        Socket socket = ss.accept();
        //3.获取客户端的输入流
        InputStream is = socket.getInputStream();
        //4.建一个FileOutputStream
        FileOutputStream fos = new FileOutputStream(new File("微信图片_202009011601561.jpg"));


        //5.读取过程
        byte[] buffer = new byte[1024];
        int len;
        while ((len = is.read(buffer)) != -1){
            fos.write(buffer,0,len);
        }

        fos.close();
        is.close();
        socket.close();
        ss.close();
    }
代码示例3:从客户端发送文件给服务端,服务端保存到本地。并返回"发送成功"给客户端
@Test
    public void client() throws IOException {
        //1.
        Socket socket = new Socket(InetAddress.getByName("127.0.0.1"),9090);

        //2.获取一个输出流
        OutputStream os = socket.getOutputStream();
        //3.获取一个输入流
        FileInputStream fis = new FileInputStream(new File("微信图片_20200901160156.jpg"));
        //4.读取过程
        byte[] buffer = new byte[1024];
        int len;
        while ((len = fis.read(buffer)) != -1){
            os.write(buffer,0,len);
        }

        //关闭数据的输出
        socket.shutdownOutput();


        //5.接收来自服务器端的数据,并显示到控制台上
        InputStream is = socket.getInputStream();
        ByteArrayOutputStream baos = new ByteArrayOutputStream();
        byte[] bufferr = new byte[20];
        int len1;
        while ((len1 = is.read(bufferr)) != -1){
            baos.write(bufferr,0,len1);
        }

        System.out.println(baos.toString());
        //6.资源关闭
        fis.close();
        os.close();
        socket.close();
        baos.close();
    }

    @Test
    public void server() throws IOException {
        //1.
        ServerSocket ss = new ServerSocket(9090);
        //2,获取客户端的socket
        Socket socket = ss.accept();
        //3.获取客户端的输入流
        InputStream is = socket.getInputStream();
        //4.建一个FileOutputStream
        FileOutputStream fos = new FileOutputStream(new File("微信图片_202009011601562.jpg"));

        //5.读取过程
        byte[] buffer = new byte[1024];
        int len;
        while ((len = is.read(buffer)) != -1){
            fos.write(buffer,0,len);
        }
        System.out.println("图片传输完成");
        //6.服务器端给予客户端反馈
        OutputStream os = socket.getOutputStream();
        os.write("你好,包包,照片我已收到,非常漂亮!".getBytes());

        //7.
        fos.close();
        is.close();
        socket.close();
        ss.close();
        os.close();
    }
5.UDP网络编程
 //发送端
    @Test
    public void sender() throws IOException {
        DatagramSocket socket = new DatagramSocket();

        String str = "我是UDP方式发送的导弹";
        byte[] data = str.getBytes();
        InetAddress inet = InetAddress.getLocalHost();
        DatagramPacket packet = new DatagramPacket(data,0,data.length,inet,9090);

        socket.send(packet);

        socket.close();
    }

    //接收端
    @Test
    public void receiver() throws IOException {
        DatagramSocket socket = new DatagramSocket(9090);

        byte[] buffer = new byte[100];
        DatagramPacket packet = new DatagramPacket(buffer,0,buffer.length);

        socket.receive(packet);


        System.out.println(new String(packet.getData(),0,packet.getLength()));

        socket.close();
    }
6.URL编程


 1036
1036


 被折叠的 条评论
为什么被折叠?
被折叠的 条评论
为什么被折叠?
 到【灌水乐园】发言


