


本文是独立组件开发的第五篇文章。
第一篇文章: Vue独立组件开发: prop event slot
第二篇文章:Vue独立组件开发:不一样的组件通信方式
第三篇文章: Vue独立组件开发:动态组件 Vue.extend及$mount
第四篇文章: 换一种思路写Vue:Render 函数与 Functional
动态组件
在开发中,你经常会遇到这么一种情况:根据条件动态地切换某个组件,或动态地选择渲染某个组件。
在<<换一种思路写Vue:Render 函数与 Functional Render>>文章中我们介绍了函数式组件 Functional Render,它是一个没有上下文的函数,常用于程序化地在多个组件中选择一个。使用 Render 或 Functional Render 可以解决动态切换组件的需求,不过那是基于一个 JS 对象(Render 函数),而 Vue 提供了另外一个内置的组件 <component> 和 is 特性,可以更好地实现动态组件。
首先来看看<component> 和 is 的基本使用,首先定义三个普通组件A,B,C:
<template>
  <div>
    组件 A
  </div>
</template>
<script>
  export default {

  }
</script>

<template>
  <div>
    组件 B
  </div>
</template>
<script>
  export default {

  }
</script>

<template>
  <div>
    组件 C
  </div>
</template>
<script>
  export default {

  }
</script>
然后在父组件中导入这 3 个组件,并动态切换:
<template>
  <div>
    <button @click="handleChange('A')">显示 A 组件</button>
    <button @click="handleChange('B')">显示 B 组件</button>
    <button @click="handleChange('C')">显示 C 组件</button>

    <component :is="component"></component>
  </div>
</template>
<script>
  import componentA from '../components/a.vue';
  import componentB from '../components/b.vue';
  import componentC from '../components/c.vue';

  export default {
    data () {
      return {
        component: componentA
      }
    },
    methods: {
      handleChange (component) {
        if (component === 'A') {
          this.component = componentA;
        } else if (component === 'B') {
          this.component = componentB;
        } else if (component === 'C') {
          this.component = componentC;
        }
      }
    }
  }
</script>
这里的 is 动态绑定的是一个组件对象(Object),它直接指向 a / b / c 三个组件中的一个。除了直接绑定一个 Object,还可以是一个 String,比如标签名、组件名。
下面的这个组件,将原生的按钮 button 进行了封装,如果传入了 prop: to,那它会渲染为一个链接地址 <a> 标签,用于打开这个,如果没有传入 to,就当作普通 button 使用。
<template>
  <component :is="tagName" v-bind="tagProps">
    <slot></slot>
  </component>
</template>

<script>
export default {
  props: {
    // 链接地址
    to: {
      type: String,
      default: ''
    },
    // 链接打开方式,如 _blank
    target: {
      type: String,
      default: '_self'
    }
  },
  computed: {
    // 动态渲染不同的标签
    tagName() {
      return this.to === '' ? 'button' : 'a'
    },
    // 如果是链接,把这些属性都绑定在 component 上
    tagProps() {
      let props = {}

      if (this.to) {
        props = {
          target: this.target,
          href: this.to
        }
      }

      return props
    }
  }
}
</script>
使用组件:
<template>
  <div>
    <i-button>普通按钮</i-button>
    <br />
    <i-button to="https://juejin.cn">链接按钮</i-button>
    <br />
    <i-button to="https://juejin.cn" target="_blank"
      >新窗口打开链接按钮</i-button
    >
  </div>
</template>
<script>
import iButton from '../components/isCom/button.vue'

export default {
  components: { iButton }
}
</script>
最终会渲染出一个原生的 <button> 按钮和两个原生的链接 <a>,且第二个点击会在新窗口中打开链接,如图:

i-button 组件中的 <component> is 绑定的就是一个标签名称 button / a,并且通过 v-bind 将一些额外的属性全部绑定到了 <component> 上。
再回到第一个 a / b / c 组件切换的示例,如果这类的组件,频繁切换,事实上组件是会重新渲染的。
现在在组件 A 里加两个生命周期 mounted, beforeDestroy。只要切换到 A 组件,mounted 就会触发一次,切换到其它组件,beforeDestroy 也会触发一次,说明组件再重新渲染,这样有可能导致性能问题。
为了避免组件的重复渲染,可以在 <component> 外层套一个 Vue.js 内置的 <keep-alive> 组件,这样组件就会被缓存起来:
<keep-alive>
    <component :is="component"></component>
</keep-alive>
这时,只有 mounted 触发了,如果不离开当前页面,切换到其它组件,beforeDestroy 不会被触发,说明组件已经被缓存了。
递归组件
递归组件就是指组件在模板中调用自己,开启递归组件的必要条件,就是在组件中设置一个 name 选项。
<template>
  <div>
    <my-component></my-component>
  </div>
</template>
<script>
export default {
  name: 'my-component'
}
</script>
在 Webpack 中导入一个 Vue 组件,一般是通过 import myComponent from 'xxx' 这样的语法,然后在当前组件(页面)的 components: { myComponent } 里注册组件,这种组件是不强制设置 name 字段的,组件的名字都是使用者在 import 进来后自定义的。
但递归组件的使用者是组件自身,它得知道这个组件叫什么,因为没有用 components 注册,所以 name 字段就是必须的了。
除了递归组件用 name,有一些特殊的方法,比如通过遍历匹配组件的 name 选项来寻找组件实例,还有keep-alive组件也会使用组件的name属性。
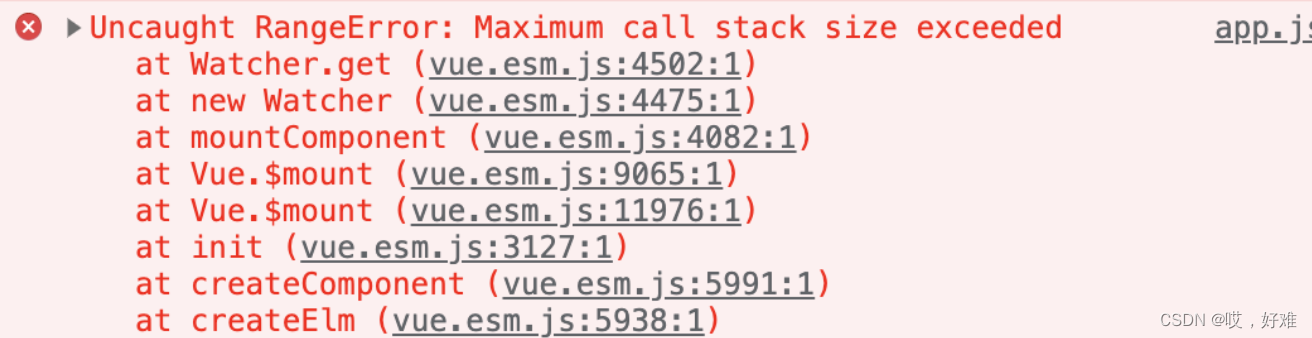
不过,使用上面的组件是有问题的,如果直接运行,会抛出 max stack size exceeded 的错误,因为组件会无限递归下去,死循环。
要解决这个问题,就要给递归组件一个限制条件,一般会在递归组件上用 v-if 在某个地方设置为 false 来终结。比如我们给上面的示例加一个属性 count,当大于 5 时就不再递归:
<template>
  <div>
    <p>recursion</p>
    <my-component :count="count + 1" v-if="count <= 5"></my-component>
  </div>
</template>
<script>
export default {
  name: 'my-component',
  props: {
    count: {
      type: Number,
      default: 1
    }
  }
}
</script>
所以,实现一个递归组件的必要条件是:
- 要给组件设置 name;
- 要有一个明确的结束条件;
总结
动态组件广泛应用于灵活渲染组件的场景,根据某种条件来渲染不同的组件,搭配<keep-alive>可以避免组件频繁的创建与销毁。
递归组件的使用需要特别关注结束条件,否则会一直递归下去导致程序报错。
这是本系列介绍 Vue 独立组件开发基础知识的最后一篇文章,后面我将利用这些基础知识创建类似于elementui,ant design组件库中的一些常用组件,来加深对Vue开发的理解。


 1502
1502


 被折叠的 条评论
为什么被折叠?
被折叠的 条评论
为什么被折叠?
 到【灌水乐园】发言


