


一、Jedis方式操作redis
使用Java来操作Redis,Jedis是Redis官方推荐使用的Java连接redis的客户端。
1.1 导入依赖
<!--导入jredis的包-->
<dependency>
    <groupId>redis.clients</groupId>
    <artifactId>jedis</artifactId>
    <version>3.2.0</version>
</dependency>
<!--fastjson-->
<dependency>
    <groupId>com.alibaba</groupId>
    <artifactId>fastjson</artifactId>
    <version>1.2.70</version>
</dependency>
1.2 连接测试
public class TestPing {
    public static void main(String[] args) {
        Jedis jedis = new Jedis("192.168.xx.xxx", 6379);
        String response = jedis.ping();
        System.out.println(response); // PONG
    }
}
1.3 事务测试
public class TestTX {
    public static void main(String[] args) {
        Jedis jedis = new Jedis("39.99.xxx.xx", 6379);

        JSONObject jsonObject = new JSONObject();
        jsonObject.put("hello", "world");
        jsonObject.put("name", "kuangshen");
        // 开启事务
        Transaction multi = jedis.multi();
        String result = jsonObject.toJSONString();
        // jedis.watch(result)
        try {
            multi.set("user1", result);
            multi.set("user2", result);
            // 执行事务
            multi.exec();
        }catch (Exception e){
            // 放弃事务
            multi.discard();
        } finally {
            // 关闭连接
            System.out.println(jedis.get("user1"));
            System.out.println(jedis.get("user2"));
            jedis.close();
        }
    }
}
1.4 相关的连接失败问题
Exception in thread “main”
redis.clients.jedis.exceptions.JedisConnectionException: Failed
connecting to host 192.168.229.103:6379 at
redis.clients.jedis.Connection.connect(Connection.java:204) at
redis.clients.jedis.BinaryClient.connect(BinaryClient.java:100) at
redis.clients.jedis.Connection.sendCommand(Connection.java:125) at
redis.clients.jedis.Connection.sendCommand(Connection.java:120) at
redis.clients.jedis.BinaryClient.ping(BinaryClient.java:113) at
redis.clients.jedis.BinaryJedis.ping(BinaryJedis.java:188) at
com.TestPing.main(TestPing.java:8) Caused by:
java.net.SocketTimeoutException: connect timed out
连接redis时找不到远程ip地址的redis服务,因为redis默认配置绑定了本机,因此需要打开配置文件,将绑定的配置注释掉:

解决了上述个问题,也许你还会遇到另一个问题,如下:
Exception in thread “main”
redis.clients.jedis.exceptions.JedisDataException: DENIED Redis is
running in protected mode because protected mode is enabled, no bind
address was specified, no authentication password is requested to
clients. In this mode connections are only accepted from the loopback
interface. If you want to connect from external computers to Redis you
may adopt one of the following solutions: 1) Just disable protected
mode sending the command ‘CONFIG SET protected-mode no’ from the
loopback interface by connecting to Redis from the same host the
server is running, however MAKE SURE Redis is not publicly accessible
from internet if you do so. Use CONFIG REWRITE to make this change
permanent. 2) Alternatively you can just disable the protected mode by
editing the Redis configuration file, and setting the protected mode
option to ‘no’, and then restarting the server. 3) If you started the
server manually just for testing, restart it with the
‘–protected-mode no’ option. 4) Setup a bind address or an
authentication password. NOTE: You only need to do one of the above
things in order for the server to start accepting connections from the
outside. at
redis.clients.jedis.Protocol.processError(Protocol.java:132) at
redis.clients.jedis.Protocol.process(Protocol.java:166) at
redis.clients.jedis.Protocol.read(Protocol.java:220) at
redis.clients.jedis.Connection.readProtocolWithCheckingBroken(Connection.java:318)
at
redis.clients.jedis.Connection.getStatusCodeReply(Connection.java:236)
at redis.clients.jedis.BinaryJedis.ping(BinaryJedis.java:189) at
com.TestPing.main(TestPing.java:8)
报错说的是,当前redis开启了保护模式,却有没有绑定有指定的ip地址,因此连接失败,所以需要关闭保护模式:

二、SpringBoot整合redis
2.1 导入依赖
<dependency>
    <groupId>org.springframework.boot</groupId>
    <artifactId>spring-boot-starter-data-redis</artifactId>
</dependency>
springboot 2.x后 ,原来使用的 Jedis 被 lettuce 替换。
jedis:采用的直连,多个线程操作的话,是不安全的。如果要避免不安全,使用jedis pool连接池!更像BIO模式
lettuce:采用netty,实例可以在多个线程中共享,不存在线程不安全的情况!可以减少线程数据了,更像NIO模式
我们在学习SpringBoot自动配置的原理时,整合一个组件并进行配置一定会有一个自动配置类xxxAutoConfiguration,并且在spring.factories中也一定能找到这个类的完全限定名。Redis也不例外。

那么就一定还存在一个RedisProperties类

之前我们说SpringBoot2.x后默认使用Lettuce来替换Jedis,现在我们就能来验证了。
先看Jedis:

@ConditionalOnClass注解中有两个类是默认不存在的,所以Jedis是无法生效的
然后再看Lettuce:

完美生效。
现在我们回到RedisAutoConfiguratio

只有两个简单的Bean
- RedisTemplate
- StringRedisTemplate
当看到xxTemplate时可以对比RestTemplat、SqlSessionTemplate,通过使用这些Template来间接操作组件。那么这俩也不会例外。分别用于操作Redis和Redis中的String数据类型。
在RedisTemplate上也有一个条件注解,说明我们是可以对其进行定制化的
说完这些,我们需要知道如何编写配置文件然后连接Redis,就需要阅读RedisProperties

这是一些基本的配置属性。

还有一些连接池相关的配置。注意使用时一定使用Lettuce的连接池。

2.2 编写配置文件
# 配置redis
spring.redis.host=39.99.xxx.xx
spring.redis.port=6379
2.3 使用RedisTemplate
@SpringBootTest
class Redis02SpringbootApplicationTests {

    @Autowired
    private RedisTemplate redisTemplate;

    @Test
    void contextLoads() {

        // redisTemplate 操作不同的数据类型,api和我们的指令是一样的
        // opsForValue 操作字符串 类似String
        // opsForList 操作List 类似List
        // opsForHah

        // 除了基本的操作,我们常用的方法都可以直接通过redisTemplate操作,比如事务和基本的CRUD

        // 获取连接对象
        //RedisConnection connection = redisTemplate.getConnectionFactory().getConnection();
        //connection.flushDb();
        //connection.flushAll();

        redisTemplate.opsForValue().set("mykey","kuangshen");
        System.out.println(redisTemplate.opsForValue().get("mykey"));
    }
}
2.4 测试结果
此时我们回到Redis查看数据时候,惊奇发现全是乱码,可是程序中可以正常输出:
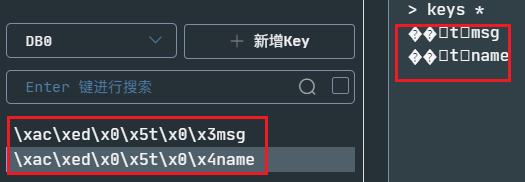
这时候就关系到存储对象的序列化问题,在网络中传输的对象也是一样需要序列化,否者就全是乱码。
我们转到看那个默认的RedisTemplate内部什么样子:

在最开始就能看到几个关于序列化的参数。
默认的序列化器是采用JDK序列化器

而默认的RedisTemplate中的所有序列化器都是使用这个序列化器:

后续我们定制RedisTemplate就可以对其进行修改。
RedisSerializer提供了多种序列化方案:
- 直接调用RedisSerializer的静态方法来返回序列化器,然后set

- 自己new 相应的实现类,然后set

2.5 定制RedisTemplate的模板:
我们创建一个Bean加入容器,就会触发RedisTemplate上的条件注解使默认的RedisTemplate失效。
@Configuration
public class RedisConfig {

   @Bean
    public RedisTemplate<String, Object> redisTemplate(RedisConnectionFactory redisConnectionFactory) throws UnknownHostException {
        // 将template 泛型设置为 <String, Object>
        RedisTemplate<String, Object> template = new RedisTemplate();
        // 连接工厂,不必修改
        template.setConnectionFactory(redisConnectionFactory);
        /*
         * 序列化设置
         */
        // key、hash的key 采用 String序列化方式
        template.setKeySerializer(RedisSerializer.string());
        template.setHashKeySerializer(RedisSerializer.string());
        // value、hash的value 采用 Jackson 序列化方式
        template.setValueSerializer(RedisSerializer.json());
        template.setHashValueSerializer(RedisSerializer.json());
        template.afterPropertiesSet();

        return template;
    }
}
这样一来,只要实体类进行了序列化,我们存什么都不会有乱码的担忧了。
三、自定义Redis工具类
使用RedisTemplate需要频繁调用.opForxxx然后才能进行对应的操作,这样使用起来代码效率低下,工作中一般不会这样使用,而是将这些常用的公共API抽取出来封装成为一个工具类,然后直接使用工具类来间接操作Redis,不但效率高并且易用。
工具类参考博客:
https://www.cnblogs.com/zeng1994/p/03303c805731afc9aa9c60dbbd32a323.html
https://www.cnblogs.com/zhzhlong/p/11434284.html


 1万+
1万+


 被折叠的 条评论
为什么被折叠?
被折叠的 条评论
为什么被折叠?
 到【灌水乐园】发言


