


目录
一、关于dns的名词解释
- dns:domain name service (域名解析服务)
1、关于客户端
- dns指向文件:/etc/resolv.conf
- 地址解析命令:
host www.baidu.com
- 地址详细解析信息命令:
dig www.baidu.com
- A记录:ip地址叫做域名的Address 记录
- SOA:授权起始主机
- dns顶级:. (全世界共有13台主机)
- dns次级:.com .net .edu .org …
- 再次级:baidu.com
搜索时,一层一层向上搜索
2、关于服务端
- 安装包:bind
- 服务名称:named
- 主配置文件:/etc/named.conf
- 数据目录:/var/named
- 端口:53
- 关于报错信息:
(1)no servers could be reached:服务无法访问
考虑:服务开启?火墙?网络?端口?
(2)服务启动失败
考虑:配置文件写错,用 journalctl -xe查询错误
(3)dig 查询状态
NOERROR:查询成功
REFUSED:服务拒绝访问
SERVFAIL:查询记录失败(dns服务器无法到达上级,拒绝缓存)
NXDOMAIN:此域名A记录在dns中不存在
二、dns服务的安装与启用
1、安装
dnf install bind.x86_64 -y
2、启用
systemctl enable --now named
firewall-cmd --permanent --add-service=dns
firewall-cmd --reload

vim /etc/named.conf
##配置文件写入
11 listen-on port 53 { any; }; 	##在本地所有网络接口上开启53端口
19 allow-query { any; }; 		##允许查询A记录的客户端列表,any表示所有
34 dnssec-validation no; 		##禁用dns检测,使dns能够缓存外部信息到本机

systemctl restart named			##重启服务


三、高速缓存dns
##配置文件写入
20 forwarders { 114.114.114.114; };
使dns不再向上查询,而是去指定位置查询

四、dns的正向解析
vim /etc/named.rfc1912.zone
##写入
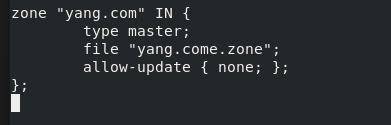
zone "yang.com" IN { ##维护的域名
type master; ##当前服务器位主dns
file "yang.com.zone"; ##域名A记录文件
allow-update { none; }; ##允许更新主机列表
};
cd /var/named/
cp -p named.localhost yang.com.zone
##修改文件
$TTL 1D
@ IN SOA dns.yang.com. root.yang.com (
0 ; serial
1D ; refresh
1H ; retry
1W ; expire
3H ) ; minimum
NS dns.yang.com.
dns A 172.25.254.20
www CNAME yang.a.yang.com. ##规范域名
yang.a A 172.25.254.111 ##正向解析记录
yang.a A 172.25.254.112
yang.com. MX 1 172.25.254.20. ##邮件解析记录
systemctl restart named ##重启服务
##测试
dig www.yang.com ##查询正向解析
dig -t mx yang.com ##邮件解析记录查询

五、dns的反向解析
vim /etc/named.rfc1912.zones
##修改
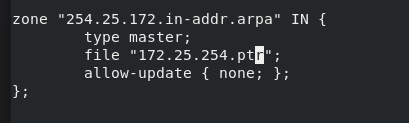
zone "0.168.192.in-addr.arpa" IN {
type master;
file "172.25.254.ptr";
allow-update { none; };
};
cd /var/named/
cp -p named.loopback 172.25.254.ptr
vim 172.25.254.ptr
##修改文件
$TTL 1D
@ IN SOA dns.yang.com. root.yang.com. (
0 ; serial
1D ; refresh
1H ; retry
1W ; expire
3H ) ; minimum
NS dns.yang.com.
dns A 172.25.254.20
11 PTR www.yang.com.
12 PTR bbs.yang.com.
13 PTR news.yang.com.
systemctl restart named
##测试:
dig -x 172.25.254.11

六、dns的双向解析
- 实验环境:客户端2台
172.25.254网段
192.168.0网段:
ifconfig ens160 192.168.0.218 netmask 255.255.255.0
服务端1台2个网段的ip
172.25.254.217
192.168.0.217
ifconfig ens160:0 192.168.0.217 netmask 255.255.255.0
在172.25.254网段的客户主机中
vim /etc/resolv.conf
nameserver 172.25.254.217
在192.168.0网段的客户主机中
vim /etc/resolv.conf
nameserver 192.168.0.217
- 配置方式:
cd /var/named/
cp -p yang.com.zone yang.com.inter
vim yang.com.inter
##修改文件
$TTL 1D
@ IN SOA dns.yang.com. root.yang.com (
0 ; serial
1D ; refresh
1H ; retry
1W ; expire
3H ) ; minimum
NS dns.yang.com.
dns A 192.168.0.20
www CNAME yang.a.yang.com.
yang.a A 192.168.0.111
yang.a A 192.168.0.112
yang.com. MX 1 192.168.0.20.
cp -p /etc/named.rfc1912.zones /etc/named.rfc1912.inters
vim /etc/named.rfc1912.inters
##修改文件
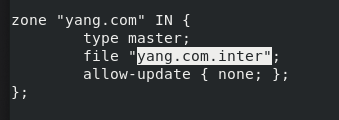
zone "yang.com" IN {
type master;
file "yang.com.inter";
allow-update { none; };
};
vim /etc/named.conf
##修改文件
#zone "." IN {
## type hint;
## file "named.ca";
##};
#
##include "/etc/named.rfc1912.zones";
##include "/etc/named.root.key";
view localnet {
match-clients { 172.25.254.0/24; };
zone "." IN {
type hint;
file "named.ca";
};
include "/etc/named.rfc1912.zones";
include "/etc/named.root.key";
};
view internet {match-clients { any; };
zone "." IN {
type hint;
file "named.ca";
};
include "/etc/named.rfc1912.inters";
include "/etc/named.root.key";
};
systemctl restart named ##重启服务
- 测试:
分别在2个网段的主机中作同样域名的地址解析,得到的A记录不同。


七、dns集群
- 主dns:
vim /etc/named.rfc1912.zones
##修改文件
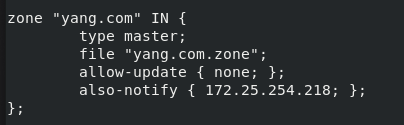
zone "yang.com" IN {
type master;
file "yang.com.zone";
allow-update { none; };
also-notify { 172.25.254.30; }; ##主动通知的辅助dns主机,否则不修改
};
vim /var/named/yang.com.zone
##修改文件
$TTL 1D
@ IN SOA dns.yang.com. root.yang.com (
2020031402 ; serial ##每次修改A记录文件,需要变更此参数的值
1D ; refresh
1H ; retry
1W ; expire
3H ) ; minimum
NS dns.yang.com.
dns A 172.25.254.20
www CNAME yang.a.yang.com.
yang.a A 172.25.254.210
yang.a A 172.25.254.211
yang.com. MX 1 172.25.254.20.
- slave dns:
dnf install bind -y
firewall-cmd --add-service=dns
vim /etc/named.conf
##修改文件
listen-on port 53 { any; };
allow-query { any; };
dnssec-validation no;
vim /etc/named.rfc1912.zone
##修改文件
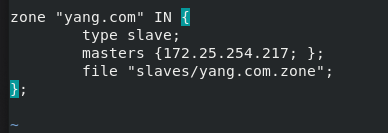
zone "yang.com" IN {
type slave; ##dns状态位辅助dns
masters { 172.25.254.20; }; ##主dns
file "slaves/yang.com.zone"; ##同步数据文件
};
systemctl restart named ##重启服务
八、dns的更新
1、dns基于ip地址的更新
- 在dns中设定:
vim /etc/named.rfc1912.zones
zone "yang.com" IN {
type master;
file "yang.com.zone";
allow-update { 172.25.254.10; }; ##允许指定客户端更新yang域
also-notify { 172.25.254.30; };
};
- 测试:在172.25.254.10中
nsupdate
> server 172.25.254.20
> update add hello.yang.com 86400 A 172.25.254.111 ##新曾A记录
> send
> update delete hello.yang.com ##删除A记录
> send
2、dns基于key更新的方式:
dnssec-keygen -a HMAC-SHA256 -b 128 -n HOST yang
cp -p /etc/rndc.key /etc/wesots.key

vim /etc/wesots.key
key "yang" {
algorithm hmac-sha256;
secret "SB1tQcLaWeroU9lGW21zeA==";
};

vim /etc/named.conf
43 include "/etc/wesots.key";

vim /etc/named.rfc1912.zones
zone "yang.com" IN {
type master;
file "yang.com.zone";
allow-update { key yang; };
also-notify { 172.25.254.30; };
};

systemctl restart named
[root@rhel7_node1 ~]# nsupdate -k /mnt/Kyang.+163+26695.private
> server 172.25.254.20
> update add hello.yang.com 86400 A 172.25.254.111
> send
> quit
九、ddns(dhcp+dns)
dnf instsall dhcp-server -y

vim /etc/dhcpd/dhcpd.conf
##修改
# dhcpd.conf
#
# Sample configuration file for ISC dhcpd
#
# option definitions common to all supported networks...
option domain-name "yang.com";
option domain-name-servers 172.25.254.20;
default-lease-time 600;
max-lease-time 7200;
# Use this to enble / disable dynamic dns updates globally.ddns-update-style interim;
# If this DHCP server is the official DHCP server for the local
# network, the authoritative directive should be uncommented.
#authoritative;
# Use this to send dhcp log messages to a different log file (you also
# have to hack syslog.conf to complete the redirection).
log-facility local7;
# No service will be given on this subnet, but declaring it helps the
# DHCP server to understand the network topology.
# This is a very basic subnet declaration.
subnet 172.25.254.0 netmask 255.255.255.0 {
range 172.25.254.51 172.25.254.80;
option routers 172.25.254.1;
}
key yang {
algorithm hmac-sha256;
secret SB1tQcLaWeroU9lGW21zeA==;
};
zone yang.com. {
primary 127.0.0.1;
key yang;
}
dns的key更新
测试:
设定测试主机网络工作方式为dhcp
设定主机名称test.yang.com
重启网络
dig test.yang.com
可以得到正确解析


 466
466


 被折叠的 条评论
为什么被折叠?
被折叠的 条评论
为什么被折叠?
 到【灌水乐园】发言


