


Nginx官网http://www.nginx.org 可以下载
- 安装部署nginx
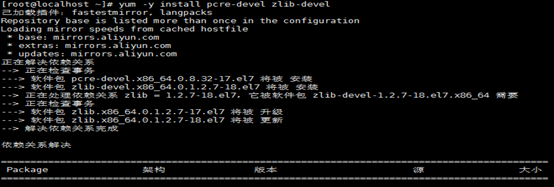
[root@localhost ~]# yum -y install pcre-devel zlib-devel #nginx配置运行需要pcre、zlib支持
[root@localhost ~]# useradd -M -s /sbin/nologin nginx #nginx默认为nobody身份运行,所以创建专门的用户,方便控制访问权限,这里做的实验,所以设置的是禁止登陆shell环境
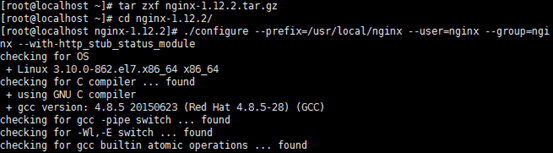
[root@localhost ~]# tar zxf nginx-1.12.2.tar.gz #解压nginx包
[root@localhost ~]# cd nginx-1.12.2/ #进入解压包路径下
[root@localhost nginx-1.12.2]# ./configure --prefix=/usr/local/nginx --user=nginx --group=nginx --with-http_stub_status_module
通常Nginx安装目录设为/usr/local/nginx下,运行用户和组都为nginx,并使用–with-http_stub_status_module模块支持状态统计,查看服务器连接状态,
模块参数:
–prefix=/usr/local/nginx : 指定安装目录
–user=nginx --group=nginx : 指定用户和组
–with-http_stub_status_module : 支持状态统计
–with-http_ssl_module : 支持ssl加密
–with-http_realip_module : 支持显示真实来源IP地址,主要用于nginx前段负载服务器使用
–with-pcre : 支持rewrite功能
–with-http_gzip_static_module : 指定压缩
ngin有很多模块,这里只列出几种,根据自己所需使用即可。
[root@localhost nginx-1.12.2]# make && make install #编译安装
[root@localhost nginx-1.12.2]# ln -s /usr/local/nginx/sbin/nginx /usr/local/sbin/ #创建 软连接
[root@localhost nginx-1.12.2]# ls -l /usr/local/sbin/nginx #创建连接文件

以上是为了使Nginx运行更加方便,为主程序所创建的链接,这样可以直接执行Nginx可以调用nginx主程序
2.启动、停止nginx服务
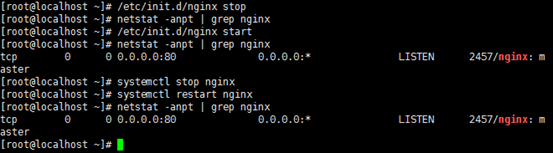
[root@localhost nginx-1.12.2]# /usr/local/nginx/sbin/nginx -s stop #停止nginx服务
[root@localhost nginx-1.12.2]# /usr/local/nginx/sbin/nginx #启动nginx服务

[root@localhost nginx-1.12.2]# netstat -anpt | grep nginx #查看监听nginx服务状态

[root@localhost nginx-1.12.2]# yum -y install elinks #安装elinks浏览器
[root@localhost nginx-1.12.2]# elinks http://localhost #访问elinks访问主机
出现如下//表示nginx服务正常运行
按回车,在按q回车退出即可!

3.退出进程、杀死进程
通过kill或killall命令发送HUP信号表示重载配置,QUIT表示退出进程,kill表示杀死进程
[root@localhost nginx-1.12.2]# killall -s HUP nginx #重载配置
[root@localhost nginx-1.12.2]# killall -s QUIT nginx #杀死进程并退出服务
当nginx进程运行时,pid号默认存放在logs/目录下的nginx.pid文件中,因此若改用kill命令,可以根据nginx.pid文件中的PID号进行控制
4.编写nginx服务脚本
为方便nginx服务启动、停止、重载操作,编写nginx服务脚本,并使用chkconfig和systemctl工具来进行管理
[root@localhost ~]# vim /etc/init.d/nginx #在路径中添加一个nginx脚本
#!bin/bash
#chkconfig:- 99 20

[root@localhost ~]# chmod +x /etc/init.d/nginx #添加执行权限
[root@localhost ~]# chkconfig --add nginx #添加为系统服务
[root@localhost ~]# systemctl stop nginx #停止服务
[root@localhost ~]# systemctl restart nginx #启动服务
[root@localhost ~]# /etc/init.d/nginx stop start #启动、停止都可以
5.主配置文件nginx.conf
nginx主配置文件位于/usr/local/nginx/conf/nginx.conf中,包括全局配置、I/O事件配置和http配置,配置语句格式为“关键字 值;”末尾以分号表示结束,#号表示注释
[root@localhost ~]# cd /usr/local/nginx/conf/ #进入配置路径

[root@localhost conf]# vim nginx.conf #进入主配置文件
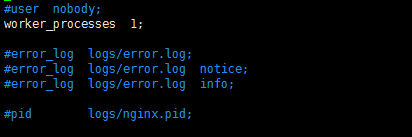
#user nobody; //运行用户,实际是编译时指定的nginx,若编译未指定默认为nobody
Worker_processes 1; //工作进程数,若服务器有多块CPU或多核,可以参考CPU核心总数指定
#error_log logs/error.log; //错误日志文件的位置
#pid logs/nginx.pid; //PID文件位置
6.I/O事件配置
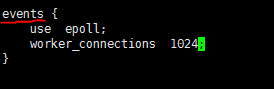
使用events{}界定标记作为nginx的I/O事件响应模型,每个进程的连接数设置,对于2.6及以上版本内核,建议使用epoll模型提高性能,每个进程的连接数根据实际需求来定,一般在10000以下,默认为1024,若工作进程为8,每个进程处理4096个连接,则允许nginx正常提供服务的连接数超过3万个(4096*8=32768),但要看服务器硬件和网络带宽等
7.http配置
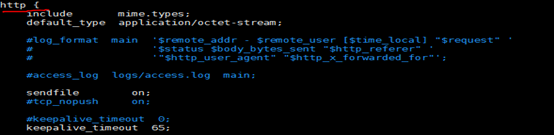
使用http{}界定标记,包括访问日志、HTTP端口、网页目录、默认字符集、连接保持、虚拟web主机和PHP解析等,但其中大部分配置语句都包含在子界定server{}中

上述配置中,listen语句允许同时限定IP地址,采用“IP地址:端口”形式,root语句用来设置特定访问位置的网页文档路径,默认为nginx安装目录下的html;可根据需要改为/var/www/html等其他路径
以上只是个nginx的简单安装讲解。


 636
636


 被折叠的 条评论
为什么被折叠?
被折叠的 条评论
为什么被折叠?
 到【灌水乐园】发言


