


React(二)
一、jsx事件绑定
1.this的绑定方式
1、默认绑定,独立执行:fun(),一般绑定window,严格模式下undefined
2、隐式绑定:被一个对象执行:obj.fun() => obj
3、显式绑定:call / apply / bind,fun.bind('aaa) => String('aaa')
4、new绑定:new Fun(),创建一个实例,this指向实例
还是之前的一些知识点,看一下下面的代码:
const obj = {
    foo: () => {
        console.log(this);
    }
}
const obj2 = {
    onclick : obj.foo
}
obj2.onclick(); //window
这种情况我们是把obj里面的方法赋值给了另一个变量,这样我们调用的话相当于进行了默认绑定,如果上面这段不好理解,那么看看下面的:
const obj = {
    foo: () => {
        console.log(this);
    }
}
let fun = obj.foo
fun(); //window
2.jsx中绑定this的三种方式
以下面这段代码为例:
1、显式绑定this,之前我们了解的都是直接把函数的地址给到点击事件,但是由于es6中的函数默认开启严格模式,this指向undefined,需要手动利用bind改变this指向
2、利用箭头函数找到this。fun2可以以一个变量的形式保存一个箭头函数(在es6中可以省略constructor直接给变量赋值)。如果我们把一个箭头函数的地址绑定给点击事件,那么就不会有this指向问题。(箭头函数没有自己的this,会向上层作用域查找,而上层作用域是类的作用域,指向的当然是类的实例)
3、目前最常用的,直接写箭头函数,点击时触发一个箭头函数的回调,箭头函数可以调用另外一个函数,这样的话就是一个隐式绑定(this.fun3(),那么fun3里的this当然指向的也是类的实例),解决了this指向的问题。
class App extends React.Component {
    constructor() {
        super();
        this.state = {
            count: 0,
        }
    }

    fun1() {
        console.log(this);
    }

    fun2 = () => {
        console.log(this);
    }

    fun3() {
        console.log(this);
    }

    render() {
        let { count } = this.state;
        return (
            <div>
	            {/*1.显式绑定this*/}
	            <h2 onClick={this.fun1.bind(this)}>fun1</h2>
	            {/*2.利用箭头函数找到this*/}
	            <h2 onClick={this.fun2}>fun2</h2>
	            {/*3.直接写箭头函数,箭头函数调用回调*/}
	            <h2 onClick={() => console.log(this)}>fun3</h2>
	            <h2 onClick={() => this.fun3()}>fun4</h2>
            </div>
        )
    }
}
root.render(<App />);
3.事件对象和传参
(1)事件对象怎么传
让我们分别看一下这2个绑定事件的按钮:
按钮1:通过bind绑定this,这样的话会默认传一个事件对象event过去,直接就能输出
按钮2:通过箭头函数的话,需要手动传参数过去,默认传的就是event
const root = ReactDOM.createRoot(document.querySelector('#root'));
class App extends React.Component {
    btnClick(e) {
        console.log('e', e);
    }

    render() {
        return (
            <div>
                <button onClick={this.btnClick.bind(this)}>点击奥里给</button>
                <button onClick={(e) => this.btnClick(e)}>箭头函数</button>
            </div>
        )
    }
}
root.render(<App />);
(2)其他参数怎么传?
同样是两种方法,看一下下面两个按钮:
按钮1:通过bind绑定this,传入参数,这里有个大坑,那就是bind后面传的两个参数,传过去会默认放在前两个参数位置,事件对象e就会放在第三个位置,接的时候就是('zzy', 18, 事件对象),这样的话参数就会比较乱,就成了e对应zzy了,这可不行。
按钮2:使用箭头函数传递其他参数,这样的话参数不会乱,比较合适,按顺序传,按顺序接就欧了。但是这里要注意一个问题,就是这个事件对象的参数,如果箭头函数没有传e,那么就不用接收e,形参和实参一一对应就行了;而如果用上面那个按钮1,会自动传事件对象e,这个时候如果传了其他参数,会默认放在参数前几位,事件对象放最后(上面提到了)。
const root = ReactDOM.createRoot(document.querySelector('#root'));
class App extends React.Component {
    btnClick(e, name, age) {
        console.log('e', e);
        console.log('name', name);
        console.log('age', age);
    }

    render() {
        return (
            <div>
                <button onClick={this.btnClick.bind(this, 'zzy', 18)}>bind传参</button>
                <button onClick={(e) => this.btnClick(e, 'zzy', 18)}>箭头函数传参</button>
            </div>
        )
    }
}
root.render(<App />);
二、条件渲染
在vue中,我们使用v-if或v-show进行条件渲染,但是在React中,我们可以直接用原生js语法进行条件渲染,这里提出三种方式:
1.直接if-else
直接在外面定义变量,根据不同情况返回不同的dom结构
constructor() {
    super();
    this.state = {
        isLogin: false,
        friend: {
            name: 'zzy',
        }
    }
}

render() {
    let { isLogin } = this.state;
    let dom = null;
    if (isLogin) {
        dom = <div>登录成功!</div>
    } else {
        dom = <button>重新登录</button>
    }

    return (
        <div>
            {/*1.if-else条件渲染*/}
            <h2>{dom}</h2>
        </div>
    )
}
2.三元表达式
直接通过三元表达式展示不同的dom
constructor() {
    super();
    this.state = {
        isLogin: false,
    }
}

render() {
    let { isLogin} = this.state;
    return (
        <div>
            {/*2.三元运算符*/ }
            <h2>{isLogin ? '登录成功!' : <button>重新登录</button>}</h2>
        </div>
    )
}
3.利用逻辑中断
一般我们从后台获取数据时,就会使用逻辑中断,如果有数据就向后执行,没有数据就不展示。
constructor() {
    super();
    this.state = {
        friend: {
            name: 'zzy',
            description: '我很帅'
        }
    }
}

render() {
    let { friend } = this.state;

    return (
        <div>
            {/*3.逻辑中断,如果后台没有请求到数据就不执行后面的显示*/ }
            <h2>{friend && `我叫${friend.name},${friend.description}`}</h2>
        </div>
    )
}
4.案例练习
点击显示隐藏文本,用if-else实现。
constructor() {
    super();
    this.state = {
        isShow: true,
    }
}

showDom() {
    console.log(this.state.isShow)
    this.setState({
        isShow: !this.state.isShow
    })
}

render() {
    let { isShow } = this.state;
    let message = null;
    if (isShow) {
        message = 'Dj Drop the beat';
    }

    return (
        <div>
            <button onClick={() => this.showDom()}>点击显示隐藏</button>
            <h2>{message}</h2>
        </div>
    )
}
用三元运算符或逻辑中断实现
return (
	 <div>
	     <button onClick={() => this.showDom()}>点击显示隐藏</button>
	     {/*1.用if-else实现*/}
	     <h2>{message}</h2>
	     {/*2.用三元运算符实现*/}
	     <h2>{isShow ? 'Dj drop the beat' : ''}</h2>
	     {/*3.用逻辑中断*/}
	     <h2>{isShow && 'Dj drop the beat'}</h2>
	 </div>
)
5.模拟v-show的实现
v-show主要是控制display属性,我们只要控制display属性动态变化就可以了。
<h2 style={{ display: isShow ? 'block' : 'none' }}>模拟v-show</h2>
三、列表渲染
列表渲染和vue中的v-for不同,主要用的是数组中的map这个api,同时可以结合filter、slice去使用。
使用:我们展示的时候,展示数组就可以了,通过map给数组包一些标签。一般来说会包一个单独的组件。这里要注意map中这个返回标签的话,返回的东西要和return写在一行(比如这个括号),不然默认就return跳出去了(我踩的坑)
constructor() {
    super();
    this.state = {
        student: [
            { id: 1, name: 'zzy', age: 18, sex: '男' },
            { id: 2, name: 'ht', age: 16, sex: '女' },
            { id: 3, name: '张学良', age: 118, sex: '男' },
            { id: 4, name: '杨虎城', age: 18, sex: '女' },
        ]
    }
}

render() {
    let { student } = this.state;
    return (
        <div>
            {student.filter(item => item.age < 20).slice(0,2).map(item => {
                return (
                <div className='active' key={item.id}>
                    <h5>姓名:{item.name}</h5>
                    <h5>年龄:{item.age}</h5>
                    <h5>性别:{item.sex}</h5>
                </div>
                )
            })}
        </div>
    )
}
其中key的唯一标识和vue中原理差不多。
四、jsx的本质
1.babel如何转换
实际上,jsx 仅仅只是 React.createElement(component, props, ...children) 函数的语法糖。
所有的jsx最终都会被转换成React.createElement的函数调用。怎么理解这句话呢?
createElement需要传递三个参数:
- 参数一:type标签
当前ReactElement的类型;
如果是标签元素,那么就使用字符串表示 “div”;
如果是组件元素,那么就直接使用组件的名称; - 参数二:config属性
所有jsx中的属性都在config中以对象的属性和值的形式存储 - 参数三:children子元素
存放在标签中的内容,以children数组的方式进行存储;
当然,如果是多个元素呢?React内部有对它们进行处理.
所以说其实jsx就是帮助我们调用函数创建虚拟DOM,方便我们编写代码的,比如render中如果我们写下面这段代码:
<div>
    <h2>{count}</h2>
    <ul className='active'>
        <li>我是li1</li>
        <li>我是li2</li>
        <li>我是li3</li>
    </ul>
    <button>按钮</button>
</div>
经过babel转译会变成:
<script>
    /*#__PURE__*/React.createElement("div", null, /*#__PURE__*/

    React.createElement("h2", null, count),

     /*#__PURE__*/React.createElement("ul", {className: "active"},
      /*#__PURE__*/React.createElement("li", null, "\u6211\u662Fli1"),
       /*#__PURE__*/React.createElement("li", null, "\u6211\u662Fli2")),

     /*#__PURE__*/React.createElement("button", null, "\u6309\u94AE"));
</script>
这样的话不用babel,我们也可以在页面展示标签,所以jsx就是个语法糖。
2.虚拟DOM的生成
上面的React.createElement 最终创建出来的是一个对象,这个对象组成一个js对象树,就是虚拟DOM

虚拟DOM帮助我们从命令式编程转到了声明式编程的模式,不会去频繁操作DOM,提升更新效率。
五、购物车案例
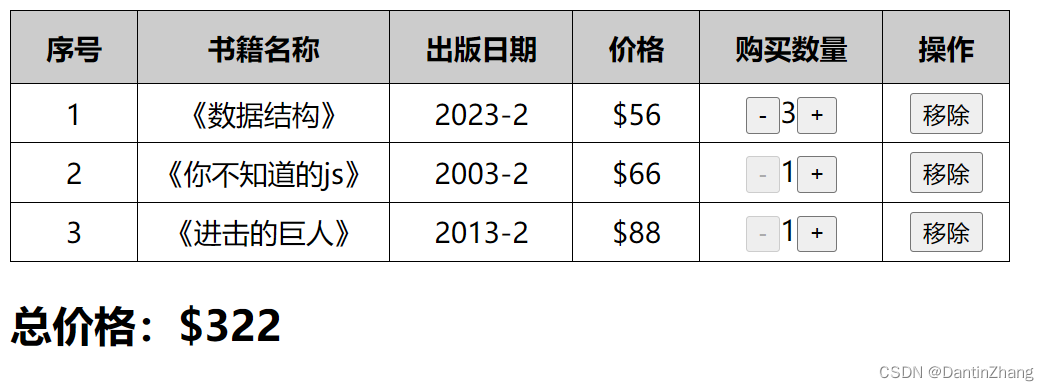
实现上面这个小玩意儿:
<div id="root"></div>
<script type="text/babel">
    const root = ReactDOM.createRoot(document.querySelector('#root'));
    class App extends React.Component {
        constructor() {
            super();
            this.state = {
                books: [
                    {
                        id: 1,
                        name: '《数据结构》',
                        date: '2023-2',
                        price: 56.00,
                        count: 3
                    },
                    {
                        id: 2,
                        name: '《你不知道的js》',
                        date: '2003-2',
                        price: 66.00,
                        count: 1
                    },
                    {
                        id: 3,
                        name: '《进击的巨人》',
                        date: '2013-2',
                        price: 88.00,
                        count: 1
                    },
                ],
            }
        }

        //点击加号或减号,加号传1减号传-1
        changeCount(index, count) {
            //1.对原来的数组进行浅拷贝(内部元素地址还是指向原来)
            const newBooks = [...this.state.books];
            //2.修改浅拷贝后的里面的值
            newBooks[index].count += count;
            //3.此时我们输出books会发现boosk里面对应的值也变了
            console.log(this.state.books[index].count);
            //4.最后调用setState执行render函数更新视图,把newBooks给它(React官方推荐做法)
            this.setState({
                books: newBooks,
            })
        }

        //删除某行数据
        deleteOne(index) {
            console.log(index);
            const newBooks = [...this.state.books];
            newBooks.splice(index,1);
            //操作是一样的,不同的是这里删除不会对books产生影响,因为是浅拷贝
            console.log(this.state.books);//删除某整个对象,books是不变的
            this.setState({
                books: newBooks,
            })
        }

        render() {
            let { books } = this.state;
            let totalPrice = 0;
            books.forEach(book => {
                totalPrice += book.price * book.count;
            });
            return (
                <div>
                    <table>
                        <thead>
                            <tr>
                                <th>序号</th>
                                <th>书籍名称</th>
                                <th>出版日期</th>
                                <th>价格</th>
                                <th>购买数量</th>
                                <th>操作</th>
                            </tr>
                        </thead>
                        <tbody>
                            {books.map((book,index) => {
                                return (
                                    <tr key={book.id}>
                                        <td>{book.id}</td>
                                        <td>{book.name}</td>
                                        <td>{book.date}</td>
                                        <td>{'$' + book.price}</td>
                                        <td>
                                            <button disabled={book.count == 1}
                                            onClick={() => this.changeCount(index,-1)}>-</button>
                                            {book.count}
                                            <button onClick={() => this.changeCount(index,1)}>+</button>
                                        </td>
                                        <td><button onClick={() => this.deleteOne(index)}>移除</button></td>
                                    </tr>
                                )
                            })}
                        </tbody>
                    </table>
                    <h2>总价格:{'$' + totalPrice}</h2>
                </div>
            )
        }
    }
    root.render(<App />);
</script>
总体来说逻辑并不难,主要是涉及到几个地方:
1、总价的计算
2、点击加号和减号改变该行数据
3、点击删除就去掉该行数据
4、没有数据时给用户提示
1.总价的计算
这个搞过很多次了,没什么说的,就是渲染时声明变量,然后遍历求出数量*单价的总和。
let totalPrice = 0;
books.forEach(book => {
    totalPrice += book.price * book.count;
});
2.点击加号和减号
这里加减逻辑类似,所以可以封装到一个函数中,参数输了索引之外,还要传入是+1还是-1。
这里的逻辑比较有意思,因为我们不能直接去修改state中的数据,我们要借助调用setState这个方法去修改,从而可以执行render函数更新页面。
React官方推荐的做法是使用一个新的变量浅拷贝原来的数据,然后修改结束之后把新的浅拷贝赋值给state中数据
//点击加号或减号,加号传1减号传-1
changeCount(index, count) {
    //1.对原来的数组进行浅拷贝(内部元素地址还是指向原来)
    const newBooks = [...this.state.books];
    //2.修改浅拷贝后的里面的值
    newBooks[index].count += count;
    //3.此时我们输出books会发现boosk里面对应的值也变了
    console.log(this.state.books[index].count);
    //4.最后调用setState执行render函数更新视图,把newBooks给它(React官方推荐做法)
    this.setState({
        books: newBooks,
    })
}
3.删除某行数据
删除和修改的逻辑是类似的,不过修改是修改对象中某个属性,由于浅拷贝拷贝的是地址,所以修改对象中的属性,那么books和newBooks都会变。但是直接删除其中某个对象,对于浅拷贝来说,books是不会变的。
//删除某行数据
deleteOne(index) {
    console.log(index);
    const newBooks = [...this.state.books];
    newBooks.splice(index,1);
    //操作是一样的,不同的是这里删除不会对books产生影响,因为是浅拷贝
    console.log(this.state.books);//删除某整个对象,books是不变的
    this.setState({
        books: newBooks,
    })
}
4.没有数据时给用户提示
条件渲染,做法有很多,比如之前的if-else。这里我们可以搞两个函数,分别返回有数据和么有数据的DOM,然后在render函数中通过三元表达式决定调用哪个函数。总体的代码是这样的:
<div id="root"></div>
<script type="text/babel">
    const root = ReactDOM.createRoot(document.querySelector('#root'));
    class App extends React.Component {
        constructor() {
            super();
            this.state = {
                books: [......],
            }
        }
        ......

        renderData() {
            let {books} = this.state;
            let totalPrice = 0;
            books.forEach(book => {
                totalPrice += book.price * book.count;
            });
            return(
                <div>
                    <table>
                        <thead>
                            <tr>
                                <th>序号</th>
                                <th>书籍名称</th>
                                <th>出版日期</th>
                                <th>价格</th>
                                <th>购买数量</th>
                                <th>操作</th>
                            </tr>
                        </thead>
                        <tbody>
                            {books.map((book, index) => {
                                return (
                                    <tr key={book.id}>
                                        <td>{book.id}</td>
                                        <td>{book.name}</td>
                                        <td>{book.date}</td>
                                        <td>{'$' + book.price}</td>
                                        <td>
                                            <button disabled={book.count == 1}
                                                onClick={() => this.changeCount(index, -1)}>-</button>
                                            {book.count}
                                            <button onClick={() => this.changeCount(index, 1)}>+</button>
                                        </td>
                                        <td><button onClick={() => this.deleteOne(index)}>移除</button></td>
                                    </tr>
                                )
                            })}
                        </tbody>
                    </table>
                    <h2>总价格:{'$' + totalPrice}</h2>
                </div>
            )
        }

        renderNoData() {
            return <h2>没有数据,去买点东西吧tmd</h2>
        }
        render() {
            let { books } = this.state;
            return books.length ? this.renderData() : this.renderNoData();
        }
    }
    root.render(<App />);
</script>


 1万+
1万+


 被折叠的 条评论
为什么被折叠?
被折叠的 条评论
为什么被折叠?
 到【灌水乐园】发言


