


 本文详细介绍了使用PyTorch实现的UNet模型,包括其结构(如DoubleConv、Down、Up和OutConv),以及如何通过use_checkpointing技术进行梯度检查点优化内存使用。着重解读了网络的搭建过程和关键模块的实现。
本文记录自己的学习过程,内容包括:
代码解读:Pytorch-UNet
深度学习编程基础:Pytorch-深度学习(新手友好)
UNet论文解读:医学图像分割:U_Net 论文阅读
数据:https://hackernoon.com/hacking-gta-v-for-carvana-kaggle-challenge-6d0b7fb4c781
完整代码解读详见:U-Net代码复现–更新中

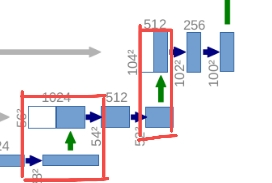
网络搭建的完整代码如下:
其中DoubleConv,Down,Up,OutConv的具体实现在后文中详细说明了
use_checkpointing:提供了实现梯度检查点(也称为checkpointing)的功能。这个技术主要用于训练时内存优化,它允许我们以计算时间为代价,减少训练深度网络时的内存占用。(具体使用方法详见:Pytorch:torch.utils.checkpoint())
class UNet(nn.Module):
    def __init__(self, n_channels, n_classes, bilinear=False):
        super(UNet, self).__init__()
        self.n_channels = n_channels
        self.n_classes = n_classes
        self.bilinear = bilinear

        self.inc = (DoubleConv(n_channels, 64))
        self.down1 = (Down(64, 128))
        self.down2 = (Down(128, 256))
        self.down3 = (Down(256, 512))
        factor = 2 if bilinear else 1
        self.down4 = (Down(512, 1024 // factor))
        self.up1 = (Up(1024, 512 // factor, bilinear))
        self.up2 = (Up(512, 256 // factor, bilinear))
        self.up3 = (Up(256, 128 // factor, bilinear))
        self.up4 = (Up(128, 64, bilinear))
        self.outc = (OutConv(64, n_classes))

    def forward(self, x):
        x1 = self.inc(x)
        x2 = self.down1(x1)
        x3 = self.down2(x2)
        x4 = self.down3(x3)
        x5 = self.down4(x4)
        x = self.up1(x5, x4)
        x = self.up2(x, x3)
        x = self.up3(x, x2)
        x = self.up4(x, x1)
        logits = self.outc(x)
        return logits

    def use_checkpointing(self):
        self.inc = torch.utils.checkpoint(self.inc)
        self.down1 = torch.utils.checkpoint(self.down1)
        self.down2 = torch.utils.checkpoint(self.down2)
        self.down3 = torch.utils.checkpoint(self.down3)
        self.down4 = torch.utils.checkpoint(self.down4)
        self.up1 = torch.utils.checkpoint(self.up1)
        self.up2 = torch.utils.checkpoint(self.up2)
        self.up3 = torch.utils.checkpoint(self.up3)
        self.up4 = torch.utils.checkpoint(self.up4)
        self.outc = torch.utils.checkpoint(self.outc)
DoubleConv模块
import torch
import torch.nn as nn
import torch.nn.functional as F


class DoubleConv(nn.Module):
    """(convolution => [BN] => ReLU) * 2"""

    def __init__(self, in_channels, out_channels, mid_channels=None):
        super().__init__()
        if not mid_channels:
            mid_channels = out_channels
        self.double_conv = nn.Sequential(
            nn.Conv2d(in_channels, mid_channels, kernel_size=3, padding=1, bias=False),
            nn.BatchNorm2d(mid_channels),
            nn.ReLU(inplace=True),
            nn.Conv2d(mid_channels, out_channels, kernel_size=3, padding=1, bias=False),
            nn.BatchNorm2d(out_channels),
            nn.ReLU(inplace=True)
        )

    def forward(self, x):
        return self.double_conv(x)
- in_channels : 指的是输入特征层的channels
- out_channels: 指的是经过DoubleConv层后输出特征层的channels
- mid_channels: 指第一个卷积层输出的channels
通过父类的构造函数搭建DoubleConv,其中Conv2d的Kernel=3,padding=1,设置padding=1经过卷积后不会改变特征层的大小,这也是现在主流的实现方式
由于会使用到BN,因此将bias设置为Flase
Down模块
Down模块包括下采样(MaxPool) + 2个Conv2d。
class Down(nn.Module):
    """Downscaling with maxpool then double conv"""

    def __init__(self, in_channels, out_channels):
        super().__init__()
        self.maxpool_conv = nn.Sequential(
            nn.MaxPool2d(2),
            DoubleConv(in_channels, out_channels)
        )

    def forward(self, x):
        return self.maxpool_conv(x)
UP模块
UP模块包含:上采样(w,h翻倍)+concat拼接+2个Conv2d。
代码中F.pad:可以自由地添加不同数量的填充到输入张量的任意边界。
具体使用方法详见:Pytorch:torch.nn.functional.pad()
class Up(nn.Module):
    """Upscaling then double conv"""

    def __init__(self, in_channels, out_channels, bilinear=True):
        super().__init__()

        # if bilinear, use the normal convolutions to reduce the number of channels
        if bilinear:
        	# 转置卷积进行上采样
            self.up = nn.Upsample(scale_factor=2, mode='bilinear', align_corners=True)
            self.conv = DoubleConv(in_channels, out_channels, in_channels // 2)
        else:
        	# 采用双线性插值进行上采样
            self.up = nn.ConvTranspose2d(in_channels, in_channels // 2, kernel_size=2, stride=2)
            self.conv = DoubleConv(in_channels, out_channels)

    def forward(self, x1, x2):
        x1 = self.up(x1)
        # input is CHW
        diffY = x2.size()[2] - x1.size()[2]
        diffX = x2.size()[3] - x1.size()[3]

        x1 = F.pad(x1, [diffX // 2, diffX - diffX // 2,
                        diffY // 2, diffY - diffY // 2])

        x = torch.cat([x2, x1], dim=1)
        return self.conv(x)
- bilinear=True:表示默认情况下是会使用双线性差值
- in_channels :指的是concat拼接后的channels,或者是up这个模块第一个卷积输入的channels
如果bilinear=False, 则使用论文中提到的转置卷积进行上采样,长宽翻倍,channels会减半,此时DoubleConv(in_channels,out_channels) 中mid_channels和out_channels是一样的。因为在原论文中这两个卷积的channels是一样的。
如果bilinear=True,采用双线性插值进行上采样(经过双线性插值自身不会改变channels),上采样后面跟着的两个卷积的channels是不一样的,比如通过第一个卷积后channels会减半,通过第二个卷积后,channels又会减半。这样做的目的是为了经过双线性插值后得到的channels和要concat拼接的特征层的channels保持一致。
首先我们需要对x1进行上采样x1=self.up(x1)得到采样之后的特征层,按理说可以直接通过concat拼接,将两个特征层在我们的channels维度进行拼接就可以了。然后再通过两个卷积层得到我们的特征输出。
但是这里作者有多做了一步,对上采样之后的x1进行了padding(目的是为了防止我们输入的图片如果不是16的整数倍的话,通过下采样得到的x1与我们要拼接的x2的高度和宽度是不一致的)。
在unet的搭建过程下采样了4次(也就是16倍),如果高和宽不是16的整数倍,那么在下采样的过程中,可能面临着向下取整的情况。比如在某个位置特征层大小是7x7的,经过下采样它的高和宽就变为3x3了,在通过上采样是6x6,很明显与7x7的特征层就无法拼接了。为了防止出现该问题,对x1进行了padding,padding之后就能保住x1和x2的高和宽是一致的了,这样就可以进行concat拼接了。
OutConv 模块
OutConv对应的是最后一个1x1的卷积层,通过1x1的卷积层得到最终的输出。
注:这里1x1的卷积没有BN和ReLU激活函数。
class OutConv(nn.Module):
    def __init__(self, in_channels, out_channels):
        super(OutConv, self).__init__()
        self.conv = nn.Conv2d(in_channels, out_channels, kernel_size=1)

    def forward(self, x):
        return self.conv(x)


 被折叠的 条评论
为什么被折叠?
被折叠的 条评论
为什么被折叠?
 到【灌水乐园】发言


