


一、playbook 的简介
-
playbook是 一个不同于使用Ansible命令行执行方式的模式,其功能更强大灵活。
-
简单来说,playbook是一个非常简单的配置管理和多主机部署系统,
-
不同于任何已经存在的模式,可作为一个适合部署复杂应用程序的基础。
-
Playbook可以定制配置,可以按照指定的操作步骤有序执行,支持同步和异步方式。
-
我们完成一个任务,例如安装部署一个httpd服务,我们需要多个模块(一个模块也可以称之为task)提供功能来完成。
-
而playbook就是组织多个task的容器,他的实质就是一个文件,有着特定的组织格式,它采用的语法格式是YAML(Yet Another Markup Language)。
二、playbooks 组成
(1)Tasks:任务,即通过 task 调用 ansible 的模板将多个操作组织在一个 playbook 中运行
(2)Variables:变量
(3)Templates:模板
(4)Handlers:处理器,当changed状态条件满足时,(notify)触发执行的操作
(5)Roles:角色
三、基础的playbook剧本编写实例
playbook中运用的模块就是ansible中的模块,就像docker-compose一样将docker操作容器的指令归纳为一个yaml文件,开启运行yaml中的指令模块就能按照预设计的方向去完成。
实例1:playbook编写 apache的yum安装部署剧本
剧本编写实现的需求:对Ansible管理的所有的webservers组的成员,yum安装最新版本的apache服务软件,并进行相应环境的调整,确保webservers的apache服务能够正常运行并设置开机自启
cd /etc/ansible    #在ansible的所在目录中创建该项目的目录
mkdir apache
vim apache.yaml
---
- name: apache yum apply
  gather_facts: false
  hosts: webservers
  remote_user: root
  tasks:
   - name: test connection
     ping:

   - name: stop firewalld
     service: name=firewalld state=stopped

   - name: stop selinux
     command: '/usr/sbin/setenforce 0'
     ignore_errors: true

   - name: yum install apache service
     yum: name=httpd state=latest

   - name: start apache service
     service: name=httpd state=started enabled=yes
运行剧本的方法:
//运行playbook
ansible-playbook apache.yaml


//补充参数:
-k(–ask-pass):用来交互输入ssh密码
-K(-ask-become-pass):用来交互输入sudo密码
-u:指定用户
ansible-playbook apache.yaml --syntax-check    #检查yaml文件的语法是否正确
ansible-playbook apache.yaml --list-task       #检查tasks任务
ansible-playbook apache.yaml --list-hosts      #检查生效的主机
ansible-playbook apache.yaml --start-at-task='install httpd'     #指定从某个task开始运行

//示例:
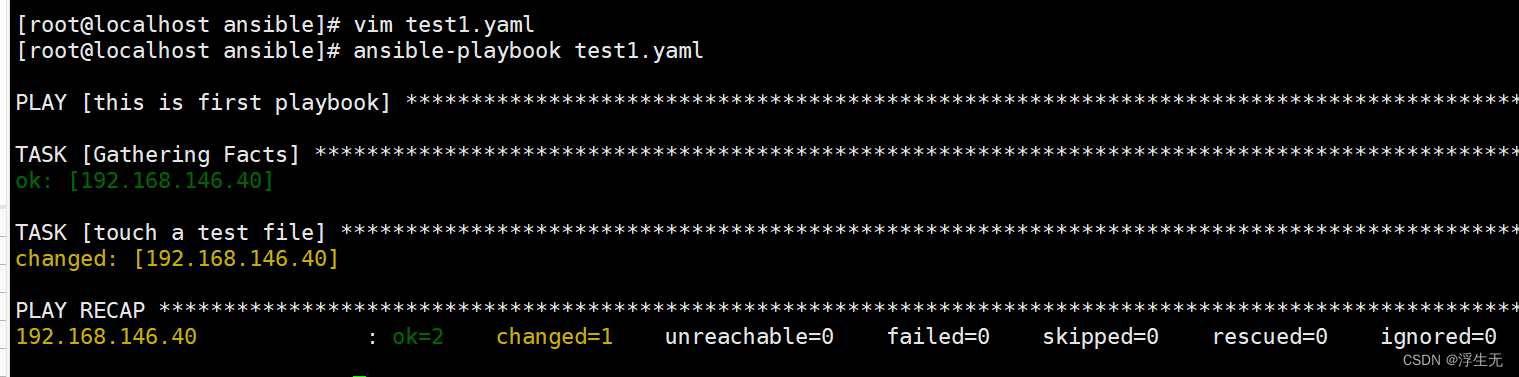
vim test1.yaml
--- #yaml文件以---开头,以表明这是一个yaml文件,可省略
- name: first play #定义一个play的名称,可省略
gather_facts: false #设置不进行facts信息收集,这可以加快执行速度,可省略
hosts: webservers #指定要执行任务的被管理主机组,如多个主机组用冒号分隔
remote_user: root #指定被管理主机上执行任务的用户
tasks: #定义任务列表,任务列表中的各任务按次序逐个在hosts中指定的主机上执行
- name: test connection #自定义任务名称
ping: #使用 module: [options] 格式来定义一个任务
- name: disable selinux
command: '/sbin/setenforce 0' #command模块和shell模块无需使用key=value格式
ignore_errors: True #如执行命令的返回值不为0,就会报错,tasks停止,可使用ignore_errors忽略失败的任务
- name: disable firewalld
service: name=firewalld state=stopped #使用 module: options 格式来定义任务,option使用key=value格式
- name: install httpd
yum: name=httpd state=latest
- name: install configuration file for httpd
copy: src=/opt/httpd.conf dest=/etc/httpd/conf/httpd.conf #这里需要一个事先准备好的/opt/httpd.conf文件
notify: "restart httpd" #如以上操作后为changed的状态时,会通过notify指定的名称触发对应名称的handlers操作
- name: start httpd service
service: enabled=true name=httpd state=started
handlers: #handlers中定义的就是任务,此处handlers中的任务使用的是service模块
- name: restart httpd #notify和handlers中任务的名称必须一致
service: name=httpd state=restarted
##Ansible在执行完某个任务之后并不会立即去执行对应的handler,而是在当前play中所有普通任务都执行完后再去执行handler,这样的好处是可以多次触发notify,但最后只执行一次对应的handler,从而避免多次重启。playbook的定义、引用变量
基础变量的定义与引用
在yaml文件中,我们可以在初始配置的模块中用var去定义变量的存在,变量的格式为key:value,以此来确定该变量在剧本中的存在
---
- name: this is first playbook
  hosts: dbservers
  remote_user: root
  vars:
   filename: abc txt
  tasks:
   - name: touch a test file
     file: path=/opt/{{filename}} state=touch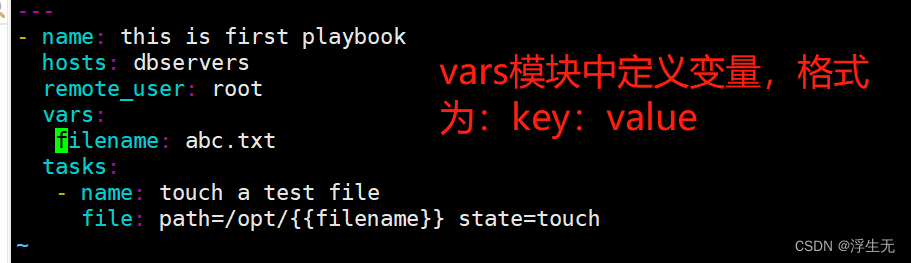

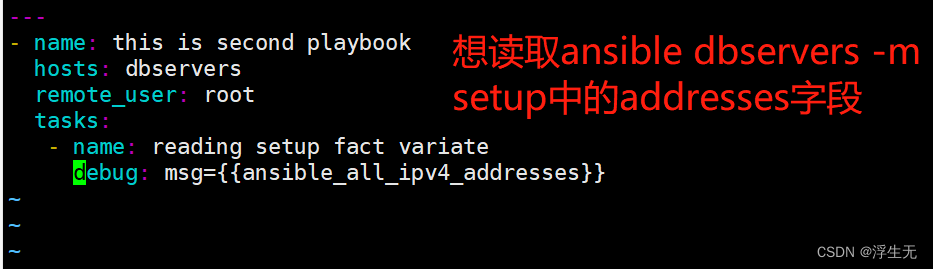
引用fact信息中的变量
首先我们知道 使用 ansible 组 -m setup 可以收集该组中所有的节点信息 ,
所以setup中fact'信息,有时候会剧本编写中需要,而fact的信息也是可以通过变量的方式进行调用
---
- name: this is second playbook
hosts: dbservers
remote_user: root
tasks:
- name: reading setup fact variate
debug: msg={{ansible_all_ipv4_addresses}}

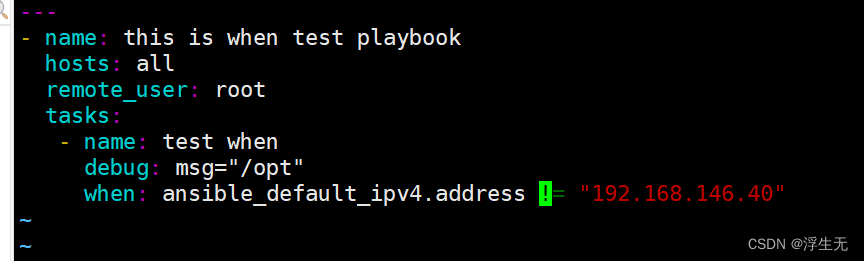
playbook中的when条件判断和变量循环使用
when条件判断
在Ansible中,提供的唯一一个通用的条件判断是when指令,
当when指令的值为true时,则该任务执行,否则不执行该任务。

//when一个比较常见的应用场景是实现跳过某个主机不执行任务或者只有满足条件的主机执行任务


#选用filter=ansible_default_ipv4中的address作为when条件进行测试
ansible all -m setup -a 'filter=ansible_default_ipv4'


---
- name: this is when test playbook
  hosts: all
  remote_user: root
  tasks:
   - name: test when
     debug: msg="判断位置"
     when: ansible_default_ipv4.address == "192.168.146.40"

除此之外 when条件还可以通过 !=(不等于条件来进行判断)

变量循环
with_item 单循环输出
---
- name: item test
  hosts: dbservers
  remote_user: root
  gather_facts: no
  tasks:
   - debug:
       msg: "{{item}}"
     with_items: [a, b, c, d]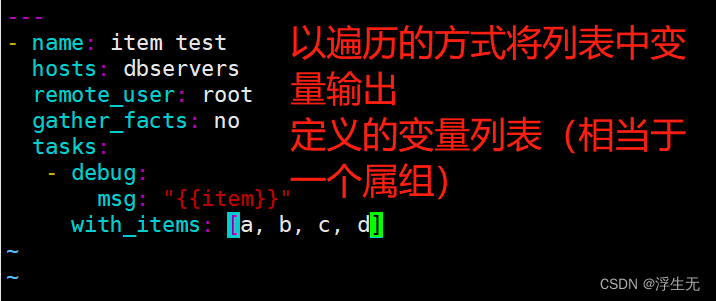
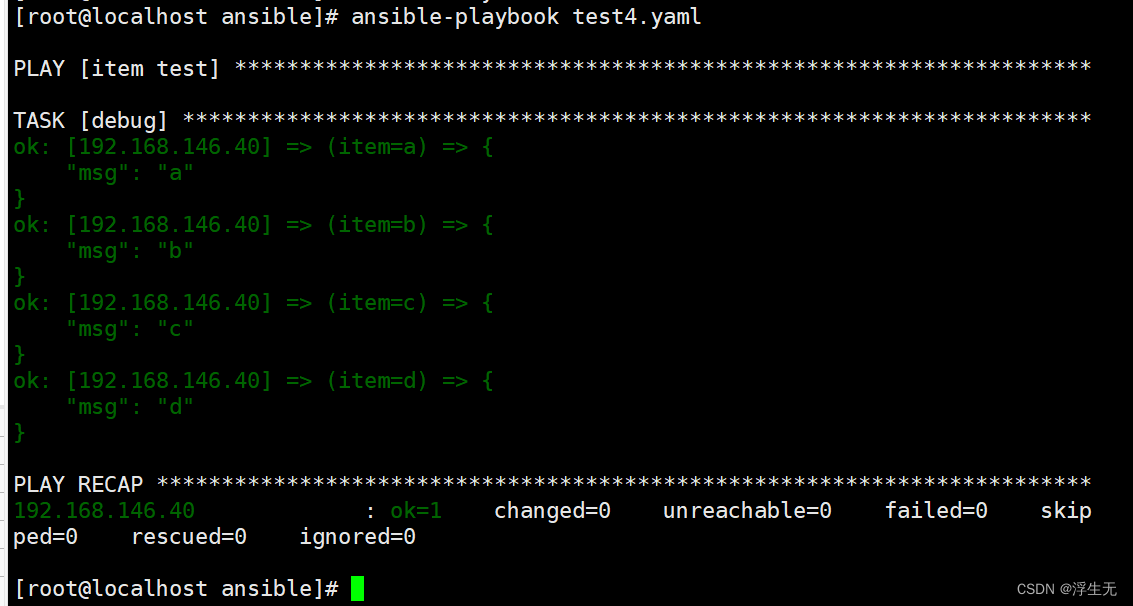
当列表为两个时。with_item的输出方式
- name: item test
  hosts: dbservers
  remote_user: root
  gather_facts: no
  tasks:
   - debug:
       msg: "{{item}}"
     with_items:
      - [a, b, c, d]
- [1, 2, 3, 4] 

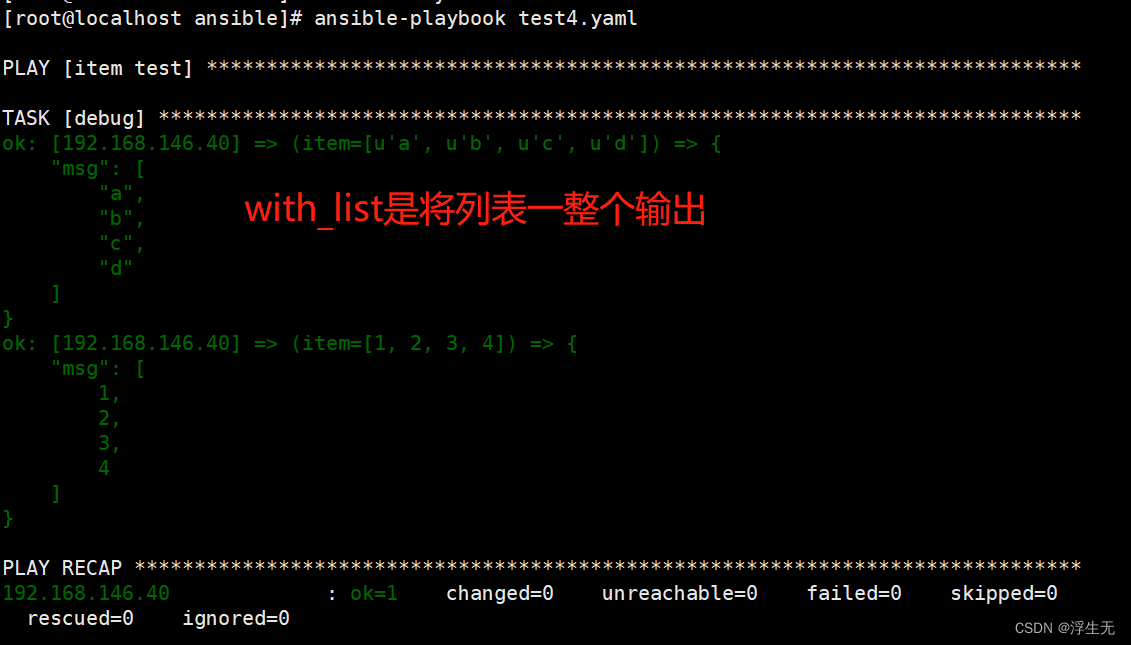
with_list 每组列表一起循环的输出
- name: item test
  hosts: dbservers
  remote_user: root
  gather_facts: no
  tasks:
   - debug:
       msg: "{{item}}"
     with_list:
      - [a, b, c, d]
      - [1, 2, 3, 4]
~ 
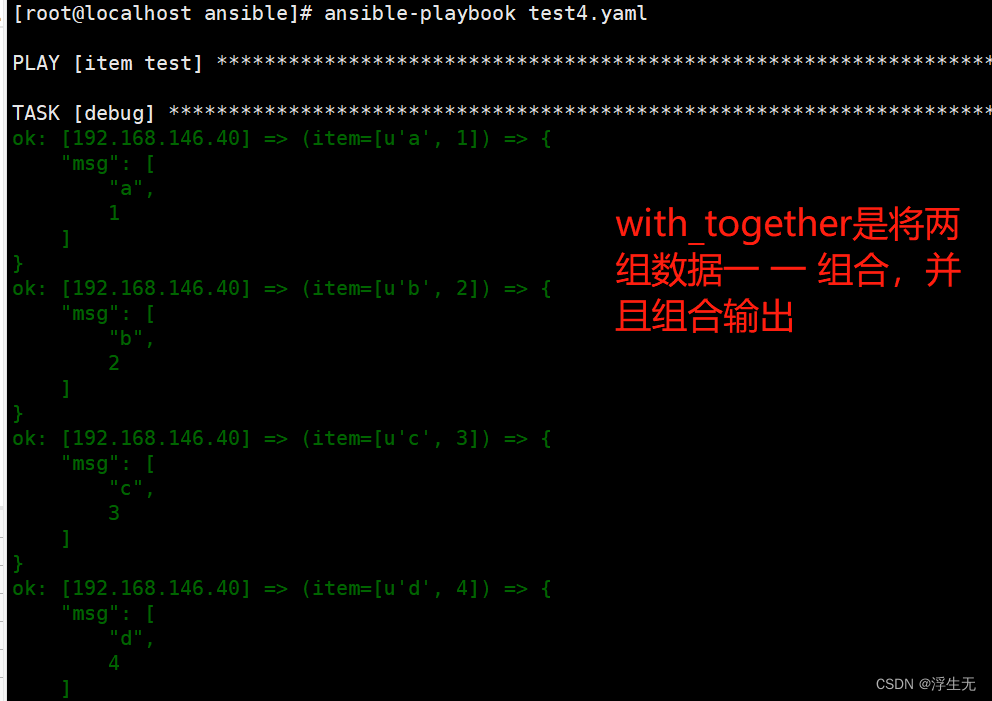
with_together 同一列表位置数据组合输出的循环
---
- name: item test
  hosts: dbservers
  remote_user: root
  gather_facts: no
  tasks:
   - debug:
       msg: "{{item}}"
     with_together:
      - [a, b, c, d]
- [1, 2, 3, 4] 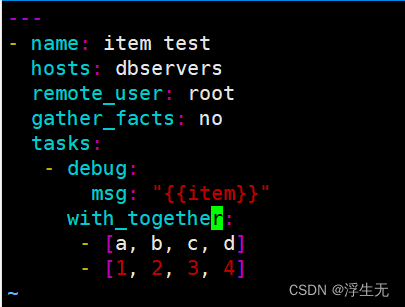
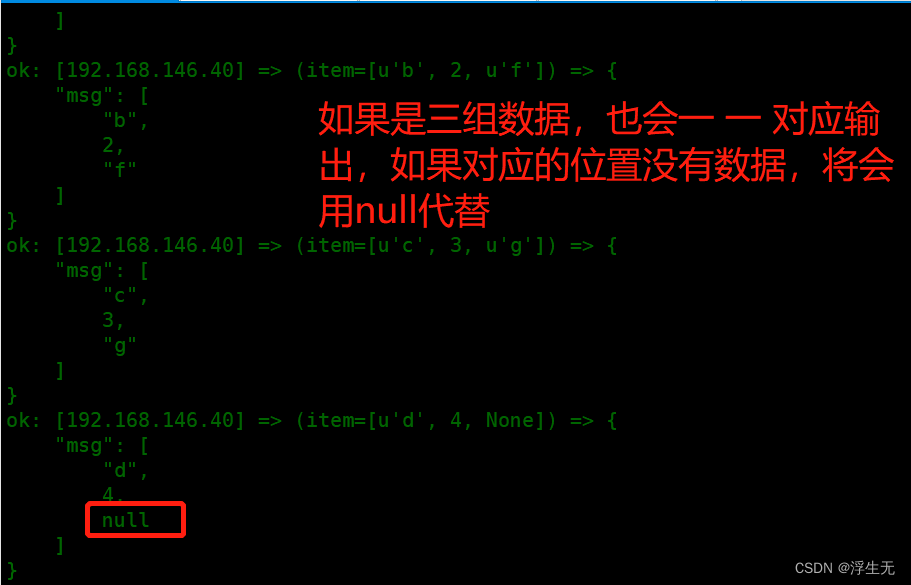
---
- name: item test
  hosts: dbservers
  remote_user: root
  gather_facts: no
  tasks:
   - debug:
       msg: "{{item}}"
     with_together:
      - [a, b, c, d]
      - [1, 2, 3, 4]
      - [e, f, g]
~ 
with_nested 列表数据循环匹配的循环(根据列表个数定义有多少层的循环)
---
- name: item test
  hosts: dbservers
  remote_user: root
  gather_facts: no
  tasks:
   - debug:
       msg: "{{item}}"
     with_nested:
      - [a, b, c, d]
      - [1, 2, 3, 4]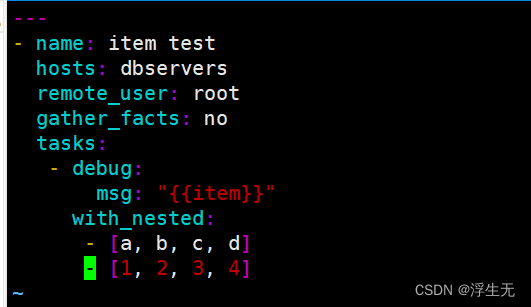

四种迭代循环方式的总结
whith_items: {{item}}会把所有的列表展开进行遍历输出,with_flattened也可以替代with_items
with_list: {{item}}会把每个列表当作一个整体输出。如果每个列表中只有一个值,则效果与with items一致。loop也可以替代ith
with_together: {{item}}引用时会把每个列表相同位置的值对齐合并后输出
with nested:{ {item}}引用时会把每个列表的值两两组合循环输出
Templates 模块
inja是基于Python的模板引擎。Template类是Jinja的一个重要组件,可以看作是一个编译过的模板文件,用来产生目标文本,传递Python的变量给模板去替换模板中的标记。
本次我们以改变apche的配置文件为例,来展现Templates模块的运用
先准备一个以 .j2 为后缀的 template 模板文件,设置引用的变量
#如果没有相关的httpd的配置文件,可以先yum按住一个httpd的服务,取其主配置文件
cp /etc/httpd/conf/httpd.conf /opt/httpd.conf.j2
vim /opt/httpd.conf.j2
Listen {{http_port}} #42行,修改
ServerName {{server_name}} #95行,修改
DocumentRoot "{{root_dir}}" #119行,修改


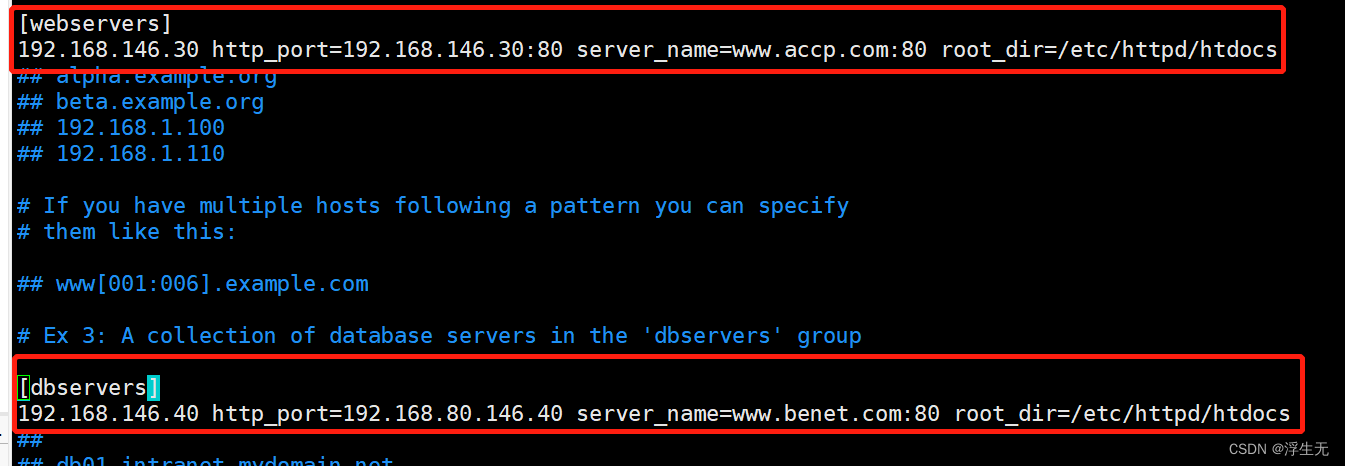
修改主机清单文件,使用主机变量定义一个变量名相同,而值不同的变量
vim /etc/ansible/hosts
[webservers]
192.168.146.30 http_port=192.168.146.30:80 server_name=www.accp.com:80 root_dir=/etc/httpd/htdocs
[dbservers]
192.168.146.40 http_port=192.168.80.146.40 server_name=www.benet.com:80 root_dir=/etc/httpd/htdocs
编写 playbook
vim apache.yaml
---
- hosts: all
  remote_user: root
  vars:
    - package: httpd
    - service: httpd
  tasks:
    - name: install httpd package
      yum: name={{package}} state=latest
    - name: install configure file
      template: src=/opt/httpd.conf.j2 dest=/etc/httpd/conf/httpd.conf     #使用template模板
      notify:
        - restart httpd
    - name: create root dir
	  file: path=/etc/httpd/htdocs state=directory
    - name: start httpd server
      service: name={{service}} enabled=true state=started
  handlers:
    - name: restart httpd
      service: name={{service}} state=restarted

ansible-playbook apache.yaml

Tags
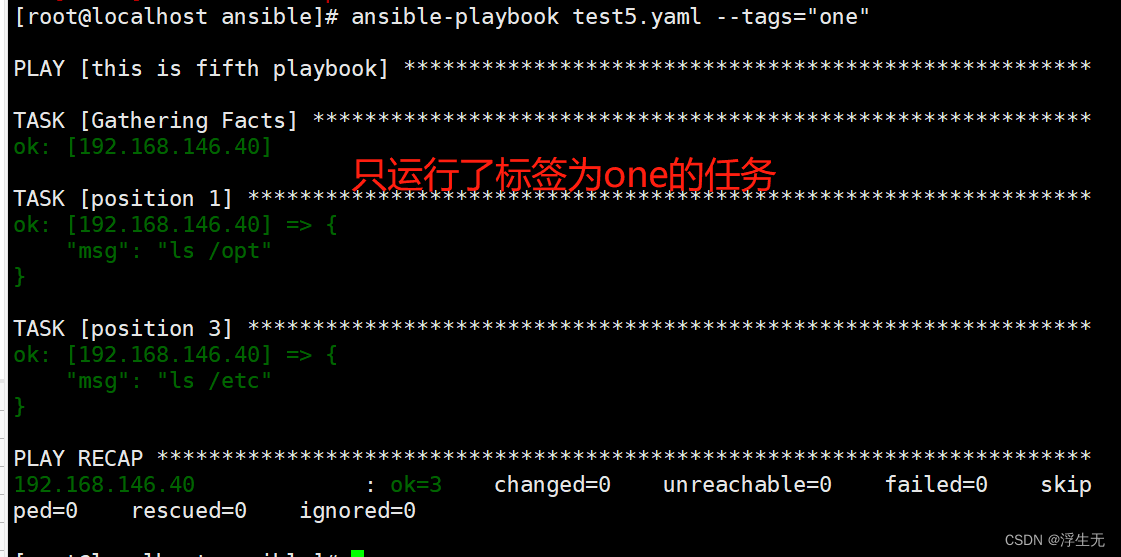
可以在一个playbook中为某个或某些任务定义“标签”,在执行此playbook时通过ansible-playbook命令使用--tags选项能实现仅运行指定的tasks。
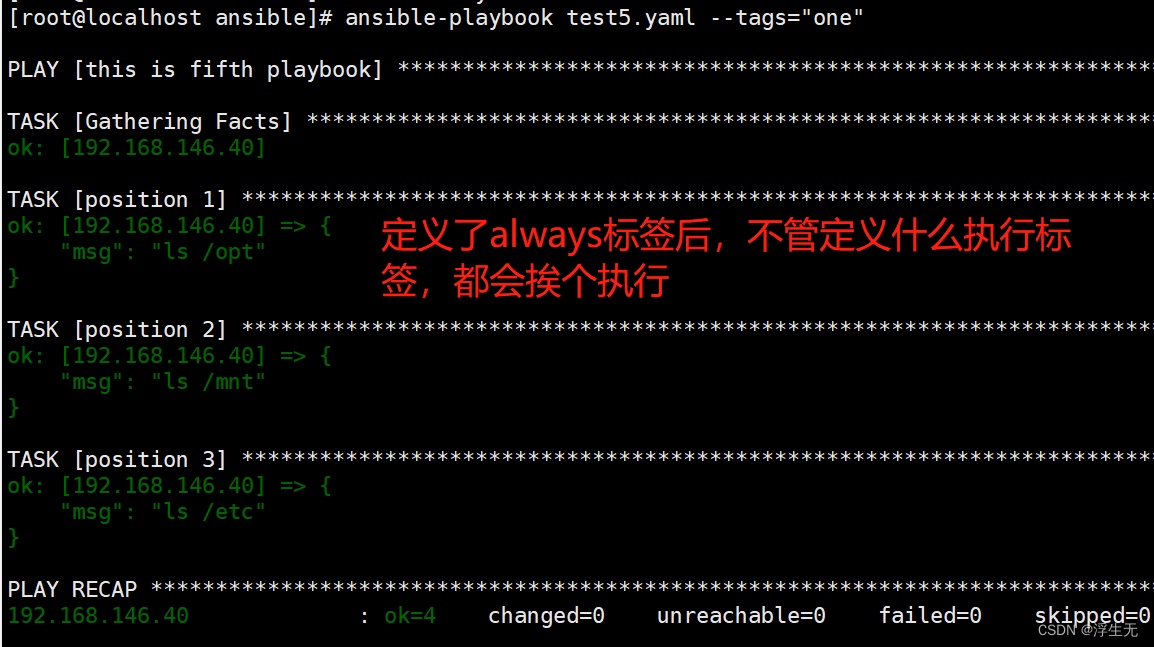
playbook还提供了一个特殊的tags为always。作用就是当使用always作为tags的task时,无论执行哪一个tags时,定义有always的tags都会执行。
单标签的使用
---
- name: this is fifth playbook
  hosts: dbservers
  remote_user: root
  vars:
   filename: abc.txt
  tasks:
   - name: position 1
     debug:
       msg: 'ls /opt'
     tags:
      - only
   - name: position 2
     debug:
       msg: 'ls /mnt'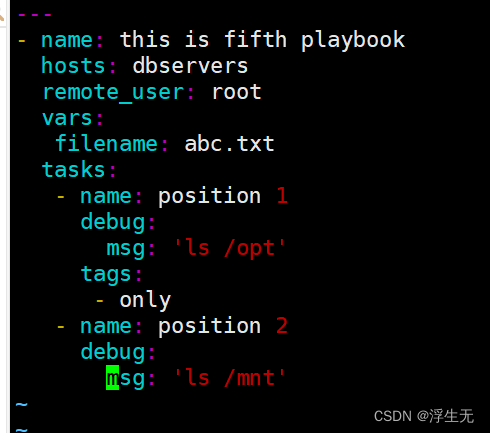

多标签的运用
---
- name: this is fifth playbook
  hosts: dbservers
  remote_user: root
  vars:
   filename: abc.txt
  tasks:
   - name: position 1
     debug:
       msg: 'ls /opt'
     tags:
      - one
   - name: position 2
     debug:
       msg: 'ls /mnt'
     tags:
      - two
   - name: position 3
     debug:
       msg: 'ls /etc'
     tags:
- one 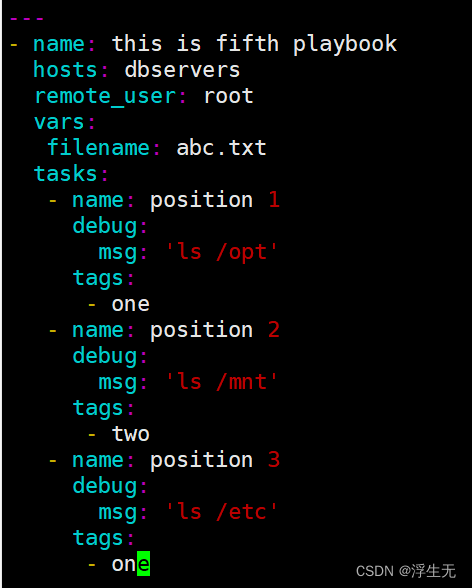
通用标签always的运用
---
- name: this is fifth playbook
  hosts: dbservers
  remote_user: root
  vars:
   filename: abc.txt
  tasks:
   - name: position 1
     debug:
       msg: 'ls /opt'
     tags:
      - one
   - name: position 2
     debug:
       msg: 'ls /mnt'
     tags:
      - always
   - name: position 3
     debug:
       msg: 'ls /etc'
     tags:
      - one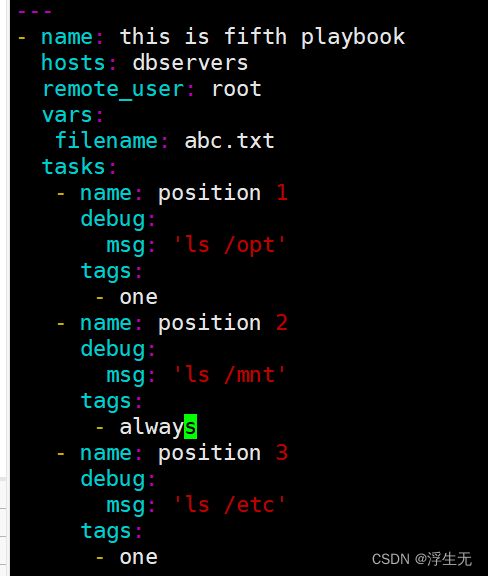
Roles
roles用于层次性、结构化地组织playbook。roles能够根据层次型结构自动装载变量文件、tasks以及handlers等。要使用roles只需要在playbook中使用include指令引入即可。
简单来讲,roles就是通过分别将变量、文件、任务、模板及处理器放置于单独的目录中,并可以便捷的include它们的一种机制。roles一般用于基于主机构建服务的场景中,但也可以是用于构建守护进程等场景中。主要使用场景代码复用度较高的情况下。
假如我们现在有3个被管理主机,第一个要配置成httpd,第二个要配置成haproxy服务器,第三个要配置成MySQL(mariadb)服务器。我们如何来定义playbook?
第一个play用到第一个主机上,用来构建httpd,第二个play用到第二个主机上,用来构建haproxy。这些个play定义在playbook中比较麻烦,将来也不利于模块化调用,不利于多次调用。比如说后来又加进来一个主机,这第3个主机既是httpd服务器,又是haproxy服务器,我们只能写第3个play,上面写上安装httpd和haproxy。这样playbook中的代码就重复了。
为了避免代码重复,可以定义一个角色叫httpd,第二个角色叫haproxy,并使用roles实现代码重复被调用。
roles 的目录结构
cd /etc/ansible/
tree roles/
roles/
├── web/ #相当于 playbook 中的 每一个 play 主题
│ ├── files/
│ ├── templates/
│ ├── tasks/
│ ├── handlers/
│ ├── vars/
│ ├── defaults/
│ └── meta/
└── db/
├── files/
├── templates/
├── tasks/
├── handlers/
├── vars/
├── defaults/
└── meta/
roles 内各目录含义解释
●files
用来存放由 copy 模块或 script 模块调用的文件。
●templates
用来存放 jinjia2 模板,template 模块会自动在此目录中寻找 jinjia2 模板文件。
●tasks
此目录应当包含一个 main.yml 文件,用于定义此角色的任务列表,此文件可以使用 include 包含其它的位于此目录的 task 文件。
●handlers
此目录应当包含一个 main.yml 文件,用于定义此角色中触发条件时执行的动作。
●vars
此目录应当包含一个 main.yml 文件,用于定义此角色用到的变量。
●defaults
此目录应当包含一个 main.yml 文件,用于为当前角色设定默认变量。 这些变量具有所有可用变量中最低的优先级,并且可以很容易地被任何其他变量覆盖。所以生产中我们一般不在这里定义变量
●meta
此目录应当包含一个 main.yml 文件,用于定义此角色的元数据信息及其依赖关系。
集中式lamp的简单role编写过程
//在一个 playbook 中使用 roles 的步骤:
(1)创建以 roles 命名的目录
mkdir /etc/ansible/roles/ -p #yum装完默认就有
(2)创建全局变量目录(可选)
mkdir /etc/ansible/group_vars/ -p
touch /etc/ansible/group_vars/all #文件名自己定义,引用的时候注意
(3)在 roles 目录中分别创建以各角色名称命名的目录,如 httpd、mysql
mkdir /etc/ansible/roles/httpd
mkdir /etc/ansible/roles/mysql
(4)在每个角色命名的目录中分别创建files、handlers、tasks、templates、meta、defaults和vars目录,用不到的目录可以创建为空目录,也可以不创建
mkdir /etc/ansible/roles/httpd/{files,templates,tasks,handlers,vars,defaults,meta}
mkdir /etc/ansible/roles/mysql/{files,templates,tasks,handlers,vars,defaults,meta}
(5)在每个角色的 handlers、tasks、meta、defaults、vars 目录下创建 main.yml 文件,千万不能自定义文件名
touch /etc/ansible/roles/httpd/{defaults,vars,tasks,meta,handlers}/main.yml
touch /etc/ansible/roles/mysql/{defaults,vars,tasks,meta,handlers}/main.yml
(6)修改 site.yml 文件,针对不同主机去调用不同的角色
vim /etc/ansible/site.yml
---
- hosts: webservers
remote_user: root
roles:
- httpd
- hosts: dbservers
remote_user: root
roles:
- mysql
(7)运行 ansible-playbook
cd /etc/ansible
ansible-playbook site.yml
示例:
mkdir /etc/ansible/roles/httpd/{files,templates,tasks,handlers,vars,defaults,meta} -p
mkdir /etc/ansible/roles/mysql/{files,templates,tasks,handlers,vars,defaults,meta} -p
mkdir /etc/ansible/roles/php/{files,templates,tasks,handlers,vars,defaults,meta} -p
touch /etc/ansible/roles/httpd/{defaults,vars,tasks,meta,handlers}/main.yml
touch /etc/ansible/roles/mysql/{defaults,vars,tasks,meta,handlers}/main.yml
touch /etc/ansible/roles/php/{defaults,vars,tasks,meta,handlers}/main.yml
------编写httpd模块------
写一个简单的tasks/main.yml
vim /etc/ansible/roles/httpd/tasks/main.yml
- name: install apache
yum: name={{pkg}} state=latest
- name: start apache
service: enabled=true name={{svc}} state=started
//定义变量:可以定义在全局变量中,也可以定义在roles角色变量中,一般定义在角色变量中
vim /etc/ansible/roles/httpd/vars/main.yml
pkg: httpd
svc: httpd
-------编写mysql模块-------
vim /etc/ansible/roles/mysql/tasks/main.yml
- name: install mysql
yum: name={{pkg}} state=latest
- name: start mysql
service: enabled=true name={{svc}} state=started
vim /etc/ansible/roles/mysql/vars/main.yml
pkg:
- mariadb
- mariadb-server
svc: mariadb
-------编写php模块-----
vim /etc/ansible/roles/php/tasks/main.yml
- name: install php
yum: name={{pkg}} state=latest
- name: start php-fpm
service: enabled=true name={{svc}} state=started
vim /etc/ansible/roles/php/vars/main.yml
pkg:
- php
- php-fpm
svc: php-fpm
-----编写roles示例-----
vim /etc/ansible/site.yml
---
- hosts: webservers
remote_user: root
roles:
- httpd
- mysql
- php
cd /etc/ansible
ansible-playbook site.yml


 1824
1824


 被折叠的 条评论
为什么被折叠?
被折叠的 条评论
为什么被折叠?
 到【灌水乐园】发言


