


手写RPC框架-项目结构以及使用
项目结构
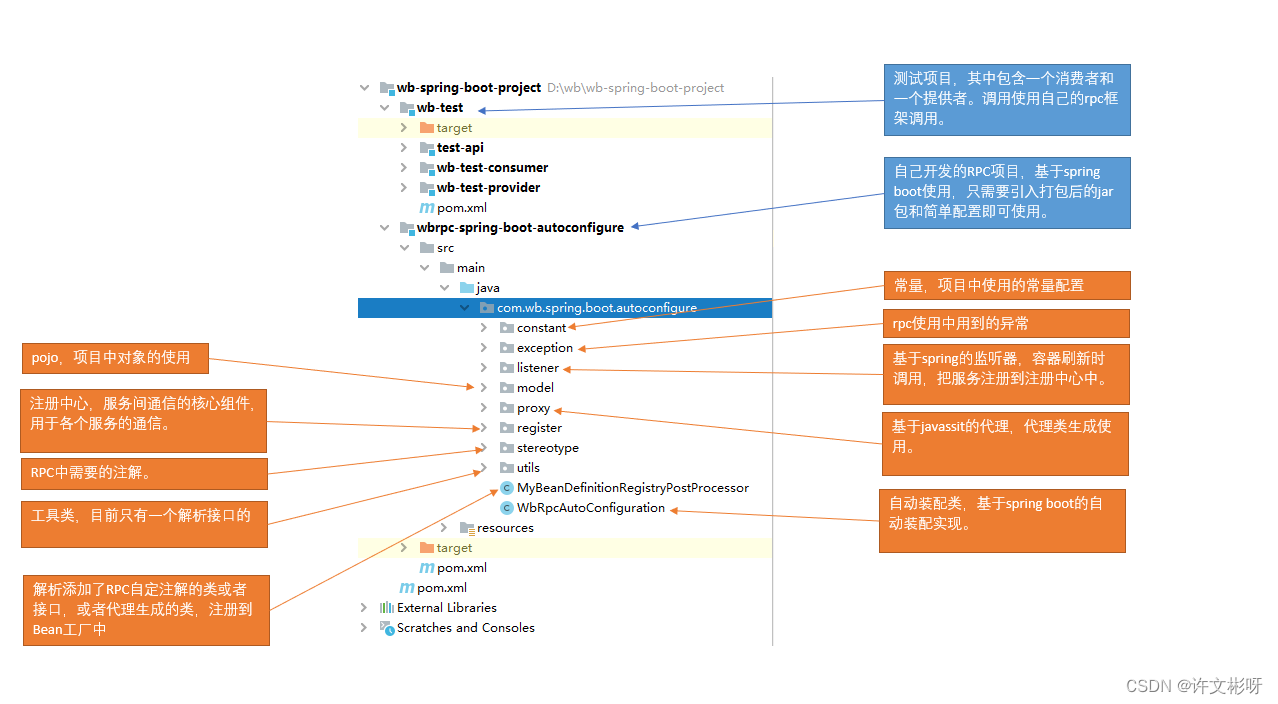
项目架构

RPC的使用
RPC是基于Spring boot的自动装配所实现的,使用的时候主要是基于几个注解 和简单配置,也达到了开箱即用的效果。
第一步 搭建两个Spring boot的项目
第二步 引入依赖(消费者和提供者通用)
<dependency>
    <groupId>org.wb.rpc</groupId>
    <artifactId>wbrpc-spring-boot-autoconfigure</artifactId>
    <version>1.0-SNAPSHOT</version>
</dependency>
第三步 简单配置(消费者和提供者通用)
wb:
  # 是否启用
  enabled: true
  # 要扫描的包
  packageScan: com.wb.test
  # 服务名称,消费端消费通过注解指定的服务名
  name: consumer
  # 注册中心使用什么
  register-type: redis
  # redis的配置信息
  redis-register:
    host: 114.215.197.96
    port: 6379
    password: xuwenbin123.
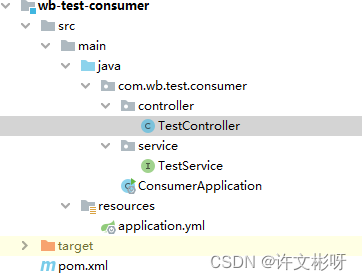
消费者代码编写
项目结构
调用远程服务接口
主要注解:
- @WbClient
只有一个参数就是要调用的服务名称 - @WbRequestMapping
把参数和对应请求的请求参数相对应,如果在打包的时候配置-parameters,注解可以省略,同名配对。 - @WbRequestBody
把某个参数放到请求体中
@WbClient("provider")
public interface TestService {

    @WbRequestMapping(value = "/test", method = WbRequestMethod.GET)
    void test(@WbRequestParam(value = "asd") String str, String str2);

    @WbRequestMapping(value = "/testbody", method = WbRequestMethod.POST)
    TestUser testpost(@WbRequestBody TestUser testUser);
}
Controller入口
@RestController
public class TestController {

	// 注入后直接调用即可
    @Autowired
    private TestService testService;

    @GetMapping("test")
    public String test(String str, String str2){
        testService.test(str, str2);
        return null;
    }

    @PostMapping("testpost")
    public TestUser testPost(){
        TestUser testUser = new TestUser();
        testUser.setName("asd");
        return testService.testpost(testUser);
    }
}
服务提供者代码编写
项目结构

入口编写(Controller)
@RestController
public class TestController {

    @GetMapping("test")
    public void hello(String asd, String str2) {
        System.out.println(asd);
    }

    @PostMapping("testbody")
    public TestUser hello(@RequestBody TestUser user) {
        return user;
    }
}
如果只是单纯的服务提供者 不做消费端,到这里配置完毕,没有一点代码侵入性。
运行查看效果
访问:http://127.0.0.1:8882/test?str=asd111
提供者输出:

项目地址
https://gitee.com/xu–wenbin/wb-spring-boot-project


 936
936


 被折叠的 条评论
为什么被折叠?
被折叠的 条评论
为什么被折叠?
 到【灌水乐园】发言


