


参考【正点原子】I.MX6U嵌入式Linux驱动开发指南V1.8
参考【韦东山】嵌入式Linux应用开发完全手册V5_IMX6ULL_Pro开发板
主要是学习文档。
对于操作硬件设备,最主要的问题是搞清楚是通过什么操作硬件设备,所有的硬件设备在内存中有对应的地址,所以只需要操作内存中的地址即可以对硬件进行操作,相当于单片机中的寄存器地址,这里就是将寄存器地址搬运到了内存中,但是在操作内存之前要搞清楚,内存的物理地址并不能进行直接操作,如果内存中的地址直接使用对应的地址数进行操作,实际上可能操作的不是对应的地址,因为中间隔着一层MMU,MMU的作用主要是接管MCU的内存管理,使得内存自动分配,不仅可以扩张内存,还可以将程序之间的内存相互隔离,以达到CPU如果使用了同一块内存也不至于内存被重复操作。也可以将物理内存进行扩张,对于32位系统,可以使用2^32次方内存地址,也就是4g的内存空间。
因为使用了内存的虚拟空间,所以在程序中需要使用专用的函数,对实际操作内存的虚拟内存进行转换
ioremap、iounmap
函数使用示例:
#define ioremap(cookie,size) __arm_ioremap((cookie), (size), MT_DEVICE)
__arm_ioremap的函数定义:
void __iomem *__arm_ioremap(phys_addr_t phys_addr, size_t size,
			    unsigned int mtype)
{
	return (void __iomem *)phys_addr;
}
phys_addr:要映射的物理起始地址。
size:要映射的内存空间大小。
mtype:ioremap 的类型,可以选择 MT_DEVICE、MT_DEVICE_NONSHARED、MT_DEVICE_CACHED 和 MT_DEVICE_WC,ioremap 函数选择 MT_DEVICE。
phys_addr:__iomem 类型的指针,指向映射后的虚拟空间首地址。
ioremap
使用时,要包含头文件:
**#include <asm/io.h>**
实际上,它是按页(4096 字节)进行映射的,是整页整页地映射的。
假设 phys_addr = 0x10002,size=4,ioremap 的内部实现是:
a) phys_addr 按页取整,得到地址 0x10000
b) size 按页取整,得到 4096
c) 把起始地址 0x10000,大小为 4096 的这一块物理地址空间,映射到虚拟地址空间,假设得到的虚拟空间起始地址为 0xf0010000
d) 那么 phys_addr = 0x10002 对应的 virt_addr = 0xf0010002
那么 phys_addr = 0x10002 对应的 virt_addr = 0xf0010002
#define SW_MUX_GPIO1_IO03_BASE (0X020E0068)
static void __iomem* SW_MUX_GPIO1_IO03;
SW_MUX_GPIO1_IO03 = ioremap(SW_MUX_GPIO1_IO03_BASE, 4);
SW_MUX_GPIO1_IO03就是通过MMU映射后的地址,地址映射完成之后还需要使用iounmap函数进行释放。
iounmap
iounmap(SW_MUX_GPIO1_IO03);
取消SW_MUX_GPIO1_IO03映射的地址。
操作单片机的时候一般是对地址中的内容进行修改,但是在Linux内核中操作内存一般使用专门的读写操作函数进行操作
读操作函数
u8 readb(const volatile void __iomem *addr)
u16 readw(const volatile void __iomem *addr)
u32 readl(const volatile void __iomem *addr)
写操作函数
void writeb(u8 value, volatile void __iomem *addr)
void writew(u16 value, volatile void __iomem *addr)
void writel(u32 value, volatile void __iomem *addr)
与单片机一样对于GPIO的操作,下面做具体解释。
- GPIO组的地址
- GPIO使能时钟、电源
- GPIO口内容
- GPIO使能方向、使能模式
GPIO设置位遵循原则:
val = data_reg;
val = val | (1<<n);
data_reg = val;
清除位
val = data_reg;
val = val & ~(1<<n);
data_reg = val;
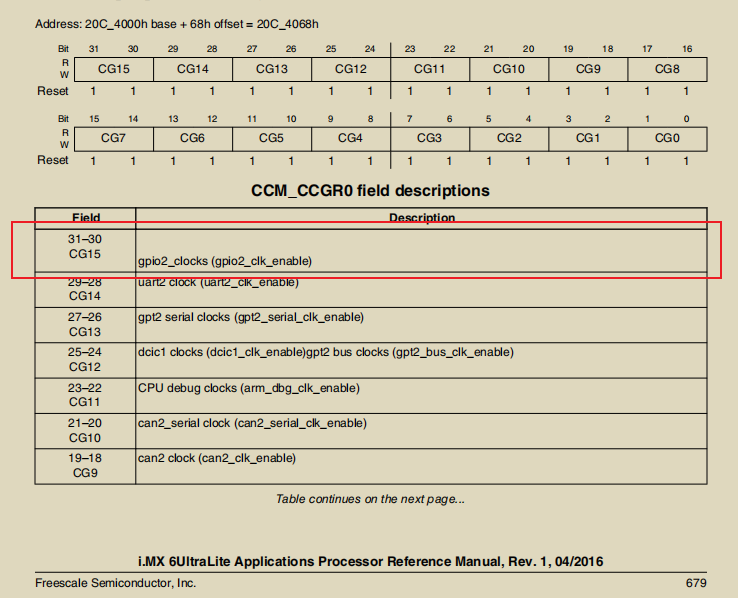
1、首先设置GPIO时钟
CCM Clock Gating Register 0 用来控制每个模块的时钟开关
CGR寄存器中的值代表模块的设置

GPIO2的时钟控制
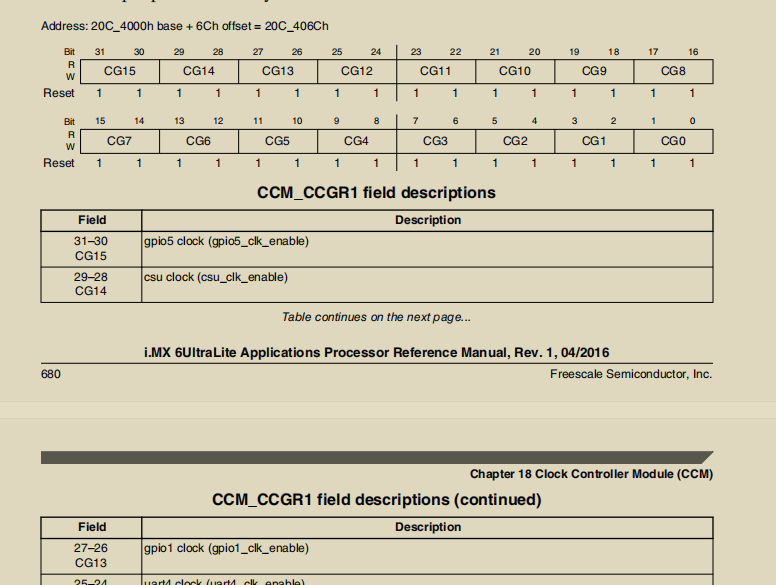
GPIO1、5时钟控制
等等其他
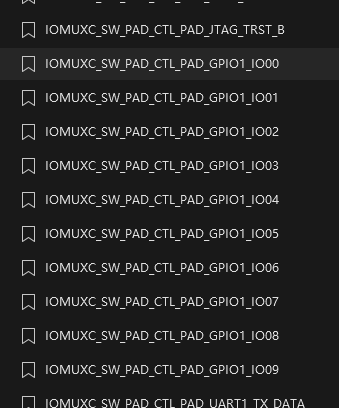
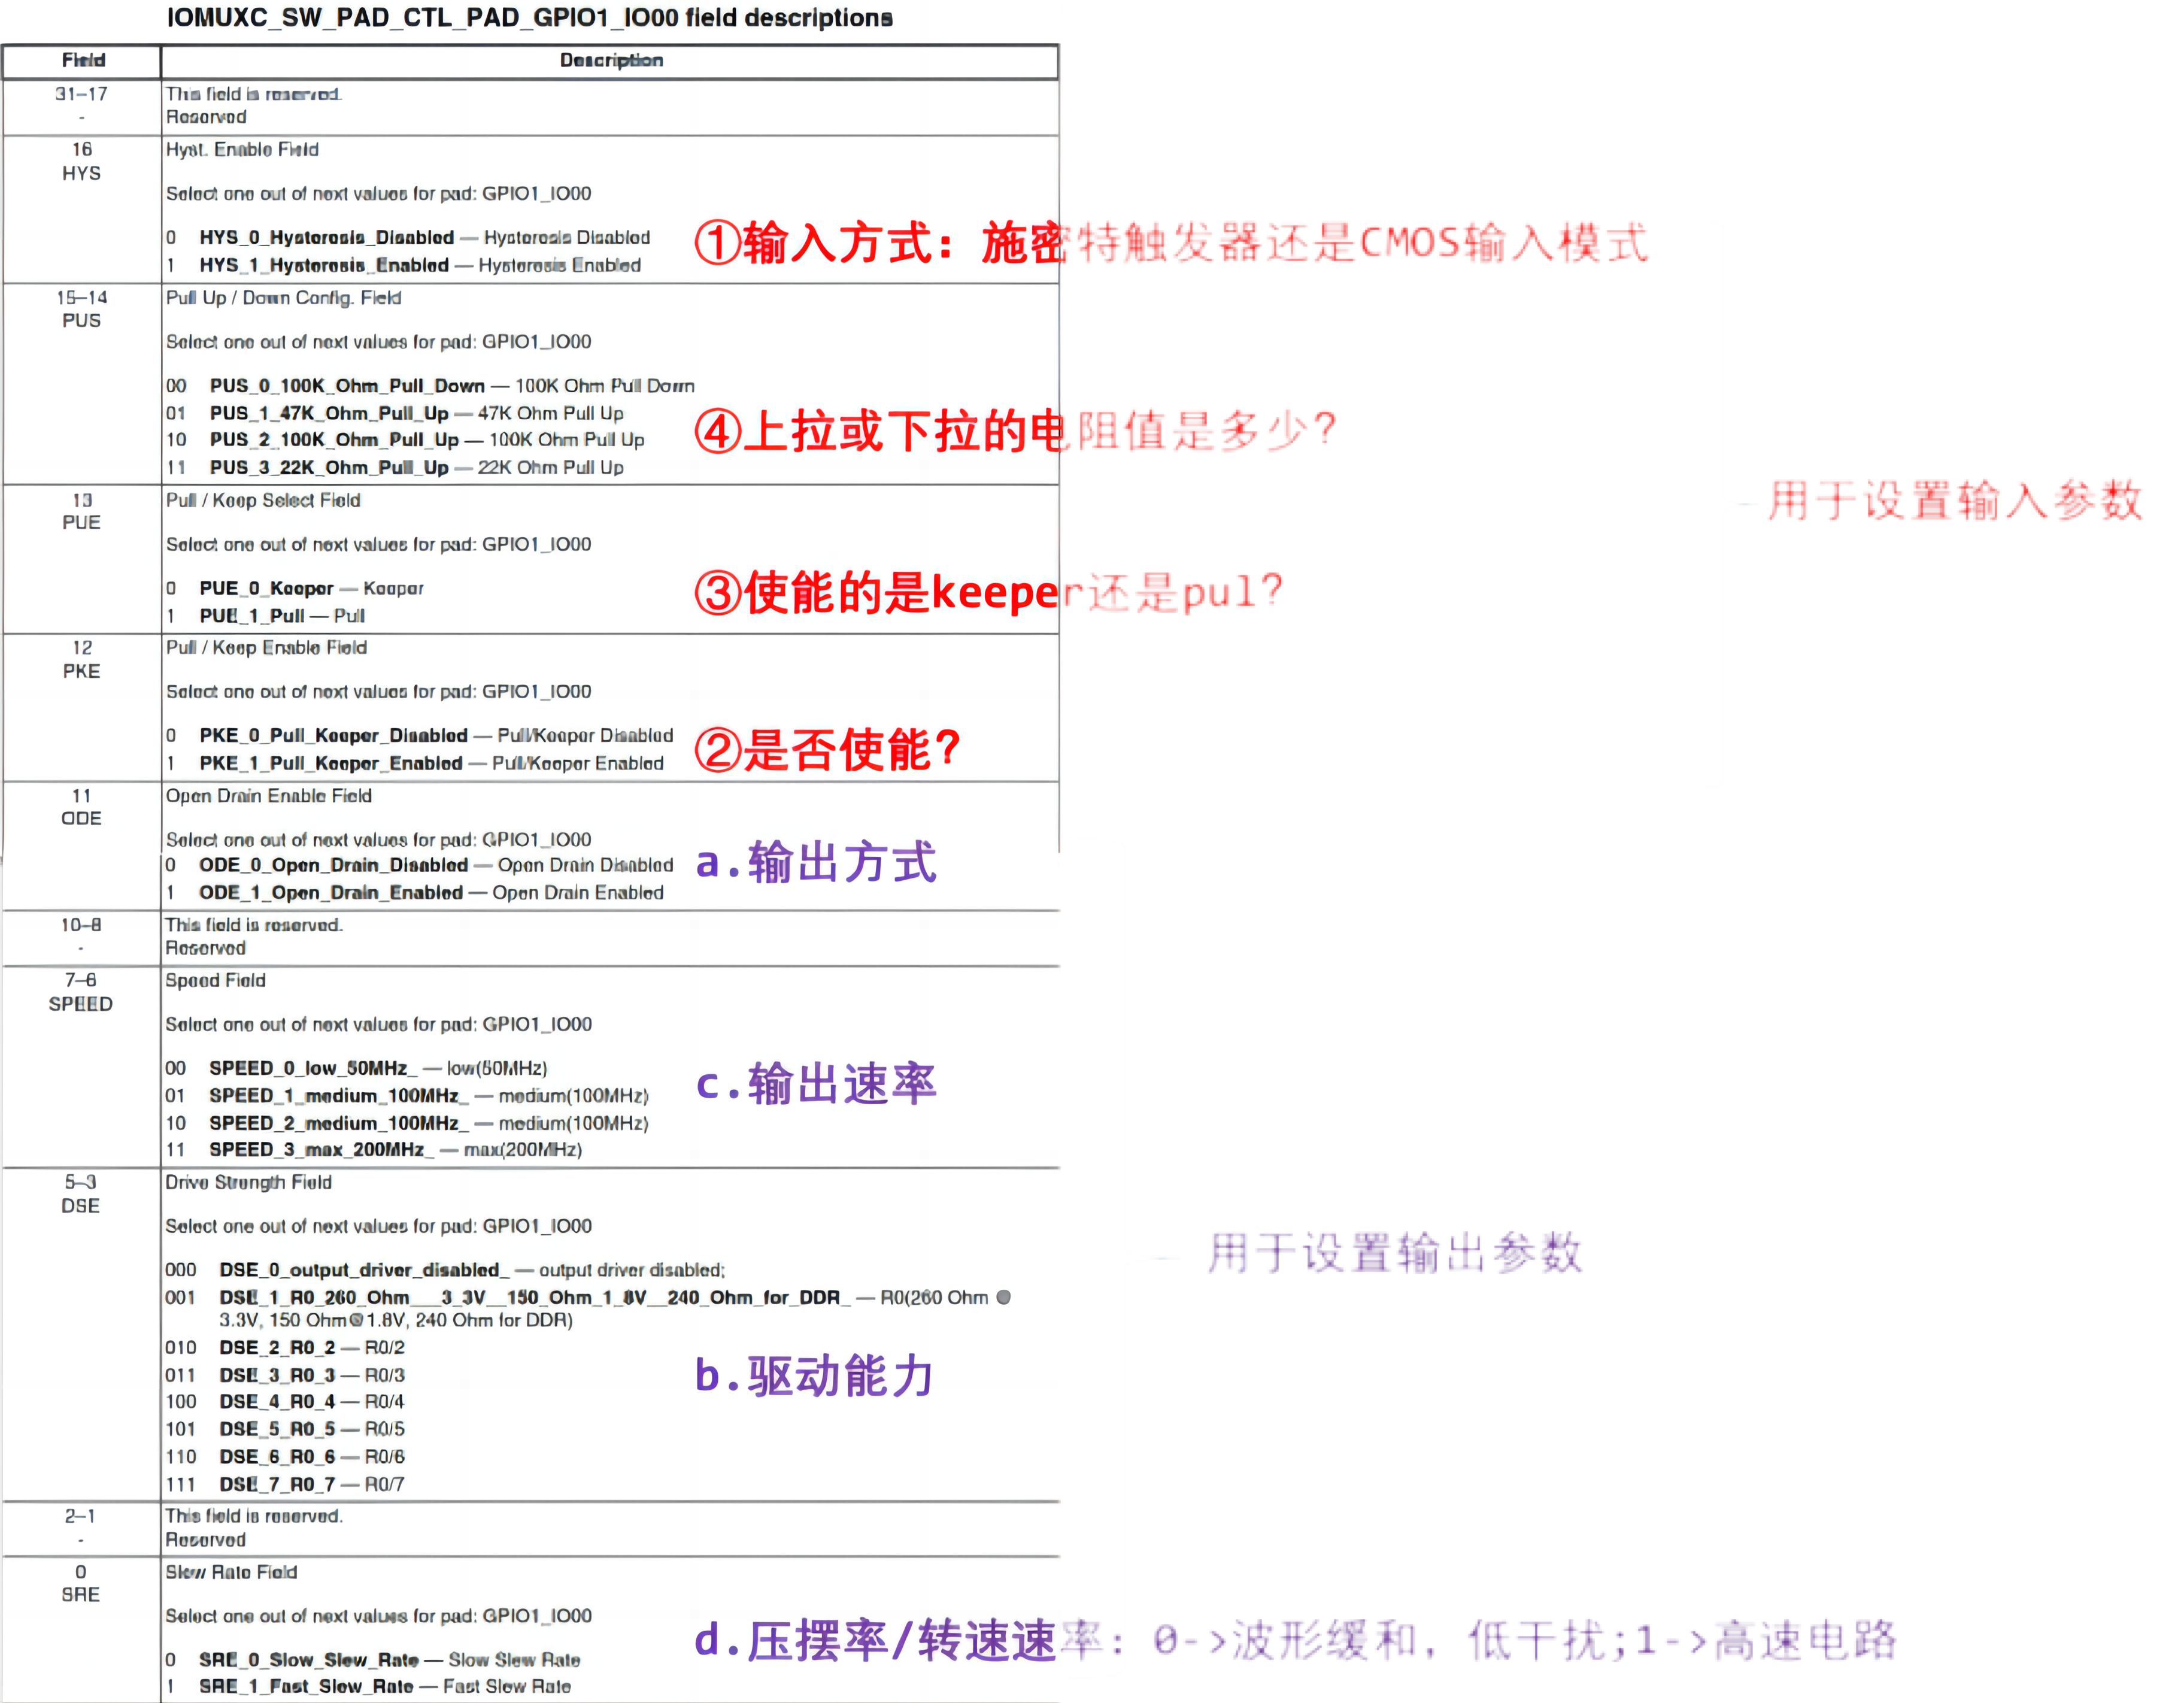
2、IOMUXC引脚模式功能的配置
IOMUXC可以被设置为某组或者某PAD的功能,这里需要将IOMUX设置为GPIO
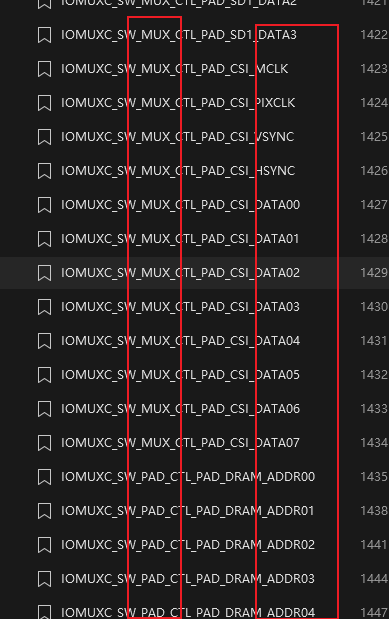
左边代表某组或者某PAD,右边代表功能
这里是将某个PAD作为GPIO
3、设置引脚方向
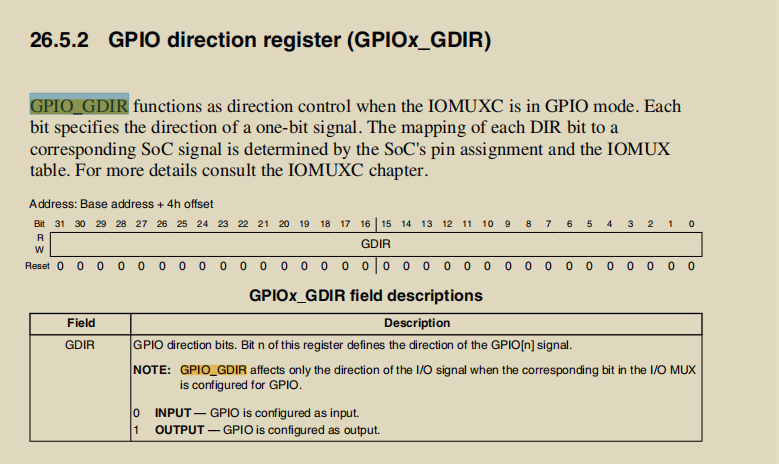
1、GPIOx_GDIR:设置引脚方向
2、GPIOx_DR:设置输出引脚的电平,每位对应一个引脚,1-高电平,0-低电平
3、GPIOx_PSR:读取引脚的电平,每位对应一个引脚,1-高电平,0-低电平
4、读GPIO
数据手册中的内容:
- 设置 CCM_CCGRx 寄存器中某位使能对应的 GPIO 模块 // 默认是使能的,上图省略了
- 设置 IOMUX 来选择引脚用于 GPIO
- 设置 GPIOx_GDIR 中某位为 0,把该引脚设置为输入功能
- 读 GPIOx_DR 或 GPIOx_PSR 得到某位的值(读 GPIOx_DR 返回的是GPIOx_PSR 的值)
5、写GPIO
- 设置 CCM_CCGRx 寄存器中某位使能对应的 GPIO 模块 // 默认是使能的,上图省略了
- 设置 IOMUX 来选择引脚用于 GPIO
- 设置 GPIOx_GDIR 中某位为 1,把该引脚设置为输出功能
- 写 GPIOx_DR 某位的值
需要注意的是,你可以设置该引脚的 loopback 功能,这样就可以从GPIOx_PSR 中读到引脚的有实电平;你从 GPIOx_DR 中读回的只是上次设置的值,它并不能反应引脚的真实电平,比如可能因为硬件故障导致该引脚跟地短路了,你通过设置 GPIOx_DR 让它输出高电平并不会起效果。
了解了这些前置知识之后,使用之前的字符设备驱动进行修改,创建LED驱动
#include <linux/types.h>
#include <linux/kernel.h>
#include <linux/delay.h>
#include <linux/ide.h>
#include <linux/init.h>
#include <linux/module.h>
#include <linux/gpio.h>
#include <asm/mach/map.h>
#include <asm/uaccess.h>
#include <asm/io.h>


#define CHRDEVBASE_MAJOR 200
#define CHRDEVBASE_NAME "led"

#define LEDOFF 0 //关灯
#define LEDOFF 1 //开灯

/* 寄存器物理地址 */
#define CCM_CCGR1_BASE (0X020C406C)
#define SW_MUX_GPIO1_IO03_BASE (0X020E0068)
#define SW_PAD_GPIO1_IO03_BASE (0X020E02F4)
#define GPIO1_DR_BASE (0X0209C000)
#define GPIO1_GDIR_BASE (0X0209C004)

/* 映射后的寄存器虚拟地址指针 */
static void __iomem *IMX6U_CCM_CCGR1;
static void __iomem *SW_MUX_GPIO1_IO03;
static void __iomem *SW_PAD_GPIO1_IO03;
static void __iomem *GPIO1_DR;
static void __iomem *GPIO1_GDIR;


// 改变GPIO1_DR即可
void led_switch(u8 sta){
    u32 val = 0;
    if(sta == LEDON){
        val = readl(GPIO1_DR);
        val &= ~(1  << 3);
        writel(val,GPIO1_DR);
    }else if(sta == LEDOFF){
        val = readl(GPIO1_DR);
        val |= (1 << 3);
        writel(val,GPIO1_DR);
    }
}


//打开设备,暂时没有动作
static int led_open(struct inode *inode, struct file *filp)
{
    return 0;
}

//读取设备,暂时没有动作
static ssize_t led_read(struct file *filp, char __user *buf,size_t cnt, loff_t *offt)
{
    return 0;
}

//因为开关led都是写函数
static ssize_t led_write(struct file *filp, const char __user *buf,size_t cnt, loff_t *offt)
{
    int retvalue;
    unsigned char databuf[1];
    unsigned char ledstat;

    retvalue = copy_from_user(databuf, buf, cnt);
    if(retvalue < 0) {
        printk("kernel write failed!\r\n");
        return -EFAULT;
    }

    ledstat = databuf[0]; /* 获取状态值 */

    if(ledstat == LEDON) {
        led_switch(LEDON); /* 打开 LED 灯 */
    } else if(ledstat == LEDOFF) {
        led_switch(LEDOFF); /* 关闭 LED 灯 */
    }
    return 0;
}

static int led_release(struct inode *inode, struct file *filp)
{
    return 0;
}


//绑定函数
static struct file_operations led_fops = {
    .owner = THIS_MODULE,
    .open = led_open,
    .read = led_read,
    .write = led_write,
    .release = led_release,
};

static int __init led_init(void)
{
    int retvalue = 0;
    u32 val = 0;

    /* 初始化 LED */
    /* 1、寄存器地址映射 */
    IMX6U_CCM_CCGR1 = ioremap(CCM_CCGR1_BASE, 4);
    SW_MUX_GPIO1_IO03 = ioremap(SW_MUX_GPIO1_IO03_BASE, 4);
    SW_PAD_GPIO1_IO03 = ioremap(SW_PAD_GPIO1_IO03_BASE, 4);
    GPIO1_DR = ioremap(GPIO1_DR_BASE, 4);
    GPIO1_GDIR = ioremap(GPIO1_GDIR_BASE, 4);

    /* 2、使能 GPIO1 时钟 */
    val = readl(IMX6U_CCM_CCGR1);
    val &= ~(3 << 26); /* 清除以前的设置 */
    val |= (3 << 26); /* 设置新值 */
    writel(val, IMX6U_CCM_CCGR1);

    /* 3、设置 GPIO1_IO03 的复用功能,将其复用为
    * GPIO1_IO03,最后设置 IO 属性。
    */
    writel(5, SW_MUX_GPIO1_IO03);

    /* 寄存器 SW_PAD_GPIO1_IO03 设置 IO 属性 */
    writel(0x10B0, SW_PAD_GPIO1_IO03);

    /* 4、设置 GPIO1_IO03 为输出功能 */
    val = readl(GPIO1_GDIR);
    val &= ~(1 << 3); /* 清除以前的设置 */
    val |= (1 << 3); /* 设置为输出 */
    writel(val, GPIO1_GDIR);

    /* 5、默认关闭 LED */
    val = readl(GPIO1_DR);
    val |= (1 << 3);
    writel(val, GPIO1_DR);


    /* 6、注册字符设备驱动 */
    retvalue = register_chrdev(LED_MAJOR, LED_NAME, &led_fops);
    if(retvalue < 0){
        printk("register chrdev failed!\r\n");
        return -EIO;
    }
    return 0;
}

static void __exit led_exit(void)
{
    /* 取消映射 */
    iounmap(IMX6U_CCM_CCGR1);
    iounmap(SW_MUX_GPIO1_IO03);
    iounmap(SW_PAD_GPIO1_IO03);
    iounmap(GPIO1_DR);
    iounmap(GPIO1_GDIR);
    unregister_chrdev(LED_MAJOR, LED_NAME);

}


module_init(led_init);
module_exit(led_exit);
MODULE_LICENSE("GPL");
MODULE_AUTHOR("zuozhongkai");
正点原子的代码与板子和芯片的IO引脚强相关,资源和驱动绑定在一起。
韦东山版本
首先创建LED头文件,将led_operations分割出来,相当于通过struct创建了一个接口,是通过函数指针+结构体的方式进行赋值。
#ifndef _LED_OPR_H
#define _LED_OPR_H

struct led_operations {
	int (*init) (int which); /* 初始化LED, which-哪个LED */
	int (*ctl) (int which, char status); /* 控制LED, which-哪个LED, status:1-亮,0-灭 */
};

struct led_operations *get_board_led_opr(void);


#endif
函数指针,可以指向一个函数。
其中borad_demo.c中提供对应操作LED的函数,该函数体中的控制函数为空,之后进行补充。
#include <linux/module.h>

#include <linux/fs.h>
#include <linux/errno.h>
#include <linux/miscdevice.h>
#include <linux/kernel.h>
#include <linux/major.h>
#include <linux/mutex.h>
#include <linux/proc_fs.h>
#include <linux/seq_file.h>
#include <linux/stat.h>
#include <linux/init.h>
#include <linux/device.h>
#include <linux/tty.h>
#include <linux/kmod.h>
#include <linux/gfp.h>
#include "led_opr.h"

static int board_demo_led_init (int which) /* 初始化LED, which-哪个LED */
{

	printk("%s %s line %d, led %d\n", __FILE__, __FUNCTION__, __LINE__, which);
	return 0;
}

static int board_demo_led_ctl (int which, char status) /* 控制LED, which-哪个LED, status:1-亮,0-灭 */
{
	printk("%s %s line %d, led %d, %s\n", __FILE__, __FUNCTION__, __LINE__, which, status ? "on" : "off");
	return 0;
}

static struct led_operations board_demo_led_opr = {
	.init = board_demo_led_init,
	.ctl  = board_demo_led_ctl,
};

struct led_operations *get_board_led_opr(void)
{
	return &board_demo_led_opr;
}
这里为资源
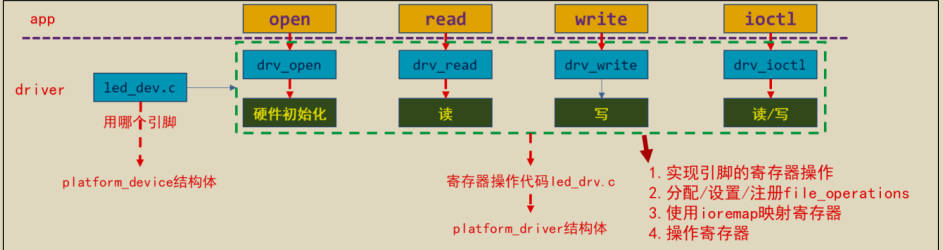
下面是驱动的内容
#include <linux/module.h>

#include <linux/fs.h>
#include <linux/errno.h>
#include <linux/miscdevice.h>
#include <linux/kernel.h>
#include <linux/major.h>
#include <linux/mutex.h>
#include <linux/proc_fs.h>
#include <linux/seq_file.h>
#include <linux/stat.h>
#include <linux/init.h>
#include <linux/device.h>
#include <linux/tty.h>
#include <linux/kmod.h>
#include <linux/gfp.h>

#include "led_opr.h"

#define LED_NUM 2

/* 1. 确定主设备号                                                                 */
static int major = 0;
static struct class *led_class;
struct led_operations *p_led_opr;


#define MIN(a, b) (a < b ? a : b)

/* 3. 实现对应的open/read/write等函数,填入file_operations结构体                   */
static ssize_t led_drv_read (struct file *file, char __user *buf, size_t size, loff_t *offset)
{
	printk("%s %s line %d\n", __FILE__, __FUNCTION__, __LINE__);
	return 0;
}

/* write(fd, &val, 1); */
static ssize_t led_drv_write (struct file *file, const char __user *buf, size_t size, loff_t *offset)
{
	int err;
	char status;
	struct inode *inode = file_inode(file);
	int minor = iminor(inode);

	printk("%s %s line %d\n", __FILE__, __FUNCTION__, __LINE__);
	err = copy_from_user(&status, buf, 1);

	/* 根据次设备号和status控制LED */
	p_led_opr->ctl(minor, status);

	return 1;
}

static int led_drv_open (struct inode *node, struct file *file)
{
	int minor = iminor(node);

	printk("%s %s line %d\n", __FILE__, __FUNCTION__, __LINE__);
	/* 根据次设备号初始化LED */
	p_led_opr->init(minor);

	return 0;
}

static int led_drv_close (struct inode *node, struct file *file)
{
	printk("%s %s line %d\n", __FILE__, __FUNCTION__, __LINE__);
	return 0;
}

/* 2. 定义自己的file_operations结构体                                              */
static struct file_operations led_drv = {
	.owner	 = THIS_MODULE,
	.open    = led_drv_open,
	.read    = led_drv_read,
	.write   = led_drv_write,
	.release = led_drv_close,
};

/* 4. 把file_operations结构体告诉内核:注册驱动程序                                */
/* 5. 谁来注册驱动程序啊?得有一个入口函数:安装驱动程序时,就会去调用这个入口函数 */
static int __init led_init(void)
{
	int err;
	int i;

	printk("%s %s line %d\n", __FILE__, __FUNCTION__, __LINE__);
	major = register_chrdev(0, "100ask_led", &led_drv);  /* /dev/led */


	led_class = class_create(THIS_MODULE, "100ask_led_class");
	err = PTR_ERR(led_class);
	if (IS_ERR(led_class)) {
		printk("%s %s line %d\n", __FILE__, __FUNCTION__, __LINE__);
		unregister_chrdev(major, "100ask_led");
		return -1;
	}

	for (i = 0; i < LED_NUM; i++)
		device_create(led_class, NULL, MKDEV(major, i), NULL, "100ask_led%d", i); /* /dev/100ask_led0,1,... */
	//获取相关的operation
	p_led_opr = get_board_led_opr();

	return 0;
}

/* 6. 有入口函数就应该有出口函数:卸载驱动程序时,就会去调用这个出口函数           */
static void __exit led_exit(void)
{
	int i;
	printk("%s %s line %d\n", __FILE__, __FUNCTION__, __LINE__);

	for (i = 0; i < LED_NUM; i++)
		device_destroy(led_class, MKDEV(major, i)); /* /dev/100ask_led0,1,... */

	device_destroy(led_class, MKDEV(major, 0));
	class_destroy(led_class);
	unregister_chrdev(major, "100ask_led");
}


/* 7. 其他完善:提供设备信息,自动创建设备节点                                     */

module_init(led_init);
module_exit(led_exit);

MODULE_LICENSE("GPL");
补充的LED开关函数,继而led操作函数分离出来了。但是这还不够。这个函数中还是与LED资源强相关耦合
#include <linux/module.h>

#include <linux/fs.h>
#include <linux/errno.h>
#include <linux/miscdevice.h>
#include <linux/kernel.h>
#include <linux/major.h>
#include <linux/mutex.h>
#include <linux/proc_fs.h>
#include <linux/seq_file.h>
#include <linux/stat.h>
#include <linux/init.h>
#include <linux/device.h>
#include <linux/tty.h>
#include <linux/kmod.h>
#include <linux/gfp.h>
#include <asm/io.h>

#include "led_opr.h"

static volatile unsigned int *CCM_CCGR1                              ;
static volatile unsigned int *IOMUXC_SNVS_SW_MUX_CTL_PAD_SNVS_TAMPER3;
static volatile unsigned int *GPIO5_GDIR                             ;
static volatile unsigned int *GPIO5_DR                               ;

static int board_demo_led_init (int which) /* 初始化LED, which-哪个LED */
{
	unsigned int val;

	//printk("%s %s line %d, led %d\n", __FILE__, __FUNCTION__, __LINE__, which);
	if (which == 0)
	{
		if (!CCM_CCGR1)
		{
			CCM_CCGR1								= ioremap(0x20C406C, 4);
			IOMUXC_SNVS_SW_MUX_CTL_PAD_SNVS_TAMPER3 = ioremap(0x2290014, 4);
			GPIO5_GDIR								= ioremap(0x020AC000 + 0x4, 4);
			GPIO5_DR								= ioremap(0x020AC000 + 0, 4);
		}

		/* GPIO5_IO03 */
		/* a. 使能GPIO5
		 * set CCM to enable GPIO5
		 * CCM_CCGR1[CG15] 0x20C406C
		 * bit[31:30] = 0b11
		 */
		*CCM_CCGR1 |= (3<<30);

		/* b. 设置GPIO5_IO03用于GPIO
		 * set IOMUXC_SNVS_SW_MUX_CTL_PAD_SNVS_TAMPER3
		 *		to configure GPIO5_IO03 as GPIO
		 * IOMUXC_SNVS_SW_MUX_CTL_PAD_SNVS_TAMPER3	0x2290014
		 * bit[3:0] = 0b0101 alt5
		 */
		val = *IOMUXC_SNVS_SW_MUX_CTL_PAD_SNVS_TAMPER3;
		val &= ~(0xf);
		val |= (5);
		*IOMUXC_SNVS_SW_MUX_CTL_PAD_SNVS_TAMPER3 = val;


		/* b. 设置GPIO5_IO03作为output引脚
		 * set GPIO5_GDIR to configure GPIO5_IO03 as output
		 * GPIO5_GDIR  0x020AC000 + 0x4
		 * bit[3] = 0b1
		 */
		*GPIO5_GDIR |= (1<<3);
	}

	return 0;
}

static int board_demo_led_ctl (int which, char status) /* 控制LED, which-哪个LED, status:1-亮,0-灭 */
{
	//printk("%s %s line %d, led %d, %s\n", __FILE__, __FUNCTION__, __LINE__, which, status ? "on" : "off");
	if (which == 0)
	{
		if (status) /* on: output 0*/
		{
			/* d. 设置GPIO5_DR输出低电平
			 * set GPIO5_DR to configure GPIO5_IO03 output 0
			 * GPIO5_DR 0x020AC000 + 0
			 * bit[3] = 0b0
			 */
			*GPIO5_DR &= ~(1<<3);
		}
		else  /* off: output 1*/
		{
			/* e. 设置GPIO5_IO3输出高电平
			 * set GPIO5_DR to configure GPIO5_IO03 output 1
			 * GPIO5_DR 0x020AC000 + 0
			 * bit[3] = 0b1
			 */
			*GPIO5_DR |= (1<<3);
		}

	}
	return 0;
}

static struct led_operations board_demo_led_opr = {
	.num  = 1,
	.init = board_demo_led_init,
	.ctl  = board_demo_led_ctl,
};

struct led_operations *get_board_led_opr(void)
{
	return &board_demo_led_opr;
}
iounmap应该在exit函数中进行调用,释放虚拟内存和物理内存。
其中led_operations与led强相关,如果更换引脚来控制LED需要修改上面结构体中的init``ctl函数
可以将LED硬件解除相关,通过获取对应资源的方式注册
#include <linux/module.h>

#include <linux/fs.h>
#include <linux/errno.h>
#include <linux/miscdevice.h>
#include <linux/kernel.h>
#include <linux/major.h>
#include <linux/mutex.h>
#include <linux/proc_fs.h>
#include <linux/seq_file.h>
#include <linux/stat.h>
#include <linux/init.h>
#include <linux/device.h>
#include <linux/tty.h>
#include <linux/kmod.h>
#include <linux/gfp.h>
#include "led_opr.h"
#include "led_resource.h"

static struct led_resource *led_rsc;
static int board_demo_led_init (int which) /* 初始化LED, which-哪个LED */
{
	//printk("%s %s line %d, led %d\n", __FILE__, __FUNCTION__, __LINE__, which);
	if (!led_rsc)
	{
		led_rsc = get_led_resouce();
	}

	printk("init gpio: group %d, pin %d\n", GROUP(led_rsc->pin), PIN(led_rsc->pin));
	switch(GROUP(led_rsc->pin))
	{
		case 0:
		{
			printk("init pin of group 0 ...\n");
			break;
		}
		case 1:
		{
			printk("init pin of group 1 ...\n");
			break;
		}
		case 2:
		{
			printk("init pin of group 2 ...\n");
			break;
		}
		case 3:
		{
			printk("init pin of group 3 ...\n");
			break;
		}
	}

	return 0;
}

static int board_demo_led_ctl (int which, char status) /* 控制LED, which-哪个LED, status:1-亮,0-灭 */
{
	//printk("%s %s line %d, led %d, %s\n", __FILE__, __FUNCTION__, __LINE__, which, status ? "on" : "off");
	printk("set led %s: group %d, pin %d\n", status ? "on" : "off", GROUP(led_rsc->pin), PIN(led_rsc->pin));

	switch(GROUP(led_rsc->pin))
	{
		case 0:
		{
			printk("set pin of group 0 ...\n");
			break;
		}
		case 1:
		{
			printk("set pin of group 1 ...\n");
			break;
		}
		case 2:
		{
			printk("set pin of group 2 ...\n");
			break;
		}
		case 3:
		{
			printk("set pin of group 3 ...\n");
			break;
		}
	}

	return 0;
}

static struct led_operations board_demo_led_opr = {
	.init = board_demo_led_init,
	.ctl  = board_demo_led_ctl,
};

struct led_operations *get_board_led_opr(void)
{
	return &board_demo_led_opr;
}
所以这里新建一个接口为led_resource
#ifndef _LED_RESOURCE_H
#define _LED_RESOURCE_H

/* GPIO3_0 */
/* bit[31:16] = group */
/* bit[15:0]  = which pin */
#define GROUP(x) (x>>16)
#define PIN(x)   (x&0xFFFF)
#define GROUP_PIN(g,p) ((g<<16) | (p))

struct led_resource {
	int pin;
};

struct led_resource *get_led_resouce(void);

#endif
实现为led的地址获取
#include "led_resource.h"

static struct led_resource board_A_led = {
	.pin = GROUP_PIN(3,1),
};

struct led_resource *get_led_resouce(void)
{
	return &board_A_led;
}
解除LED的硬件相关性
顺其自然的引出platform_device/platform_driver模型
进而引入总线设备驱动模型
platform_device/platform_driver 将资源与驱动分开,驱动当做驱动,资源当做资源,当然这样驱动就需要面面俱到。
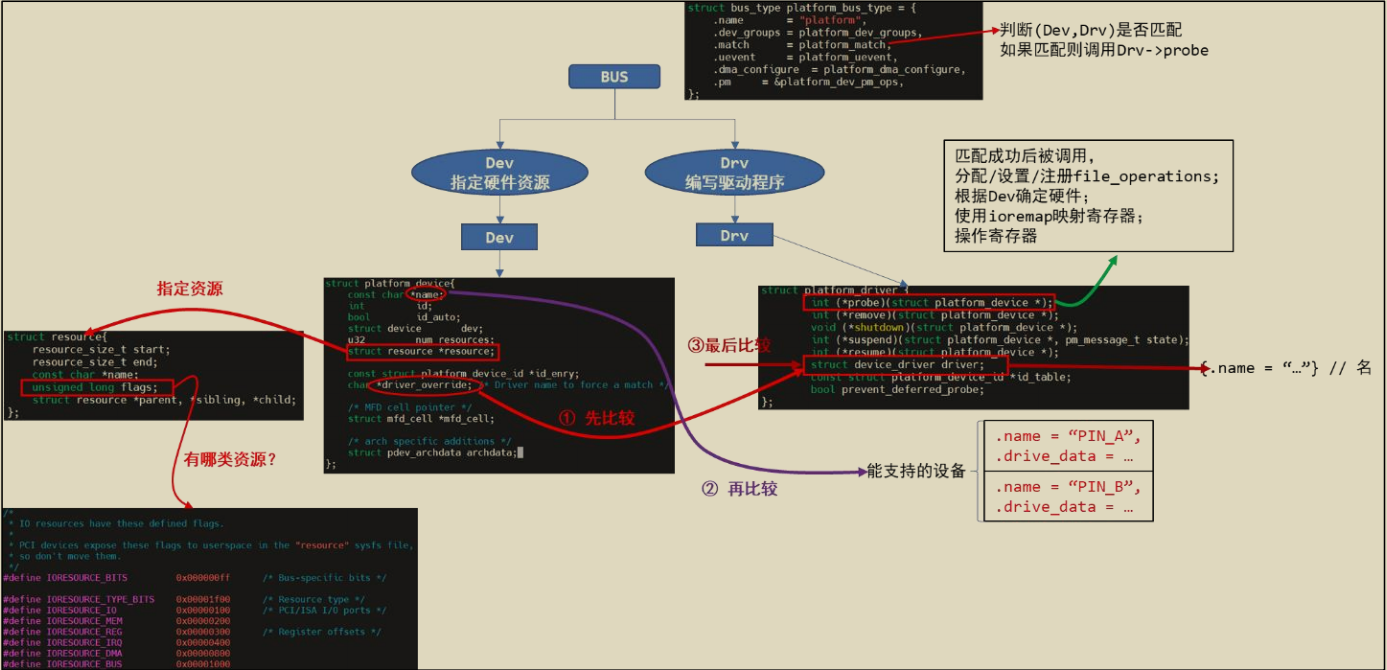
一开始的图示,有很多内容进行比较
硬件资源与驱动程序之间进行比较,比较的应该是硬件资源的信息与驱动中的内容进行匹配。

每一个dev都对应一个dri
Bus来管理,在总线左边有device、在总线右边有driver
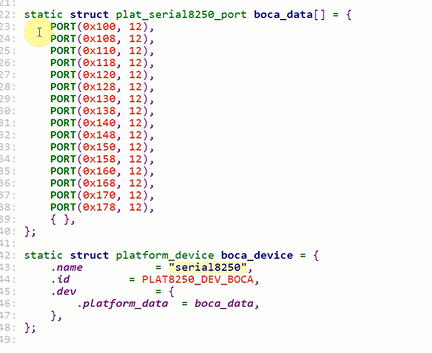
之前led_resource里面只支持LED,而在在platform_device支持所有的硬件
但是对于不同但单板和引脚都要定义不同的platform_device 来支持,所以会造成冗余,所以内核冗余代码很多
所以再次将它抽离出来,在内核外部编译,内核解析外部文件构造出对应的platform_device
设备树仅仅指定对应的硬件
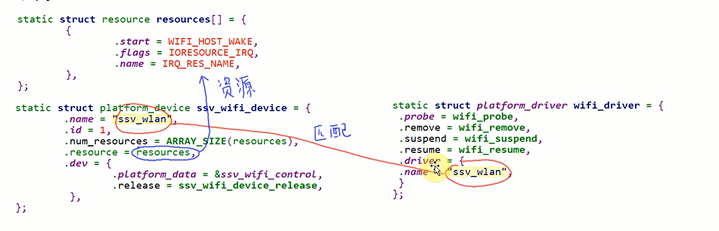
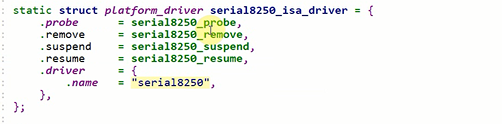
根据命名进行匹配,platformXX仅仅是为了统一
例如:

在platform结构体中存放硬件资源
在找到对应的platform_driver

平台设备和平台driver如何建立联系?
内核中有一个东西叫做总线,是一个虚拟的总线,有两个链表,当注册一个平台设备的时候,就会放入左边链表,当注册一个平台driver的时候就会放入右侧链表,

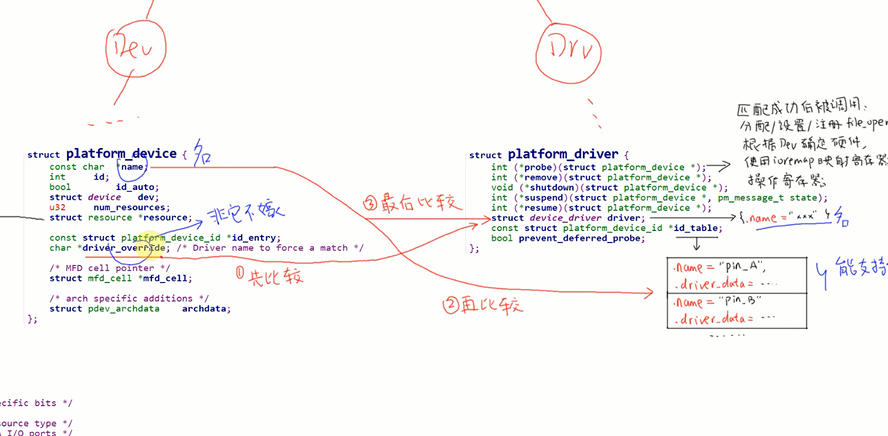
根据platform_device的名字找到platform_driver的id_table中支持的设备,如果id_table中没有对应的name就会比较对应的device_driver的name
源码解析:
platform_match函数
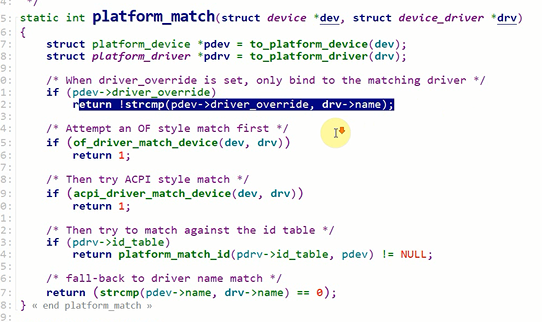
首先比较driver_override
然后是设备树相关
然后比较id_table查看支持的id_table
最后比较两个名字
如何放入链表的源码
platform_device_register
platform_device_add
 device_add
 	bus_add_device // 放入链表
 		bus_probe_device // probe 枚举设备,即找到匹配的(dev, drv)
 			device_initial_probe
 				__device_attach
 					bus_for_each_drv(...,__device_attach_driver,...)
						 __device_attach_driver
							 driver_match_device(drv, dev) // 是否匹配
							 	driver_probe_device // 调用 drv 的 probe
platform_driver_register
	__platform_driver_register
 		driver_register
		  bus_add_driver // 放入链表
 			driver_attach(drv)
 				bus_for_each_dev(drv->bus, NULL, drv, __driver_attach);
 					__driver_attach
 						driver_match_device(drv, dev) // 是否匹配
 							driver_probe_device // 调用 drv 的 probe
下面将LED程序修改成总线模型,简单来说就是构建platform_device和platform_driver,两个名称一样,将原来的register_chrdev函数改成platform函数。
首先构造platform_device
#include <linux/fs.h>
#include <linux/errno.h>
#include <linux/miscdevice.h>
#include <linux/kernel.h>
#include <linux/major.h>
#include <linux/mutex.h>
#include <linux/proc_fs.h>
#include <linux/seq_file.h>
#include <linux/stat.h>
#include <linux/init.h>
#include <linux/device.h>
#include <linux/tty.h>
#include <linux/kmod.h>
#include <linux/gfp.h>
#include <linux/platform_device.h>

#include "led_resource.h"


static void led_dev_release(struct device *dev)
{
}

static struct resource resources[] = {
        {
                .start = GROUP_PIN(3,1),
                .flags = IORESOURCE_IRQ,
                .name = "100ask_led_pin",
        },
        {
                .start = GROUP_PIN(5,8),
                .flags = IORESOURCE_IRQ,
                .name = "100ask_led_pin",
        },
};


static struct platform_device board_A_led_dev = {
        .name = "100ask_led",
        .num_resources = ARRAY_SIZE(resources),
        .resource = resources,
        .dev = {
                .release = led_dev_release,
         },
};

static int __init led_dev_init(void)
{
    int err;

    err = platform_device_register(&board_A_led_dev);

    return 0;
}

static void __exit led_dev_exit(void)
{
    platform_device_unregister(&board_A_led_dev);
}

module_init(led_dev_init);
module_exit(led_dev_exit);

MODULE_LICENSE("GPL");
将resources单独放在一个结构体中供driver调用
创建platform_driver并注册
#include <linux/module.h>

#include <linux/fs.h>
#include <linux/errno.h>
#include <linux/miscdevice.h>
#include <linux/kernel.h>
#include <linux/major.h>
#include <linux/mutex.h>
#include <linux/proc_fs.h>
#include <linux/seq_file.h>
#include <linux/stat.h>
#include <linux/init.h>
#include <linux/device.h>
#include <linux/tty.h>
#include <linux/kmod.h>
#include <linux/gfp.h>
#include <linux/platform_device.h>

#include "led_opr.h"
#include "leddrv.h"
#include "led_resource.h"

static int g_ledpins[100];
static int g_ledcnt = 0;

static int board_demo_led_init (int which) /* 初始化LED, which-哪个LED */
{
    //printk("%s %s line %d, led %d\n", __FILE__, __FUNCTION__, __LINE__, which);

    printk("init gpio: group %d, pin %d\n", GROUP(g_ledpins[which]), PIN(g_ledpins[which]));
    switch(GROUP(g_ledpins[which]))
    {
        case 0:
        {
            printk("init pin of group 0 ...\n");
            break;
        }
        case 1:
        {
            printk("init pin of group 1 ...\n");
            break;
        }
        case 2:
        {
            printk("init pin of group 2 ...\n");
            break;
        }
        case 3:
        {
            printk("init pin of group 3 ...\n");
            break;
        }
    }

    return 0;
}

static int board_demo_led_ctl (int which, char status) /* 控制LED, which-哪个LED, status:1-亮,0-灭 */
{
    //printk("%s %s line %d, led %d, %s\n", __FILE__, __FUNCTION__, __LINE__, which, status ? "on" : "off");
    printk("set led %s: group %d, pin %d\n", status ? "on" : "off", GROUP(g_ledpins[which]), PIN(g_ledpins[which]));

    switch(GROUP(g_ledpins[which]))
    {
        case 0:
        {
            printk("set pin of group 0 ...\n");
            break;
        }
        case 1:
        {
            printk("set pin of group 1 ...\n");
            break;
        }
        case 2:
        {
            printk("set pin of group 2 ...\n");
            break;
        }
        case 3:
        {
            printk("set pin of group 3 ...\n");
            break;
        }
    }

    return 0;
}

static struct led_operations board_demo_led_opr = {
    .init = board_demo_led_init,
    .ctl  = board_demo_led_ctl,
};

struct led_operations *get_board_led_opr(void)
{
    return &board_demo_led_opr;
}

static int chip_demo_gpio_probe(struct platform_device *pdev)
{
    struct resource *res;
    int i = 0;

    while (1)
    {
        res = platform_get_resource(pdev, IORESOURCE_IRQ, i++);
        if (!res)
            break;

        g_ledpins[g_ledcnt] = res->start;
        led_class_create_device(g_ledcnt);
        g_ledcnt++;
    }
    return 0;

}

static int chip_demo_gpio_remove(struct platform_device *pdev)
{
    struct resource *res;
    int i = 0;

    while (1)
    {
        res = platform_get_resource(pdev, IORESOURCE_IRQ, i);
        if (!res)
            break;

        led_class_destroy_device(i);
        i++;
        g_ledcnt--;
    }
    return 0;
}


static struct platform_driver chip_demo_gpio_driver = {
    .probe      = chip_demo_gpio_probe,
    .remove     = chip_demo_gpio_remove,
    .driver     = {
        .name   = "100ask_led",
    },
};

static int __init chip_demo_gpio_drv_init(void)
{
    int err;

    err = platform_driver_register(&chip_demo_gpio_driver);
    register_led_operations(&board_demo_led_opr);

    return 0;
}

static void __exit lchip_demo_gpio_drv_exit(void)
{
    platform_driver_unregister(&chip_demo_gpio_driver);
}

module_init(chip_demo_gpio_drv_init);
module_exit(lchip_demo_gpio_drv_exit);

MODULE_LICENSE("GPL");
下一篇具体理解设备树到驱动的注册,了解过程即可。


 713
713


 被折叠的 条评论
为什么被折叠?
被折叠的 条评论
为什么被折叠?
 到【灌水乐园】发言


