


前言:
Spring Boot 为我们提供了自动配置的功能,我们可以像使用插件一样,对各个组件自由组合装配,只需引入定义好的 starter 即可,有点类似于 Java 的 SPI 机制,SPI 机制是为了解决项目与项目之间的解耦,而 Spring Boot starter 方式实现了模块化的解耦,前文我们从 Spring Booot 源码层面分析了自动配置的实现原理,本篇分享一下自定义实现 starter 。
Spring Boot 系列文章传送门
自定义 starter
自定义 starter 基本步骤
Spring Boot starter 利用自动配置的原理,将 starter 中的配置项自动加载到 Spring IOC 容器中,减少了 Spring 复杂的 XML 配置,我们自己实现一个 starter 通常要经过如下步骤:
- 创建 Maven 项目,在 pom.xml 文件中引入 spring-boot-configuration 相关依赖。
- 编写和配置文件对应的类,提供属性配置。
- 编写业务类。
- 编写自动配置 AutoConfiguration 类。
- 在项目 resources/META-INF 路径下创建 spring.factories 文件。
- 打包测试。
创建 Maven 项目 pom.xml 引入依赖
<?xml version="1.0" encoding="UTF-8"?>
<project xmlns="http://maven.apache.org/POM/4.0.0" xmlns:xsi="http://www.w3.org/2001/XMLSchema-instance"
         xsi:schemaLocation="http://maven.apache.org/POM/4.0.0 https://maven.apache.org/xsd/maven-4.0.0.xsd">
    <modelVersion>4.0.0</modelVersion>
    <parent>
        <groupId>org.springframework.boot</groupId>
        <artifactId>spring-boot-starter-parent</artifactId>
        <version>2.4.5</version>
        <relativePath/> <!-- lookup parent from repository -->
    </parent>
    <groupId>com.my.study</groupId>
    <artifactId>my-study-spring-boot-start</artifactId>
    <version>0.0.1-SNAPSHOT</version>
    <name>my-study-spring-boot-start</name>
    <description>my-study-spring-boot-start</description>
    <url/>


    <dependencies>
        <dependency>
            <groupId>org.springframework.boot</groupId>
            <artifactId>spring-boot-starter-web</artifactId>
        </dependency>

        <!--<dependency>
            <groupId>org.springframework.boot</groupId>
            <artifactId>spring-boot-autoconfigure</artifactId>
        </dependency>-->

        <dependency>
            <groupId>org.springframework.boot</groupId>
            <artifactId>spring-boot-configuration-processor</artifactId>
            <optional>true</optional>
        </dependency>

        <dependency>
            <groupId>org.springframework.boot</groupId>
            <artifactId>spring-boot-starter-test</artifactId>
            <scope>test</scope>
        </dependency>

        <dependency>
            <groupId>org.projectlombok</groupId>
            <artifactId>lombok</artifactId>
        </dependency>

    </dependencies>

    <build>
        <plugins>
            <plugin>
                <groupId>org.springframework.boot</groupId>
                <artifactId>spring-boot-maven-plugin</artifactId>
            </plugin>
        </plugins>
    </build>

</project>
spring-boot-configuration 配置是必选,其他配置根据需要选择引入。
编写和配置文件对应的类,提供属性配置
自定义 Starter 需要配置属性可以在 src/main/resources/application.properties 或 src/main/resources/application.yml 中定义,这些属性可以MyStarterProperties 类完成属性注入。
@Data
@ConfigurationProperties(prefix = "com.study.test")
public class MyStarterProperties {

    private String prefix;

    private String suffix;
}
定义业务类
@Slf4j
public class MyStarterComponent {

    private final MyStarterProperties myStarterProperties;

    public MyStarterComponent(MyStarterProperties myStarterProperties) {
        this.myStarterProperties = myStarterProperties;
    }

    public String myStrartTest() {
        String result = myStarterProperties.getPrefix() + "-" + myStarterProperties.getSuffix();
        log.info("MyStrartComponent方法输出:{}", result);
        return result;
    }
}
编写自动配置 AutoConfiguration 类
创建一个自动配置类,负责配置自定义 Starter 的功能,在自动配置类上使用 @Configuration 注解,并通过其他注解如@ConditionalOnClass、@ConditionalOnProperty 等来定义条件,以确保只有在满足特定条件时才会应用配置,这里只是简单使用了 @Configuration 注解。
@EnableConfigurationProperties({MyStarterProperties.class})
@Configuration
public class MyStarterAutoConfiguration {

    @Bean
    MyStarterComponent getMyStarterComponent(MyStarterProperties myStarterProperties) {
        return new MyStarterComponent(myStarterProperties);
    }
}
创建 spring.factories
在项目 resources/META-INF 路径下创建 spring.factories 文件,把自定义配置类的全限定类名配置进去,如下:
org.springframework.boot.autoconfigure.EnableAutoConfiguration=com.my.study.start.config.MyStarterAutoConfiguration

打包测试
以上步骤已经完成了一个自定义 Starter,接下来使用 Maven install 命令打包测试即可。
自定义 Starter 测试验证
自定义 Starter 已经只做完成,并且已经打包到 Maven 仓库了,我们需要新建一个项目进行测试。
测试验证步骤
- 新建 Spring Boot 项目。
- pom.xml 引入自定义的 Starter。
- 在 application.properties 或者 application.xml 文件完成属性配置。
- 编写测试代码完成测试。
新建 Spring Boot 项目
新建 Spring Boot 项目非常简单,这里不在演示。
pom.xml 引入自定义的 Starter
<dependency>
	<groupId>com.my.study</groupId>
	<artifactId>my-study-spring-boot-start</artifactId>
	<version>0.0.1-SNAPSHOT</version>
</dependency>
application.properties 或者 application.xml 文件完成属性配置
spring.application.name=my-study-spring-boot
server.port=8081
com.study.test.prefix=myStarter
com.study.test.suffix=hello
编写测试代码
简单写了个接口进行测试。
@RestController
public class MyController {

    @Autowired
    private MyStarterComponent myStrartComponent;

    @GetMapping("/test")
    public String test() {
        return myStrartComponent.myStrartTest();
    }

}
测试结果
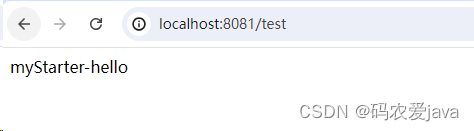

验证结果符合预期,至此已经完全实现了个一个自定义的 Starter,整个实现过程也是十分简单的,希望可以帮组到有需要的小伙伴。
如有不正确的地方请各位指出纠正。


 898
898


 被折叠的 条评论
为什么被折叠?
被折叠的 条评论
为什么被折叠?
 到【灌水乐园】发言


