


主从复制简介
MySQL数据库的主从复制方案,是其自带的功能,并且主从复制并不是复制磁盘上的数据库文件,而是通过binlog日志复制到需要同步的从服务器上。
MySQL数据库支持单向、双向、链式级联,等不同业务场景的复制。在复制的过程中,一台服务器充当主服务器(Master),接收来自用户的内容更新,而一个或多个其他的服务器充当从服务器(slave),接收来自Master上binlog文件的日志内容,解析出SQL,重新更新到Slave,使得主从服务器数据达到一致。
## 主从复制的作用
主从复制主要有备份和支持高并发两个作用
备份
利用复制功能当Master服务器出现问题时,我们可以人工的切换到从服务器继续提供服务,此时服务器的数据和宕机时的数据几乎完全一致。
支持高并发
当用户量很大时,一台服务器显然不够用了,那么怎么在多台服务器之间保持数据同步呢,答案就是主从复制
## 主从复制分类
主从复制的逻辑有以下几种
一主一从
也就是单向主从模式,在master端写入数据,在slave端读取数据
一主多从
有一个master端和多个slave端

双主双向同步
也就是互为主从模式

## 主从复制的实现机理
主从复制的步骤
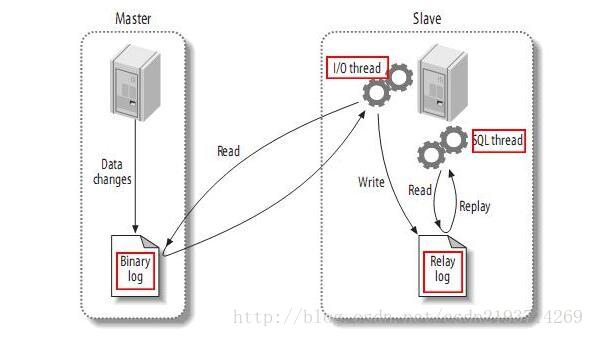
master将改变记录到二进制日志(binary log)中(这些记录叫做二进制日志事件,binary log events);
slave将master的binary log events拷贝到它的中继日志(relay log);
slave重做中继日志中的事件,将改变反映它自己的数据。
以上三步可以细化为7步
1. 主数据库写入数据之后, 会有data changes(数据变化)记录
2. 有变化记录之后,将增删改的一些sql语句记录到本地的Binary log(二进制日志)中
3. 从库会一直开启着一个线程
4. 通过线程去读取这个二进制日志的内容
5. 从库会将数据写入到自己的Relay log(中继日志)中
6. 从库会将中继日志中的操作转化为SQL thread(SQL语句)
7. 通过转化的SQL语句写入到自己的数据库, 两边的数据就一致了
## 主从复制示例
下面以一主一从为例简单介绍主从复制的实现过程
### 准备两台数据库服务器
这里笔者在自己电脑上跑了两台linux虚拟机(centos 7)作为数据库服务器,数据库为mariadb 10.1.38
```
主服务器:192.168.1.17
从服务器:192.168.1.111
```
注意:以下操作在主服务器上进行
### 关闭主服务器mariadb数据库服务
```linux
systemctl stop mariadb
### 修改主服务器配置文件/etc/my.cnf
```linux
vim /etc/my.cnf
在[mysqld]下面添加如下两行代码
server-id=1
log-bin=sweet-login
server-id是识别主从服务器的唯一标识符,每个服务器的server-id必须不同
log-bin是设置的二进制日志的文件名,sweet是我们自己起的,后面要加上-logbin
#
# This group is read both both by the client and the server
# use it for options that affect everything
#
[mysqld]
character-set-server=utf8
collation-server=utf8_general_ci
log-error=/var/log/mysqld.log
server-id=1
log-bin=sweet-logbin
[client]
default-character-set=utf8
[mysql]
default-character-set=utf8
#
# include all files from the config directory
#
!includedir /etc/my.cnf.d
启动mariadb,以root用户登录,新建用户主从同步的用户sweet,允许允许他从任意从库服务器连接主库
create user 'zongze'@'%' identified by '123';
这里%表示所有ip,也就是说任意sweet这个用户可以从任意ip地址的从服务器远程连接到主服务器的数据库
给sweet账号授权,给他复制(把主库复制到从库)的权限
grant replication slave on *.* to 'sweet'@'%';
注:以上两步可以合并为一步(创建用户的同时授权)
grant replication slave on *.* to 'sweet'@'%' identified by '123';
检查授权状态
show grants for 'sweet'@'%';
MariaDB [(none)]> show grants for 'sweet'@'%';
+------------------------------------------------------------------------------------------------------------------+
| Grants for sweet@% |
+------------------------------------------------------------------------------------------------------------------+
| GRANT REPLICATION SLAVE ON *.* TO 'sweet'@'%' IDENTIFIED BY PASSWORD '*23AE809DDACAF96AF0FD78ED04B6A265E05AA257' |
+------------------------------------------------------------------------------------------------------------------+
1 row in set (0.00 sec)
出现以上提示说明授权成功了
检查创建的复制账号
select user,host,password from mysql.user;
MariaDB [(none)]> select user,host,password from mysql.user;
+--------+-----------+-------------------------------------------+
| user | host | password |
+--------+-----------+-------------------------------------------+
| root | localhost | *23AE809DDACAF96AF0FD78ED04B6A265E05AA257 |
| root | 127.0.0.1 | |
| root | ::1 | |
| sweet | % | *23AE809DDACAF96AF0FD78ED04B6A265E05AA257 |
| root | % | *23AE809DDACAF96AF0FD78ED04B6A265E05AA257 |
+--------+-----------+-------------------------------------------+
注意,这里有一个大坑!!!如果上面用户表里有一个匿名用户,那么普通用户在本机是登录不上的!!!
解决办法是删除匿名用户,注意一定要重启服务才会生效!!!
读者如果想详细了解登录不上的原因可以参考博客:mysql普通用户本机无法登录的解决办法
### 对主数据库锁表只读,防止数据写入,数据复制失败
```sql
flush table with read lock;
### 检查主库状态,记录日志文件的名字和位置
```sql
show master status;
+---------------------+----------+--------------+------------------+
| File | Position | Binlog_Do_DB | Binlog_Ignore_DB |
+---------------------+----------+--------------+------------------+
| sweet-logbin.000001 | 494 | | |
+---------------------+----------+--------------+------------------+
### 再打开一个SSH窗口,导出数据库的所有数据
在命令行下执行:
```sql
mysqldump -uroot -p --all-databases > /tmp/masterdb.sql
### 将导出的数据传输到从服务器
```linux
scp /tmp/masterdb.sql root@192.168.1.111:/tmp
以下操作在从库服务器上执行
关闭从库服务器
systemctl stop mariadb
### 打开/etc/my.cnf,写入以下配置
#
# This group is read both both by the client and the server
# use it for options that affect everything
#
[client-server]
[mysqld]
server-id=5
read-only=true
#
# include all files from the config directory
#
!includedir /etc/my.cnf.d
server-id不能与主库的相同
重启数据库,导入之前备份的数据库备份
systemctl start mariadb
mysql -uroot -p < /tmp/masterdb.sql
### 配置slave连接master
在mysql界面输入以下指令
change master to master_host='192.168.1.17',
master_user='sweet',
master_password='123',
master_log_file='sweet-logbin.000001', # 这里的文件名就是之前记录的文件名
master_log_pos=494; # 这里的状态就是position
### 启动从库的同步开关
```sql
start slave
### 查看复制状态
```sql
show slave status\G;
Slave_IO_State: Waiting for master to send event
Master_Host: 192.168.1.17
Master_User: sweet
Master_Port: 3306
Connect_Retry: 60
Master_Log_File: sweet-logbin.000001
Read_Master_Log_Pos: 494
Relay_Log_File: localhost-relay-bin.000002
Relay_Log_Pos: 540
Relay_Master_Log_File: sweet-logbin.000001
Slave_IO_Running: Yes
Slave_SQL_Running: Yes
Replicate_Do_DB:
Replicate_Ignore_DB:
Replicate_Do_Table:
Replicate_Ignore_Table:
Replicate_Wild_Do_Table:
Replicate_Wild_Ignore_Table:
Last_Errno: 0
Last_Error:
Skip_Counter: 0
Exec_Master_Log_Pos: 494
Relay_Log_Space: 842
Until_Condition: None
Until_Log_File:
Until_Log_Pos: 0
Master_SSL_Allowed: No
Master_SSL_CA_File:
Master_SSL_CA_Path:
Master_SSL_Cert:
Master_SSL_Cipher:
Master_SSL_Key:
Seconds_Behind_Master: 0
Master_SSL_Verify_Server_Cert: No
Last_IO_Errno: 0
Last_IO_Error:
Last_SQL_Errno: 0
Last_SQL_Error:
Replicate_Ignore_Server_Ids:
Master_Server_Id: 1
Master_SSL_Crl:
Master_SSL_Crlpath:
Using_Gtid: No
Gtid_IO_Pos:
Replicate_Do_Domain_Ids:
Replicate_Ignore_Domain_Ids:
Parallel_Mode: conservative
检查Master_Host, Master_User, Master_Log_File, Read_Master_Log_Pos, Slave_IO_Running, Slave_SQL_Running这几项是否无误
重启从库服务器,刷新用户表,使sweet用户能在从库登录
systemctl stop mariadb
systemctl start mariadb
mysql -usweet -p
### 解锁主库
unlock tables;
### 给sweet设置权限,,验证读写分离效果
grant select,create,drop on *.* to 'sweet'@'%' ;
主库数据库
+--------------------+
| Database |
+--------------------+
| information_schema |
| mysql |
| performance_schema |
+--------------------+
从库数据库
```sql
+--------------------+
| Database |
+--------------------+
| information_schema |
| mysql |
| performance_schema |
+--------------------+
在主库创建一个数据库
```sql
create database mm;
查看从库
```sql
MariaDB [(none)]> show databases;
+--------------------+
| Database |
+--------------------+
| information_schema |
| mm |
| mysql |
| performance_schema |
+--------------------+
在从库删除数据库mm
```sql
drop database mm;
提示只读,说明成功实现了读写分离
MariaDB [(none)]> drop database mm;
ERROR 1290 (HY000): The MariaDB server is running with the --read-only option so it cannot execute this statement
如果在主库删除了数据库mm,从库也会跟着消失
drop database mm;
+--------------------+
| Database |
+--------------------+
| information_schema |
| mysql |
| performance_schema |
+--------------------+


 796
796

 被折叠的 条评论
为什么被折叠?
被折叠的 条评论
为什么被折叠?
 到【灌水乐园】发言


