


SSH整合的大体结构:我们将Struts2和hibernate交给spring来管理
创建好web项目之后,首先当然是先引入需要的pom节点,需要的pom的节点可以在Maven官方仓库中下载https://mvnrepository.com/
当然以下是我自己准备好的一份pom节点,复制进去下载完即可使用
junit
junit
4.11
test
org.hibernate
hibernate-core
3.5.1-Final
javax.transaction
jta
1.1
org.hibernate
hibernate-annotations
3.4.0.GA
org.slf4j
slf4j-nop
1.6.4
org.slf4j
slf4j-api
1.7.25
org.hibernate.javax.persistence
hibernate-jpa-2.0-api
1.0.1.Final
net.sf.ehcache
ehcache
1.2.3
org.hibernate
hibernate-ehcache
3.6.10.Final
org.springframework
spring-context
4.2.0.RELEASE
org.aspectj
aspectjweaver
1.8.7
org.springframework
spring-web
4.2.0.RELEASE
javax.servlet
jstl
1.2
runtime
javax
javaee-api
6.0
provided
com.alibaba
druid
1.1.6
org.springframework
spring-tx
4.2.0.RELEASE
org.springframework
spring-orm
4.2.0.RELEASE
org.springframework
spring-beans
4.2.0.RELEASE
org.apache.struts
struts2-convention-plugin
2.3.24
commons-lang3
org.apache.commons
org.apache.struts
struts2-spring-plugin
2.3.24
javax.servlet
javax.servlet-api
3.1.0
provided
asm
asm-commons
3.3
commons-fileupload
commons-fileupload
1.3.1
mysql
mysql-connector-java
5.1.39
commons-io
commons-io
2.4
org.apache.commons
commons-lang3
3.3.1
commons-logging
commons-logging-api
1.1
org.freemarker
freemarker
2.3.23
javassist
javassist
3.11.0.GA
ognl
ognl
3.0.6
org.apache.struts
struts2-core
2.3.24
org.apache.struts.xwork
xwork-core
2.3.24
src/main/resources
src/main/java
**/*.xml
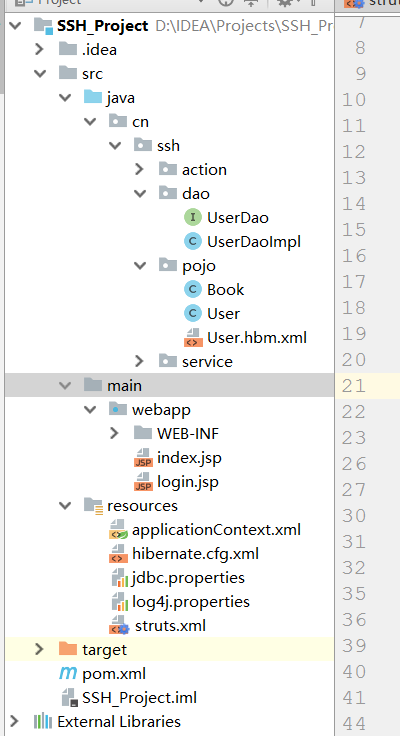
在src下创建resource目录,并在创建好的目录中创建相应的XML文件
applicationContext.xml全局配置文件
http://www.springframework.org/schema/beans/spring-beans.xsd
http://www.springframework.org/schema/aop
http://www.springframework.org/schema/aop/spring-aop.xsd
http://www.springframework.org/schema/context
http://www.springframework.org/schema/context/spring-context.xsd
http://www.springframework.org/schema/cache
http://www.springframework.org/schema/cache/spring-cache.xsd
http://www.springframework.org/schema/tx
http://www.springframework.org/schema/tx/spring-tx.xsd">
true
true
update
cn/ssh/pojo/User.hbm.xml
hibernate.cfg.xml(当applicationtext.xml中出现Hibernate相关配置时,就可以不需要此文件。。当然此时的applicationtext.xml中文件是存在Hibernate配置)
/p>
"-//Hibernate/Hibernate Configuration DTD 3.0//EN"
"http://www.hibernate.org/dtd/hibernate-configuration-3.0.dtd">
com.mysql.jdbc.Driver
jdbc:mysql:///hibernate
root
0000
true
true
update
thread
至于Struts.xml文件我们等到需要的时候在进行配置
web.xml(需要修改web.xml的头部)
http://java.sun.com/xml/ns/j2ee/web-app_2_4.xsd">
Archetype Created Web Application
contextConfigLocation
classpath:applicationContext.xml
org.springframework.web.context.ContextLoaderListener
OpenSessionInViewFilter
org.springframework.orm.hibernate3.support.OpenSessionInViewFilter
OpenSessionInViewFilter
*.action
struts2
org.apache.struts2.dispatcher.ng.filter.StrutsPrepareAndExecuteFilter
struts2
/*
指定项目启动后的首页面,如果不是index.jsp页面需要添加
login.jsp
创建Java包,创建实体类以及相关的xml文件

Pojo层
packagecn.ssh.pojo;import javax.persistence.*;public classUser {privateInteger id;privateString name;privateString password;publicInteger getId() {returnid;
}public voidsetId(Integer id) {this.id =id;
}publicString getName() {returnname;
}public voidsetName(String name) {this.name =name;
}publicString getPassword() {returnpassword;
}public voidsetPassword(String password) {this.password =password;
}
}
/p>
"-//Hibernate/Hibernate Configuration DTD 3.0//EN"
"http://www.hibernate.org/dtd/hibernate-mapping-3.0.dtd">
dao层
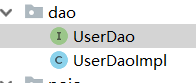
public interfaceUserDao {publicUser findUser(String name,String password);
}
在实现类中我们继承HibernateDaoSupport类,这个类主要给我们提供了一些增删改的方法
packagecn.ssh.dao;importcn.ssh.pojo.User;importorg.hibernate.SessionFactory;importorg.springframework.beans.factory.annotation.Autowired;importorg.springframework.beans.factory.annotation.Qualifier;importorg.springframework.orm.hibernate3.support.HibernateDaoSupport;importorg.springframework.stereotype.Repository;importjava.util.List;/***@author: wmj
* @Data: 2018-10-30 14:44
**/
public class UserDaoImpl extends HibernateDaoSupport implementsUserDao {
@OverridepublicUser findUser(String name, String password) {
List users = (List) this.getHibernateTemplate()
.find("from User u WHERE u.name=? AND u.password=?", name, password);if (users.size()>0){return users.get(0);
}else{return null;
}
}
}
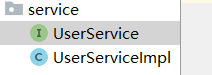
service层
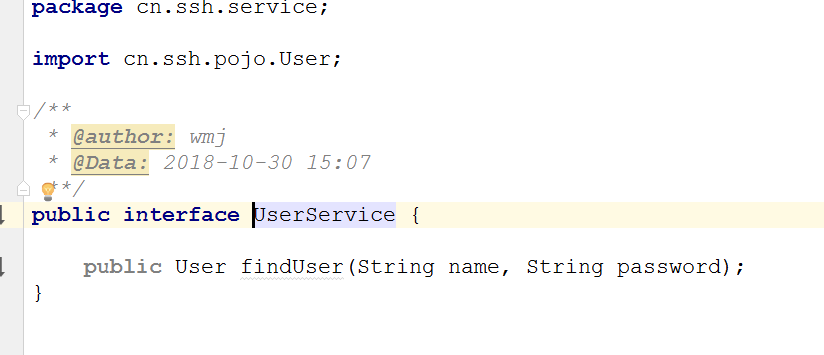
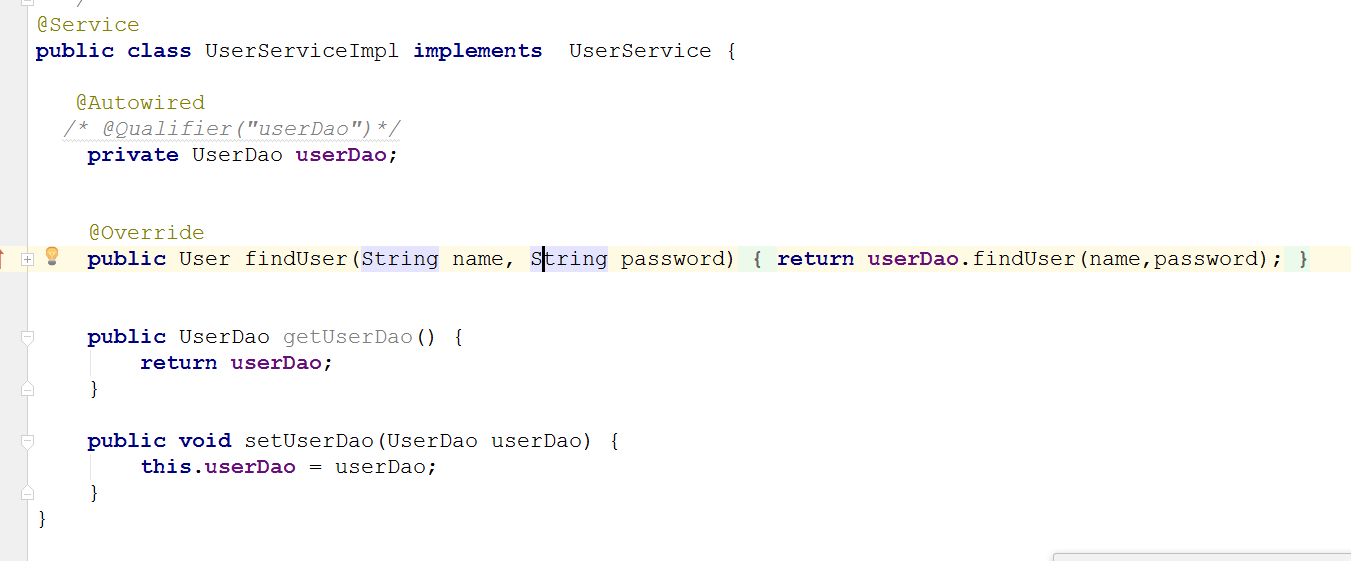
action层
UserAction继承ActionSupport
packagecn.ssh.action;importcn.ssh.pojo.User;importcn.ssh.service.UserService;importcom.opensymphony.xwork2.ActionContext;importcom.opensymphony.xwork2.ActionSupport;importorg.springframework.beans.factory.annotation.Autowired;importorg.springframework.beans.factory.annotation.Qualifier;importorg.springframework.stereotype.Controller;importjava.util.Map;/***@author: wmj
* @Data: 2018-10-30 15:25
**/@Controllerpublic class UserAction extendsActionSupport {
@AutowiredprivateUserService userService;privateString name; //名称privateString password; //密码privateString message; //信息提示publicString login(){
User user=userService.findUser(name, password);
ActionContext context=ActionContext.getContext();
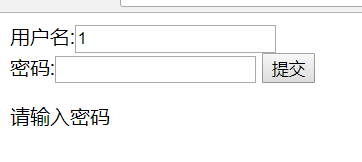
//用户名为空if (name==null || name.equals("")){this.setMessage("请输入名称");return "login";
}
//密码为空if (password==null || password.equals("")){this.setMessage("请输入密码");return "login";
}
//将登陆的用户保存在session集合中
Map session=context.getSession();if (null!=user){
session.put("user",user);return "index";
}this.setMessage("登录失败");return "login";
}
//要有getter和setter方法,否则映射不到publicUserService getUserService() {returnuserService;
}public voidsetUserService(UserService userService) {this.userService =userService;
}publicString getName() {returnname;
}public voidsetName(String name) {this.name =name;
}publicString getPassword() {returnpassword;
}public voidsetPassword(String password) {this.password =password;
}publicString getMessage() {returnmessage;
}public voidsetMessage(String message) {this.message =message;
}
}
创建相应的JSP页面
创建login.jsp 登陆页面
User: wumengjieDate:2018/10/30
Time:15:32
Tochange this template use File | Settings | File Templates.--%>
Title用户名:
密码:
这时配置Struts.xml文件
/p>
"-//Apache Software Foundation//DTD Struts Configuration 2.3//EN"
"http://struts.apache.org/dtds/struts-2.3.dtd">
/login.jsp
/index.jsp
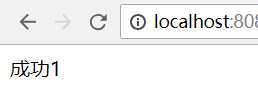
登录成功页面:index.jsp
成功
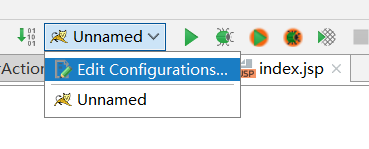
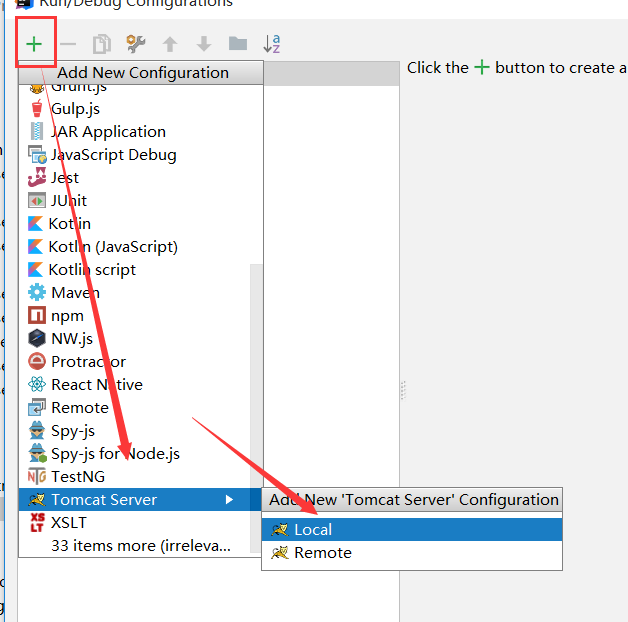
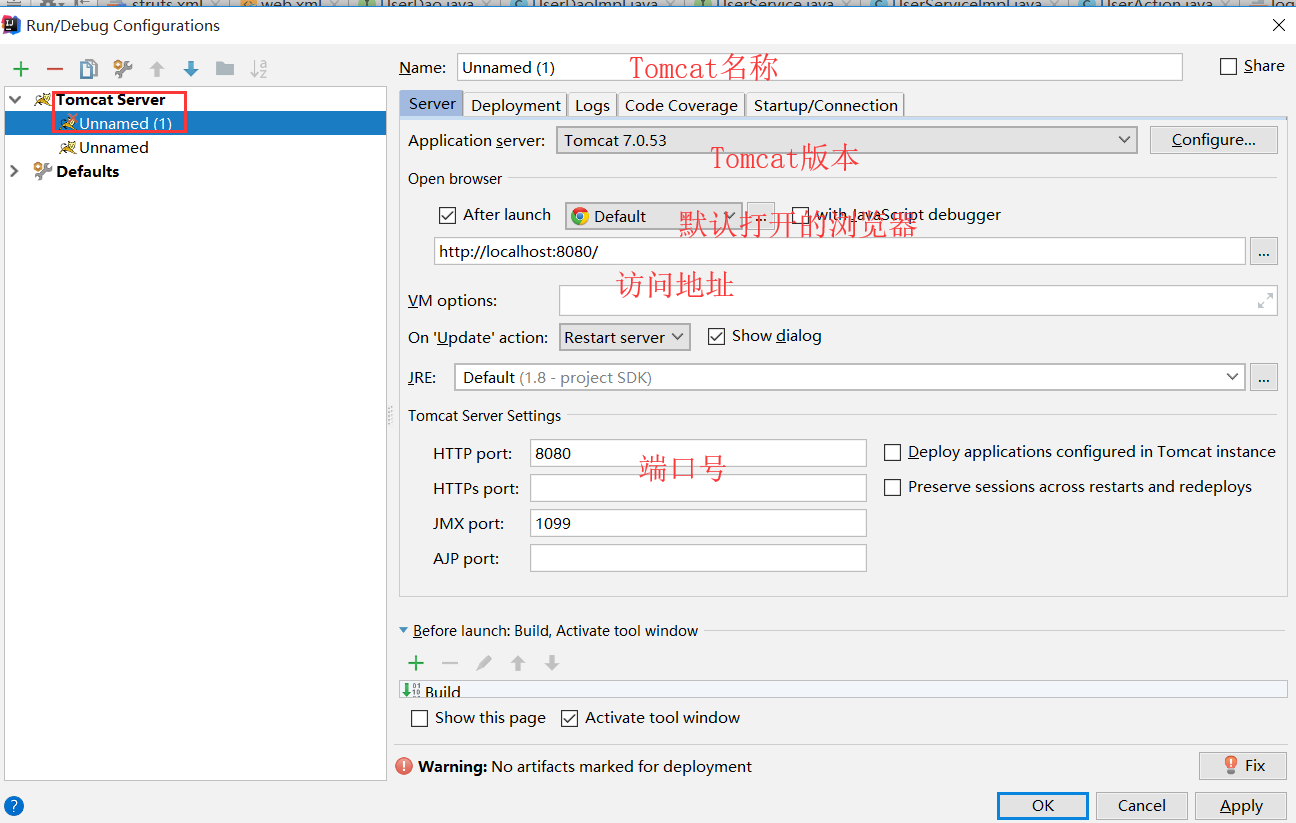
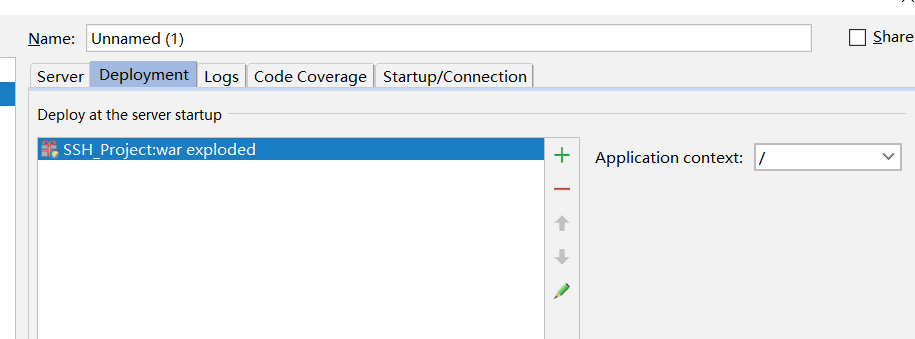
配置TomCat
点击Edit Configurations....
点击加号,找到Tomcat Server,配置本地tomcat
配置相关信息
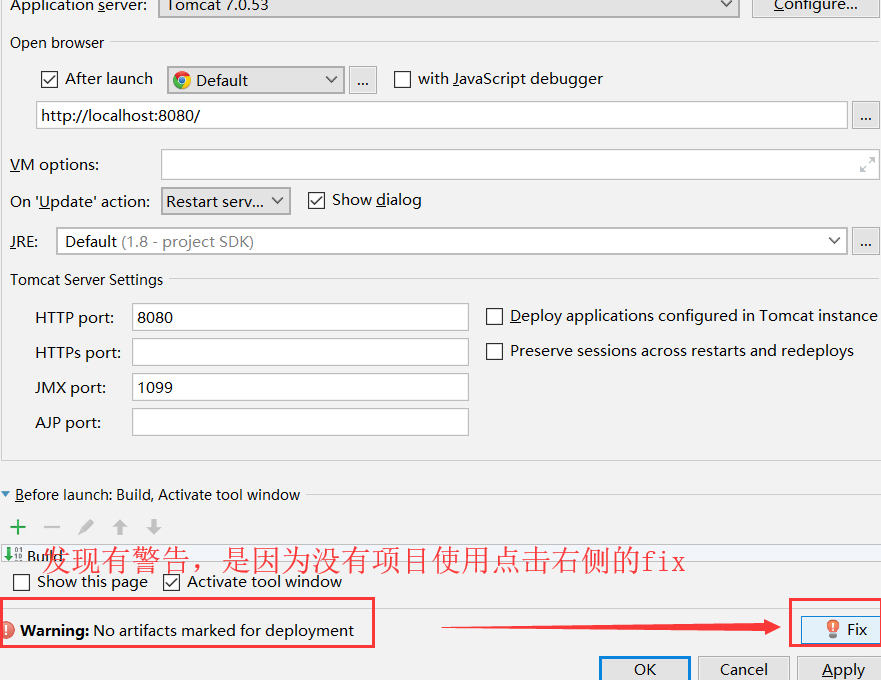
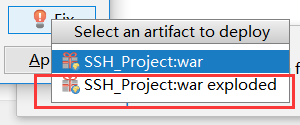
点击带有exploded的即可,把tomcat集成到项目中
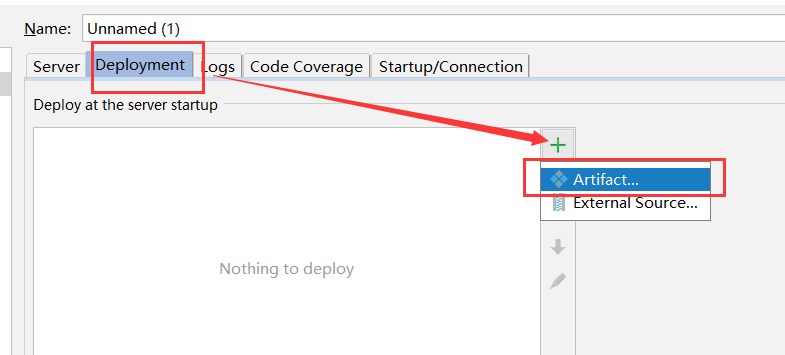
也可以点击 Deployment------点击加号-----artifact
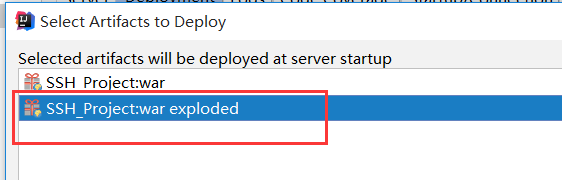
什么都不需要改,点击apply即可
启动tomcat,测试
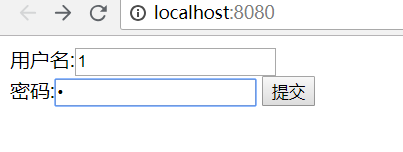
当没有输入密码或输入错误密码会进行提示,因为在UserAction中有message字段,对字段进行赋值,在页面获取即可


 354
354


 被折叠的 条评论
为什么被折叠?
被折叠的 条评论
为什么被折叠?
 到【灌水乐园】发言


