


一、背景
最近在做一些东西的时候,遇到一个需要Springmvc后台接收list类型数据的需求,几经辗转才完美解决了这个问题,今天记下来方便以后使用,也分享给需要的小伙伴们~
二、实现方式
实现方式一
前端页面
 1 <%@ page language="java" contentType="text/html; charset=UTF-8"
 2     pageEncoding="UTF-8"%>
 3 <!DOCTYPE html PUBLIC "-//W3C//DTD HTML 4.01 Transitional//EN" "http://www.w3.org/TR/html4/loose.dtd">
 4 <html>
 5 <head>
 6 <meta http-equiv="Content-Type" content="text/html; charset=UTF-8">
 7 <title>测试</title>
 8 </head>
 9 <body>
10     <input type="button" name="request" value="请求后台" style="width:200px;height:50px;background-color:red;margin-bottom:20px;">
11     <div name="rs"></div>
12     <input type="checkbox" name="se" value="1">hafiz.zhang<br/>
13     <input type="checkbox" name="se" value="2">jack.chen<br/>
14     <input type="checkbox" name="se" value="3">lili.wang<br/>
15 <script type="text/javascript">
16
17     $("input[name='request']").click(function(){
18         var data = [];
19         $("input[name='se']").each(function(){
20             if($(this).prop("checked")) {
21                 data.push($(this).val());
22             }
23         });
24         var json_data = JSON.stringify(data);
25         $.ajax({
26             type:"post",
27             url:$.wap.url + "/test/index",
28             contentType:"application/json",
29             data:json_data ,
30             dataType:"json",
31             success:function(data){
32                 var str="";
33                 for(var i = 0; i < data.length; i++) {
34                     str += ";name=" + data[i];
35                 }
36                 $("div[name='rs']").html(str);
37             },
38             error:function(){
39                 alert("出错啦");
40             }
41         });
42     });
43 </script>
44 </body>
45 </html>
后台接收
 1 package com.hafiz.www.controller;
 2
 3 import java.util.ArrayList;
 4 import java.util.List;
 5
 6 import org.springframework.stereotype.Controller;
 7 import org.springframework.web.bind.annotation.RequestBody;
 8 import org.springframework.web.bind.annotation.RequestMapping;
 9 import org.springframework.web.bind.annotation.RequestMethod;
10 import org.springframework.web.bind.annotation.ResponseBody;
11
12 @Controller
13 @RequestMapping("/test")
14 public class TestController {
15     @RequestMapping(value = "/index", method = RequestMethod.POST)
16     @ResponseBody
17     public List<Integer> test(@RequestBody ArrayList<Integer> ids){
18         System.out.println("List==" + ids);
19         return ids;
20     }
21 }
注意:这种方法只适用于POST方法提交,(上面代码中标红的是必不可少的代码)如果使用get方法会出现如下图所示的错误
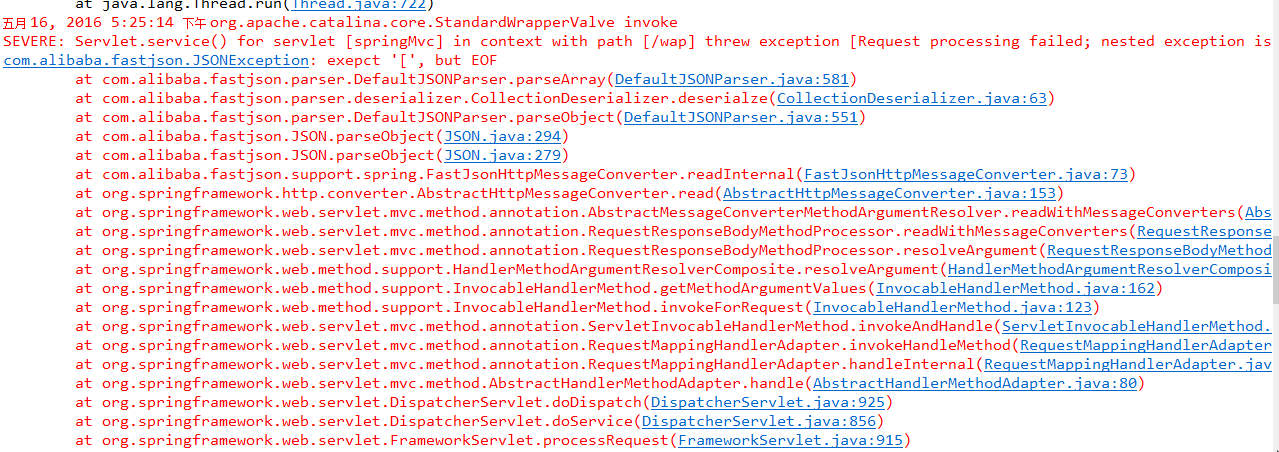
这是因为get方式的参数中的双引号会被编码,导致传到后台的不再是json串格式,所以解析出错。
实现方式二
前端页面
 1 <%@ page language="java" contentType="text/html; charset=UTF-8"
 2     pageEncoding="UTF-8"%>
 3 <!DOCTYPE html PUBLIC "-//W3C//DTD HTML 4.01 Transitional//EN" "http://www.w3.org/TR/html4/loose.dtd">
 4 <html>
 5 <head>
 6 <meta http-equiv="Content-Type" content="text/html; charset=UTF-8">
 7 <title>测试</title>
 8 </head>
 9 <body>
10     <input type="button" name="request" value="请求后台" style="width:200px;height:50px;background-color:red;margin-bottom:20px;">
11     <div name="rs"></div>
12     <input type="checkbox" name="se" value="1">hafiz.zhang<br/>
13     <input type="checkbox" name="se" value="2">jack.chen<br/>
14     <input type="checkbox" name="se" value="3">lili.wang<br/>
15 <script type="text/javascript">
16
17     $("input[name='request']").click(function(){
18         var data = [];
19         $("input[name='se']").each(function(){
20             if($(this).prop("checked")) {
21                 data.push($(this).val());
22             }
23         });
24         $.ajax({
25             type:"get",
26             url:$.wap.url + "/test/index",
27             data:{"datas":data},//或者data:{"datas[]":data}
28             dataType:"json",
29             success:function(data){
30                 var str="";
31                 for(var i = 0; i < data.length; i++) {
32                     str += ";name=" + data[i];
33                 }
34                 $("div[name='rs']").html(str);
35             },
36             error:function(){
37                 alert("出错啦");
38             }
39         });
40     });
41 </script>
42 </body>
43 </html>
后台接收,指定参数名必须以数组方式,如:@RequestParam("datas[]")
1).通过ArrayList接收
 1 package com.hafiz.www.controller;
 2
 3 import java.util.ArrayList;
 4 import java.util.List;
 5
 6 import org.springframework.stereotype.Controller;
 7 import org.springframework.web.bind.annotation.RequestMapping;
 8 import org.springframework.web.bind.annotation.RequestMethod;
 9 import org.springframework.web.bind.annotation.RequestParam;
10 import org.springframework.web.bind.annotation.ResponseBody;
11
12 @Controller
13 @RequestMapping("/test")
14 public class TestController {
15     @RequestMapping(value = "/index", method = RequestMethod.GET)
16     @ResponseBody
17     public List test(@RequestParam("datas[]") ArrayList<Integer> ids){
18         System.out.println("List==" + ids);
19         return ids;
20     }
21 }
2).通过数组进行接收
 1 package com.hafiz.www.controller;
 2
 3 import java.util.ArrayList;
 4 import java.util.List;
 5
 6 import org.springframework.stereotype.Controller;
 7 import org.springframework.web.bind.annotation.RequestMapping;
 8 import org.springframework.web.bind.annotation.RequestMethod;
 9 import org.springframework.web.bind.annotation.RequestParam;
10 import org.springframework.web.bind.annotation.ResponseBody;
11
12 @Controller
13 @RequestMapping("/test")
14 public class TestController {
15     @RequestMapping(value = "/index", method = RequestMethod.POST)
16     @ResponseBody
17     public Integer[] test(@RequestParam("datas[]") Integer[] ids){
18         System.out.println("ids==" + ids);
19         return ids;
20     }
21 }
注意:
1.这种方式对于get和post方式的请求同样都适用....
2.以上两种实现方式传到后台的数据不能为null,否则会报Http 400错误。
实现方式三
前端页面
 1 <%@ page language="java" contentType="text/html; charset=UTF-8" pageEncoding="UTF-8" %>
 2 <!DOCTYPE html PUBLIC "-//W3C//DTD HTML 4.01 Transitional//EN" "http://www.w3.org/TR/html4/loose.dtd">
 3 <html>
 4 <head>
 5     <meta http-equiv="Content-Type" content="text/html; charset=UTF-8">
 6     <title>测试</title>
 7 </head>
 8 <body>
 9 <input type="button" name="request" value="请求后台"
10        style="width:200px;height:50px;background-color:red;margin-bottom:20px;">
11 <div name="rs"></div>
12 <input type="checkbox" name="se" value="1">hafiz.zhang<br/>
13 <input type="checkbox" name="se" value="2">jack.chen<br/>
14 <input type="checkbox" name="se" value="3">lili.wang<br/>
15 <script type="application/javascript" src="js/jquery-1.11.1.min.js"></script>
16 <script type="text/javascript">
17
18     $("input[name='request']").click(function () {
19         var data = [];
20         $("input[name='se']").each(function () {
21             if ($(this).prop("checked")) {
22                 data.push($(this).val());
23             }
24         });
25         $.ajax({
26             type: "post",
27             url: "/test/index",
28             data: {"datas": data.join()}
29             dataType: "json",
30             success: function (data) {
31                 var str = "";
32                 for (var i = 0; i < data.length; i++) {
33                     str += ";name=" + data[i];
34                 }
35                 $("div[name='rs']").html(str);
36             },
37             error: function () {
38                 alert("出错啦");
39             }
40         });
41     });
42 </script>
43 </body>
44 </html>
后端代码
1)通过数组接收
 1 package com.hafiz.www.controller;
 2
 3 import org.springframework.stereotype.Controller;
 4 import org.springframework.web.bind.annotation.RequestMapping;
 5 import org.springframework.web.bind.annotation.RequestMethod;
 6 import org.springframework.web.bind.annotation.RequestParam;
 7 import org.springframework.web.bind.annotation.ResponseBody;
 8
 9 import java.util.ArrayList;
10 import java.util.List;
11
12 /**
13  * Desc:测试控制器
14  * Created by hafiz.zhang on 2017/7/2.
15  */
16 @Controller
17 @RequestMapping("/test")
18 public class TestController {
19     @RequestMapping(value = "/index", method = RequestMethod.POST)
20     @ResponseBody
21     public Integer[] test(@RequestParam("datas") Integer[] ids) {
22         System.out.println("ids=" + ids);
23         return ids;
24     }
25 }
2).通过List接收
package com.hafiz.www.controller;

import org.springframework.stereotype.Controller;
import org.springframework.web.bind.annotation.RequestMapping;
import org.springframework.web.bind.annotation.RequestMethod;
import org.springframework.web.bind.annotation.RequestParam;
import org.springframework.web.bind.annotation.ResponseBody;
import java.util.List;

/**
 * Desc:测试控制器
 * Created by hafiz.zhang on 2017/7/2.
 */
@Controller
@RequestMapping("/test")
public class TestController {
    @RequestMapping(value = "/index", method = RequestMethod.POST)
    @ResponseBody
    public List test(@RequestParam("datas") List<Integer> ids) {
        System.out.println("ids=" + ids);
        return ids;
    }
}
这种方式即使没有选中任何复选框进行提交,也不会报错!
对于想要前端传自定义对象数组到后端,以上的方式就不适用了,那么解决办法是什么呢?
-
ajax请求中设置contentType:"application/json;charset=utf-8"
-
ajax请求中设置data:JSON.stringify(dataList)
-
后端Controller种用@RequestBody YourObject[] data进行接收,并且只能用数组接收.
如果你有更好的实现方式,希望可以拿来分享。。。。
三、总结
1.实现方式一只对post方法有效,且比较繁琐,不推荐!
2.实现方式二要求后端接收的时候必须声明参数为数组,但可以使用数组或者list进行接收参数,如:@RequestParam("datas[]"),前端使用data:{"datas":data}或data:{"datas[]":data}都可以!且post和get方法都适用。但是不能传空数组,限制也比较多,也不太推荐。
3.实现方式三只需要前端传值的时候使用数组的join()方法,为空数组也不会报错,配置简单,要求少,且支持使用数组和list进行接收参数,比较推荐!


 426
426


 被折叠的 条评论
为什么被折叠?
被折叠的 条评论
为什么被折叠?
 到【灌水乐园】发言


