


MVN 常用命令解析
一.命令说明
除了在使用开发工具进行编译,有时我们还需要使用命令行编译,诸如编译 Jar 包,输出到指定位置等需要,Pom 的配置前面已经介绍了,下面列举一些MVN命令
1.帮助命令查看
mvn -help
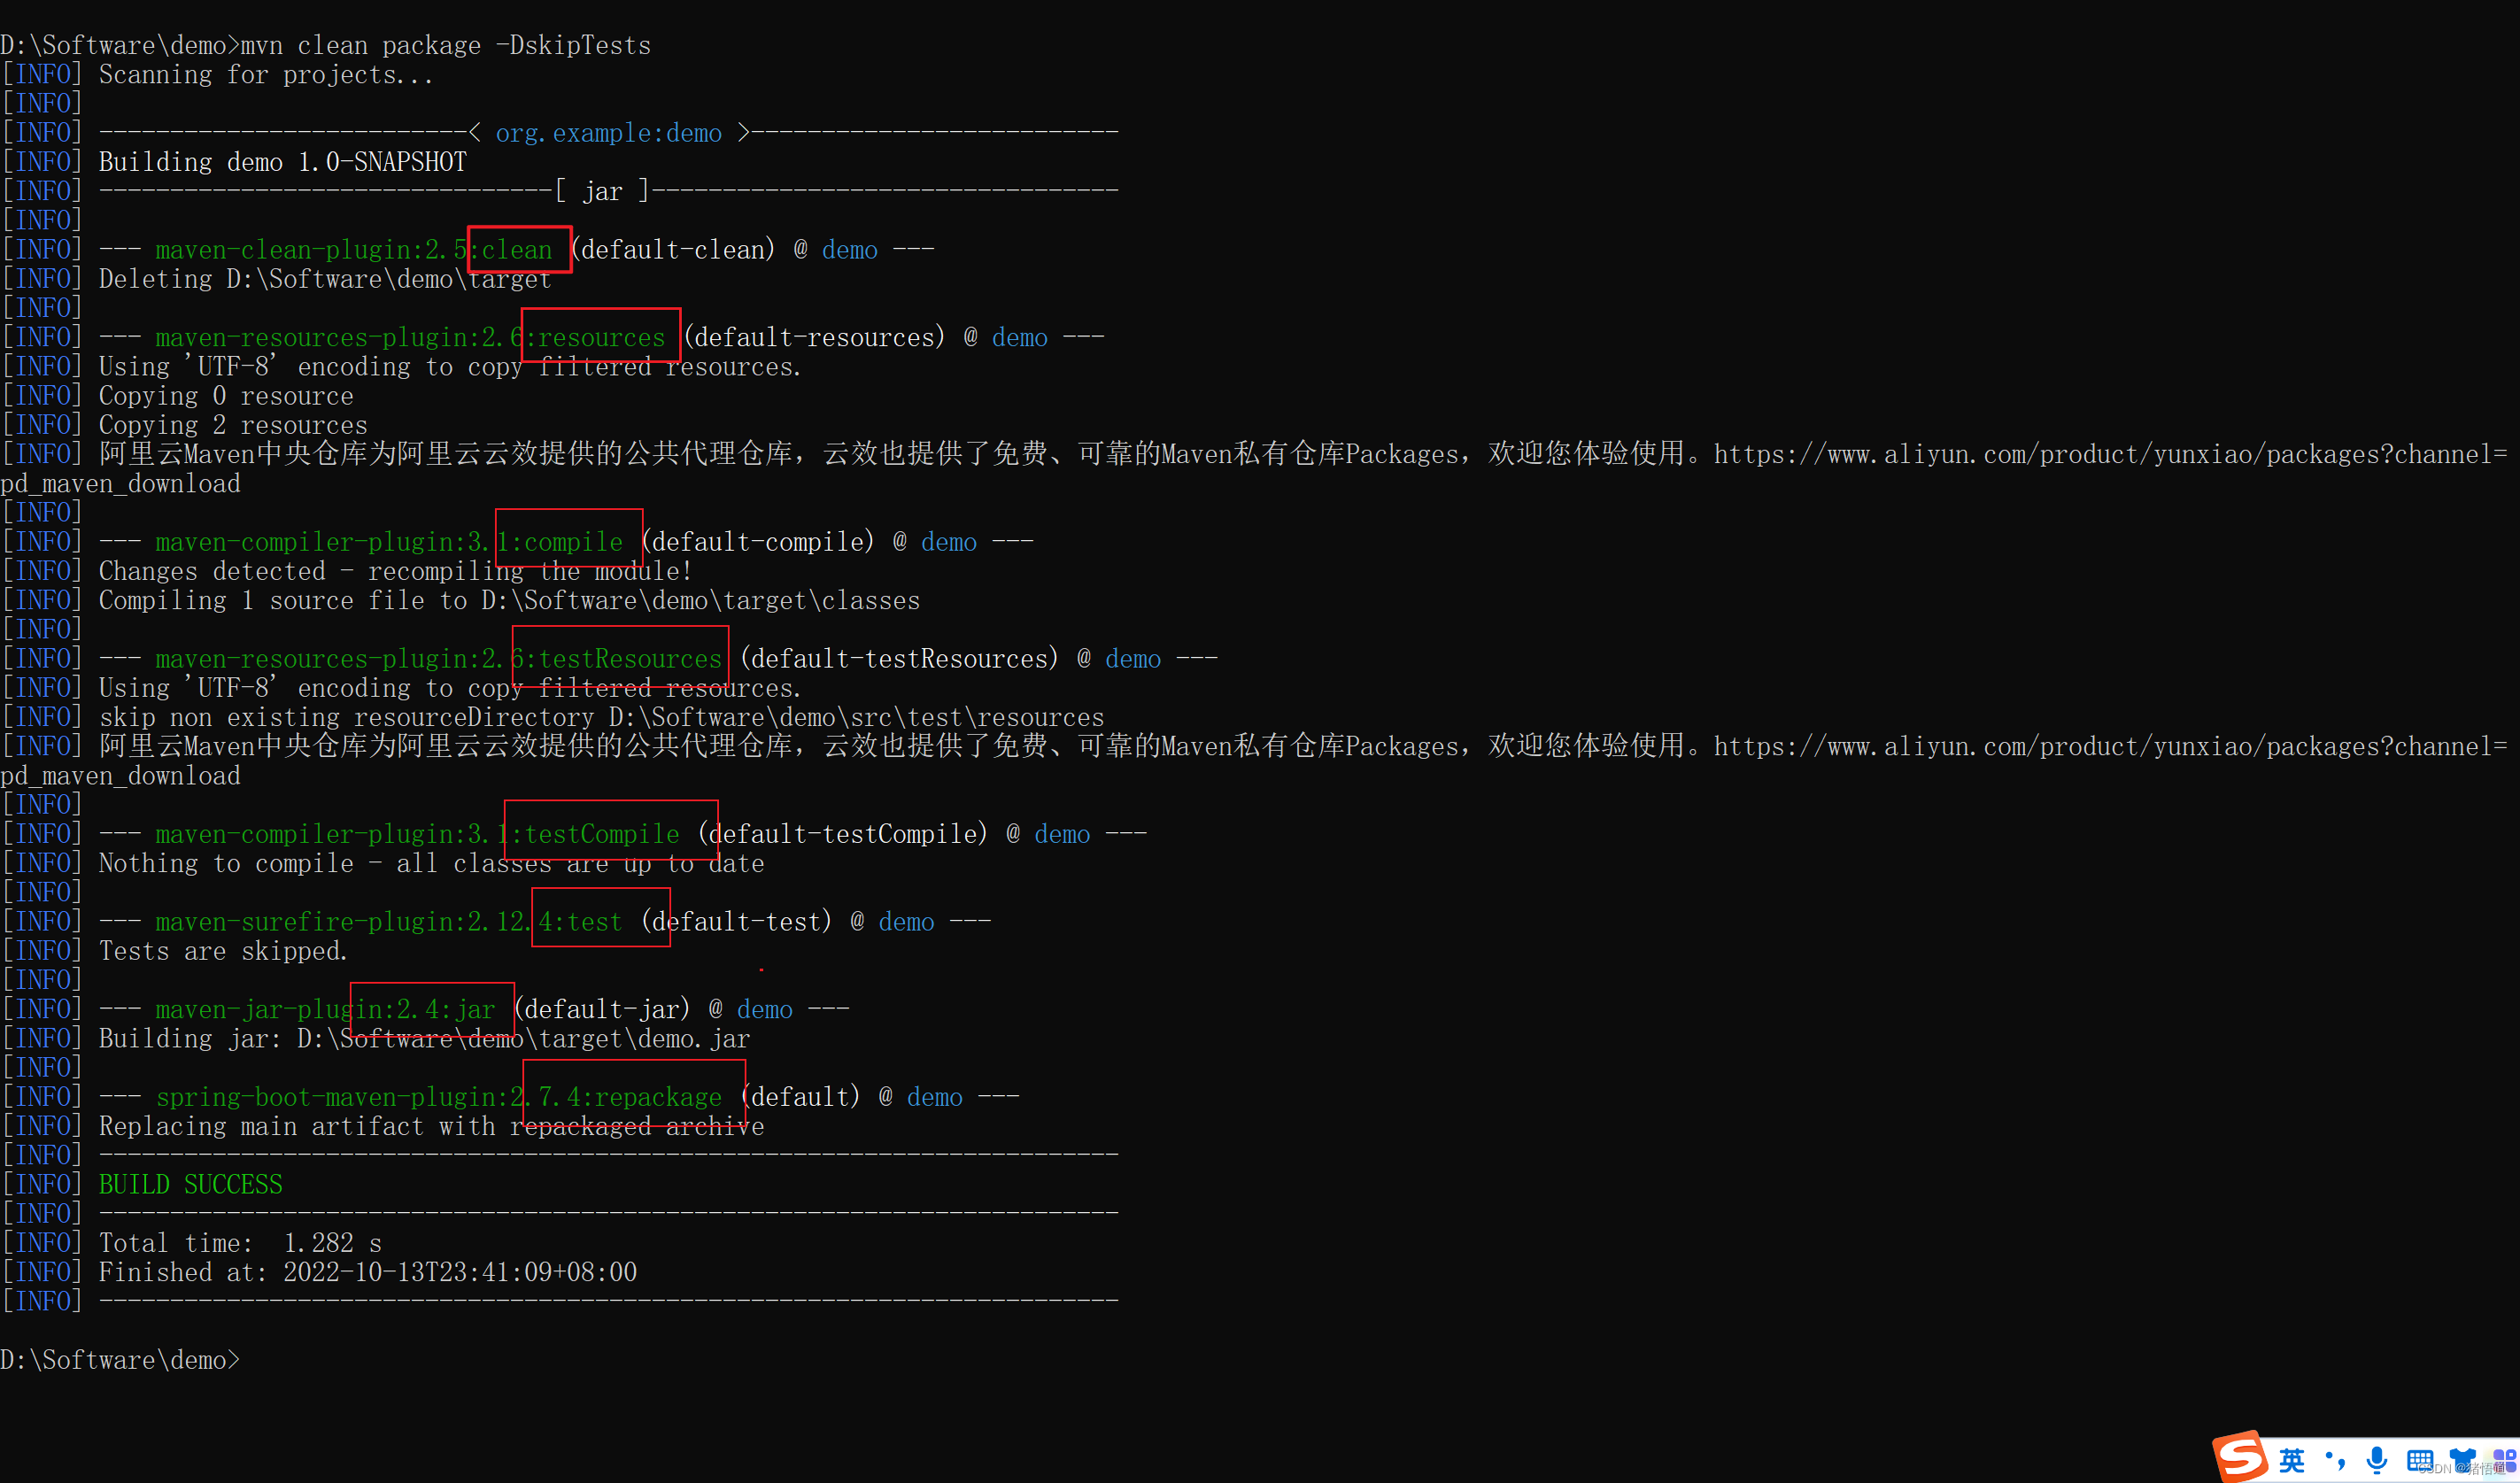
2.清理和编译,包含了 7 个阶段:clean、resources、compile、testResources、testCompile、test、jar
mvn clean package -DskipTests
3.清理和编译,并上传本地库,包含了 8 个阶段:clean、resources、compile、testResources、testCompile、test、jar、install
mvn clean install -DskipTests
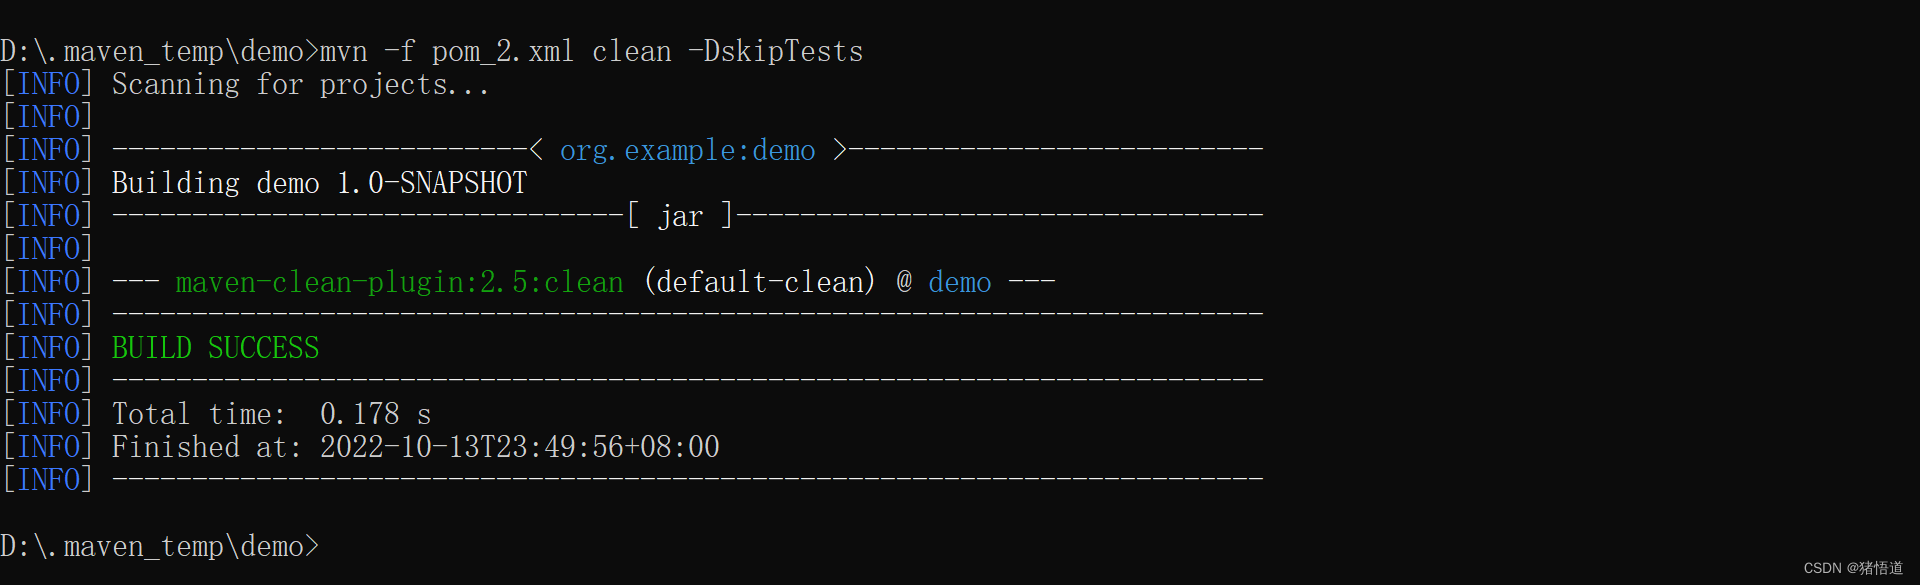
4.指定使用的Pom文件(默认当前目录下 pom.xml 文件,不存在又未单独指定则编译报错)
mvn -f pom_1.xml clean -DskipTests
5.聚合项目,在父目录触发编译,默认按子模块配置顺序编译(但如果子模块之间存在依赖关系,则会自动先编译被依赖的)
mvn clean package -DskipTests
6.聚合项目,编译指定子模块
mvn clean package -pl mod_1 -DskipTests
7.编译指定子模块及其依赖项
mvn clean package -pl mod_2 -am -DskipTests
8.按顺序编译指定子模块
mvn clean package -pl mod_1,mod_2
9.同时编译依赖当前模块的模块,-am 和 -amd 可同时出现
mvn clean package -pl mod_2 -amd
mvn clean package -pl mod_2 -am -amd
10.-D + 参数名,可动态修改Pom配置的属性值:包名、输出目录等
mvn clean package -pl mod_2 -am -DjarName=mod_2_modify
11.-P + 参数名,动态设置编译环境和参数
mvn clean package -Pdev
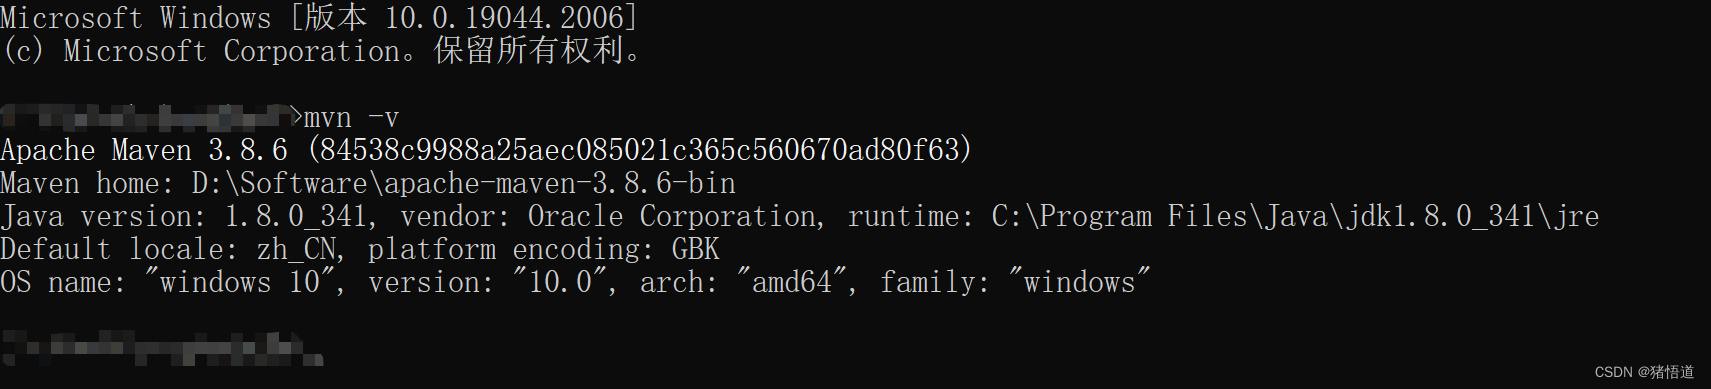
测试用 Maven 版本
二.MVN 命令测试
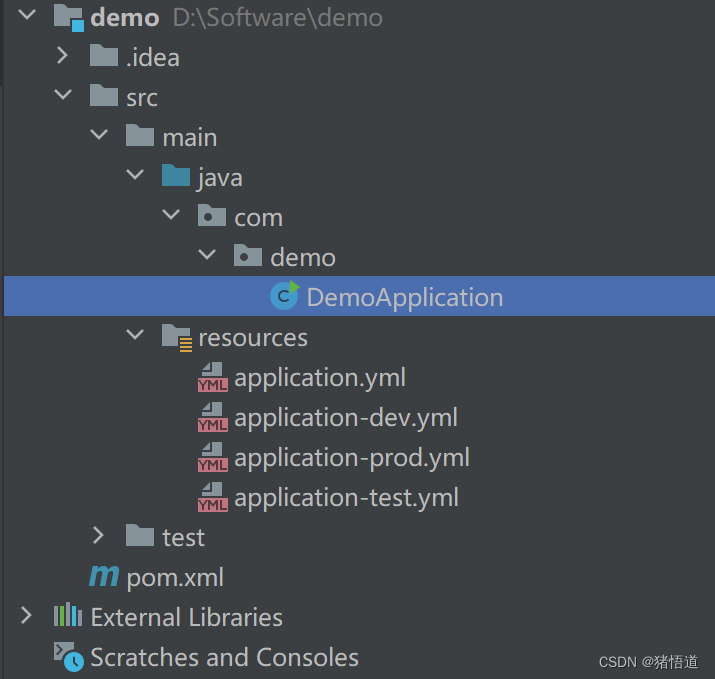
1.清理和打包
工程结构(仅定义一个启动类用于演示),
Pom 配置
<?xml version="1.0" encoding="UTF-8"?>
<project xmlns="http://maven.apache.org/POM/4.0.0"
         xmlns:xsi="http://www.w3.org/2001/XMLSchema-instance"
         xsi:schemaLocation="http://maven.apache.org/POM/4.0.0 http://maven.apache.org/xsd/maven-4.0.0.xsd">
    <modelVersion>4.0.0</modelVersion>

    <groupId>org.example</groupId>
    <artifactId>demo</artifactId>
    <version>1.0-SNAPSHOT</version>

    <properties>
        <maven.compiler.source>8</maven.compiler.source>
        <maven.compiler.target>8</maven.compiler.target>
        <project.build.sourceEncoding>UTF-8</project.build.sourceEncoding>
    </properties>

    <!--配置阿里云依赖包和插件仓库-->
    <repositories>
        <repository>
            <id>aliyun</id>
            <url>https://maven.aliyun.com/repository/public</url>
            <releases>
                <enabled>true</enabled>
            </releases>
            <snapshots>
                <enabled>false</enabled>
            </snapshots>
        </repository>
    </repositories>
    <pluginRepositories>
        <pluginRepository>
            <id>aliyun-plugin</id>
            <url>https://maven.aliyun.com/nexus/content/groups/public/</url>
            <snapshots>
                <enabled>false</enabled>
            </snapshots>
        </pluginRepository>
    </pluginRepositories>

    <dependencies>
        <dependency>
            <groupId>org.springframework.boot</groupId>
            <artifactId>spring-boot-starter-web</artifactId>
            <version>2.7.4</version>
        </dependency>

    </dependencies>

    <build>
        <finalName>demo</finalName>
        <plugins>
            <plugin>
                <groupId>org.springframework.boot</groupId>
                <artifactId>spring-boot-maven-plugin</artifactId>
                <version>2.7.4</version>
                <executions>
                    <execution>
                        <goals>
                            <goal>repackage</goal>
                        </goals>
                    </execution>
                </executions>
            </plugin>
        </plugins>
    </build>
</project>
项目启动类
package com.demo;

import org.springframework.boot.SpringApplication;
import org.springframework.boot.autoconfigure.SpringBootApplication;

/**
 * @author
 * @date 2022-10-13 14:22
 * @since 1.8
 */
@SpringBootApplication
public class DemoApplication {

    /**
     * 主类
     * @param args
     */
    public static void main(String[] args) {
        System.out.println("DemoApplication Start ...");
        SpringApplication.run(DemoApplication.class,args);
    }
}
编译:mvn clean package -DskipTests
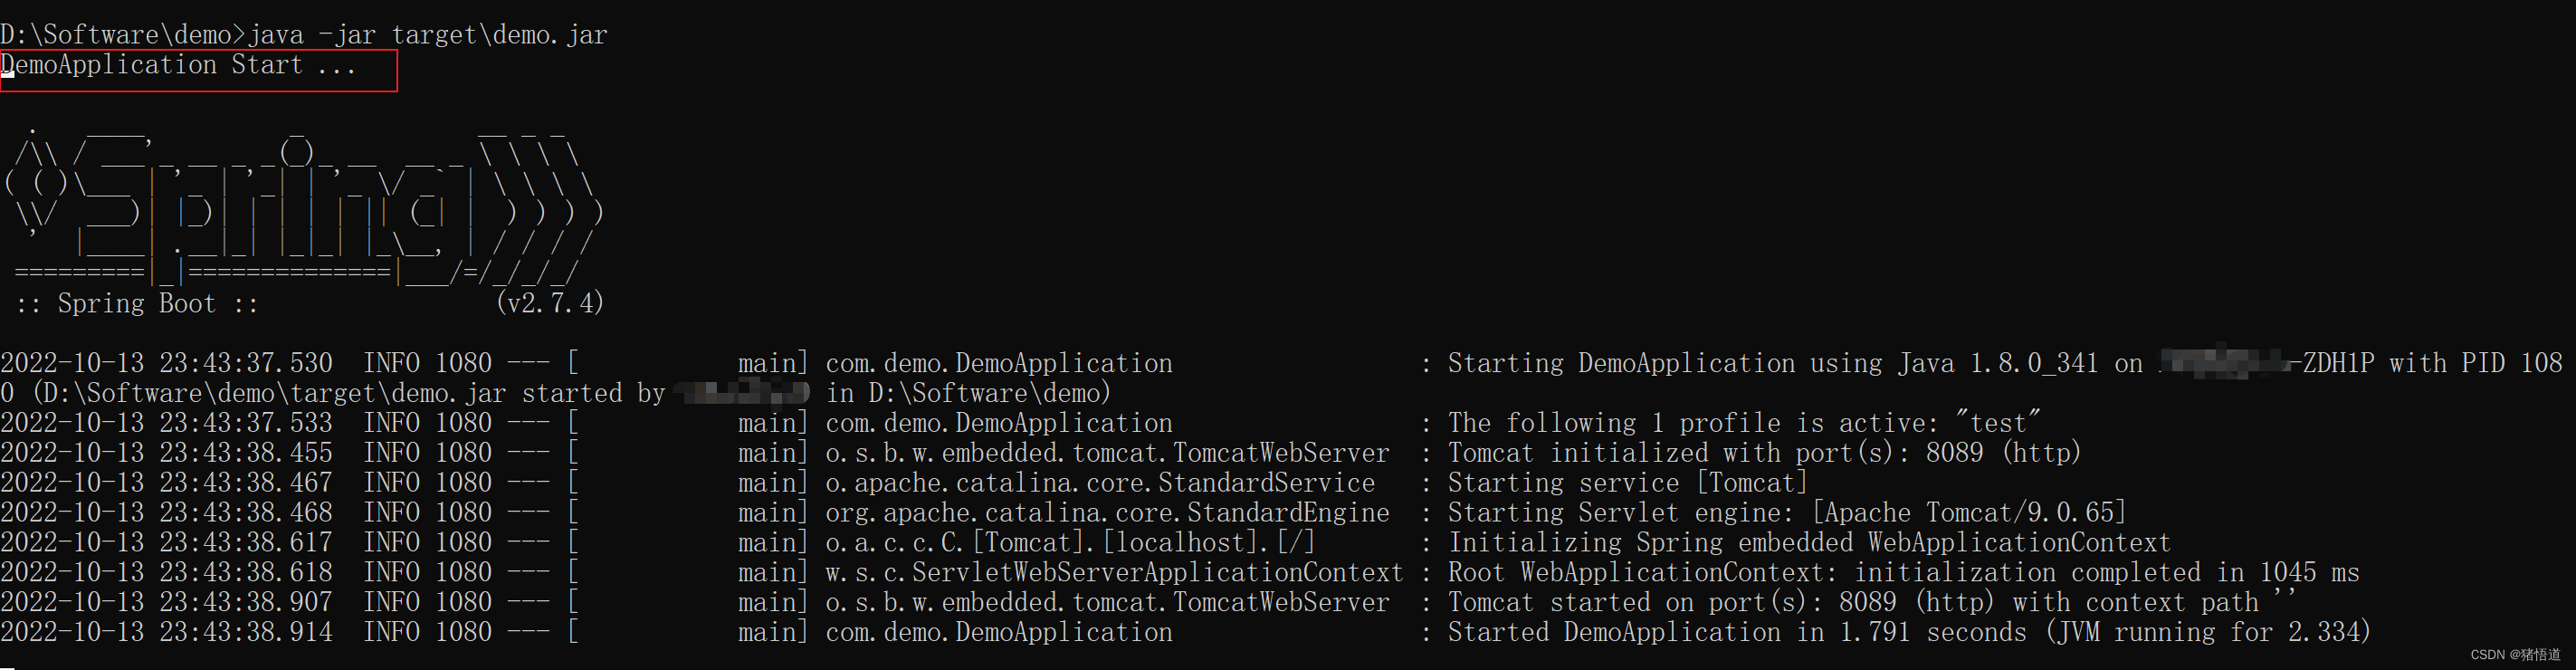
启动
2.指定 Pom 文件
将上面源码拷贝一份到其他位置,并修改 Pom 文件名称,如图

默认情况执行报错(仅通过 clean 验证即可)
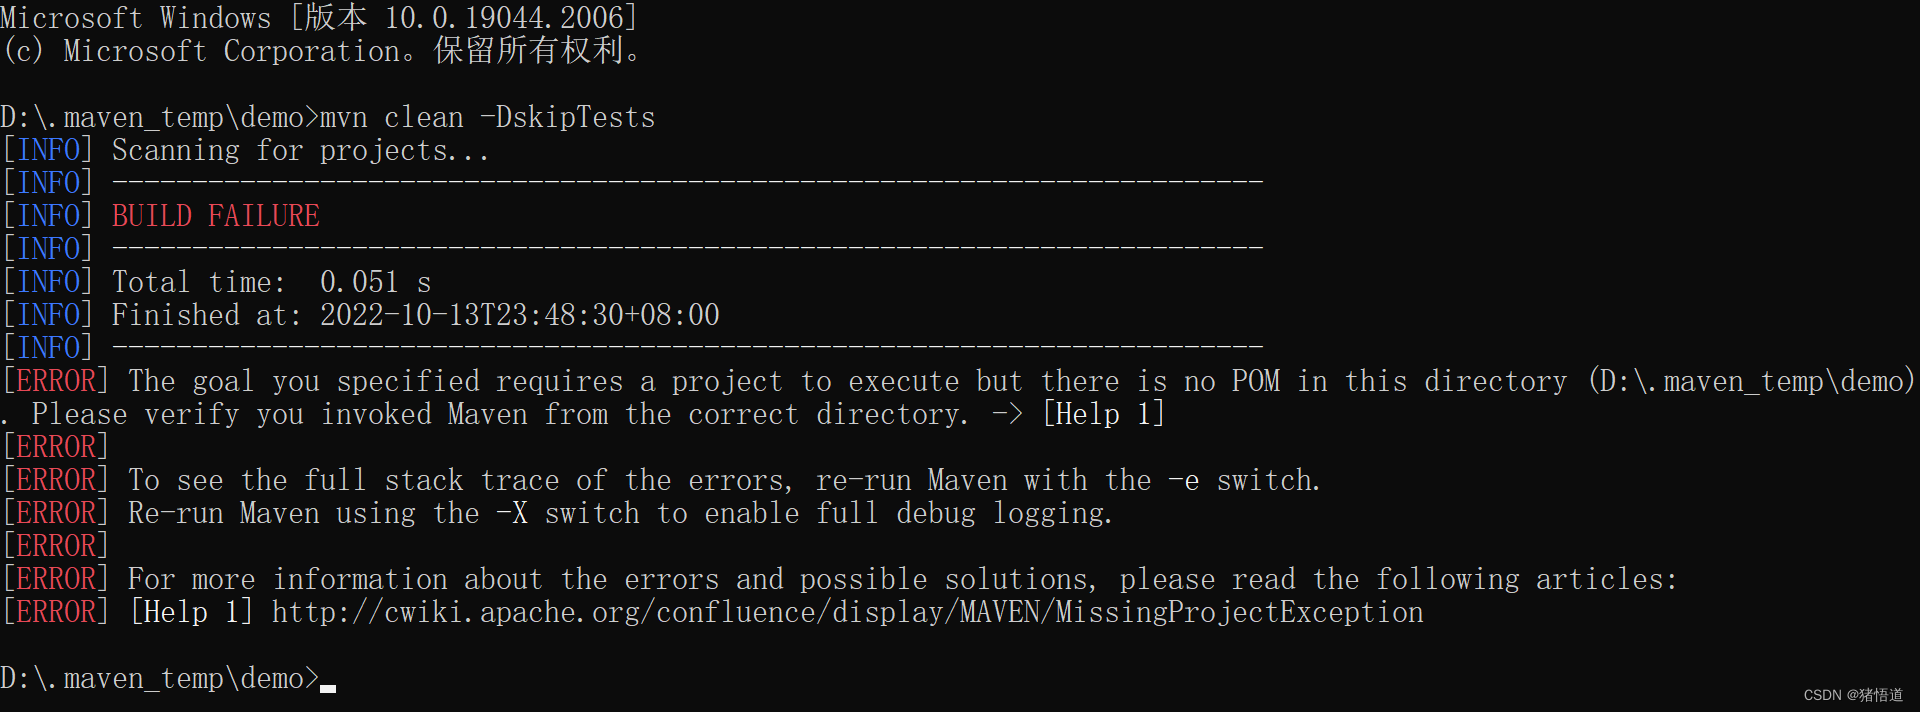
指定 Pom 文件:mvn -f pom_2.xml clean -DskipTests
3.聚合项目编译
1.工程配置说明
依赖关系说明:
mod_4 依赖 mod_2 依赖 mod_1
mod_1 和 mod_3 不依赖其他包
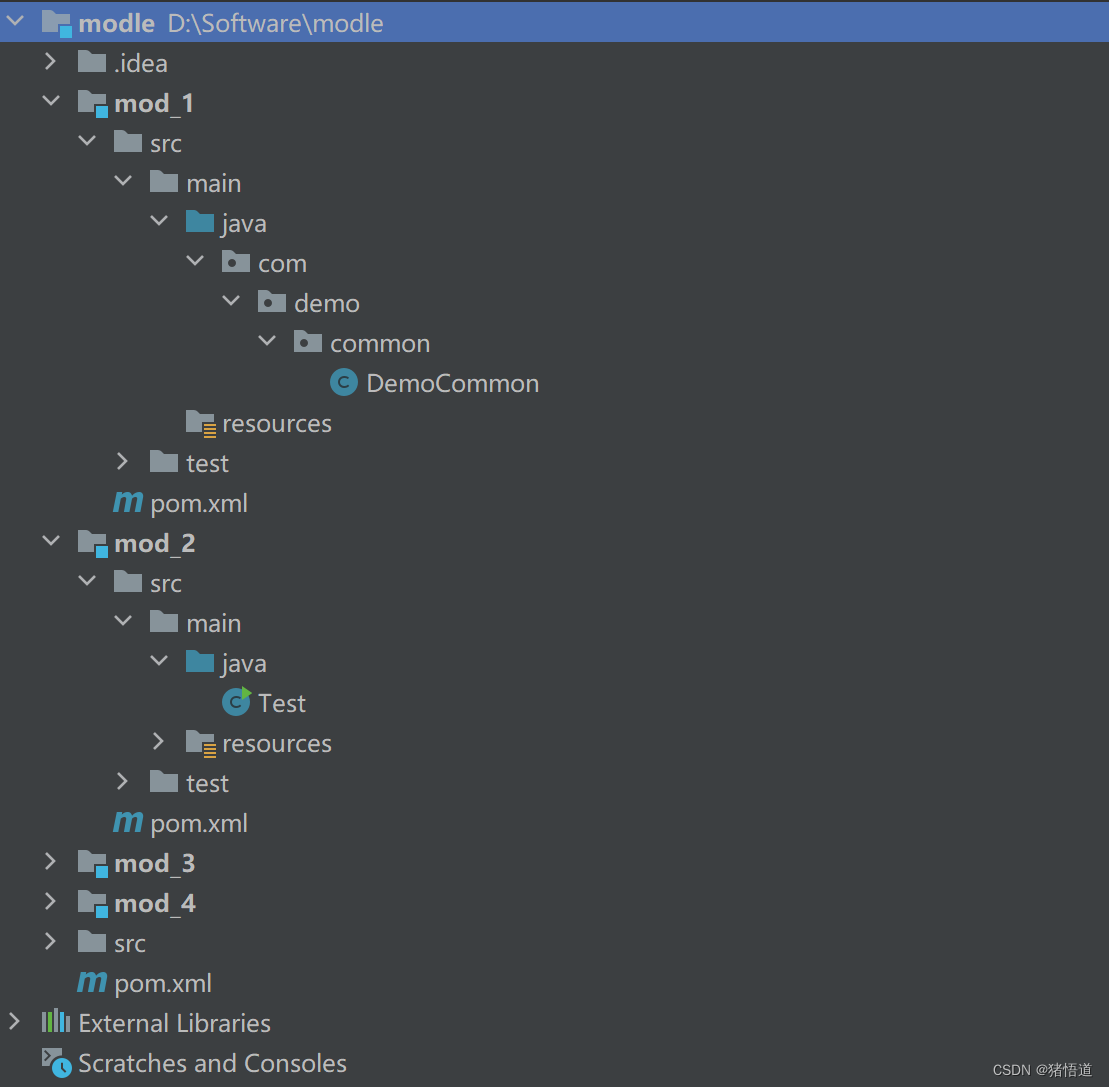
1.父项目
<?xml version="1.0" encoding="UTF-8"?>
<project xmlns="http://maven.apache.org/POM/4.0.0"
         xmlns:xsi="http://www.w3.org/2001/XMLSchema-instance"
         xsi:schemaLocation="http://maven.apache.org/POM/4.0.0 http://maven.apache.org/xsd/maven-4.0.0.xsd">
    <modelVersion>4.0.0</modelVersion>

    <groupId>org.example</groupId>
    <artifactId>modle</artifactId>
    <packaging>pom</packaging>
    <version>1.0-SNAPSHOT</version>
    <modules>
        <module>mod_3</module>
        <module>mod_2</module>
        <module>mod_1</module>
        <module>mod_4</module>

    </modules>

    <properties>
        <maven.compiler.source>8</maven.compiler.source>
        <maven.compiler.target>8</maven.compiler.target>
        <project.build.sourceEncoding>UTF-8</project.build.sourceEncoding>
    </properties>

</project>
2.子项目 Mod_1
<?xml version="1.0" encoding="UTF-8"?>
<project xmlns="http://maven.apache.org/POM/4.0.0"
         xmlns:xsi="http://www.w3.org/2001/XMLSchema-instance"
         xsi:schemaLocation="http://maven.apache.org/POM/4.0.0 http://maven.apache.org/xsd/maven-4.0.0.xsd">
    <parent>
        <artifactId>modle</artifactId>
        <groupId>org.example</groupId>
        <version>1.0-SNAPSHOT</version>
    </parent>
    <modelVersion>4.0.0</modelVersion>

    <artifactId>mod_1</artifactId>

    <properties>
        <maven.compiler.source>8</maven.compiler.source>
        <maven.compiler.target>8</maven.compiler.target>
        <project.build.sourceEncoding>UTF-8</project.build.sourceEncoding>
    </properties>

</project>
添加一个 Common 类
package com.demo.common;

/**
 * @author
 * @date 2022-10-13 16:06
 * @since 1.8
 */
public class DemoCommon {
    public static void print(){
        System.out.println("Mod_1:" + DemoCommon.class.getName());
    }
}
3.子项目 Mod_2
<?xml version="1.0" encoding="UTF-8"?>
<project xmlns="http://maven.apache.org/POM/4.0.0"
         xmlns:xsi="http://www.w3.org/2001/XMLSchema-instance"
         xsi:schemaLocation="http://maven.apache.org/POM/4.0.0 http://maven.apache.org/xsd/maven-4.0.0.xsd">
    <parent>
        <artifactId>modle</artifactId>
        <groupId>org.example</groupId>
        <version>1.0-SNAPSHOT</version>
    </parent>
    <modelVersion>4.0.0</modelVersion>

    <artifactId>mod_2</artifactId>

    <properties>
        <maven.compiler.source>8</maven.compiler.source>
        <maven.compiler.target>8</maven.compiler.target>
        <project.build.sourceEncoding>UTF-8</project.build.sourceEncoding>
        <jarName>mod_2</jarName>
    </properties>

    <dependencies>
        <dependency>
            <groupId>org.example</groupId>
            <artifactId>mod_1</artifactId>
            <version>1.0-SNAPSHOT</version>
            <scope>compile</scope>
        </dependency>
    </dependencies>

    <build>
        <finalName>${jarName}</finalName>
        <plugins>
            <plugin>
                <groupId>org.apache.maven.plugins</groupId>
                <artifactId>maven-jar-plugin</artifactId>
                <version>3.3.0</version>
                <configuration>
                    <archive>
                        <addMavenDescriptor>false</addMavenDescriptor>
                        <manifest>
                            <mainClass>Test</mainClass>
                            <addClasspath>true</addClasspath>
                            <classpathPrefix>dependency/</classpathPrefix>
                        </manifest>
                    </archive>
                </configuration>
            </plugin>
            <plugin>
                <groupId>org.apache.maven.plugins</groupId>
                <artifactId>maven-dependency-plugin</artifactId>
                <version>3.3.0</version>
                <executions>
                    <execution>
                        <id>copy-dependencies</id>
                        <phase>package</phase>
                        <goals>
                            <goal>copy-dependencies</goal>
                        </goals>
                    </execution>
                </executions>
            </plugin>
        </plugins>
    </build>

</project>
添加一个主类用于启动查看
import com.demo.common.DemoCommon;

import java.io.IOException;

/**
 * @author
 * @date 2022-10-13 16:08
 * @since 1.8
 */
public class Test {
    public static void main(String[] args) throws IOException {
        DemoCommon.print();
    }
}
4.子项目 Mod_3
<?xml version="1.0" encoding="UTF-8"?>
<project xmlns="http://maven.apache.org/POM/4.0.0"
         xmlns:xsi="http://www.w3.org/2001/XMLSchema-instance"
         xsi:schemaLocation="http://maven.apache.org/POM/4.0.0 http://maven.apache.org/xsd/maven-4.0.0.xsd">
    <parent>
        <artifactId>modle</artifactId>
        <groupId>org.example</groupId>
        <version>1.0-SNAPSHOT</version>
    </parent>
    <modelVersion>4.0.0</modelVersion>

    <artifactId>mod_3</artifactId>

    <properties>
        <maven.compiler.source>8</maven.compiler.source>
        <maven.compiler.target>8</maven.compiler.target>
        <project.build.sourceEncoding>UTF-8</project.build.sourceEncoding>
    </properties>

</project>
5.子项目 Mod_4
<?xml version="1.0" encoding="UTF-8"?>
<project xmlns="http://maven.apache.org/POM/4.0.0"
         xmlns:xsi="http://www.w3.org/2001/XMLSchema-instance"
         xsi:schemaLocation="http://maven.apache.org/POM/4.0.0 http://maven.apache.org/xsd/maven-4.0.0.xsd">
    <parent>
        <artifactId>modle</artifactId>
        <groupId>org.example</groupId>
        <version>1.0-SNAPSHOT</version>
    </parent>
    <modelVersion>4.0.0</modelVersion>

    <artifactId>mod_4</artifactId>

    <properties>
        <maven.compiler.source>8</maven.compiler.source>
        <maven.compiler.target>8</maven.compiler.target>
        <project.build.sourceEncoding>UTF-8</project.build.sourceEncoding>
    </properties>

    <dependencies>
        <dependency>
            <groupId>org.example</groupId>
            <artifactId>mod_2</artifactId>
            <version>1.0-SNAPSHOT</version>
            <scope>compile</scope>
        </dependency>
    </dependencies>
</project>
2.编译测试
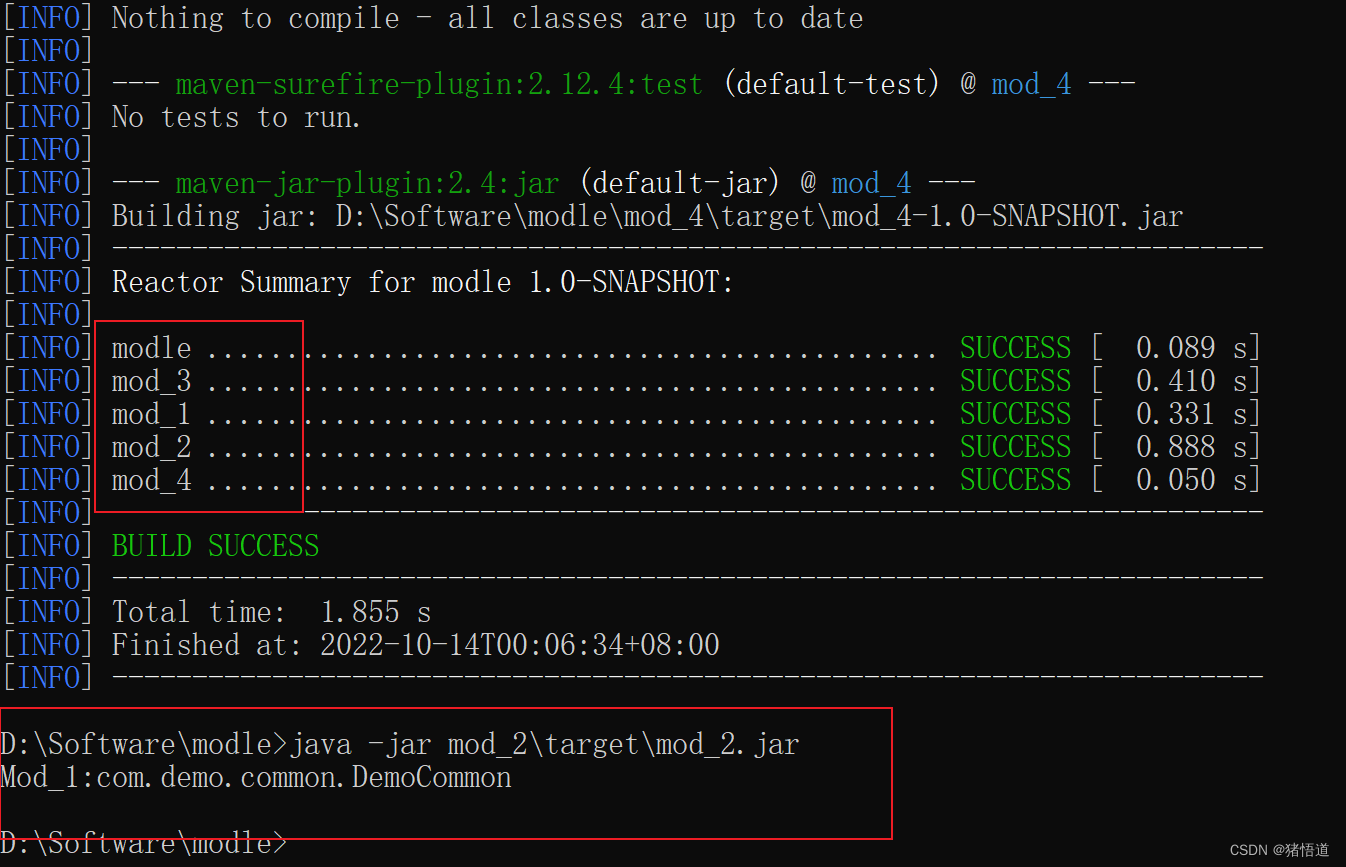
1.父目录直接编译
命令:mvn clean package -DskipTest
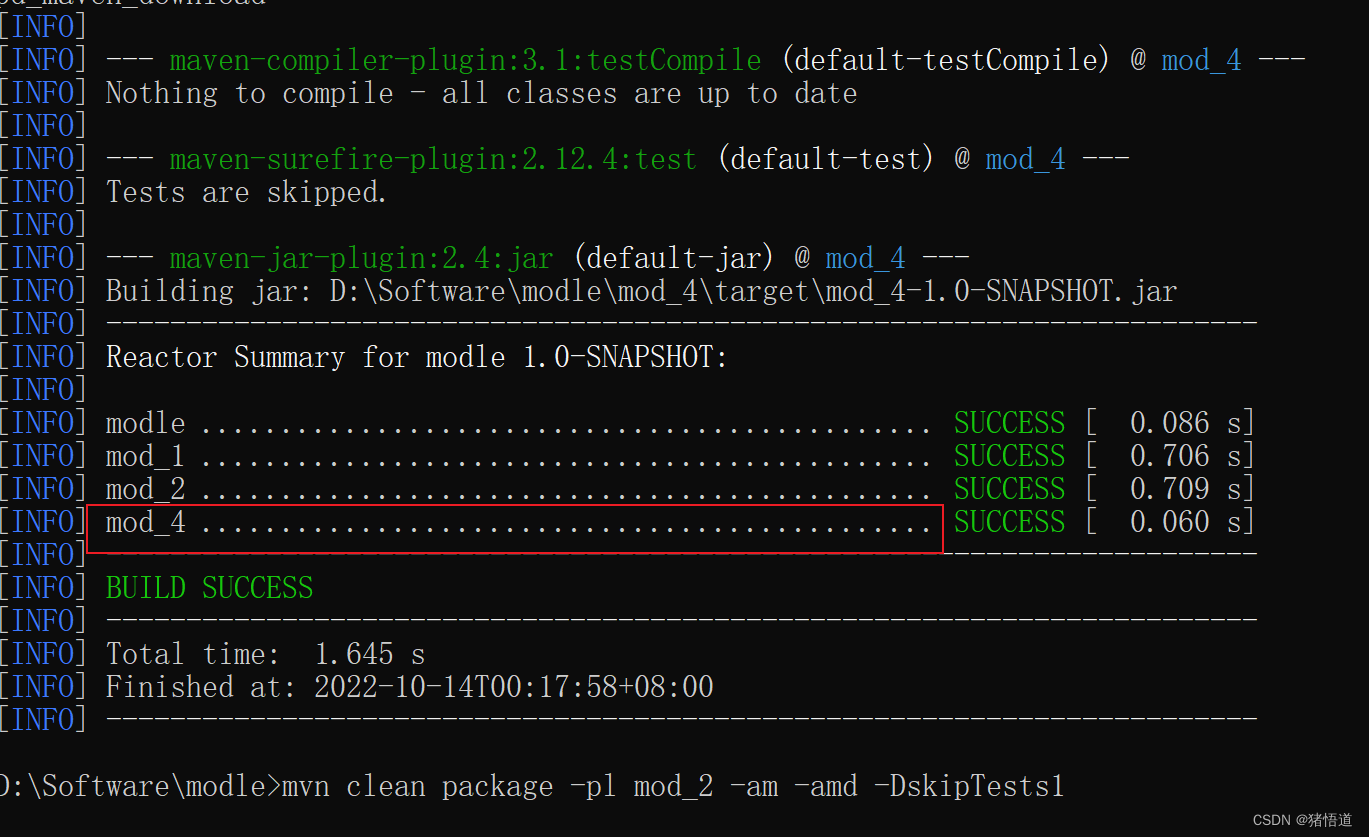
注意一个细节,子包配置顺序为(3,2,1,4),但存在依赖关系链(1,2,4)
mvn 自己会做一个修正
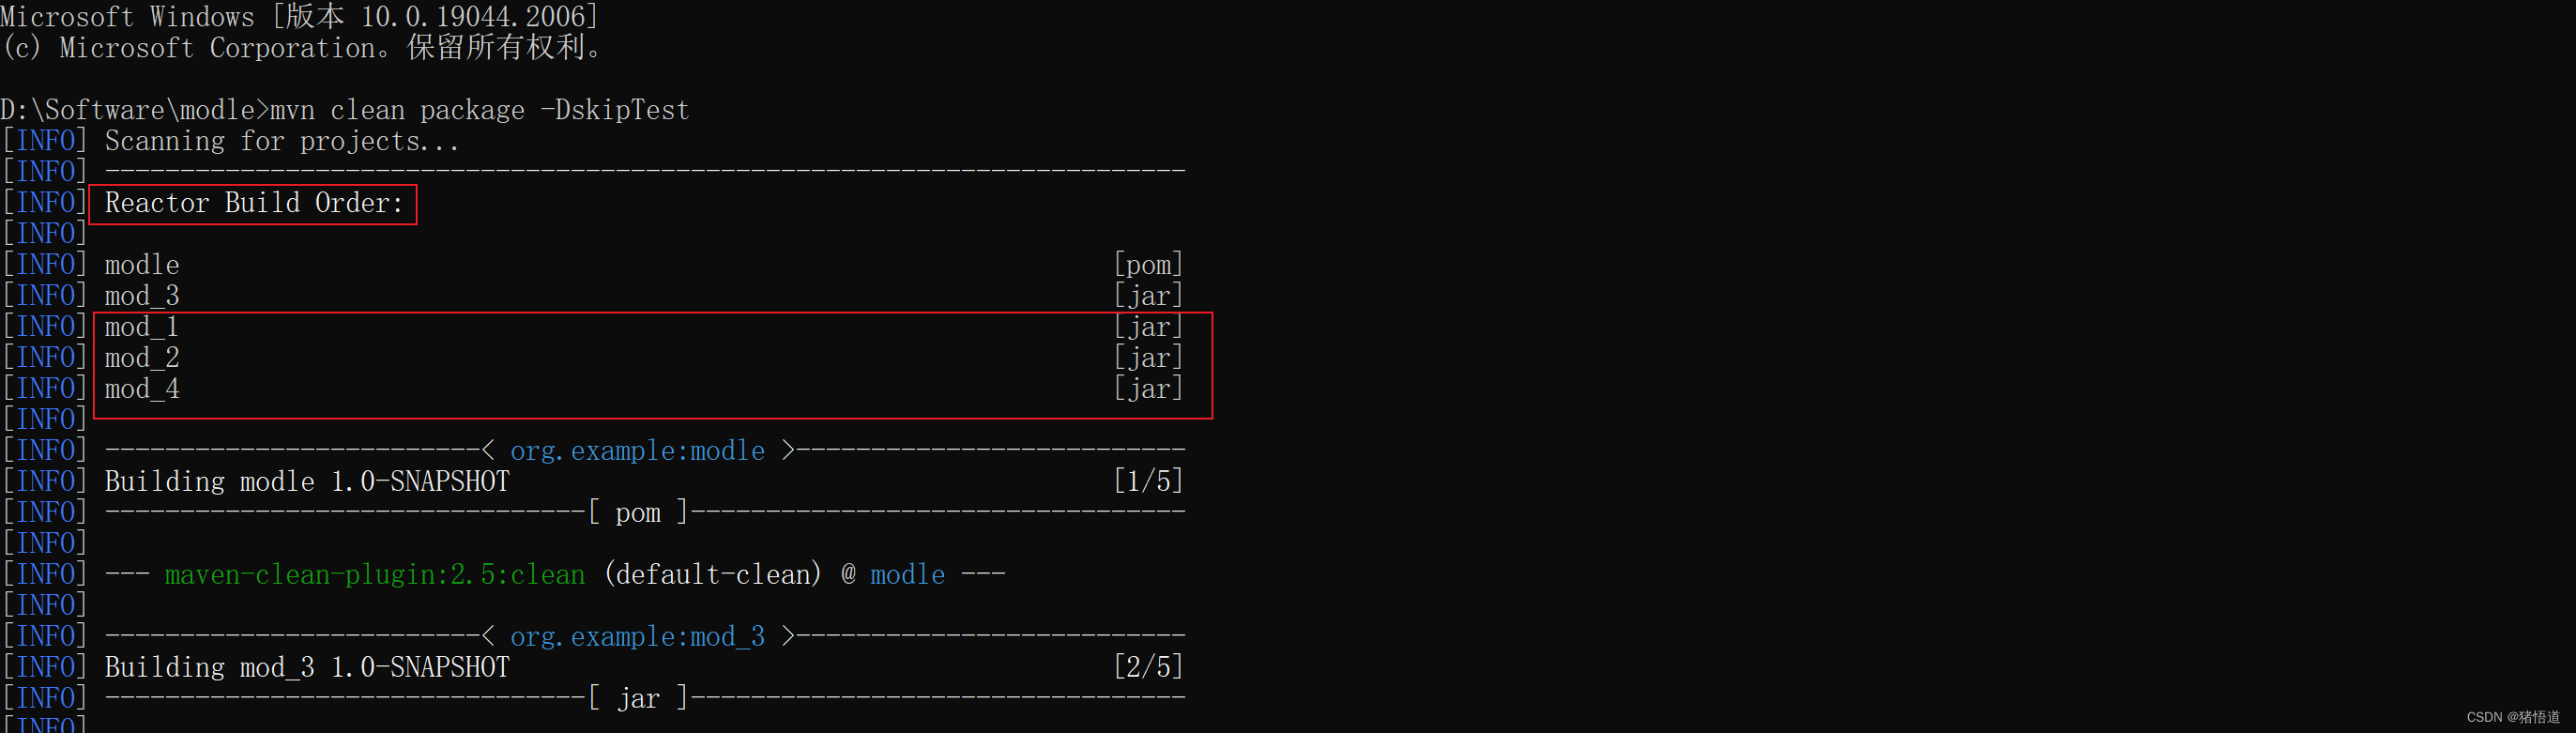
结果
2.编译指定子包
编译 mod_3:mvn clean package -pl mod_3 -DskipTests

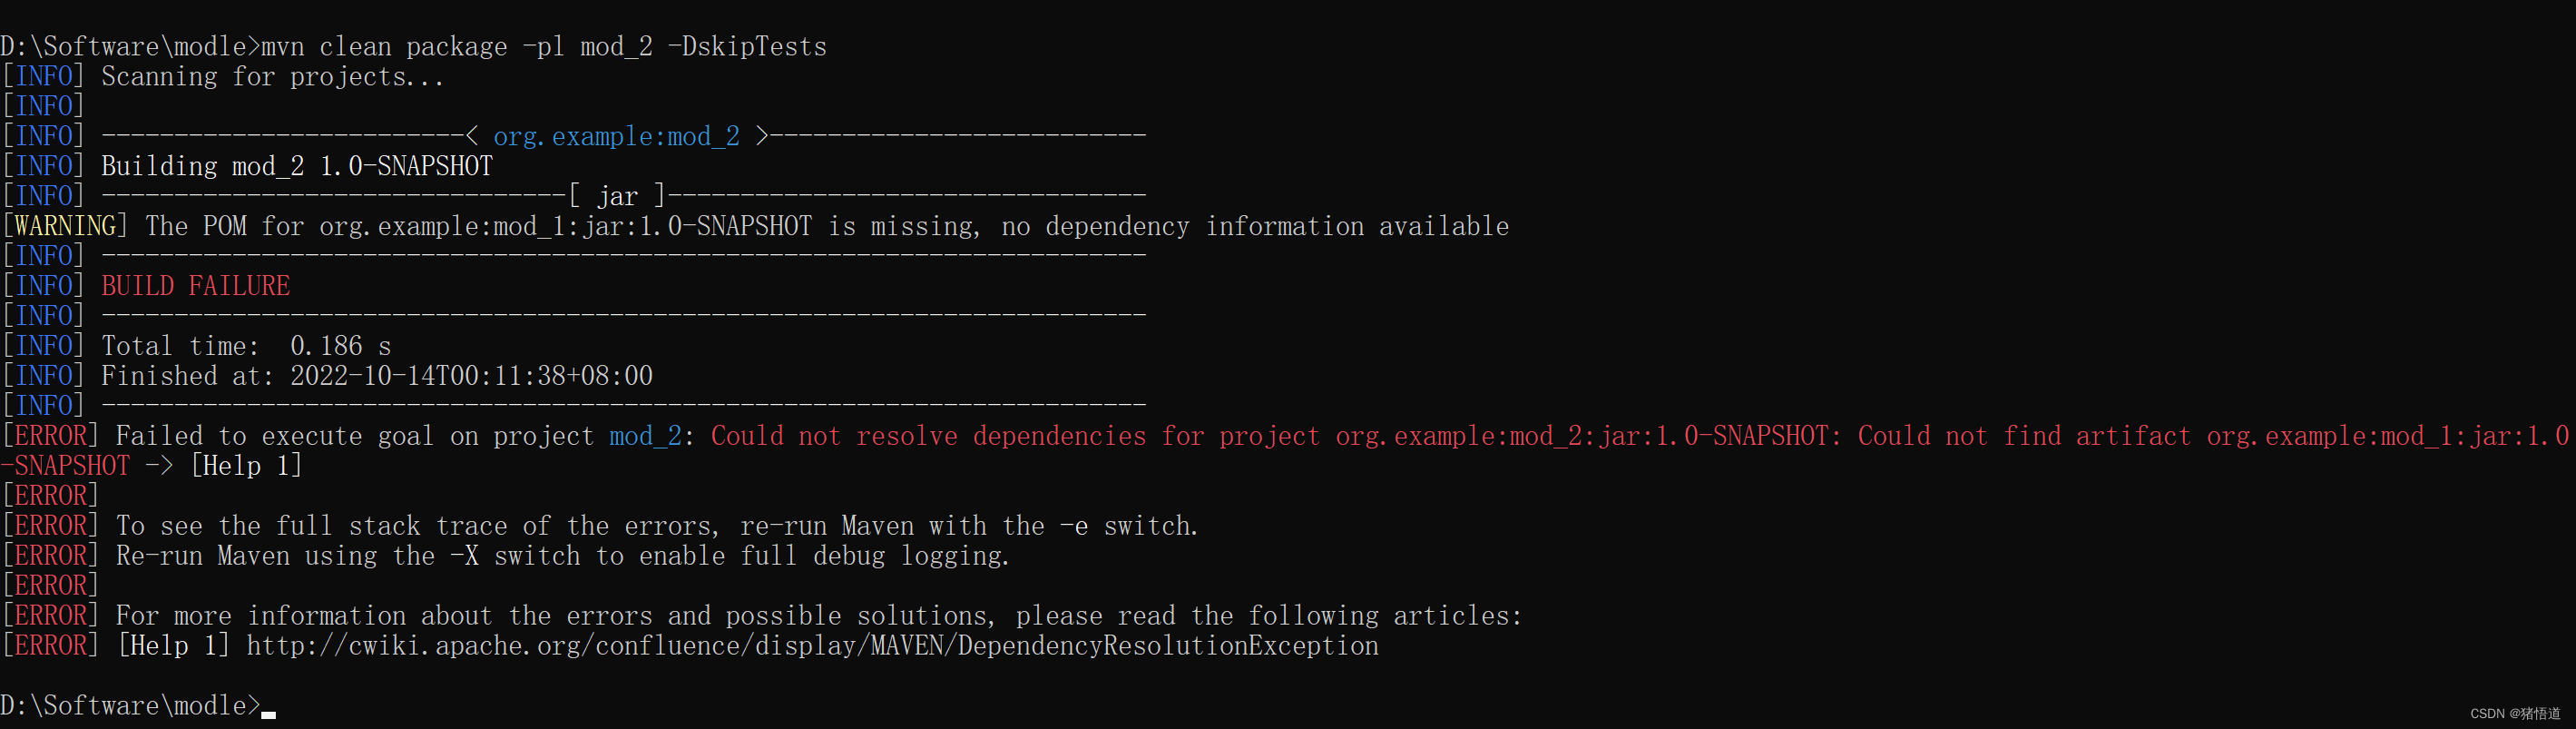
3.编译包和依赖
仅编译子包 mod_2 失败,他要依赖 mod_1,结果如图:mvn clean package -pl mod_2 -DskipTests
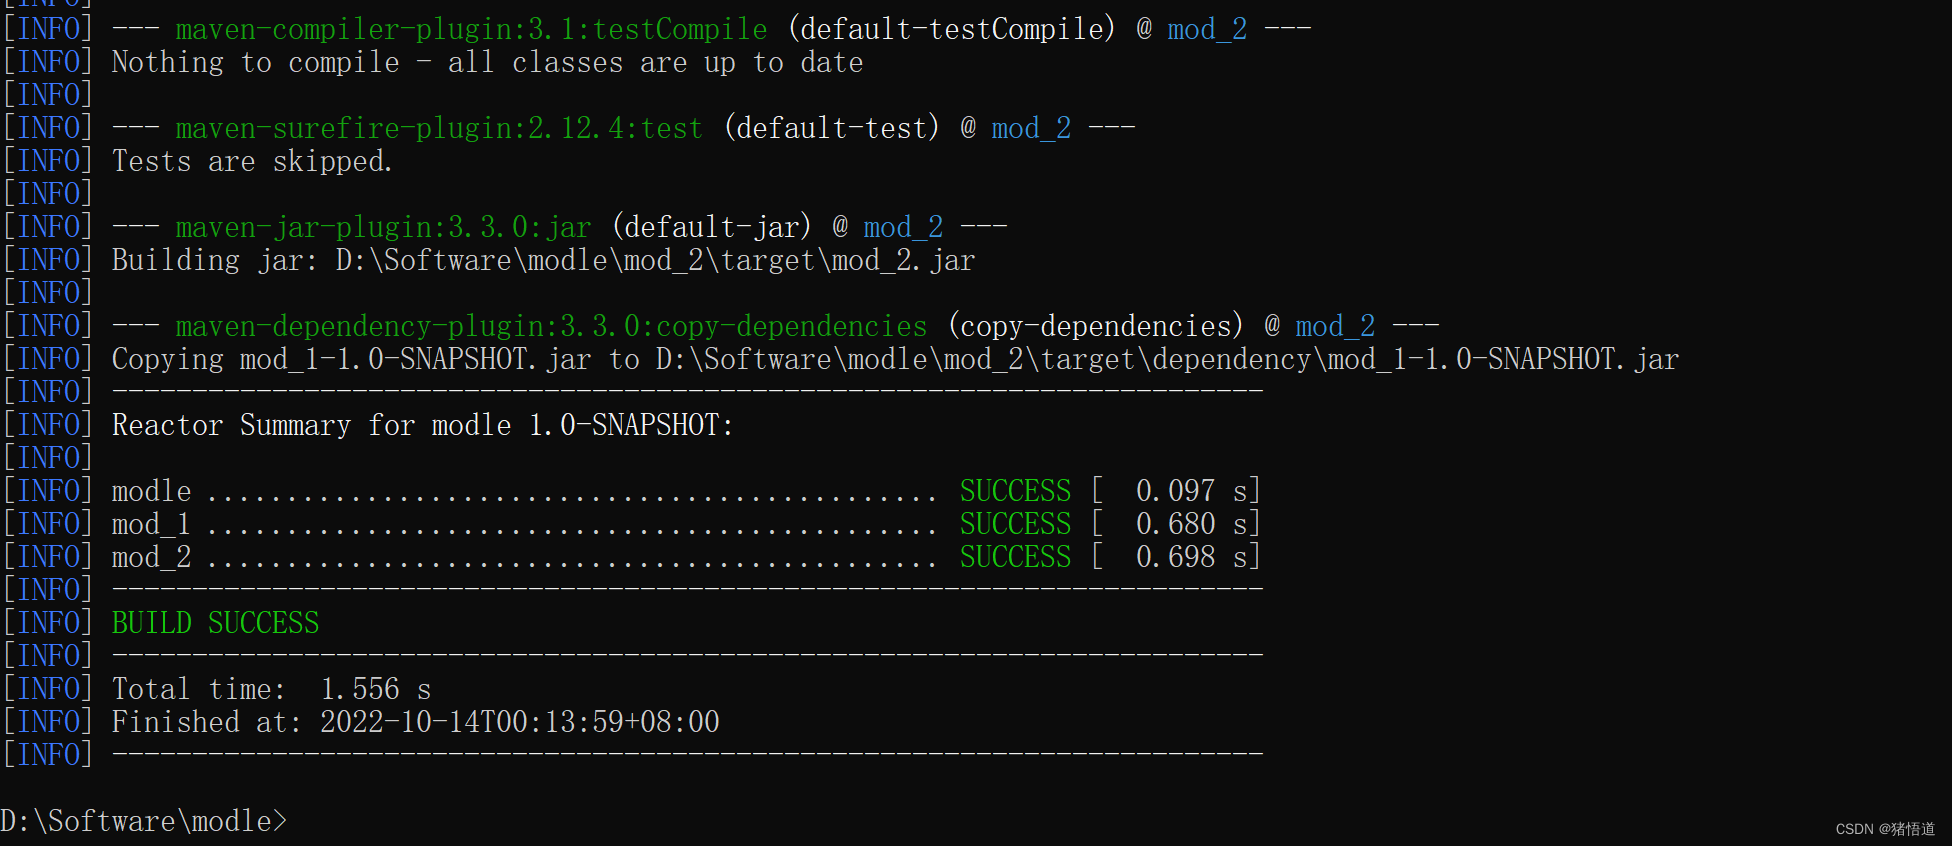
编译 2 及其所依赖的包:mvn clean package -pl mod_2 -am -DskipTests
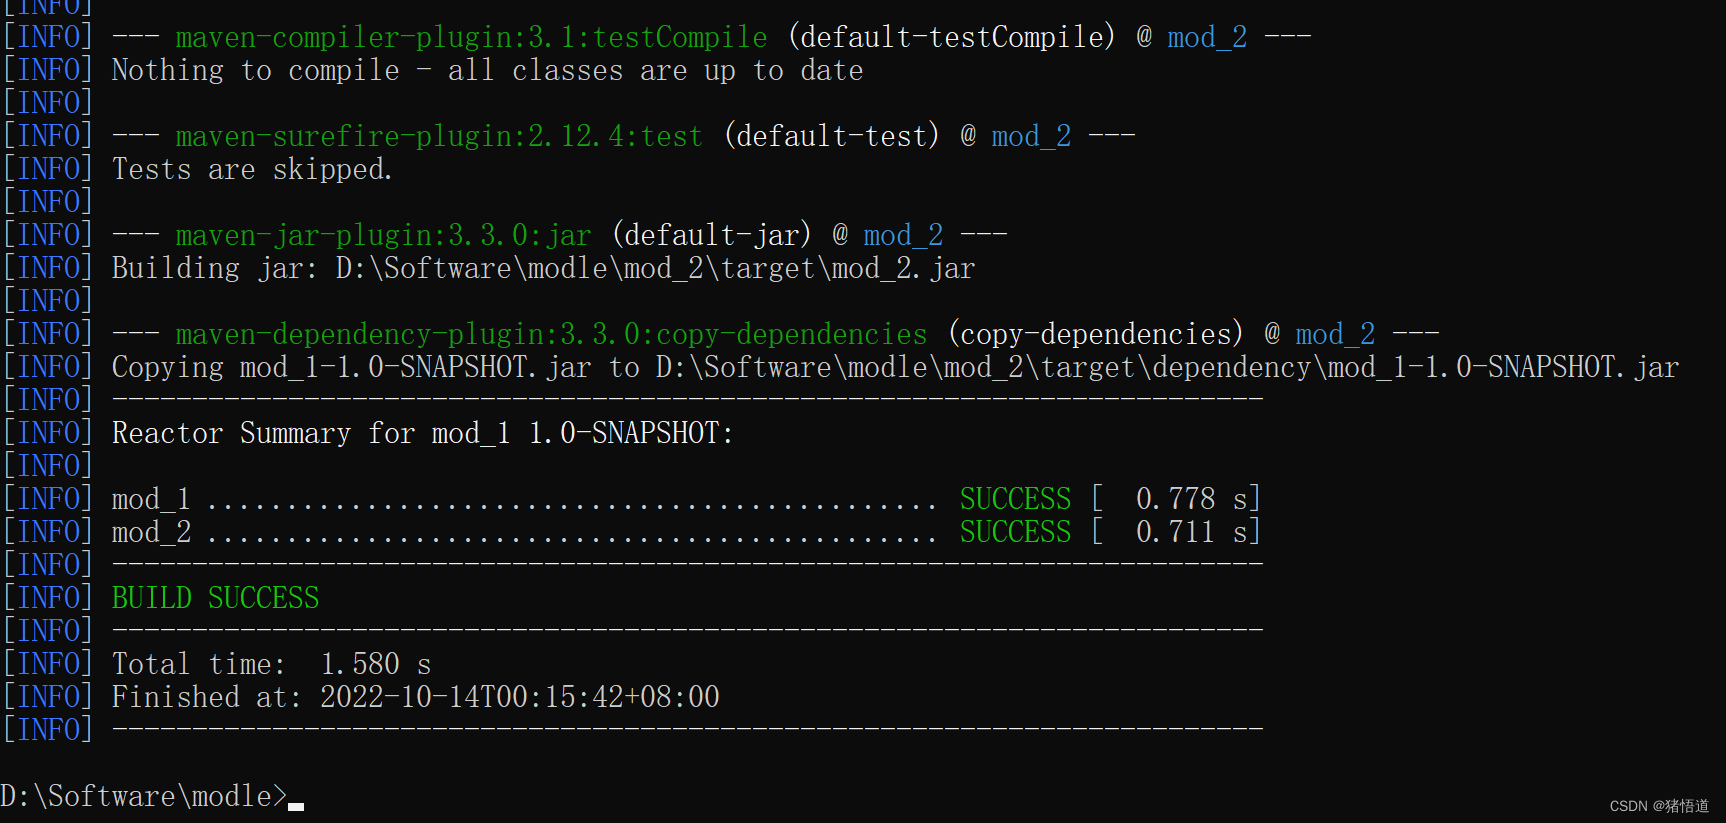
先编译子包 1,再编译子包 2,效果如下,父包未编译:mvn clean package -pl mod_1,mod_2 -DskipTests
编译自身,同时编译需要依赖自身的包(可以看到 mod_4 也会被触发编译):mvn clean package -pl mod_2 -am -amd -DskipTests
4.指定参数值(-D)
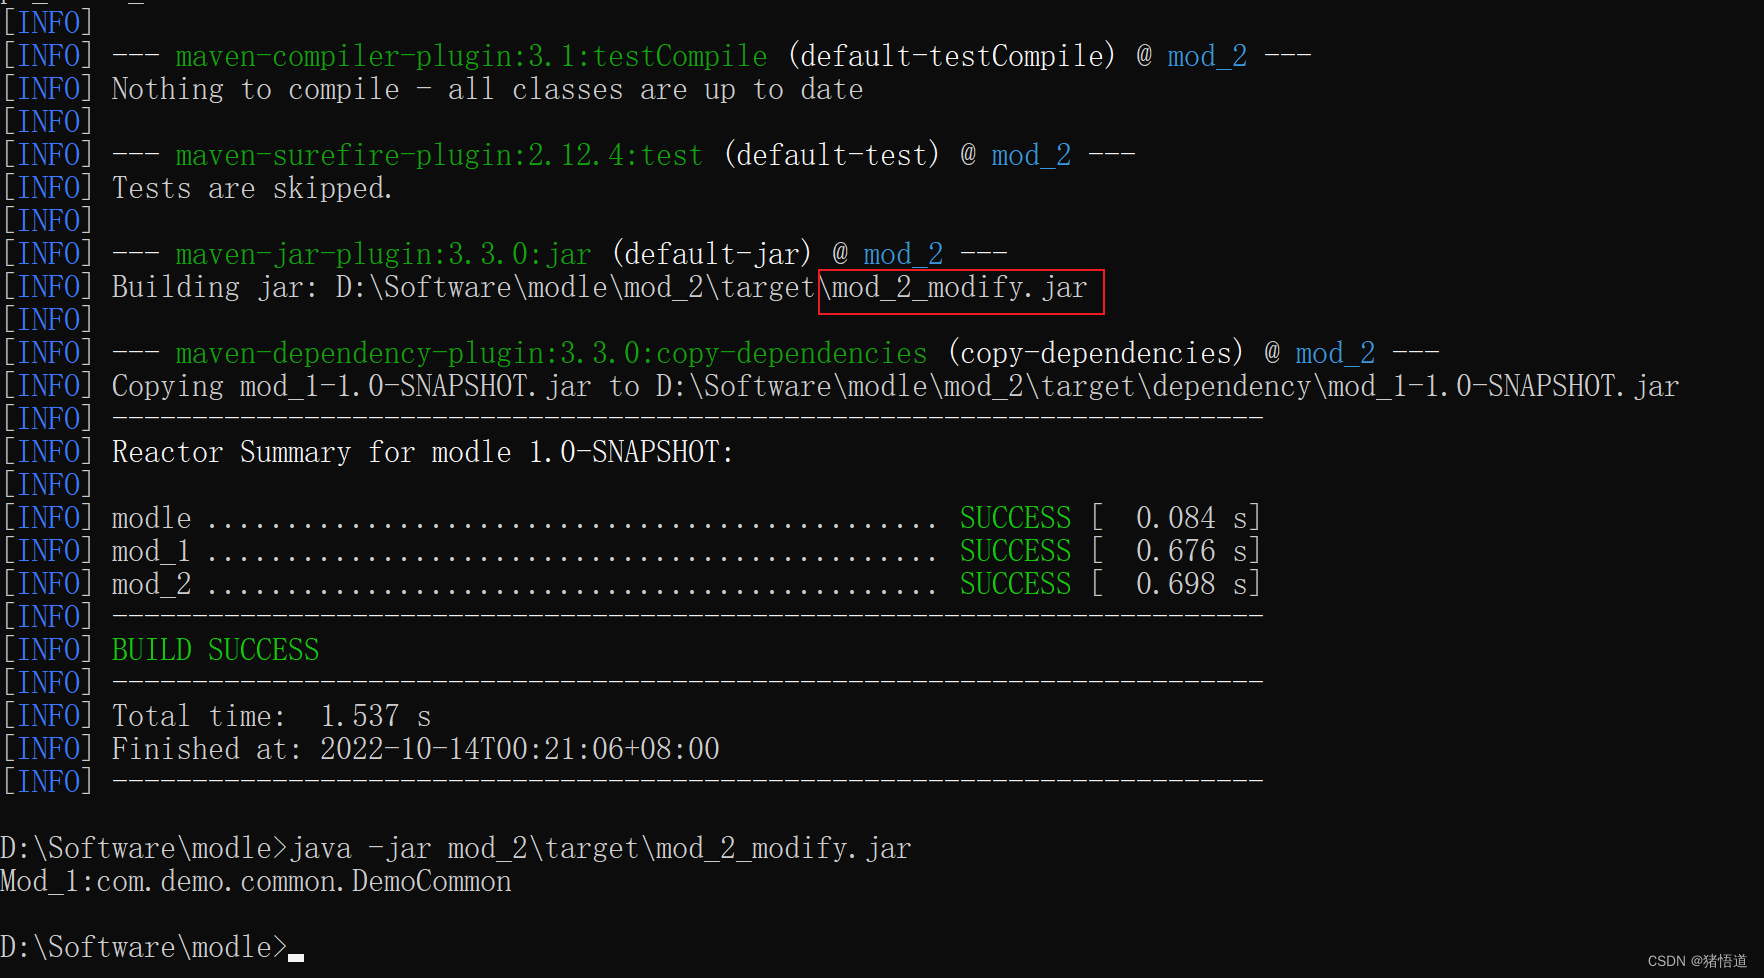
mod_2 配置了包名,在编译时动态修改:mvn clean package -pl mod_2 -am -DskipTests -DjarName=mod_2_modify
<jarName>mod_2</jarName>
4.多环境编译
以上面的子包 2 为例,添加多环境 Yml 配置,新的 Pom 如下;在编译时则输出包即包含的是
指定环境的信息
<?xml version="1.0" encoding="UTF-8"?>
<project xmlns="http://maven.apache.org/POM/4.0.0"
         xmlns:xsi="http://www.w3.org/2001/XMLSchema-instance"
         xsi:schemaLocation="http://maven.apache.org/POM/4.0.0 http://maven.apache.org/xsd/maven-4.0.0.xsd">
    <parent>
        <artifactId>modle</artifactId>
        <groupId>org.example</groupId>
        <version>1.0-SNAPSHOT</version>
    </parent>
    <modelVersion>4.0.0</modelVersion>

    <artifactId>mod_2</artifactId>

    <properties>
        <maven.compiler.source>8</maven.compiler.source>
        <maven.compiler.target>8</maven.compiler.target>
        <project.build.sourceEncoding>UTF-8</project.build.sourceEncoding>
        <jarName>mod_2</jarName>
    </properties>

    <!-- 多环境配置 -->
    <profiles>
        <profile>
            <!--环境ID-->
            <id>test</id>
            <properties>
                <properties.active>test</properties.active>
                <dockerHost>127.0.0.2</dockerHost>
            </properties>
            <!--默认激活的配置-->
            <activation>
                <activeByDefault>true</activeByDefault>
            </activation>
        </profile>
        <profile>
            <!--环境ID-->
            <id>dev</id>
            <properties>
                <properties.active>dev</properties.active>
                <dockerHost>127.0.0.3</dockerHost>
            </properties>
        </profile>
        <profile>
            <!--环境ID-->
            <id>prod</id>
            <properties>
                <properties.active>prod</properties.active>
                <dockerHost>127.0.0.4</dockerHost>
            </properties>
        </profile>
    </profiles>

    <dependencies>
        <dependency>
            <groupId>org.example</groupId>
            <artifactId>mod_1</artifactId>
            <version>1.0-SNAPSHOT</version>
            <scope>compile</scope>
        </dependency>
    </dependencies>

    <build>
        <finalName>${jarName}</finalName>
        <plugins>
            <plugin>
                <groupId>org.apache.maven.plugins</groupId>
                <artifactId>maven-jar-plugin</artifactId>
                <version>3.3.0</version>
                <configuration>
                    <archive>
                        <addMavenDescriptor>false</addMavenDescriptor>
                        <manifest>
                            <mainClass>Test</mainClass>
                            <addClasspath>true</addClasspath>
                            <classpathPrefix>dependency/</classpathPrefix>
                        </manifest>
                    </archive>
                </configuration>
            </plugin>
            <plugin>
                <groupId>org.apache.maven.plugins</groupId>
                <artifactId>maven-dependency-plugin</artifactId>
                <version>3.3.0</version>
                <executions>
                    <execution>
                        <id>copy-dependencies</id>
                        <phase>package</phase>
                        <goals>
                            <goal>copy-dependencies</goal>
                        </goals>
                    </execution>
                </executions>
            </plugin>
        </plugins>
        <resources>
            <!--打包的时候先去掉所有的配置文件-->
            <resource>
                <directory>src/main/resources</directory>
                <excludes>
                    <exclude>*.yml</exclude>
                </excludes>
            </resource>
            <!--添加需要包含的文件-->
            <resource>
                <directory>src/main/resources</directory>
                <!-- 是否替换yml或者properties里@xx@表示的maven properties属性值 -->
                <filtering>true</filtering>
                <!-- 在打包的时候,根据-P参数,加上需要的yml配置文件 -->
                <includes>
                    <include>application.yml</include>
                    <include>application-${properties.active}.yml</include>
                    <!--<include>**/application-${profile.active}.yml</include>-->
                </includes>
            </resource>
        </resources>
    </build>

</project>
将 mod_2 测试类修改如下
import java.io.IOException;
import java.io.InputStream;
import java.util.Properties;

/**
 * @author
 * @date 2022-10-13 16:08
 * @since 1.8
 */
public class Test {

    public static void main(String[] args) throws IOException {

        Properties p= new Properties();

        InputStream input= Test.class.getClassLoader().getResourceAsStream("application.yml");

        p.load(input);

        String active = (String) p.get("active");

        System.out.println("Active: " + active);

        input = Test.class.getClassLoader().getResourceAsStream("application-"+ active +".yml");

        p.clear();

        p.load(input);

        System.out.println(p);
    }
}
为 mod_2 添加配置文件
application.yml
profiles:
  active: @properties.active@
application-dev.yml
dockerHost: @dockerHost@
application-prod.yml
dockerHost: @dockerHost@
application-test.yml
dockerHost: @dockerHost@
编译指定激活环境,并设置 dockerHost 值:mvn -Ptest -DdockerHost=192.168.3.1 clean package -pl mod_2 -am -DskipTests
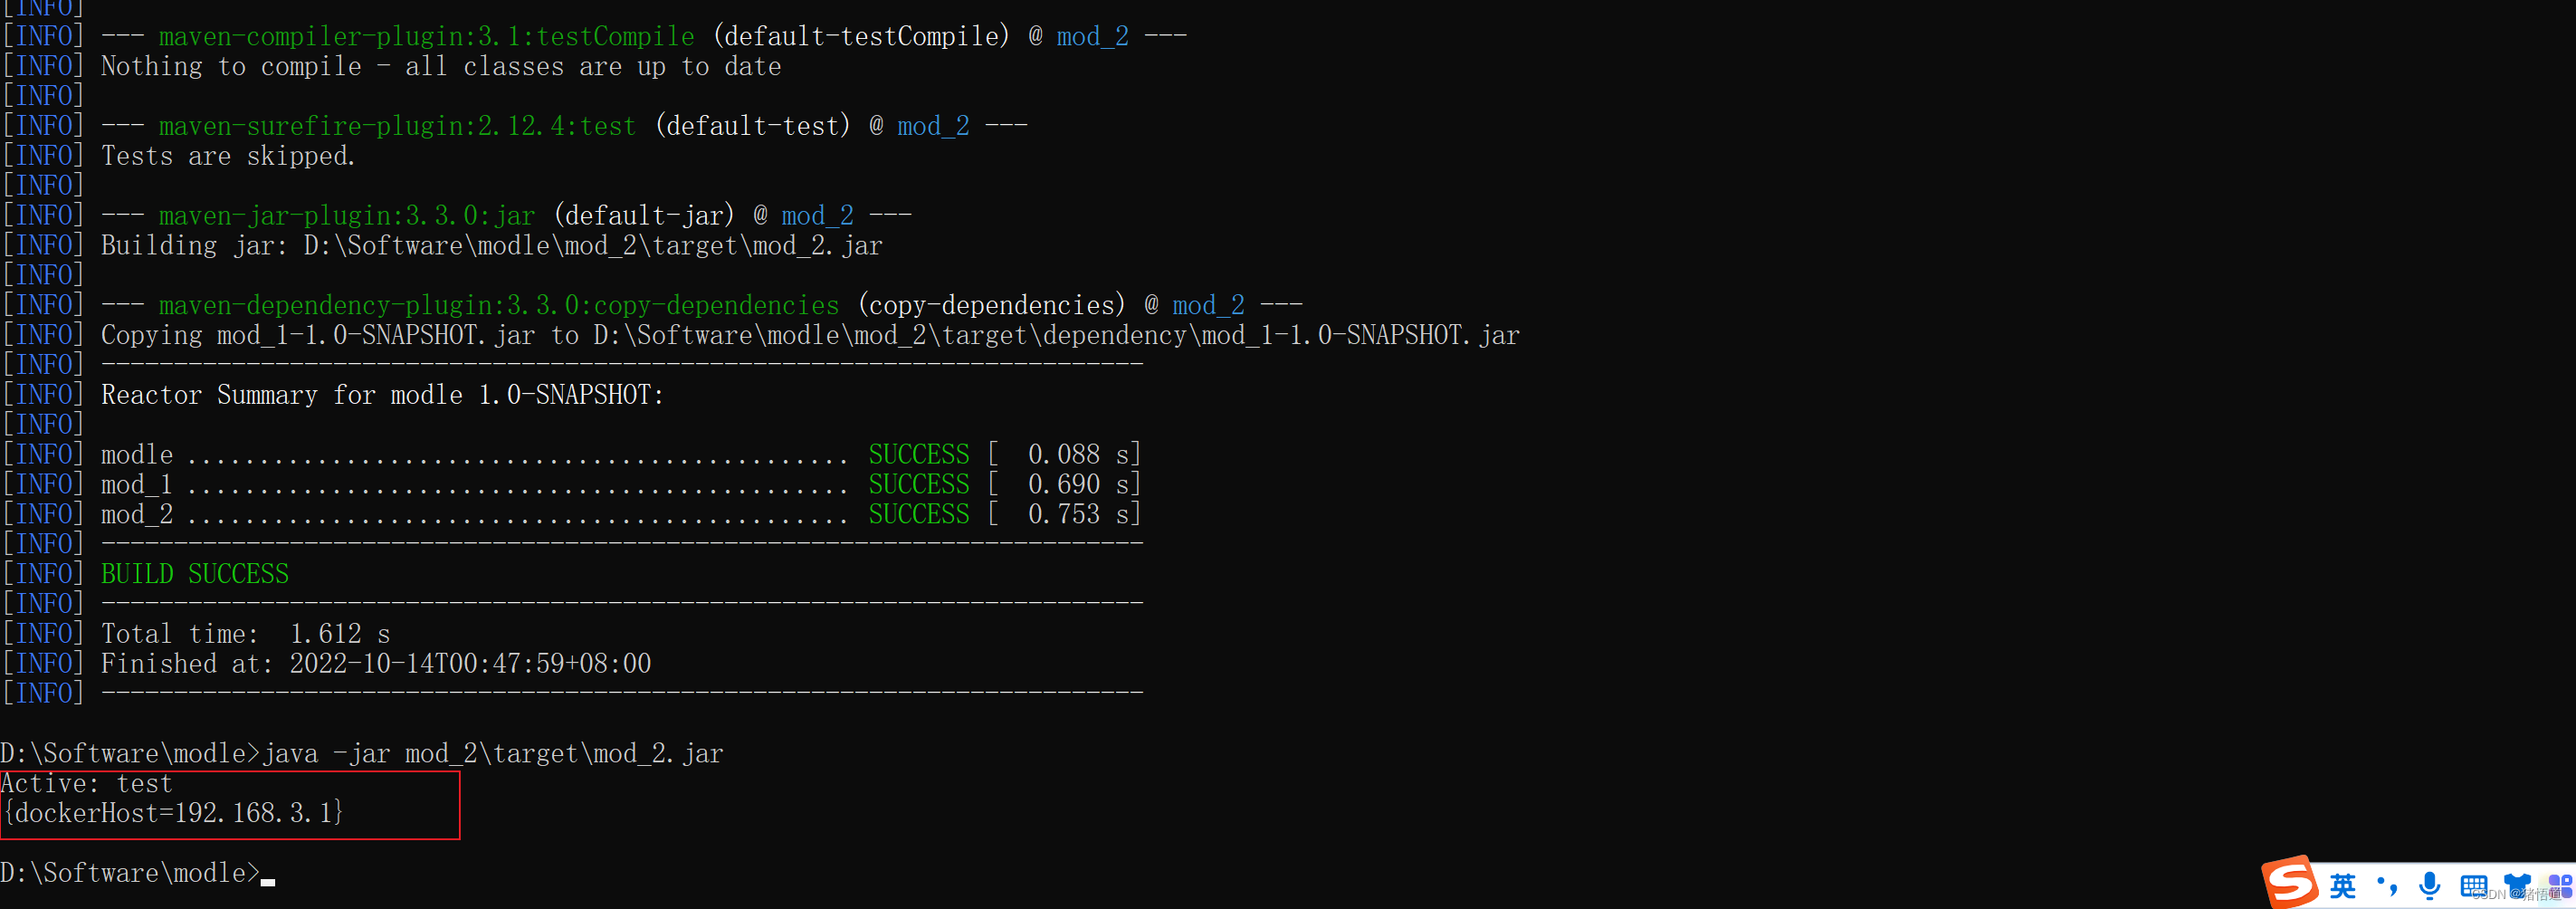
可以看到,我们 MVN 打包时修改了 Yml 配置,我们又通过代码索引到了最终要使用的配置文件,看一下包截图

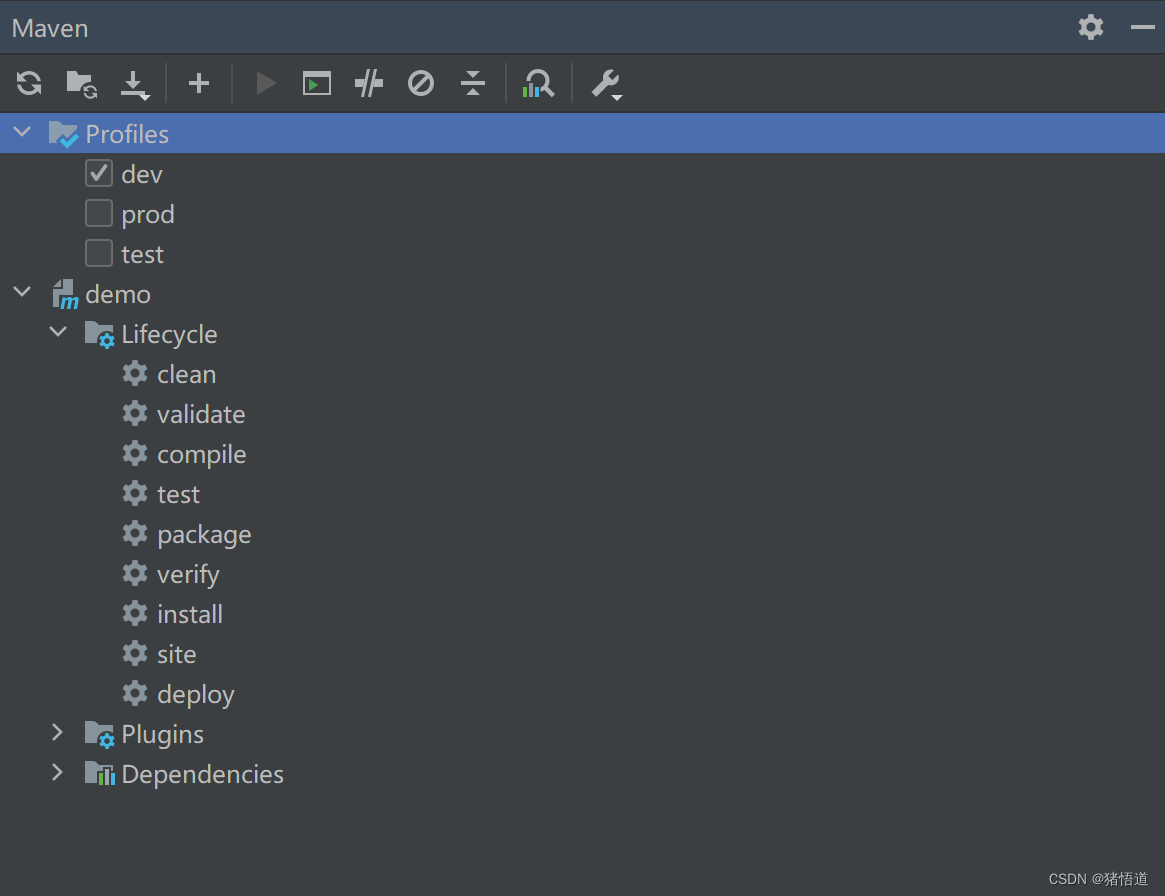
多环境编译配置后可在 Idea 直接选择对应环境打包
三.结语
当前,很多自动部署工具,结合版本控制工具使用,已经可以实现非常完善的代码自动编译和发布功能,依赖的工具或组件诸如:SVN、Jenkins、GitHub、Devops、Docker、Kubernetes(K8S)等,感兴趣的同学可以自己去设计或者搭建一套 Java 程序自动化部署的系统


 312
312


 被折叠的 条评论
为什么被折叠?
被折叠的 条评论
为什么被折叠?
 到【灌水乐园】发言


