


SpringBoot 整合swagger3.X
1. 引入依赖
<!--引入spring web -->
 <dependency>
     <groupId>org.springframework.boot</groupId>
     <artifactId>spring-boot-starter-web</artifactId>
 </dependency>
 <!--引入swagger3 -->
 <dependency>
     <groupId>io.springfox</groupId>
     <artifactId>springfox-boot-starter</artifactId>
     <version>3.0.0</version>
 </dependency>
2. swagger配置
package com.javaboy.vhr.config;

import org.springframework.context.annotation.Bean;
import org.springframework.context.annotation.Configuration;
import org.springframework.http.HttpMethod;
import springfox.documentation.builders.ApiInfoBuilder;
import springfox.documentation.builders.PathSelectors;
import springfox.documentation.builders.RequestHandlerSelectors;
import springfox.documentation.builders.ResponseBuilder;
import springfox.documentation.oas.annotations.EnableOpenApi;
import springfox.documentation.service.ApiInfo;
import springfox.documentation.service.Contact;
import springfox.documentation.service.Response;
import springfox.documentation.spi.DocumentationType;
import springfox.documentation.spring.web.plugins.Docket;

import java.util.ArrayList;
import java.util.List;

/**
 * @Author: gaoyang
 * @Date: 2020/12/23  10:46
 * @Description: swagger3.0 配置
 */
@Configuration
@EnableOpenApi
public class Swagger3Config {

    /**
     * swagger3的配置文件
     */
    @Bean
    public Docket createRestApi() {
        return new Docket(DocumentationType.OAS_30)
                .apiInfo(apiInfo())
                .select()
                //.apis(RequestHandlerSelectors.withMethodAnnotation(ApiOperation.class))
                .apis(RequestHandlerSelectors.basePackage("com.javaboy.vhr.controller"))
                .paths(PathSelectors.any())
                .build()
                //.globalRequestParameters(getGlobalRequestParameters())
                .globalResponses(HttpMethod.GET, getGlobalResponseMessage())
                .globalResponses(HttpMethod.POST, getGlobalResponseMessage())
                .globalResponses(HttpMethod.DELETE, getGlobalResponseMessage())
                .globalResponses(HttpMethod.PUT, getGlobalResponseMessage());
    }

    /**
     * 构建 api文档的详细信息函数,注意这里的注解引用的是哪个
     */
    private ApiInfo apiInfo() {
        // 获取工程名称
        String projectName = System.getProperty("user.dir");
        return new ApiInfoBuilder()
                .title(projectName.substring(projectName.lastIndexOf("\\") + 1) + " API接口文档")
                .contact(new Contact("Mr.Gao", "https://blog.csdn.net/weixin_42201180", "995062855@qq.com"))
                .version("1.0")
                .description("API文档")
                .build();
    }

    /**
     * 生成全局通用参数
     *
     * @return
     */
    /*private List<RequestParameter> getGlobalRequestParameters() {
        List<RequestParameter> parameters = new ArrayList<>();
        parameters.add(new RequestParameterBuilder()
                .name("x-access-token")
                .description("令牌")
                .required(false)
                .in(ParameterType.HEADER)
                .build());
        parameters.add(new RequestParameterBuilder()
                .name("Equipment-Type")
                .description("产品类型")
                .required(false)
                .in(ParameterType.HEADER)
                .build());
        return parameters;
    }*/

    /**
     * 生成通用响应信息
     *
     * @return
     */
    private List<Response> getGlobalResponseMessage() {
        List<Response> responseList = new ArrayList<>();
        responseList.add(new ResponseBuilder().code("404").description("找不到资源").build());
        return responseList;
    }

}
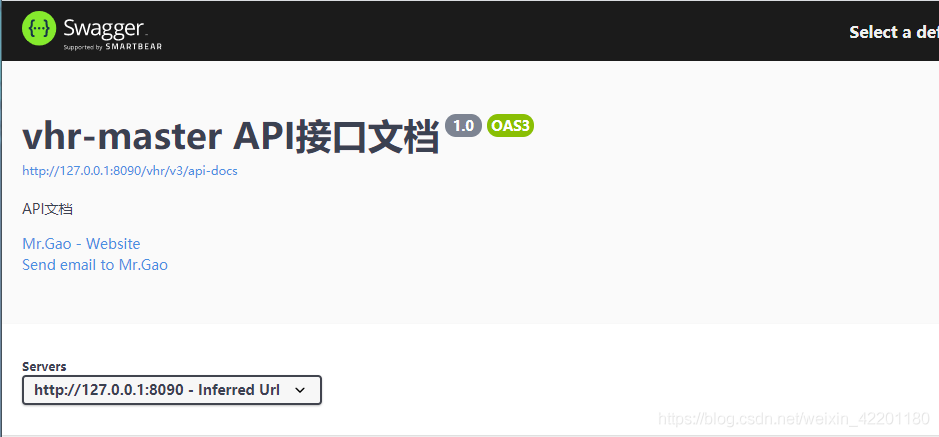
3. 启动程序访问
启动后访问:http://127.0.0.1:8090/swagger-ui/index.html
4. 集成增强文档knife4j
4.1 添加依赖
<!--Knife4j-->
<dependency>
    <groupId>com.github.xiaoymin</groupId>
    <artifactId>knife4j-spring-boot-starter</artifactId>
    <version>3.0.2</version>
</dependency>
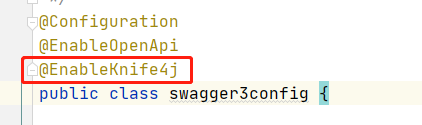
4.2 swagger配置类添加@EnableKnife4j注解
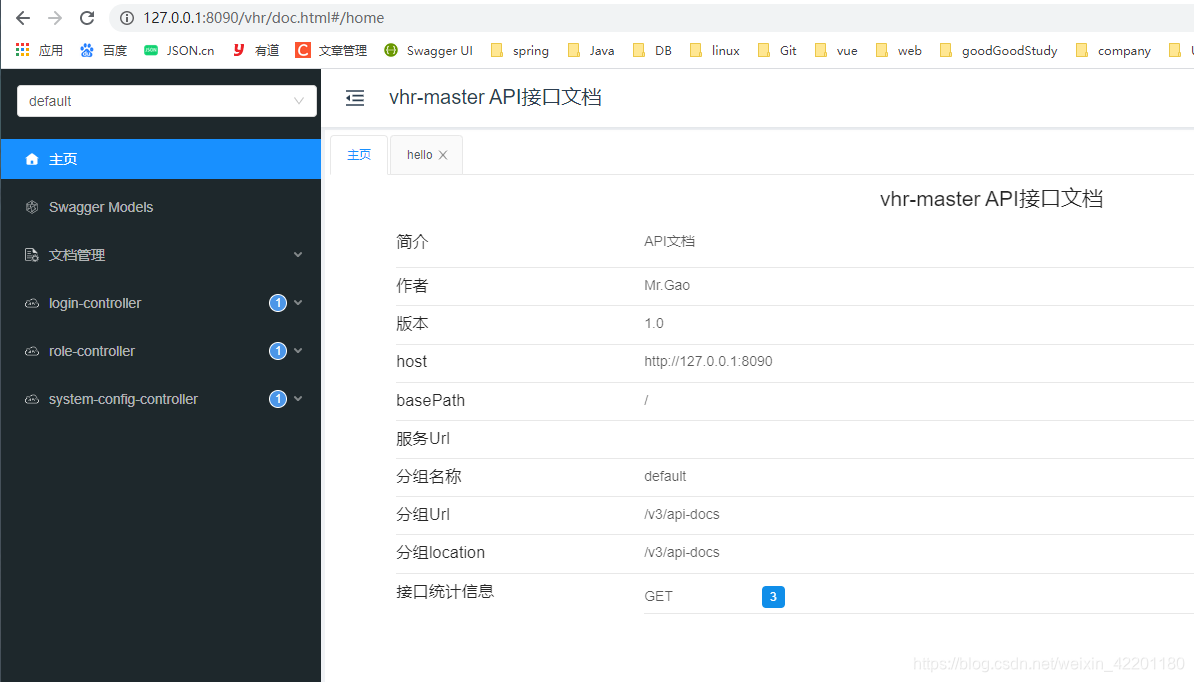
4.3 启动访问
启动访问api文档:http://127.0.0.1:8090/doc.html
5. 生成环境关闭swagger
# swagger3.0 settings
springfox:
  documentation:
    swagger-ui:
      enabled: true # true放开api文档,false关闭api文档
6. 集成SpringSecurity
如果SpringSecurity集成swagger要放行swaggerAPI
@Override
public void configure(WebSecurity web) throws Exception {
    web.ignoring().antMatchers("/swagger-ui/index.html",
            "/swagger-ui/**",
            "/doc.html",
            "/webjars/**",
            // swagger api json
            "/v3/api-docs",
            //用来获取支持的动作
            "/swagger-resources/configuration/ui",
            //用来获取api-docs的URI
            "/swagger-resources",
            //安全选项
            "/swagger-resources/configuration/security",
            "/swagger-resources/**");
}
技术问题回复不及时➕微:JavaBoy_1024


 1174
1174


 被折叠的 条评论
为什么被折叠?
被折叠的 条评论
为什么被折叠?
 到【灌水乐园】发言


