


本文主要关注粘贴图片上传,因为点击工具栏可以增加触发事件
addHandler
一、标签部分:
<el-upload
    :action="photoUploadUrl"
    :show-file-list="false"
    :on-success="handleQuillImgSuccess"
    with-credentials
    accept="image/gif, image/jpeg, image/jpg, image/bmp, image/png"
    style="display: none"
    >
    <i id="imgInput" class="el-icon-plus avatar-uploader-icon" />
</el-upload>
<quill-editor ref="myQuillEditor" v-model="ruleForm.documentBody" :options="editorOption" />
二、脚本部分:附代码说明,就不在单独阐述
步骤:
- 注册实例:
- 在mounted注册工具栏图片插入事件

- 执行图片触发事件
- 图片上传成功处理图片回显富文本
- 在mounted注册粘贴事件
代码:
import { uploadFile } from "/api"
import { quillEditor } from "vue-quill-editor"
//......
data() {
return {
// 图片上传服务器地址
photoUploadUrl: 'http:localhost:8089',
// 存储富文本内容
ruleForm: {
documentBody: ''
},
// 富文本配置
editorOption: {
placeholder: '请输入内容'
},
// 光标位置对象
addRange: null
}
},
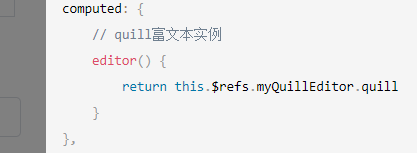
computed: {
// quill富文本实例
editor() {
return this.$refs.myQuillEditor.quill
}
},
mounted() {
this.$nextTick(() => {
// 增加富文本工具栏 图片 工具点击事件
this.editor.getModule("toolbar").addHandler("image", this.imgHandler)
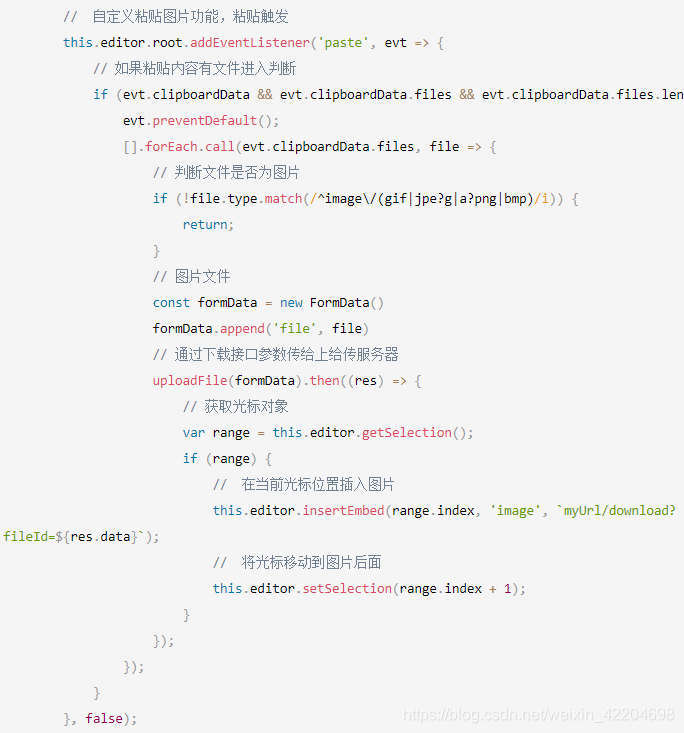
// 自定义粘贴图片功能,粘贴触发
this.editor.root.addEventListener('paste', evt => {
// 如果粘贴内容有文件进入判断
if (evt.clipboardData && evt.clipboardData.files && evt.clipboardData.files.length) {
evt.preventDefault();
[].forEach.call(evt.clipboardData.files, file => {
// 判断文件是否为图片
if (!file.type.match(/^image\/(gif|jpe?g|a?png|bmp)/i)) {
return;
}
// 图片文件
const formData = new FormData()
formData.append('file', file)
// 通过下载接口参数传给上给传服务器
uploadFile(formData).then((res) => {
// 获取光标对象
var range = this.editor.getSelection();
if (range) {
// 在当前光标位置插入图片
this.editor.insertEmbed(range.index, 'image', `myUrl/download?fileId=${res.data}`);
// 将光标移动到图片后面
this.editor.setSelection(range.index + 1);
}
});
});
}
}, false);
})
},
methods: {
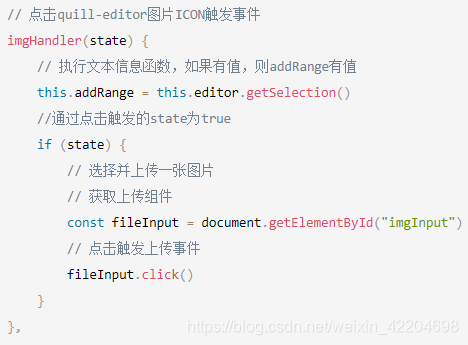
// 点击quill-editor图片ICON触发事件
imgHandler(state) {
// 执行文本信息函数,如果有值,则addRange有值
this.addRange = this.editor.getSelection()
//通过点击触发的state为true
if (state) {
// 选择并上传一张图片
// 获取上传组件
const fileInput = document.getElementById("imgInput")
// 点击触发上传事件
fileInput.click()
}
},
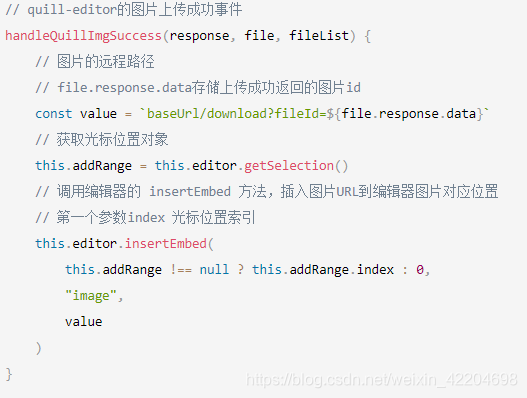
// quill-editor的图片上传成功事件
handleQuillImgSuccess(response, file, fileList) {
// 图片的远程路径
// file.response.data存储上传成功返回的图片id
const value = `baseUrl/download?fileId=${file.response.data}`
// 获取光标位置对象
this.addRange = this.editor.getSelection()
// 调用编辑器的 insertEmbed 方法,插入图片URL到编辑器图片对应位置
// 第一个参数index 光标位置索引
this.editor.insertEmbed(
this.addRange !== null ? this.addRange.index : 0,
"image",
value
)
}
}
以上就是quillEditor自定义图片上传相关功能,希望能帮到大家


 357
357


 被折叠的 条评论
为什么被折叠?
被折叠的 条评论
为什么被折叠?
 到【灌水乐园】发言


