


在netty的实际使用中,会经常有多个客户端和服务器进行连接的情况。另外,由于netty的客户端和服务端是进行的长连接,所以也需要客户端和服务端进行心跳的传递,今天学习完这块内容后,跟着视频写了个demo。大致就是多个客户端与服务端建立连接之后,服务端已广播的形式给客户端发送消息。
下面先写服务端相关代码
自定义的处理器
package cn.zxw.netty.third_chat.server;

import io.netty.channel.Channel;
import io.netty.channel.ChannelHandlerContext;
import io.netty.channel.SimpleChannelInboundHandler;
import io.netty.channel.group.ChannelGroup;
import io.netty.channel.group.DefaultChannelGroup;
import io.netty.handler.timeout.IdleStateEvent;
import io.netty.util.concurrent.GlobalEventExecutor;

/**
 * @author zxw
 * @version 1.0
 * @description 自定义handler
 * @data: 2020/3/3 9:50
 */
public class ChatServerHandler extends SimpleChannelInboundHandler<String> {

    /**
     * 装有所有客户端channel的组
     */
    private static ChannelGroup channelGroup = new DefaultChannelGroup(GlobalEventExecutor.INSTANCE);

    @Override
    protected void channelRead0(ChannelHandlerContext ctx, String msg) throws Exception {
        Channel channel = ctx.channel();
        //循环channel组,判断是不是其它客户端发送的消息
        channelGroup.forEach(ch -> {
            if (channel != ch) {
                ch.writeAndFlush(channel.remoteAddress() + "---发送的消息为:" + msg + "\n");
            } else {
                ch.writeAndFlush("【自己的消息】" + msg + "\n");
            }
        });
    }

    /**
     * 用户事件触发方法   判断事件
     *
     * @param ctx 上下文对象
     * @param evt 事件对象
     * @throws Exception
     */
    @Override
    public void userEventTriggered(ChannelHandlerContext ctx, Object evt) throws Exception {
        //判断该事件是否为超时事件
        if (evt instanceof IdleStateEvent) {
            IdleStateEvent event = (IdleStateEvent) evt;
            String type = "";
            //判断具体事件  具体项目可以根据不同情况进行不同处理
            switch (event.state()) {
                case READER_IDLE:
                    type = "读空闲";
                    break;
                case WRITER_IDLE:
                    type = "写空闲";
                    break;
                default:
                    type = "读写空闲";
            }
            System.out.printf("%s==超时事件==%s\n", ctx.channel().remoteAddress().toString(), type);
            ctx.channel().close();
        }
    }

    @Override
    public void handlerAdded(ChannelHandlerContext ctx) throws Exception {
        Channel channel = ctx.channel();
        //通知其它客户端
        channelGroup.writeAndFlush("【服务端:】" + channel.remoteAddress() + "加入\n");
        channelGroup.add(channel);
    }

    @Override
    public void channelActive(ChannelHandlerContext ctx) throws Exception {
        Channel channel = ctx.channel();
        System.out.println("【客户端:】" + channel.remoteAddress() + "上线\n");
    }

    @Override
    public void channelInactive(ChannelHandlerContext ctx) throws Exception {
        Channel channel = ctx.channel();
        System.out.println("【客户端:】" + channel.remoteAddress() + "下线\n");
    }

    @Override
    public void channelUnregistered(ChannelHandlerContext ctx) throws Exception {
        Channel channel = ctx.channel();
        channelGroup.writeAndFlush("【客户端:】" + channel.remoteAddress() + "离开\n");
        //此处不用从组中一处,掉线之后netty会自动的从组中移除
    }
}
初始化处理器类
package cn.zxw.netty.third_chat.server;

import io.netty.channel.ChannelInitializer;
import io.netty.channel.ChannelPipeline;
import io.netty.channel.socket.SocketChannel;
import io.netty.handler.codec.DelimiterBasedFrameDecoder;
import io.netty.handler.codec.Delimiters;
import io.netty.handler.codec.string.StringDecoder;
import io.netty.handler.codec.string.StringEncoder;
import io.netty.handler.timeout.IdleStateHandler;

import java.util.concurrent.TimeUnit;

/**
 * @author zxw
 * @version 1.0
 * @description 初始化handler
 * @data: 2020/3/3 9:44
 */
public class ChatServerInit extends ChannelInitializer<SocketChannel> {
    @Override
    protected void initChannel(SocketChannel socketChannel) throws Exception {
        ChannelPipeline pipeline = socketChannel.pipeline();
        //添加处理器,netty通过解决不同的情景来添加不同的处理器
        pipeline.addLast(new DelimiterBasedFrameDecoder(4096, Delimiters.lineDelimiter()))
                .addLast(new StringDecoder())
                .addLast(new StringEncoder())
                .addLast(new IdleStateHandler(100,200,300, TimeUnit.SECONDS))
                .addLast(new ChatServerHandler());
    }
}
服务类
package cn.zxw.netty.third_chat.server;

import io.netty.bootstrap.ServerBootstrap;
import io.netty.channel.ChannelFuture;
import io.netty.channel.EventLoopGroup;
import io.netty.channel.nio.NioEventLoopGroup;
import io.netty.channel.socket.nio.NioServerSocketChannel;

/**
 * @author zxw
 * @version 1.0
 * @description 基于聊天的服务端(实现客户端给服务端发消息,让后将消息广播到其它客户端)
 * @data: 2020/3/3 9:39
 */
public class ChatServer {

    public static void main(String[] args) {
        EventLoopGroup bossGroup = new NioEventLoopGroup();
        EventLoopGroup workerGroup = new NioEventLoopGroup();
        try {
            ServerBootstrap serverBootstrap = new ServerBootstrap();
            serverBootstrap.group(bossGroup,workerGroup).channel(NioServerSocketChannel.class).childHandler(new ChatServerInit());
            ChannelFuture channelFuture = serverBootstrap.bind(8899).sync();
            channelFuture.channel().closeFuture().sync();
        } catch (Exception e){
            e.printStackTrace();
        } finally {
            bossGroup.shutdownGracefully();
            workerGroup.shutdownGracefully();
        }
    }
}
接下来就是客户端相关代码(基本雷同)
自定义处理器
package cn.zxw.netty.third_chat.client;

import io.netty.channel.ChannelHandlerContext;
import io.netty.channel.SimpleChannelInboundHandler;

/**
 * @author zxw
 * @version 1.0
 * @description bootstart
 * @data: 2020/3/3 11:17
 */
public class ChatClientHandler extends SimpleChannelInboundHandler<String> {
    @Override
    protected void channelRead0(ChannelHandlerContext channelHandlerContext, String s) throws Exception {
        System.out.println("服务端消息:" + s);
    }
}
初始化处理器类
package cn.zxw.netty.third_chat.client;

import io.netty.channel.ChannelInitializer;
import io.netty.channel.ChannelPipeline;
import io.netty.channel.socket.SocketChannel;
import io.netty.handler.codec.DelimiterBasedFrameDecoder;
import io.netty.handler.codec.Delimiters;
import io.netty.handler.codec.string.StringDecoder;
import io.netty.handler.codec.string.StringEncoder;

/**
 * @author zxw
 * @version 1.0
 * @description 初始化handler
 * @data: 2020/3/3 9:44
 */
public class ChatClientInit extends ChannelInitializer<SocketChannel> {
    @Override
    protected void initChannel(SocketChannel socketChannel) throws Exception {
        ChannelPipeline pipeline = socketChannel.pipeline();
        //添加处理器,netty通过解决不同的情景来添加不同的处理器
        pipeline.addLast(new DelimiterBasedFrameDecoder(4096, Delimiters.lineDelimiter()))
                .addLast(new StringDecoder())
                .addLast(new StringEncoder())
                .addLast(new ChatClientHandler());
    }
}
客户端类
package cn.zxw.netty.third_chat.client;

import io.netty.bootstrap.Bootstrap;
import io.netty.channel.Channel;
import io.netty.channel.EventLoopGroup;
import io.netty.channel.nio.NioEventLoopGroup;
import io.netty.channel.socket.nio.NioSocketChannel;

import java.io.BufferedReader;
import java.io.InputStreamReader;

/**
 * @author zxw
 * @version 1.0
 * @description 聊天客户端程序
 * @data: 2020/3/3 11:14
 */
public class ChatClient {

    public static void main(String[] args) {
        EventLoopGroup eventLoopGroup = new NioEventLoopGroup();
        try {
            Bootstrap bootstrap = new Bootstrap();
            bootstrap.group(eventLoopGroup).channel(NioSocketChannel.class).handler(new ChatClientInit());
            //获得channel对象
            Channel channel = bootstrap.connect("localhost", 8899).sync().channel();
            //通过键盘输入给服务端发消息,并且死循环的监听服务端的消息
            while (true) {
                BufferedReader br = new BufferedReader(new InputStreamReader(System.in));
                channel.writeAndFlush(br.readLine() + "\r\n");
            }
        } catch (Exception e) {
            e.printStackTrace();
        } finally {
            eventLoopGroup.shutdownGracefully();
        }
    }
}
——————————————————————————————————————————————
接下来就是测试工作,先启动服务端。再启动一个客户端。此时应该是客户端没有输出,而服务端有输出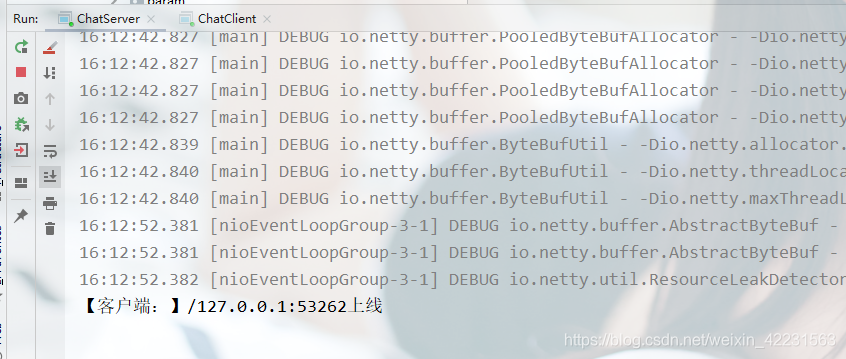
———————————————————————————————————————————————
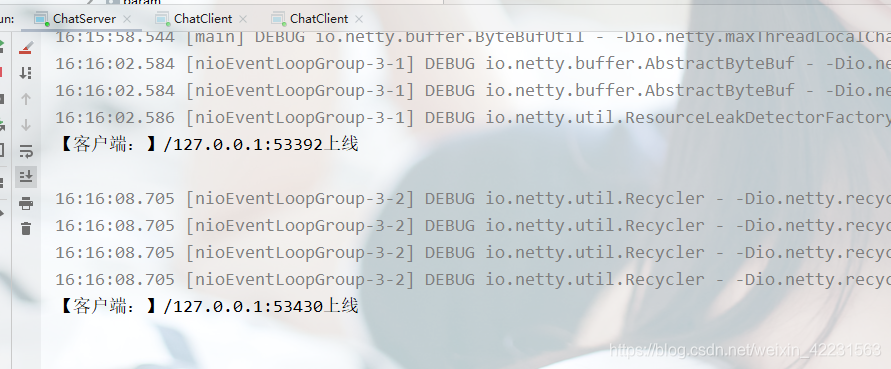
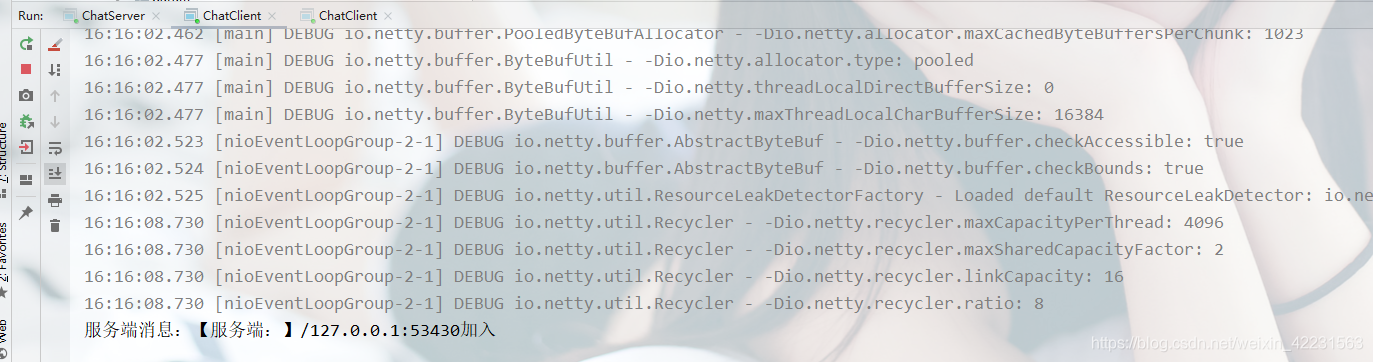
我们再次启动一个客户端,此时应该是服务端和第一个客户端有输出
———————————————————————————————————————————————
———————————————————————————————————————————————
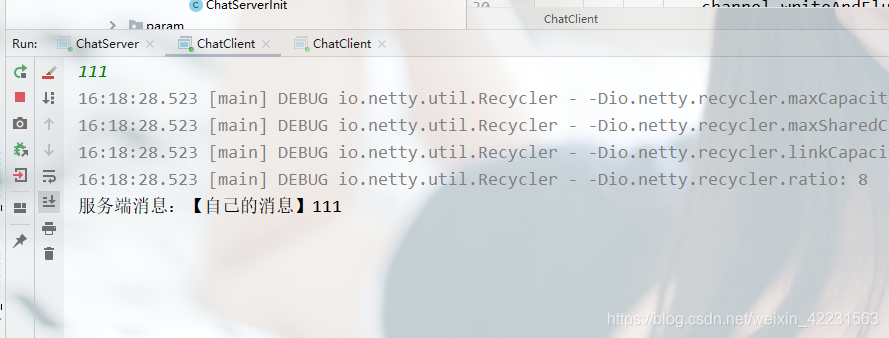
最后我们在第一个客户端输入内容,进行测试
———————————————————————————————————————————————

———————————————————————————————————————————————
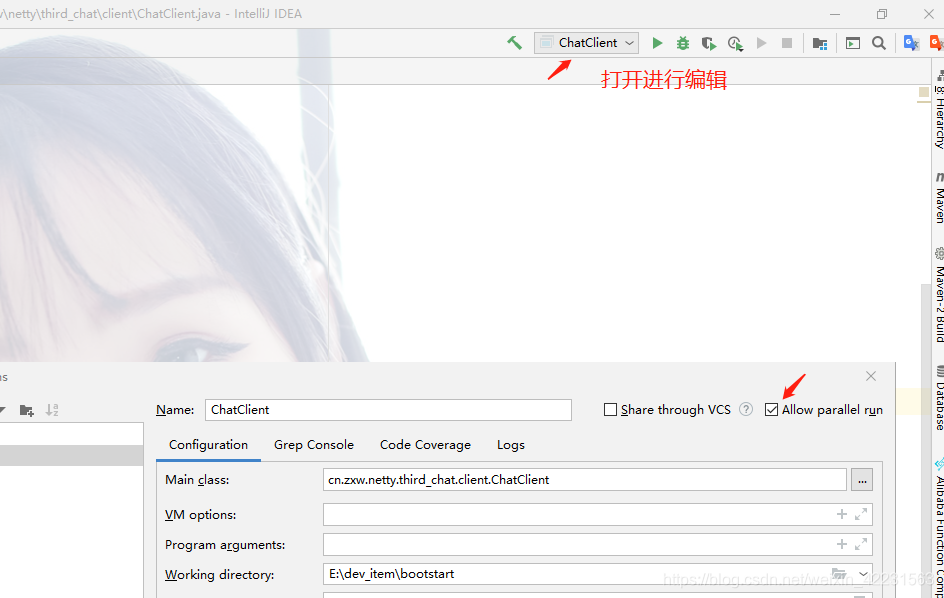
如果大家测试超时间,可以更改下读写的时间更方便测试,如果IDEA不能进行多个main方法启动,可以这样进行设置


 1515
1515


 被折叠的 条评论
为什么被折叠?
被折叠的 条评论
为什么被折叠?
 到【灌水乐园】发言


