


一、概述
本文展示了一个基于 Spring AI Alibaba 实现的多模态应用,具备「文本生成图像」与「图像生成文本」两大核心能力。通过集成阿里云百炼平台的 AI 模型,我们评估了其生成图像的准确性与图像描述能力。在实践中,我们不仅见证了多模态模型在创意内容生成方面的潜力,也发现了当前技术的局限性。希望通过本次实战,为读者提供对该领域更清晰、全面的认识。
二、功能介绍
本应用实现了如下两项多模态能力:
- 文本生成图像:输入一段描述性文本,调用图像生成模型输出相应图片;
- 图像生成文本:上传图片,调用多模态模型生成相应的描述性文本。
三、环境准备
在开始之前,请确保你的环境满足以下要求:
- 操作系统:Windows 11
- Java 版本:JDK 17+(请注意 Spring Boot 3.4.4 的兼容性)
- 依赖管理:Maven 3.8.3+
- 阿里云百炼平台:账号申请 后,可以查看到以下模型的选择。
四、Spring AI 集成:完整代码实现
1. 代码结构
以下是项目的文件结构:
├─src
│    └─main
│        ├─java
│        │  └─com
│        │      └─image
│        │          └─chat
│        │              ├─ ChatApplication.java
│        │              ├─common
│        │              │      ChatInit.java
│        │              │      FilesUtils.java
│        │              └─controller
│        │                      ImageController.java
│        └─resources
│            └─ application.yml
└─ pom.xml
- ImageChatApplication.java:Spring Boot 应用的启动类。
- ChatInit.java:初始化聊天客户端的配置类。
- FilesUtils.java:用于处理文件上传和图片压缩的工具类。
- ImageController.java:提供多模态功能的控制器类。
- application.yml:应用的配置文件。
- pom.xml:项目的依赖管理文件。
2. 初始化类(ChatInit.java)
@Configuration
@RequiredArgsConstructor
public class ChatInit {

    private final ChatModel chatModel;

    @Bean
    public ChatClient chatClient() {
        return ChatClient.builder(chatModel)
                // 定义助手的默认行为和风格
                .defaultSystem("你是一位专业且细致的助手。在遇到不确定或不明确的信息时," +
                        "会主动询问用户以获取更多信息。回答问题时," +
                        "你倾向于使用简洁、条理清晰的语言。如果信息复杂或包含多个部分," +
                        "请确保每个部分都有适当的标题或编号,以创建分层结构。")
                .build();
    }
}
说明: ChatInit 类负责初始化聊天客户端 ChatClient,并定义了助手的默认行为和风格。通过 .defaultSystem 方法,我们为助手设定了一个清晰的回答逻辑,确保生成的内容条理分明。
3. 文件处理(FilesUtils.java)
@Slf4j
@NoArgsConstructor
public final class FilesUtils {

    /**
     * 压缩上传的图片并保存到指定路径。
     * @param file          需要压缩的图片文件(MultipartFile类型)
     * @param relativePath  目标保存路径的相对路径(相对于项目根目录)
     * @param targetWidth   压缩后的目标宽度(像素)
     * @param targetHeight  压缩后的目标高度(像素)
     * @throws IOException  文件读写或图片处理异常
     */
    public static void compressImage(MultipartFile file, String relativePath, int targetWidth, int targetHeight) throws IOException {
        /* 读取原始图片 */
        BufferedImage originalImage = ImageIO.read(file.getInputStream());
        int originalWidth = originalImage.getWidth();
        int originalHeight = originalImage.getHeight();

        /* 计算压缩比例 */
        double scaleWidth = (double) targetWidth / originalWidth;
        double scaleHeight = (double) targetHeight / originalHeight;
        double scale = Math.min(scaleWidth, scaleHeight);

        /* 计算新的尺寸 */
        int newWidth = (int) (originalWidth * scale);
        int newHeight = (int) (originalHeight * scale);

        /* 创建新的 BufferedImage 并设置渲染参数 */
        BufferedImage resizedImage = new BufferedImage(newWidth, newHeight, BufferedImage.TYPE_INT_RGB);
        Graphics2D g2d = resizedImage.createGraphics();
        g2d.setRenderingHint(RenderingHints.KEY_INTERPOLATION, RenderingHints.VALUE_INTERPOLATION_BILINEAR);
        g2d.drawImage(originalImage, 0, 0, newWidth, newHeight, null);
        g2d.dispose();

        /* 获取项目运行目录 */
        String basePath = new File("").getCanonicalPath();

        /* 构建完整路径 */
        String fullPath = System.getProperty("user.dir") + File.separator + relativePath;
        log.info("fullPath is [{}]", fullPath);

        // 创建输出目录
        File outputFile = new File(fullPath);
        outputFile.getParentFile().mkdirs();

        /* 保存图片(保存为 PNG 格式) */
        ImageIO.write(resizedImage, "png", outputFile);
    }
}
说明: FilesUtils 是一个工具类,用于处理图片上传和压缩。compressImage 方法会将上传的图片压缩到指定尺寸(例如 512x512),并保存到目标路径。压缩后的图片用于后续的多模态处理。
4. 控制器(ImageController.java)
@Slf4j
@RestController
@RequestMapping("/ai/v1")
public class ImageController {

    // 图像模型,用于生成图片。
    @Autowired
    private ImageModel imageModel;

    // 聊天客户端,用于处理多模态请求。
    @Autowired
    private ChatClient chatClient;

    /**
     * 根据输入的文本消息生成图片。
     *
     * @param inputMsg 输入的文本消息。
     * @param response HTTP 响应对象,用于返回生成的图片。
     * @throws Exception 如果生成图片或处理响应时发生异常。
     */
    @GetMapping("/message2Image")
    public void message2Image(@RequestParam String inputMsg, HttpServletResponse response)  throws Exception {
        log.info("inputMsg is  [{}]", inputMsg);

        // 调用图像模型生成图片
        ImageGeneration imageOut = imageModel.call(new ImagePrompt(inputMsg)).getResult();
        String imageUrl = imageOut.getOutput().getUrl();

        log.info("image url  is  [{}]", imageUrl);

        // 从图片 URL 获取输入流
        URL url = URI.create(imageUrl).toURL();
        InputStream in = url.openStream();

        // 设置响应头为图片类型,并将图片数据写入响应流
        response.setHeader("Content-Type", MediaType.IMAGE_PNG_VALUE);
        response.getOutputStream().write(in.readAllBytes());
        response.getOutputStream().flush();
    }

    /**
     * 根据输入的图片生成文本描述。
     *
     * @param inputMsg 输入的文本消息(可选,用于提供上下文)。
     * @param file 上传的图片文件。
     * @return 生成的文本描述。
     * @throws Exception 如果处理图片或调用模型时发生异常。
     */
    @RequestMapping("/image2Message")
    public String image2Message(@RequestParam String inputMsg, @RequestParam MultipartFile file) throws Exception {

        // 定义目标路径和文件名
        String filePath = "static/image/" + System.currentTimeMillis() + ".png";

        // 压缩图片并保存到目标路径
        FilesUtils.compressImage(file, filePath, 512, 512); // 压缩到 512x512

        // 创建 UserMessage,包含文本和压缩后的图片
        UserMessage message = new UserMessage(
                inputMsg,
                new Media(
                        MimeTypeUtils.IMAGE_PNG,
                        new FileSystemResource(filePath)
                )
        );
        message.getMetadata().put(DashScopeChatModel.MESSAGE_FORMAT, MessageFormat.IMAGE);

        // 调用多模态模型生成文本描述
        return chatClient.prompt(new Prompt(message))
                .call()
                .content();
    }
}
说明: ImageController 是核心的 API 控制器,提供了两个主要接口:
message2Image:根据输入的文本生成图像,并将结果直接返回给客户端。image2Message:接收上传的图片,调用多模态模型生成描述性文本。
5. 启动类(ChatApplication.java)
@SpringBootApplication
public class ChatApplication {

    public static void main(String[] args) {
        SpringApplication.run(ChatApplication.class, args);
    }
}
说明:
ChatApplication 是 Spring Boot 应用的入口类,通过 @SpringBootApplication 注解启动 Spring 容器。
6. 配置文件(application.yml)
server:
  port: 8080
spring:
  application:
    name: Hello-Spring-AI
  servlet:
    multipart:
      max-file-size: 2MB
      max-request-size: 2MB
  ai:
    dashscope:
      # 注意这个理是使用阿里云百炼平台的API-KEY
      api-key: sk-xxxxxxxxxxxxxxxxxxxxxxxxxx
      model: qwq-plus
      chat:
        options:
          model: qwen-vl-max-latest
          multi-model: true
      image:
        options:
          model: wanx2.1-t2i-turbo  # 明确指定 Text-to-Image 模型
          width: 512  # 可选:指定生成图像的宽度
          height: 512  # 可选:指定生成图像的高度
          n: 1  # 可选:指定生成图像的数量
说明: application.yml 文件配置了应用的端口、文件上传限制以及 AI 模型的相关参数。api-key 是阿里云百炼平台的密钥,用于调用 AI 模型。
7. POM 文件
    <!-- 全局属性管理 -->
    <properties>
        <java.version>23</java.version>
        <project.build.sourceEncoding>UTF-8</project.build.sourceEncoding>
        <project.reporting.outputEncoding>UTF-8</project.reporting.outputEncoding>
        <!-- 自定义依赖版本 -->
        <spring-boot.version>3.4.4</spring-boot.version>
        <spring-ai.version>1.0.0-M6</spring-ai.version>
        <spring-alibaba.version>1.0.0-M6.1</spring-alibaba.version>
        <maven.compiler.version>3.11.0</maven.compiler.version>
    </properties>

    <dependencies>
        <dependency>
            <groupId>org.springframework.boot</groupId>
            <artifactId>spring-boot-starter-data-redis</artifactId>
            <version>${spring-boot.version}</version>
        </dependency>
        <dependency>
            <groupId>org.springframework.boot</groupId>
            <artifactId>spring-boot-starter-web</artifactId>
            <version>${spring-boot.version}</version>
        </dependency>
        <dependency>
            <groupId>com.alibaba.cloud.ai</groupId>
            <artifactId>spring-ai-alibaba-starter</artifactId>
            <version>${spring-alibaba.version}</version>
        </dependency>
        <dependency>
            <groupId>org.projectlombok</groupId>
            <artifactId>lombok</artifactId>
            <version>1.18.32</version>
            <optional>true</optional>
        </dependency>
        <dependency>
            <groupId>org.apache.commons</groupId>
            <artifactId>commons-lang3</artifactId>
            <version>3.17.0</version>
        </dependency>
    </dependencies>
    <dependencyManagement>
        <dependencies>
            <dependency>
                <groupId>org.springframework.ai</groupId>
                <artifactId>spring-ai-bom</artifactId>
                <version>${spring-ai.version}</version>
                <type>pom</type>
                <scope>import</scope>
            </dependency>
        </dependencies>
    </dependencyManagement>

    <!-- 构建配置 -->
    <build>
        <plugins>
            <!-- 编译器插件 -->
            <plugin>
                <groupId>org.apache.maven.plugins</groupId>
                <artifactId>maven-compiler-plugin</artifactId>
                <version>${maven.compiler.version}</version>
                <configuration>
                    <release>${java.version}</release>
                    <annotationProcessorPaths>
                        <path>
                            <groupId>org.projectlombok</groupId>
                            <artifactId>lombok</artifactId>
                            <version>1.18.32</version>
                        </path>
                    </annotationProcessorPaths>
                </configuration>
            </plugin>

            <!-- Spring Boot打包插件 -->
            <plugin>
                <groupId>org.springframework.boot</groupId>
                <artifactId>spring-boot-maven-plugin</artifactId>
                <configuration>
                    <excludes>
                        <exclude>
                            <groupId>org.projectlombok</groupId>
                            <artifactId>lombok</artifactId>
                        </exclude>
                    </excludes>
                </configuration>
            </plugin>
        </plugins>
    </build>

    <!-- 仓库配置 -->
    <repositories>
        <repository>
            <id>alimaven</id>
            <name>aliyun maven</name>
            <url>https://maven.aliyun.com/repository/public</url>
        </repository>
        <repository>
            <id>spring-milestones</id>
            <name>Spring Milestones</name>
            <url>https://repo.spring.io/milestone</url>
            <snapshots>
                <enabled>false</enabled>
            </snapshots>
        </repository>
        <repository>
            <id>spring-snapshots</id>
            <name>Spring Snapshots</name>
            <url>https://repo.spring.io/snapshot</url>
            <releases>
                <enabled>false</enabled>
            </releases>
        </repository>
    </repositories>
说明:
pom.xml 文件定义了项目的依赖和构建配置。我们引入了 Spring Boot、Spring AI 以及阿里云的相关依赖,确保应用能够顺利运行。
以下是精简后的文章内容:
五、验证与效果对比
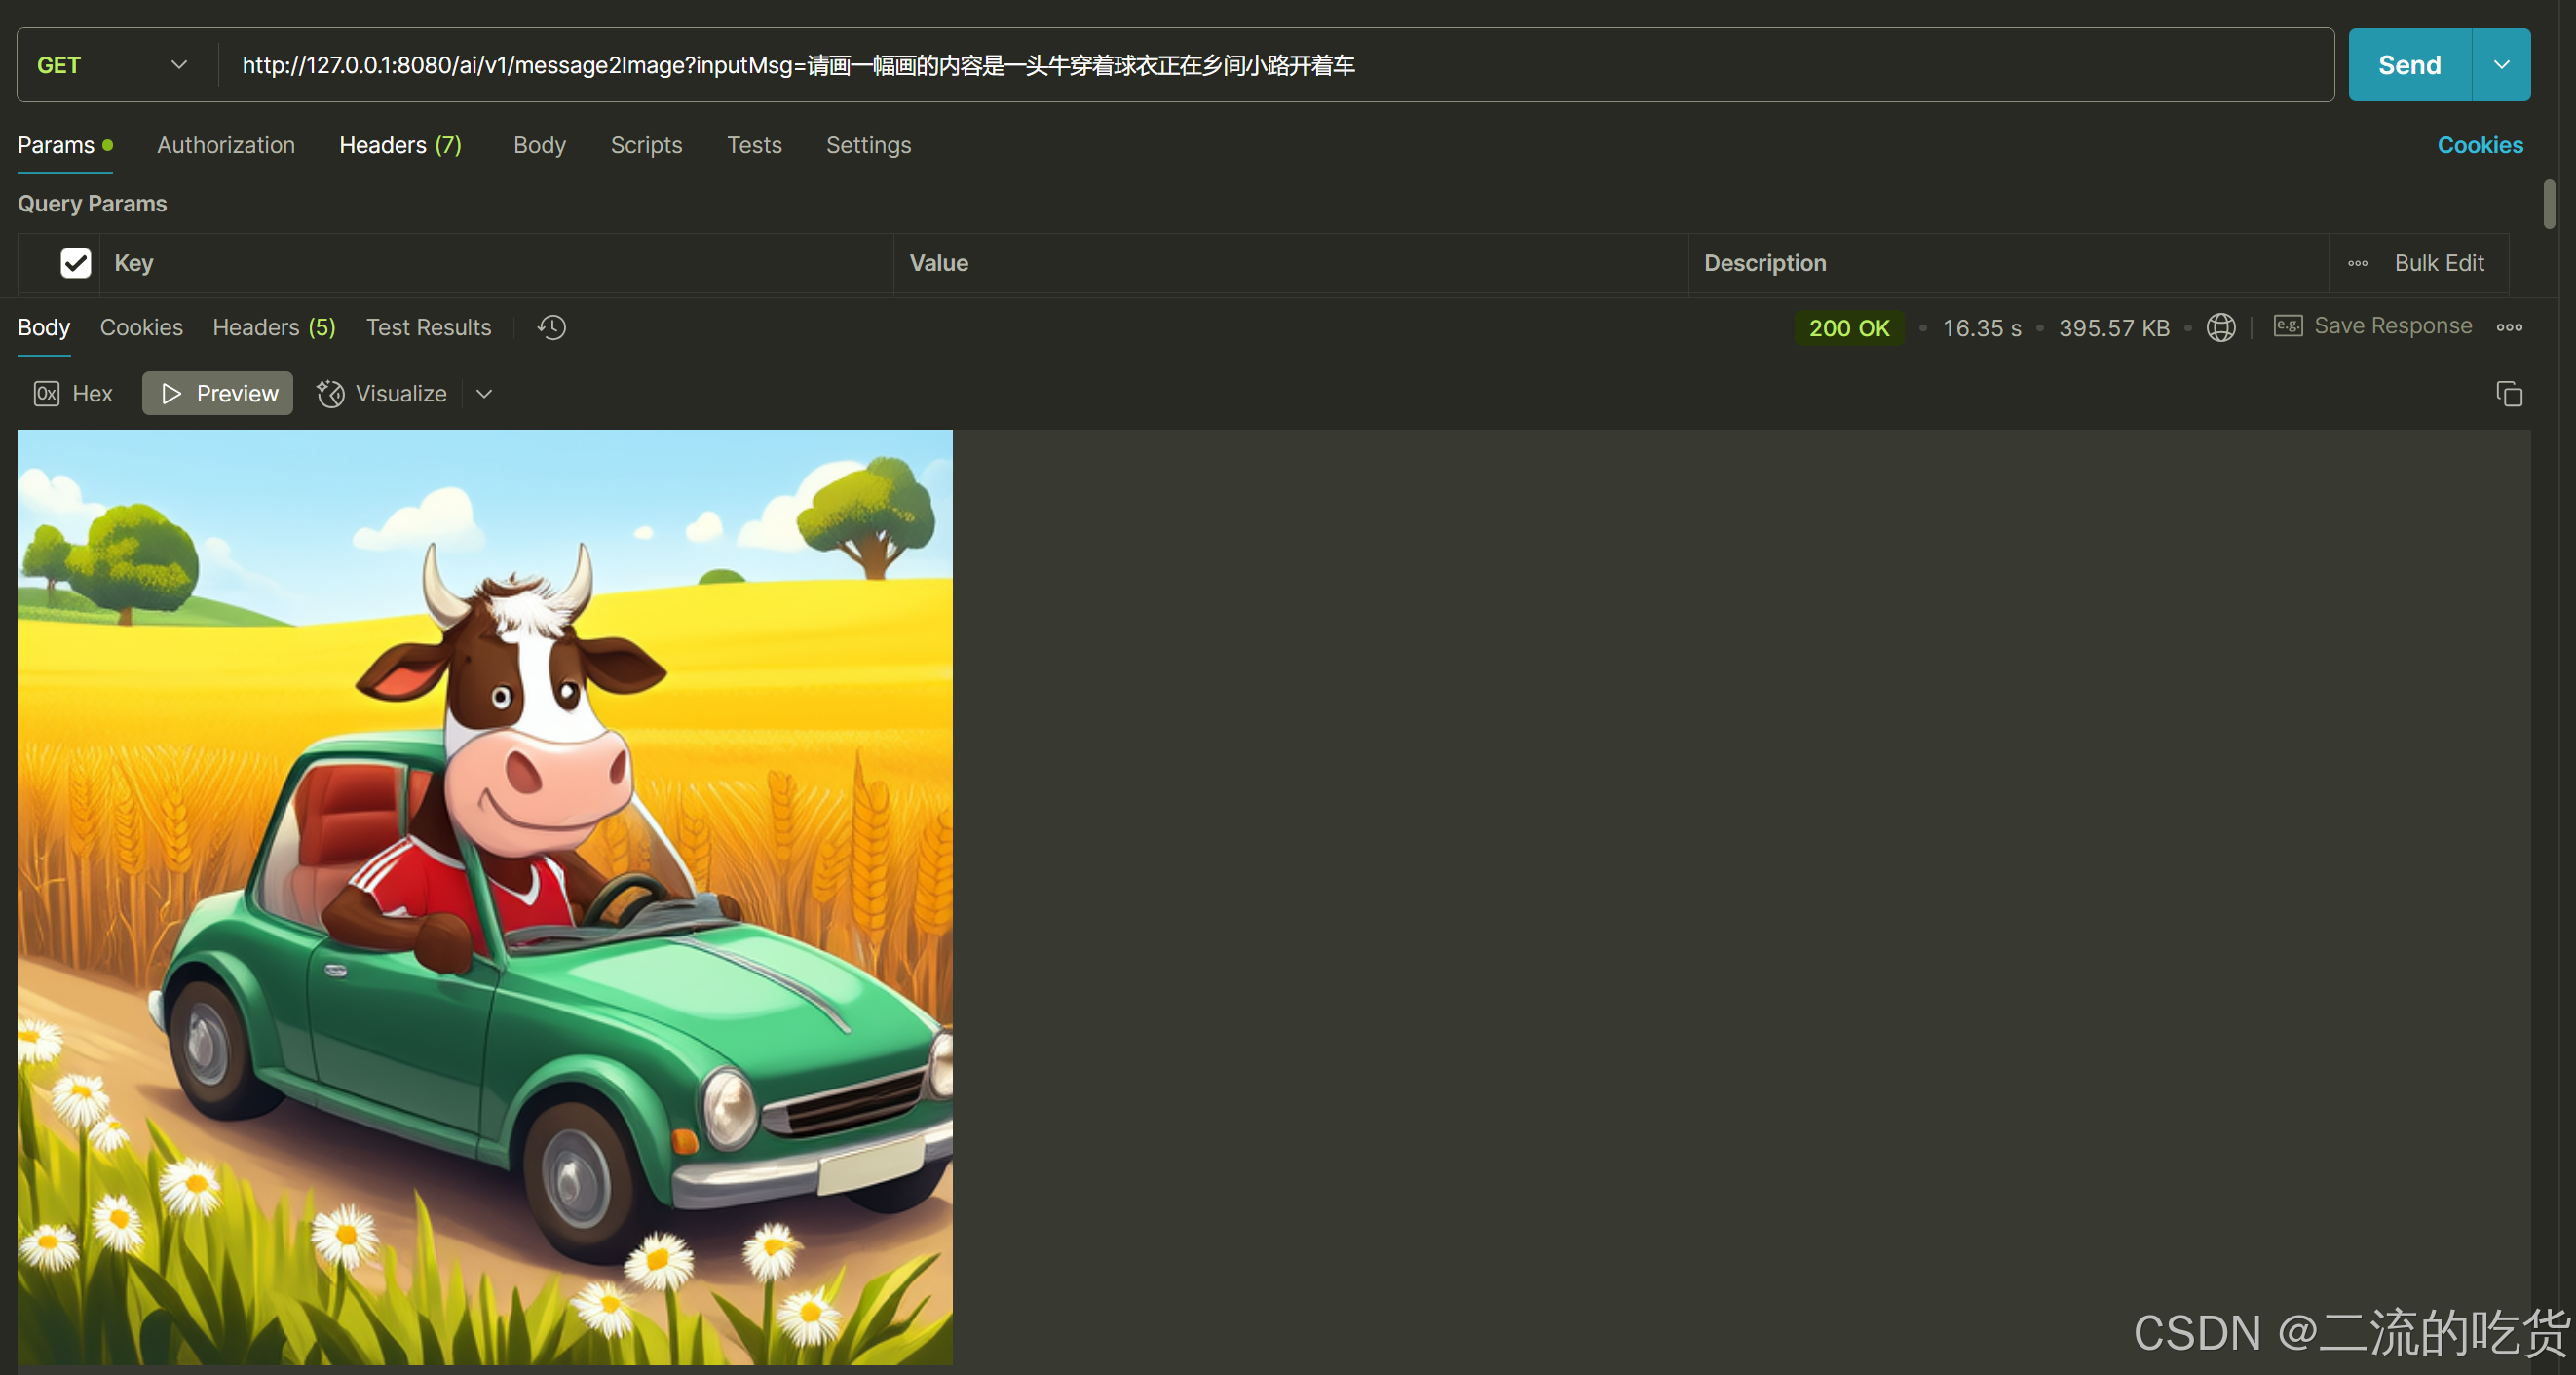
测试场景:我们按照接口 文本生成图像 来生成一张图片,然后让 图像生成文本 接口再描述一下这张图片。
1. 文本生成图像
测试输入:
输入文本:请画一幅画的内容是一头牛穿着球衣正在乡间小路开着车
生成结果:
2. 图像生成文本
测试输入:
我们把生成的图片保存后,传入第二个接口,然后问 请描述一下这幅画的内容
生成结果:

效果总结
整体来看,Spring AI Alibaba 提供的多模态能力具有良好的可拓展性,但也存在以下问题:
-
输出稳定性欠佳:相同输入可能产生差异较大的图像结果,生成内容不易精确控制。
-
复杂内容表达能力不足:面对细节复杂的文本,图像生成常出现信息缺失或偏差。
六、再扯几句
多模态技术作为 AI 领域的前沿方向,虽然已经展现出巨大潜力,但目前还存在一些技术难题。从图像生成到文本描述,虽然看起来很酷,实际应用中却充满挑战。比如,生成的图像有时不够一致,特别是在处理复杂的描述时,效果可能与预期有较大差距。此外,图像转文本的能力也还不够精准,往往遗漏了重要的细节。管他呢,先学会怎么用再说, HOHO~~


 1万+
1万+

 被折叠的 条评论
为什么被折叠?
被折叠的 条评论
为什么被折叠?
 到【灌水乐园】发言


