


 本文介绍了BorderPane布局的特点和用法,展示了如何通过JavaFX在不同区域(顶部、底部、左侧、右侧和中心)放置和对齐节点。同时,还提供了绑定场景宽度和高度属性的方法。
BorderPane布局顶部,底部,左,右或中心区域中的子节点。每个区域只能有一个节点。BorderPane的顶部和底部区域允许可调整大小的节点占用所有可用宽度。
左边界区域和右边界区域占据顶部和底部边界之间的可用垂直空间。
默认情况下,所有边界区域尊重子节点的首选宽度和高度。放置在顶部,底部,左侧,右侧和中心区域中的节点的默认对齐方式如下:
顶部: Pos.TOP_LEFT
底部: Pos.BOTTOM_LEFT
左侧: Pos.TOP_LEFT
右侧: Pos.TOP_RIGHT
中心: Pos.CENTER
示例
将按钮添加到BorderPane,如下代码所示 -
import javafx.application.Application;
import javafx.geometry.Insets;
import javafx.scene.Scene;
import javafx.scene.control.Button;
import javafx.scene.layout.BorderPane;
import javafx.stage.Stage;
public class Main extends Application {
public static void main(String[] args) {
Application.launch(args);
}
@Override
public void start(Stage primaryStage) {
primaryStage.setTitle("BorderPane Test");
BorderPane bp = new BorderPane();
bp.setPadding(new Insets(10, 20, 10, 20));
Button btnTop = new Button("Top");
bp.setTop(btnTop);
Button btnLeft = new Button("Left");
bp.setLeft(btnLeft);
Button btnCenter = new Button("Center");
bp.setCenter(btnCenter);
Button btnRight = new Button("Right");
bp.setRight(btnRight);
Button btnBottom = new Button("Bottom");
bp.setBottom(btnBottom);
Scene scene = new Scene(bp, 300, 200);
primaryStage.setScene(scene);
primaryStage.show();
}
}
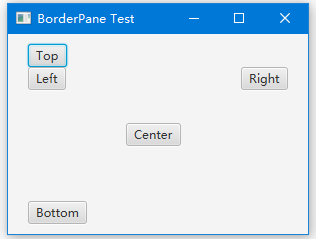
上面的代码生成以下结果。
实例-2
使用场景绑定BorderPane宽度和高度
import javafx.application.Application;
import javafx.event.ActionEvent;
import javafx.event.EventHandler;
import javafx.scene.Group;
import javafx.scene.Scene;
import javafx.scene.control.Menu;
import javafx.scene.control.MenuBar;
import javafx.scene.control.MenuItem;
import javafx.scene.layout.BorderPane;
import javafx.scene.paint.Color;
import javafx.stage.Stage;
public class Main extends Application {
public static void main(String[] args) {
Application.launch(args);
}
@Override
public void start(Stage primaryStage) {
primaryStage.setTitle("Title");
Group root = new Group();
Scene scene = new Scene(root, 400, 250, Color.WHITE);
MenuBar menuBar = new MenuBar();
EventHandler action = changeTabPlacement();
Menu menu = new Menu("Direction");
MenuItem left = new MenuItem("Left");
left.setOnAction(action);
menu.getItems().add(left);
MenuItem right = new MenuItem("Right");
right.setOnAction(action);
menu.getItems().add(right);
MenuItem top = new MenuItem("Top");
top.setOnAction(action);
menu.getItems().add(top);
MenuItem bottom = new MenuItem("Bottom");
bottom.setOnAction(action);
menu.getItems().add(bottom);
menuBar.getMenus().add(menu);
BorderPane borderPane = new BorderPane();
borderPane.prefHeightProperty().bind(scene.heightProperty());
borderPane.prefWidthProperty().bind(scene.widthProperty());
borderPane.setTop(menuBar);
root.getChildren().add(borderPane);
primaryStage.setScene(scene);
primaryStage.show();
}// from w WW.y i i bAI. c OM
private EventHandler changeTabPlacement() {
return new EventHandler() {
public void handle(ActionEvent event) {
MenuItem mItem = (MenuItem) event.getSource();
String side = mItem.getText();
if ("left".equalsIgnoreCase(side)) {
System.out.println("left");
} else if ("right".equalsIgnoreCase(side)) {
System.out.println("right");
} else if ("top".equalsIgnoreCase(side)) {
System.out.println("top");
} else if ("bottom".equalsIgnoreCase(side)) {
System.out.println("bottom");
}
}
};
}
}
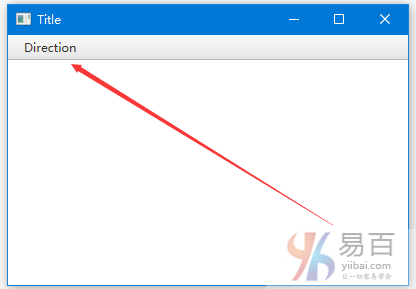
上面的代码生成以下结果。
¥ 我要打赏
纠错/补充
收藏
加QQ群啦,易百教程官方技术学习群
注意:建议每个人选自己的技术方向加群,同一个QQ最多限加 3 个群。


 181
181

 被折叠的 条评论
为什么被折叠?
被折叠的 条评论
为什么被折叠?
 到【灌水乐园】发言


