


初始化项目
1. 首先新建一个Ionic5的项目:
ionic start test-1 blank
2. 安装对应的npm依赖:
npm install angular2-signaturepad --save
3. 依赖安装完成后在app.module.ts中注册该模块:
// 模块路径
import { SignaturePadModule } from 'angular2-signaturepad';
@NgModule({
declarations: [AppComponent],
entryComponents: [],
// 在imports中进行注册
imports: [BrowserModule, IonicModule.forRoot(), AppRoutingModule, SignaturePadModule],
providers: [
StatusBar,
SplashScreen,
{ provide: RouteReuseStrategy, useClass: IonicRouteStrategy }
],
bootstrap: [AppComponent]
})
export class AppModule { }
创建签名页
1. 签名需要屏幕上有足够的空间,我们新建一个Page页面专门用于签名:
ionic g page sign
2. 然后编辑sign.page.html文件,针对这个页面布局做一些修改(小弟UI功底贼差,这里可以自行发挥)
重 绘
返 回
确 认
3. 页面的CSS样式:
.rule { // 起到格尺的作用
// 宽高撑满
width: 100%;
height: 100%;
// 透明
opacity: 0;
// 脱离文档流
position: absolute;
top: 0;
left: 0;
// 设置鼠标穿透
pointer-events: none;
// 防止拖拽报错
touch-action: none;
}
.sign { // 画布添加下边框起到分割线作用
border-bottom: 1px solid #eaeaea;
}
.div-btn{ // 底部三个操作按钮居中显示
text-align: center;
}
.btn { // 设置每个按钮的大小、间隔
width: 85px;
height: 40px;
margin: 30px 10px;
}
4. 开始写JS代码(代码都写了注释,就不再解释了):
import { SignaturePad } from 'angular2-signaturepad';
@Component({
selector: 'app-sign',
templateUrl: './sign.page.html',
styleUrls: ['./sign.page.scss'],
})
export class SignPage {
@ViewChild("div")
private div: any; // 尺子DIV对象
@ViewChild(SignaturePad)
private pad: SignaturePad; // 画布
private options: any; // 宽高参数
private isShowPad: boolean; // 是否显示
private otherPage = {that: null, callBack: null}; // 其他页面传来的参数(回调)
constructor(private navCtrl: NavController, private navParam: ActivatedRoute) {
// 设置初始值
this.options = { canvasWidth: 200, canvasHeight: 200 };
this.isShowPad = false;
// 接收传参
this.otherPage.that = navParam.snapshot.queryParams.that;
this.otherPage.callBack = navParam.snapshot.queryParams.callBack;
}
// 页面加载完成在调用初始化方法
ionViewWillEnter() {
this.canvasResize();
}
// 设置画布大小
canvasResize() {
// 获取当前屏幕宽高,留出100高度(下边框有1px)显示操作按钮,
let dom = this.div.nativeElement;
this.options.canvasWidth = dom.offsetWidth;
this.options.canvasHeight = dom.offsetHeight - 99;
// 等待属性设置完成之后再显示画布
this.isShowPad = true;
}
// 清空画布内容
clear() {
this.pad.clear();
}
// 确认按钮
ok() {
// 点击确认后将图片转换为Base64传给回调、然后关闭该页面
this.otherPage.callBack(this.otherPage.that, this.pad.toDataURL());
this.navCtrl.back();
}
// 返回按钮
back() {
this.navCtrl.back();
}
}
首页的调用测试
1. 签名页面已经绘制好了,接下来在Home组件中进行调用,编辑home.page.html:
请输入签名
点击开始签名
2. 首页这里就不修改样式了,能用就行,接下来是JS代码:
export class HomePage {
private base64: string = "";
constructor(private navCtrl: NavController) {}
// 打开画布页面
openPage() {
this.navCtrl.navigateForward("sign", {queryParams: {
// 传入当前组件的this指向和回调
that: this,
callBack: this.setBase64
}});
}
// 获取base64图像然后显示在页面上
setBase64(that, base64) {
that.base64 = base64;
}
}
这样最简单的手写签名程序就完成了,运行查看效果:
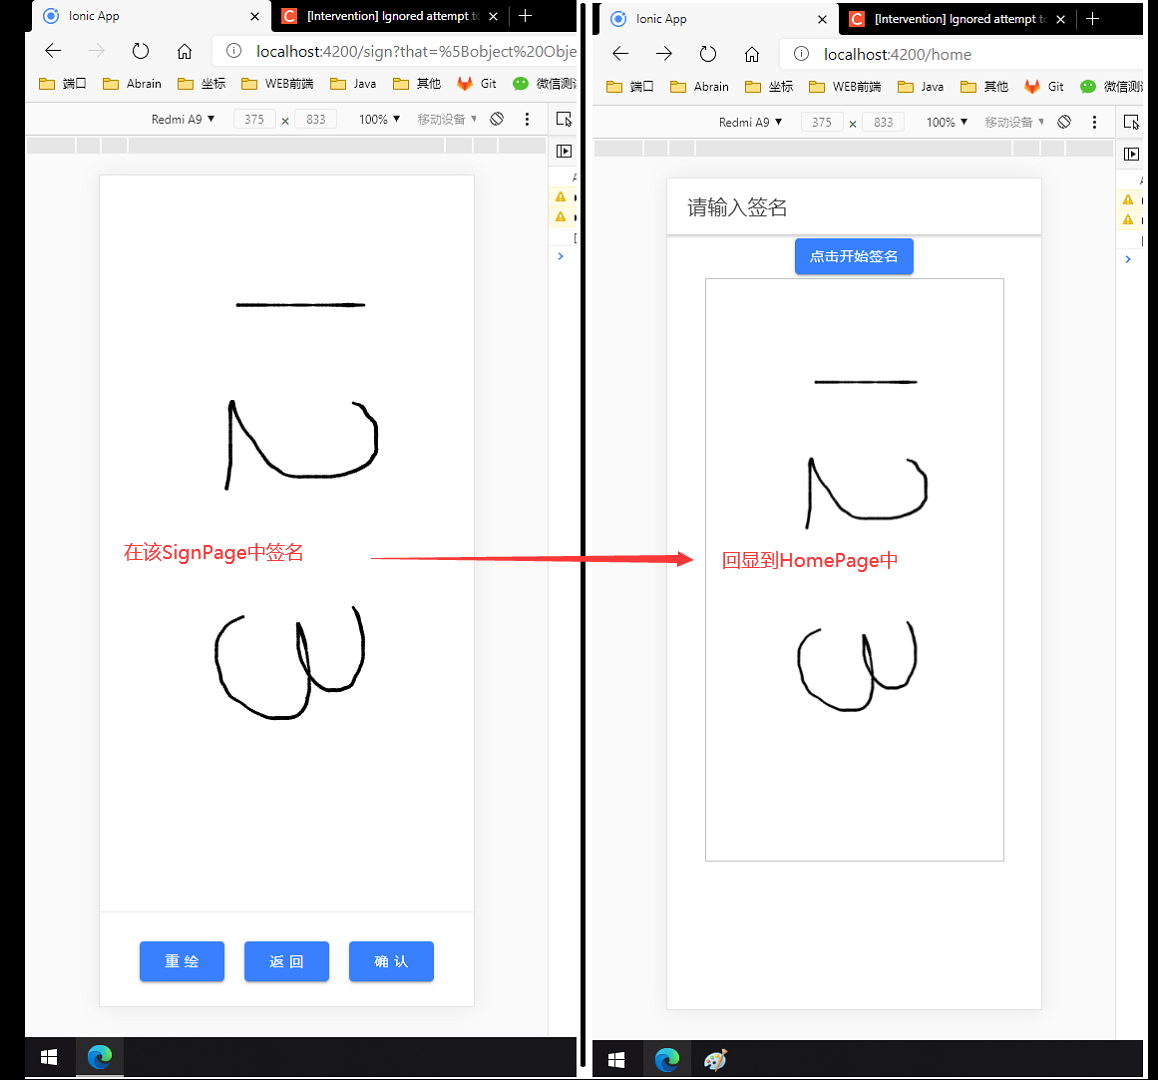
Base图片旋转
从测试效果上来看,我们已经实现了目标功能,但是客户签字时肯定是横着签的,然后回显到Home页之后显示也会出现问题,如果把画布修改为宽大于高,画布是横过来了,但是局限于手机屏幕大小根本没办法签名,这里我在网上找了一个Base64的图像旋转代码可以使用:
1. 创建Ionic服务:
ionic g service service/util
export class UtilService {
constructor() { }
rotateBase64Img(src, edg, callback) {
var canvas = document.createElement("canvas");
var ctx = canvas.getContext("2d");
var imgW;//图片宽度
var imgH;//图片高度
var size;//canvas初始大小
if (edg % 90 != 0) {
console.error("旋转角度必须是90的倍数!");
throw '旋转角度必须是90的倍数!';
}
(edg < 0) && (edg = (edg % 360) + 360)
const quadrant = (edg / 90) % 4; //旋转象限
const cutCoor = {sx: 0, sy: 0, ex: 0, ey: 0}; //裁剪坐标
var image = new Image();
image.crossOrigin = "anonymous"
image.src = src;
image.onload = function () {
imgW = image.width;
imgH = image.height;
size = imgW > imgH ? imgW : imgH;
canvas.width = size * 2;
canvas.height = size * 2;
switch (quadrant) {
case 0:
cutCoor.sx = size;
cutCoor.sy = size;
cutCoor.ex = size + imgW;
cutCoor.ey = size + imgH;
break;
case 1:
cutCoor.sx = size - imgH;
cutCoor.sy = size;
cutCoor.ex = size;
cutCoor.ey = size + imgW;
break;
case 2:
cutCoor.sx = size - imgW;
cutCoor.sy = size - imgH;
cutCoor.ex = size;
cutCoor.ey = size;
break;
case 3:
cutCoor.sx = size;
cutCoor.sy = size - imgW;
cutCoor.ex = size + imgH;
cutCoor.ey = size + imgW;
break;
}
ctx.translate(size, size);
ctx.rotate(edg * Math.PI / 180);
ctx.drawImage(image, 0, 0);
var imgData = ctx.getImageData(cutCoor.sx, cutCoor.sy, cutCoor.ex, cutCoor.ey);
if (quadrant % 2 == 0) {
canvas.width = imgW;
canvas.height = imgH;
} else {
canvas.width = imgH;
canvas.height = imgW;
}
ctx.putImageData(imgData, 0, 0);
callback(canvas.toDataURL())
};
}
}
3. 然后在Home组件中引入这个服务,在显示图片的回调中将Base进行旋转:
export class HomePage {
// 这里引入刚刚写好的工具类服务
constructor(private navCtrl: NavController, private util: UtilService) {}
// ....省略代码
// 获取base64图像然后旋转270度后显示在页面上
setBase64(that, base64) {
// 第一个参数:Base64字符串
// 第二个参数:旋转角度
// 第三个参数:回调,接收返回的参数就是旋转后的Base64图片字符串
that.util.rotateBase64Img(base64, 270, res=>that.base64 = res);
}
}
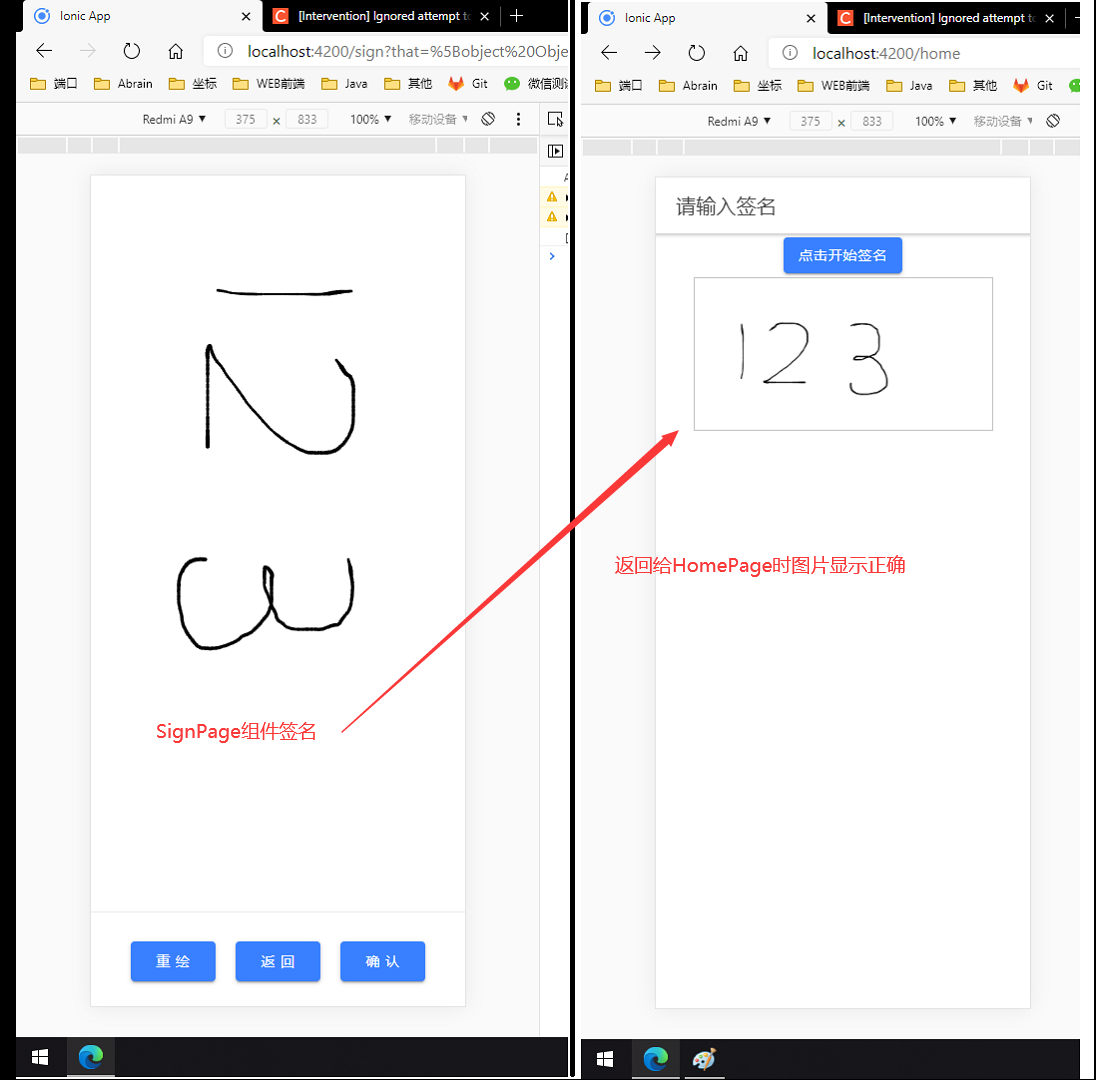
这样图片旋转也已经处理好了,再来测试一下:


 435
435


 被折叠的 条评论
为什么被折叠?
被折叠的 条评论
为什么被折叠?
 到【灌水乐园】发言


