


阅读过前四章的你,对于spring整合mybatis应该清楚了80%,剩下的就是事务这里不太了解
这也是最后一章,简述事务是如何支持的
回顾下mybatis-spring整合包源码阅读(一)---- SqlSessionFactoryBean相关总结
提到过一个点
贴源码 org.mybatis.spring.SqlSessionFactoryBean 代码 506-510
    if (this.transactionFactory == null) {
      this.transactionFactory = new SpringManagedTransactionFactory();
    }

    configuration.setEnvironment(new Environment(this.environment, this.transactionFactory, this.dataSource));
事务的控制就是由这个 SpringManagedTransactionFactory 来支持的
说起Mybatis的事务支持,就不得不说Mybatis的执行器
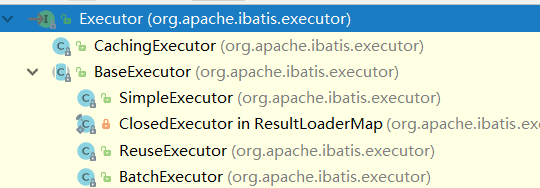
mybatis对数据库的CRUD操作就是由这几个执行器来执行的,如果你没有阅读过mybatis的一些源码,那么我带你梳理下执行器这里的逻辑.
首先要知道最重要的一点
JBDC是一个规范,Mybatis也好、Hibernate 也罢,底层都是JDBC
JDBC操作数据库无非就是
1、找到数据源
2、打开链接
3、执行SQL
4、处理结果集
5、提交事务
6、关闭链接
Mybatis的执行器也是这几步骤
直接上MapperProxy的执行源码
  @Override
  public Object invoke(Object proxy, Method method, Object[] args) throws Throwable {
    try {
    // 只有你自己实现CRUD,而不是使用Mybatis的代理方式执行时,才会进入try
      if (Object.class.equals(method.getDeclaringClass())) {
        return method.invoke(this, args);
      } else if (isDefaultMethod(method)) {
        return invokeDefaultMethod(proxy, method, args);
      }
    } catch (Throwable t) {
      throw ExceptionUtil.unwrapThrowable(t);
    }

    final MapperMethod mapperMethod = cachedMapperMethod(method);
    // 这里是重点
    return mapperMethod.execute(sqlSession, args);
  }
看看如下代码,实际上不论最后怎么样,执行是时候都会是SqlSession在执行的方法
而SqlSession的真正执行者,就是mybatis的执行器
 public Object execute(SqlSession sqlSession, Object[] args) {
    Object result;
    switch (command.getType()) {
      case INSERT: {
    	Object param = method.convertArgsToSqlCommandParam(args);
        result = rowCountResult(sqlSession.insert(command.getName(), param));
        break;
      }
      case UPDATE: {
        Object param = method.convertArgsToSqlCommandParam(args);
        result = rowCountResult(sqlSession.update(command.getName(), param));
        break;
      }
      case DELETE: {
        Object param = method.convertArgsToSqlCommandParam(args);
        result = rowCountResult(sqlSession.delete(command.getName(), param));
        break;
      }
      case SELECT:
        if (method.returnsVoid() && method.hasResultHandler()) {
          executeWithResultHandler(sqlSession, args);
          result = null;
        } else if (method.returnsMany()) {
          result = executeForMany(sqlSession, args);
        } else if (method.returnsMap()) {
          result = executeForMap(sqlSession, args);
        } else if (method.returnsCursor()) {
          result = executeForCursor(sqlSession, args);
        } else {
          Object param = method.convertArgsToSqlCommandParam(args);
          result = sqlSession.selectOne(command.getName(), param);
        }
        break;
      case FLUSH:
        result = sqlSession.flushStatements();
        break;
      default:
        throw new BindingException("Unknown execution method for: " + command.getName());
    }
    if (result == null && method.getReturnType().isPrimitive() && !method.returnsVoid()) {
      throw new BindingException("Mapper method '" + command.getName()
          + " attempted to return null from a method with a primitive return type (" + method.getReturnType() + ").");
    }
    return result;
  }
一般情况下执行的时候,都是org.apache.ibatis.session.defaults.DefaultSqlSession执行
但是!spring在整合Mybatis时,用的是org.mybatis.spring.SqlSessionTemplate 因为他实现了SqlSession
贴构造方法代码
 private final SqlSessionFactory sqlSessionFactory;

  private final ExecutorType executorType;

  private final SqlSession sqlSessionProxy;

  private final PersistenceExceptionTranslator exceptionTranslator;

  public SqlSessionTemplate(SqlSessionFactory sqlSessionFactory) {
    this(sqlSessionFactory, sqlSessionFactory.getConfiguration().getDefaultExecutorType());
  }

  public SqlSessionTemplate(SqlSessionFactory sqlSessionFactory, ExecutorType executorType) {
    this(sqlSessionFactory, executorType,
        new MyBatisExceptionTranslator(
            sqlSessionFactory.getConfiguration().getEnvironment().getDataSource(), true));
  }

  public SqlSessionTemplate(SqlSessionFactory sqlSessionFactory, ExecutorType executorType,
      PersistenceExceptionTranslator exceptionTranslator) {

    notNull(sqlSessionFactory, "Property 'sqlSessionFactory' is required");
    notNull(executorType, "Property 'executorType' is required");

    this.sqlSessionFactory = sqlSessionFactory;
    this.executorType = executorType;
    this.exceptionTranslator = exceptionTranslator;
    // 这里是重点,创建代理类,是的,又一个代理类
    this.sqlSessionProxy = (SqlSession) newProxyInstance(
        SqlSessionFactory.class.getClassLoader(),
        new Class[] { SqlSession.class },
        new SqlSessionInterceptor());
  }
他说在哪里初始化的呢,是在spring的SPI机制中进行的初始化
org.mybatis.spring.boot.autoconfigure.MybatisAutoConfiguration
   @Bean
    @ConditionalOnMissingBean
    public SqlSessionTemplate sqlSessionTemplate(SqlSessionFactory sqlSessionFactory) {
        ExecutorType executorType = this.properties.getExecutorType();
        return executorType != null ? new SqlSessionTemplate(sqlSessionFactory, executorType) : new SqlSessionTemplate(sqlSessionFactory);
    }
当你执行CRUD最终都会被执行器简化,具体方法请参考org.apache.ibatis.executor.Executor的接口方法,而在你执行代码时,所有的方法又会被这个新加入的代理类拦截,这个代理类的代码如下
 private class SqlSessionInterceptor implements InvocationHandler {
    @Override
    public Object invoke(Object proxy, Method method, Object[] args) throws Throwable {
      SqlSession sqlSession = getSqlSession(
          SqlSessionTemplate.this.sqlSessionFactory,
          SqlSessionTemplate.this.executorType,
          SqlSessionTemplate.this.exceptionTranslator);
      try {
        Object result = method.invoke(sqlSession, args);
        if (!isSqlSessionTransactional(sqlSession, SqlSessionTemplate.this.sqlSessionFactory)) {
          // force commit even on non-dirty sessions because some databases require
          // a commit/rollback before calling close()
          sqlSession.commit(true);
        }
        return result;
      } catch (Throwable t) {
        Throwable unwrapped = unwrapThrowable(t);
        if (SqlSessionTemplate.this.exceptionTranslator != null && unwrapped instanceof PersistenceException) {
          // release the connection to avoid a deadlock if the translator is no loaded. See issue #22
          closeSqlSession(sqlSession, SqlSessionTemplate.this.sqlSessionFactory);
          sqlSession = null;
          Throwable translated = SqlSessionTemplate.this.exceptionTranslator.translateExceptionIfPossible((PersistenceException) unwrapped);
          if (translated != null) {
            unwrapped = translated;
          }
        }
        throw unwrapped;
      } finally {
        if (sqlSession != null) {
          closeSqlSession(sqlSession, SqlSessionTemplate.this.sqlSessionFactory);
        }
      }
    }
  }
可以看到此处用的事务处理都是sqlSession
重点:如何处理的
1、获取sqlSession
想要保持事务,那么JDBC的链接必须是同一个
 SqlSession sqlSession = getSqlSession(
          SqlSessionTemplate.this.sqlSessionFactory,
          SqlSessionTemplate.this.executorType,
          SqlSessionTemplate.this.exceptionTranslator);
解析
贴源码
  public static SqlSession getSqlSession(SqlSessionFactory sessionFactory, ExecutorType executorType, PersistenceExceptionTranslator exceptionTranslator) {

    notNull(sessionFactory, NO_SQL_SESSION_FACTORY_SPECIFIED);
    notNull(executorType, NO_EXECUTOR_TYPE_SPECIFIED);
	// 这是一个线程绑定对象,专门用于存储SqlSession的
    SqlSessionHolder holder = (SqlSessionHolder) TransactionSynchronizationManager.getResource(sessionFactory);

	// 如果你的代码是第一次执行,那么session肯定不存在,所以需要开启事务
    SqlSession session = sessionHolder(executorType, holder);
    if (session != null) {
      return session;
    }

    if (LOGGER.isDebugEnabled()) {
      LOGGER.debug("Creating a new SqlSession");
    }
    // 重点在这里
    session = sessionFactory.openSession(executorType);

    registerSessionHolder(sessionFactory, executorType, exceptionTranslator, session);

    return session;
  }
最终的执行源码是
  @Override
  public SqlSession openSession(ExecutorType execType) {
    return openSessionFromDataSource(execType, null, false);
  }


  private SqlSession openSessionFromDataSource(ExecutorType execType, TransactionIsolationLevel level, boolean autoCommit) {
    Transaction tx = null;
    try {
      final Environment environment = configuration.getEnvironment();
// 此处 就是第一章时写的重点,注入的是Spring的事务管理工厂,具体的执行者就是 org.mybatis.spring.transaction.SpringManagedTransaction
// 而后将 Transaction 存储与SqlSession中,且Sqlsession是线程绑定的,所以,事务就是这样管理的
      final TransactionFactory transactionFactory = getTransactionFactoryFromEnvironment(environment);
      tx = transactionFactory.newTransaction(environment.getDataSource(), level, autoCommit);
      final Executor executor = configuration.newExecutor(tx, execType);
      return new DefaultSqlSession(configuration, executor, autoCommit);
    } catch (Exception e) {
      closeTransaction(tx); // may have fetched a connection so lets call close()
      throw ExceptionFactory.wrapException("Error opening session.  Cause: " + e, e);
    } finally {
      ErrorContext.instance().reset();
    }
  }
org.mybatis.spring.transaction.SpringManagedTransaction#openConnection
调用的getConnection 方法实际上是也是一个线程绑定变量
这样就实现了同一个Connection,也就实现了事务的控制
至此,spring整合mybatis,参数的解析,创建代理对象,执行CRUD、事务的管理,简述完成


 5259
5259


 被折叠的 条评论
为什么被折叠?
被折叠的 条评论
为什么被折叠?
 到【灌水乐园】发言


