


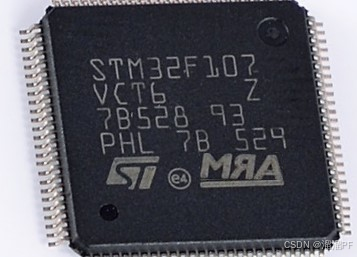
下图为实验效果图,完整代码在文后


import cv2
import sys
import os
import numpy as np
from datetime import datetime
import matplotlib.pyplot as plt
from segment_anything import sam_model_registry, SamPredictor

#显示掩码
def show_mask(mask, ax, random_color=False):
    if random_color:
        color = np.concatenate([np.random.random(3), np.array([0.6])], axis=0)
    else:
        color = np.array([30 / 255, 144 / 255, 255 / 255, 0.6])
    h, w = mask.shape[-2:]
    mask_image = mask.reshape(h, w, 1) * color.reshape(1, 1, -1)
    ax.imshow(mask_image)
#显示提示点
def show_points(coords, labels, ax, marker_size=375):
    pos_points = coords[labels == 1]
    neg_points = coords[labels == 0]
    ax.scatter(pos_points[:, 0], pos_points[:, 1], color='green', marker='*', s=marker_size, edgecolor='white',
               linewidth=1.25)
    ax.scatter(neg_points[:, 0], neg_points[:, 1], color='red', marker='*', s=marker_size, edgecolor='white',
               linewidth=1.25)
#显示提示框
def show_box(box, ax):
    x0, y0 = box[0], box[1]
    w, h = box[2] - box[0], box[3] - box[1]
    ax.add_patch(plt.Rectangle((x0, y0), w, h, edgecolor='green', facecolor=(0, 0, 0, 0), lw=2))

#根据指定点进行分割
image = cv2.imread(r'output/R-C.jpg')
print("[%s]正在转换图片格式......" % datetime.now().strftime('%Y-%m-%d %H:%M:%S'))
image_later = cv2.cvtColor(image, cv2.COLOR_BGR2RGB)  # 将图像从BGR颜色空间转换为RGB颜色空间,还原图片色彩(图像处理库所认同的格式)
print("[%s]正在初始化模型参数......" % datetime.now().strftime('%Y-%m-%d %H:%M:%S'))
sys.path.append("..")  # 将当前路径上一级目录添加到sys.path列表,这里模型使用绝对路径所以这行没啥用
sam_checkpoint = "segment_anything/modeling/sam_vit_h_4b8939.pth"  # 定义模型路径
model_type = "vit_h"  # 定义模型类型
device = "cpu"  # "cpu"  or  "cuda"
sam = sam_model_registry[model_type](checkpoint=sam_checkpoint)
sam.to(device=device)  # 定义模型参数
predictor = SamPredictor(sam)  # 调用预测模型
predictor.set_image(image_later)
print("【多点分割阶段】")
print("[%s]正在分割图片......" % datetime.now().strftime('%Y-%m-%d %H:%M:%S'))
input_point = np.array([[211,158],[212,172],[233,165],[256,162],[212,167],[237,161],[268,175],[239,184]])
input_label = np.array([1,1,1,1,0,0,0,0])
masks, scores, logits = predictor.predict(
    point_coords=input_point,
    point_labels=input_label,
    multimask_output=False,
)
# 假设这是你的目标文件夹路径
save_folder = 'output'

# 定义一个函数来二值化掩码(如果掩码不是已经是二值的)
def binarize_mask(mask, threshold=0.5):
    return (mask > threshold).astype(np.uint8) * 255  # 转换为0或255,便于显示


# 确保文件夹存在,如果不存在则创建它
if not os.path.exists(save_folder):
    os.makedirs(save_folder)

for i, (mask, score) in enumerate(zip(masks, scores)):

    # flip_roi_in_place(image, mask)
    binary_mask = binarize_mask(mask)
    plt.figure(figsize=(10, 10))
    plt.imshow(image_later)
    show_mask(binary_mask, plt.gca())
    show_points(input_point, input_label, plt.gca())
    plt.title(f"Mask {i + 1}, Score: {score:.3f}", fontsize=18)
    plt.axis('off')
    # 构造文件名,基于置信度
    filename = f"mask_{i+1}_score_{score:.3f}.png"
    file_path = os.path.join(save_folder, filename)
    # 保存图形
    plt.savefig(file_path)
    plt.imsave(os.path.join(save_folder, f"binary_mask_{i+1}_score_{score:.3f}.png"), binary_mask, cmap='gray')
    plt.show()
也可以在代码后面添加代码,实现消除和翻转图片中分割对象的功能
 #消除
    specular = cv2.inpaint(image, binary_mask, 10, flags=cv2.INPAINT_TELEA)
    #保存ROI
    file_name = os.path.join(save_folder, "inpaintARM.png")
    cv2.imwrite(file_name, specular)
    plt.figure(figsize=(5, 5))
    plt.imshow(specular)
    plt.title(f"inpaint {i + 1}, Contour_Score: {score:.3f}", fontsize=18)
    plt.axis('off')
    plt.show()
#翻转
res = cv2.bitwise_and(image,image,mask=binary_mask)
images,contours, _ = cv2.findContours(binary_mask, cv2.RETR_EXTERNAL, cv2.CHAIN_APPROX_SIMPLE)
if contours:
# 初始化一个矩形,它将存储所有轮廓的最小边界框
x1, y1 = float('inf'), float('inf')
x2, y2 = 0, 0
# 遍历所有轮廓,找到最小的边界框
for c in contours:
x, y, w, h = cv2.boundingRect(c)
x1 = min(x1, x)
y1 = min(y1, y)
x2 = max(x2, x + w)
y2 = max(y2, y + h)
# 裁剪包含所有轮廓的ROI
roi = image[y1:y2, x1:x2]
# 同时沿水平和垂直轴翻转ROI(即180度旋转)
roi_flipped_both = cv2.flip(roi, 1)
image[y1:y2, x1:x2] = roi_flipped_both
# 保存ROI
file_name = os.path.join(save_folder, "filpARM.png")
cv2.imwrite(file_name, image)
# 如果需要显示ROI(注意:这将在循环中多次打开窗口)
plt.figure(figsize=(5, 5))
plt.imshow(image)
plt.title(f"ROI {i + 1}, Contour_Score: {score:.3f}", fontsize=18)
plt.axis('off')
plt.show() 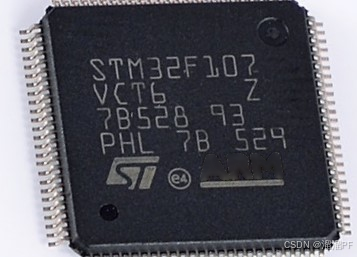


 被折叠的 条评论
为什么被折叠?
被折叠的 条评论
为什么被折叠?
 到【灌水乐园】发言


