![0ae3fe4465c455cc34ae94a134af5f9e.png](https://img-blog.csdnimg.cn/img_convert/0ae3fe4465c455cc34ae94a134af5f9e.png)
![1b975ea0916e5c90844b0487b6b93312.png](https://img-blog.csdnimg.cn/img_convert/1b975ea0916e5c90844b0487b6b93312.png)
建模过程
1.在【上视基准面】画样条曲线。(注意两个端点的水平、竖直几何关系)
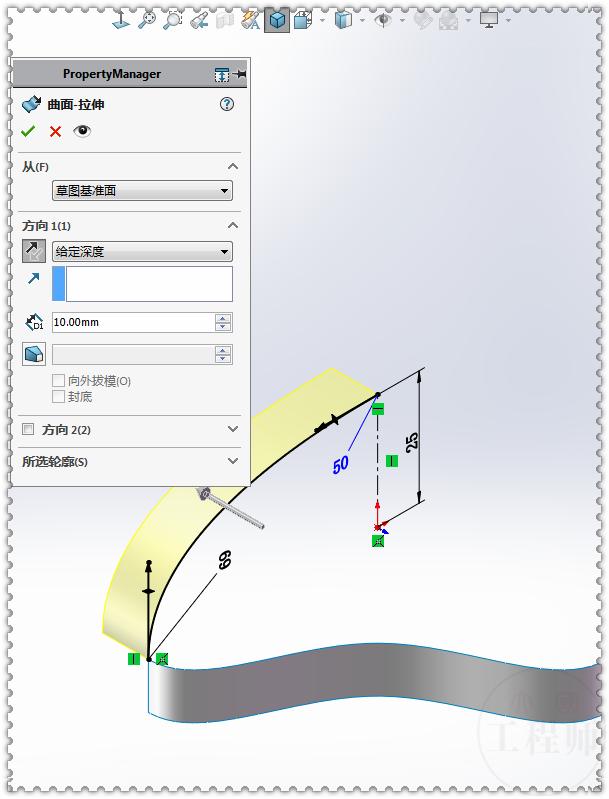
![091b1da5644f4034bbba7a61980fdddc.png](https://img-blog.csdnimg.cn/img_convert/091b1da5644f4034bbba7a61980fdddc.png)
2.【曲面拉伸】。
![b88bbc38507bbf4cf03d69a36da7c94c.png](https://img-blog.csdnimg.cn/img_convert/b88bbc38507bbf4cf03d69a36da7c94c.png)
3.在【右视基准面】画样条曲线。
![eaa843612e27672e37087cdbc645fa55.png](https://img-blog.csdnimg.cn/img_convert/eaa843612e27672e37087cdbc645fa55.png)
4.【曲面拉伸】。
![eb4b53fe790aca2615a955fb16818a9a.png](https://img-blog.csdnimg.cn/img_convert/eb4b53fe790aca2615a955fb16818a9a.png)
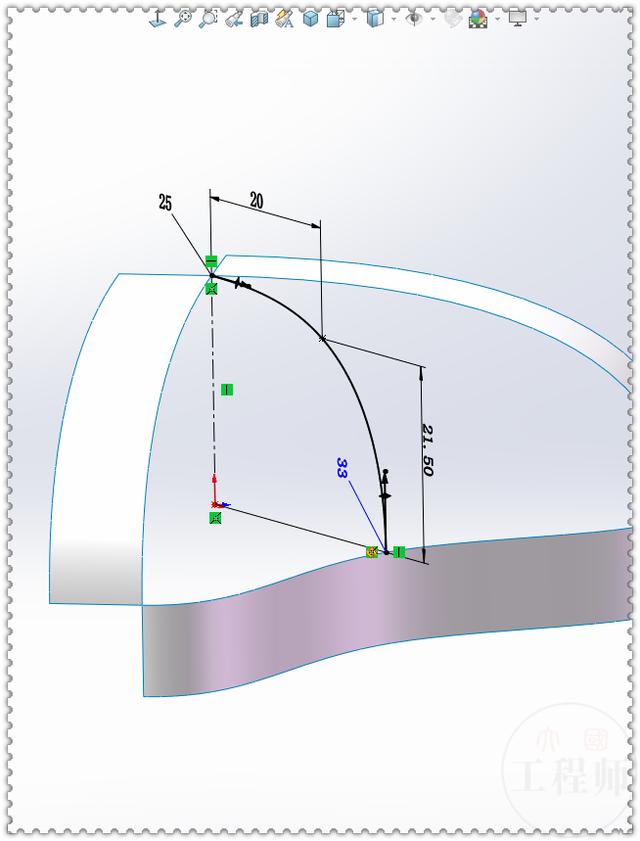
5.在【前视基准面】画样条曲线,和上一步尺寸相同。
![f8ca745975e4a51d8cbdc82904062a0a.png](https://img-blog.csdnimg.cn/img_convert/f8ca745975e4a51d8cbdc82904062a0a.png)
6.继续【曲面拉伸】。
![c922e75866ecc5448e6c4fa65108f8fa.png](https://img-blog.csdnimg.cn/img_convert/c922e75866ecc5448e6c4fa65108f8fa.png)
7.新建【基准面】参考:前视有右视基准面 。
![dd919b9e31b987ec5e95e2fbdc37a2a4.png](https://img-blog.csdnimg.cn/img_convert/dd919b9e31b987ec5e95e2fbdc37a2a4.png)
8.在新【基准面】上画样条曲线。(两端依然是水平、竖直关系)
![1d291491a98a4b444f8cc2b61752013c.png](https://img-blog.csdnimg.cn/img_convert/1d291491a98a4b444f8cc2b61752013c.png)
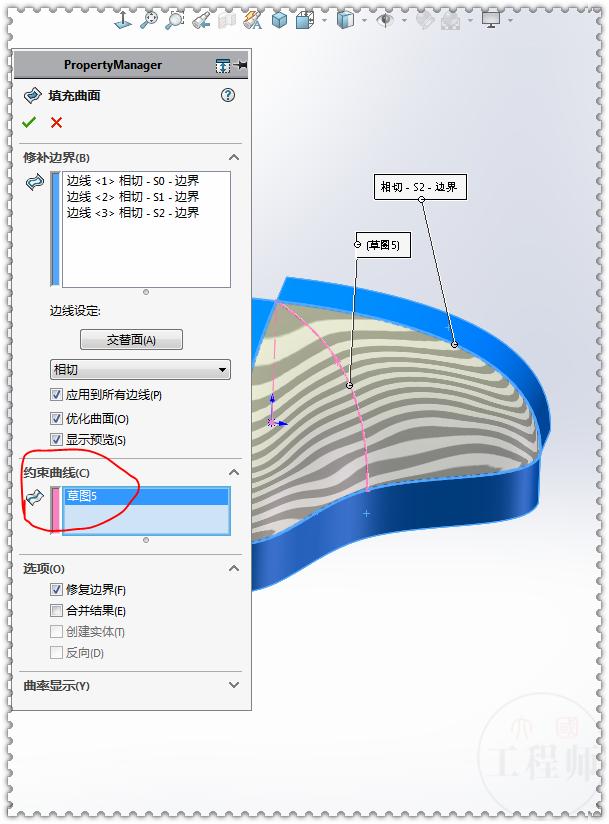
9.【曲面填充】边线设定:相切——应用到所有边线。
![7e6b67294de5005b6494f9e5e204103a.png](https://img-blog.csdnimg.cn/img_convert/7e6b67294de5005b6494f9e5e204103a.png)
9-1.约束曲线:粉色样条曲线。
![c87b035bce5ea41ce41950c079f917e2.png](https://img-blog.csdnimg.cn/img_convert/c87b035bce5ea41ce41950c079f917e2.png)
10.【删除/保留实体】。
![09ba9155f2faa4676675d2c47ac13d04.png](https://img-blog.csdnimg.cn/img_convert/09ba9155f2faa4676675d2c47ac13d04.png)
11.新建【基准轴】,选择:前视、右视基准面。
![6d4ff678558c5efc8a00566837188f13.png](https://img-blog.csdnimg.cn/img_convert/6d4ff678558c5efc8a00566837188f13.png)
12.【圆周阵列】实体,数量:4个。
![088ff20f05aecbb88f63fb2574eb4522.png](https://img-blog.csdnimg.cn/img_convert/088ff20f05aecbb88f63fb2574eb4522.png)
13.【曲面缝合】。
![cbbb7ad49f97df529f41ea8e096b8757.png](https://img-blog.csdnimg.cn/img_convert/cbbb7ad49f97df529f41ea8e096b8757.png)
14.【加厚】。
![b884c3f6d25c500abae8c7136364edae.png](https://img-blog.csdnimg.cn/img_convert/b884c3f6d25c500abae8c7136364edae.png)
15.【镜像】实体。
![56558277b208db56d20a04f86071c2c2.png](https://img-blog.csdnimg.cn/img_convert/56558277b208db56d20a04f86071c2c2.png)
16.【唇缘/凹槽】凹槽实体:上半个 ;唇缘实体:下半个 ;基准面:上视基准面;凹槽选择——生成凹槽的面:1.5厚度的面;边线:内侧边线 。
![a82f00d832fc52d4321c2ea2debc2fbc.png](https://img-blog.csdnimg.cn/img_convert/a82f00d832fc52d4321c2ea2debc2fbc.png)
16-1.唇缘选择——生成唇缘的面 :端面;边线:内侧边线 ;最后输入参数。(会有报错提示,不管他继续确定)
![cb5e7f1824931b915e96ce7f1281e74b.png](https://img-blog.csdnimg.cn/img_convert/cb5e7f1824931b915e96ce7f1281e74b.png)
16-2.剖开后的样子。
![3d82106aedc0eef981d84c75af2e2759.png](https://img-blog.csdnimg.cn/img_convert/3d82106aedc0eef981d84c75af2e2759.png)
17.完成。
![304ca526e8756481904926256e3f57a2.png](https://img-blog.csdnimg.cn/img_convert/304ca526e8756481904926256e3f57a2.png)
17-2.用【移动/复制】把上方实体挪开后的图形。
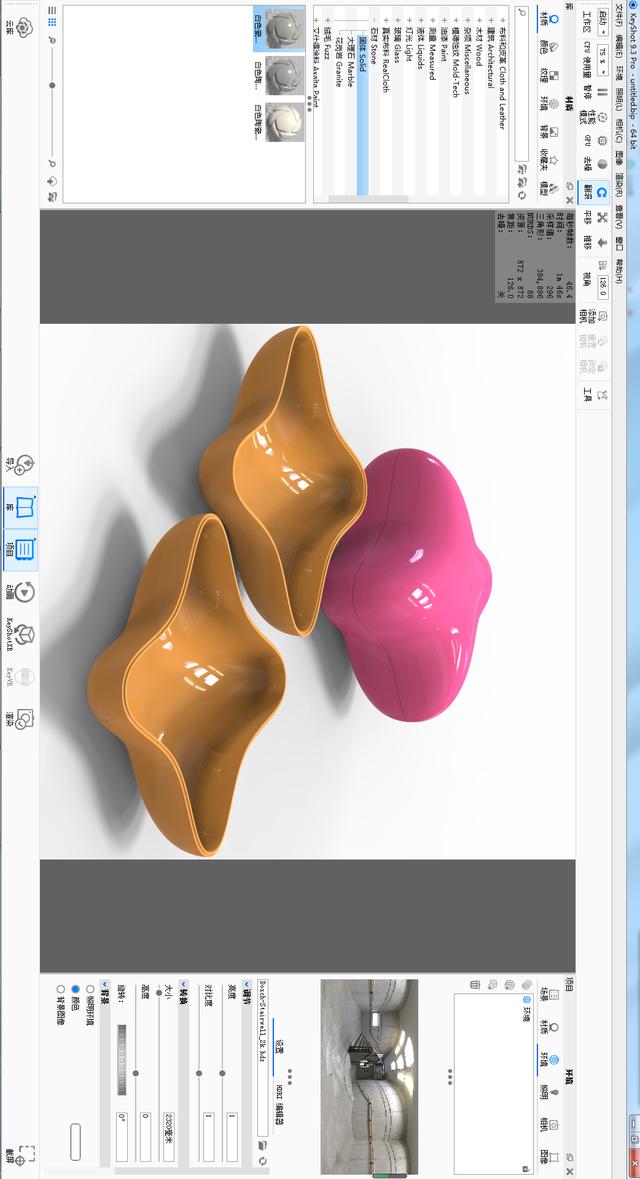
![f2eb92d16effba5b2fe807922679ecdd.png](https://img-blog.csdnimg.cn/img_convert/f2eb92d16effba5b2fe807922679ecdd.png)
18.简单渲染一下:
![2331fad9c23ff7a37c6862a0379a94fc.png](https://img-blog.csdnimg.cn/img_convert/2331fad9c23ff7a37c6862a0379a94fc.png)