


网上看到很过通过命令:pip install mysqlclient 进行安装的教程,但是我却始终安装失败,遇到的错误千奇百怪,后来通过自己下载mysqlclient客户端终于安装成功;
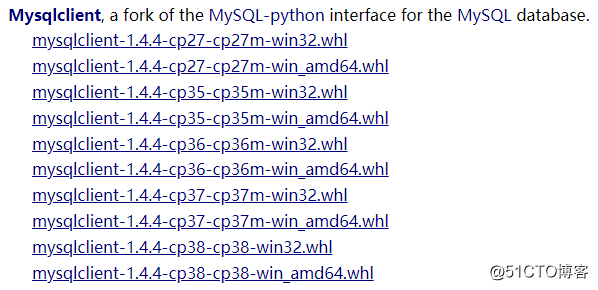
根据自己的需要,我选择的是最下边的cp38(目测cp38应该是C++版本,下载下来的文件通过pip install 进行安装的时候会进行c++编译,如果你的电脑(我是Windows)上没有安装VC++,那么找个新版本的安装一下即可:https://support.microsoft.com/zh-cn/help/2977003/the-latest-supported-visual-c-downloads)记住如果没有C++,就先安装C++这个;
下载好mysqlclientt之后如下(只要下载1个,我系统是64位,所以先下载的64位的,结果用不了,所以又下载了32位的才成功,所以建议先下载32位的试试):

打开控制台(开始->运行->cmd):
第一步:cd 到下载的mysqlclient文件所在的目录:cdC:\Users\Yeat\Downloads\mysqlclient
第二步:执行安装命令:pip installmysqlclient-1.4.4-cp38-cp38-win32.whl
如果成功的话会看到:C:\Users\Yeat\Downloads>pip install mysqlclient-1.4.4-cp38-cp38-win32.whl
Processing c:\users\yeat\downloads\mysqlclient-1.4.4-cp38-cp38-win32.whl
Installing collected packages: mysqlclient
Successfully installed mysqlclient-1.4.4
C:\Users\Yeat\Downloads>当然如果失败的话,那很可能看到类似下图的画面:C:\Users\Yeat>pip install mysqlclient‑1.3.13‑cp36‑cp36m‑win_amd64.whl
WARNING: Requirement 'mysqlclient‑1.3.13‑cp36‑cp36m‑win_amd64.whl' looks like a filename, but the file does not exist
ERROR: mysqlclient‑1.3.13‑cp36‑cp36m‑win_amd64.whl is not a valid wheel filename.
C:\Users\Yeat>pip install MySQL_python‑1.2.5‑cp27‑none‑win_amd64.whl
WARNING: Requirement 'MySQL_python‑1.2.5‑cp27‑none‑win_amd64.whl' looks like a filename, but the file does not exist
ERROR: MySQL_python‑1.2.5‑cp27‑none‑win_amd64.whl is not a valid wheel filename.
C:\Users\Yeat>pip install MySQL_python‑1.2.5‑cp27‑none‑win_amd64
ERROR: Invalid requirement: 'MySQL_python‑1.2.5‑cp27‑none‑win_amd64'
C:\Users\Yeat>cd C:\Users\Yeat\Downloads
C:\Users\Yeat\Downloads>pip install MySQL_python-1.2.5-cp27-none-win_amd64.whl
ERROR: MySQL_python-1.2.5-cp27-none-win_amd64.whl is not a supported wheel on this platform.
C:\Users\Yeat\Downloads>pip install mysqlclient-1.4.4-cp38-cp38-win_amd64.whl
ERROR: mysqlclient-1.4.4-cp38-cp38-win_amd64.whl is not a supported wheel on this platform.
失败,那就换下载的mysqlclient版本,只能提供这个办法了!!!!
二、在Django框架里使用mysql
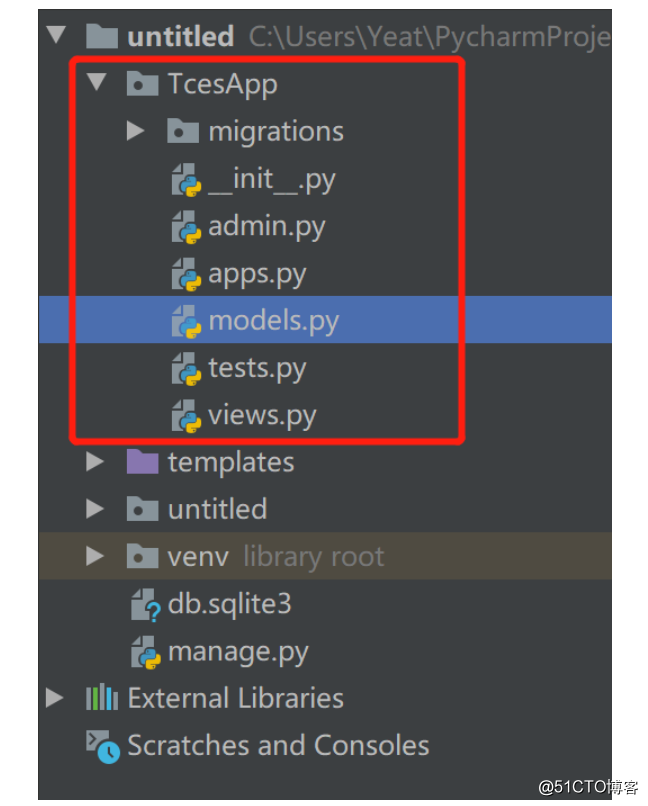
1.进入项目工程目录执行命令:django-admin startapp TcesApp,我的完整命令是:C:\Users\Yeat\PycharmProjects\untitled>django-admin startapp TcesApp,前面的部分是我的工程目录路径;
2.命令执行完毕后工程里会增加TcesApp目录如图:
3.进入models.py中创建与你的数据库表相对应的对象model,我的内容如下:1
2
3
4
5
6
7
8
9
10
11
12
13
14
15
16from
django.db
import
models
class
e_exams(models.Model):
ID
=
models.CharField(max_length
=
50
),
ExamName
=
models.CharField(max_length
=
50
)
ExamCode
=
models.CharField(max_length
=
50
)
SceneID
=
models.CharField(max_length
=
50
)
Creater
=
models.CharField(max_length
=
50
)
CreateTime
=
models.DateTimeField()
State
=
models.CharField(max_length
=
50
)
Field_Char1
=
models.CharField(max_length
=
50
)
Field_Char2
=
models.CharField(max_length
=
50
)
Field_Char3
=
models.CharField(max_length
=
50
)
class
Meta:
db_table
=
'e_exams'
#数据表名称
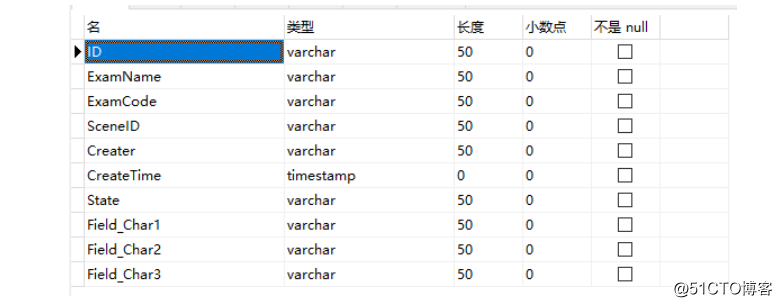
我的表结构 e_exams:
在models.py中可以创建过个表的model。
4.在admin.py中注册model:1
2
3
4
5from
django.contrib
import
admin
from
.
import
models
# Register your models here.
admin.site.register(models.e_exams)
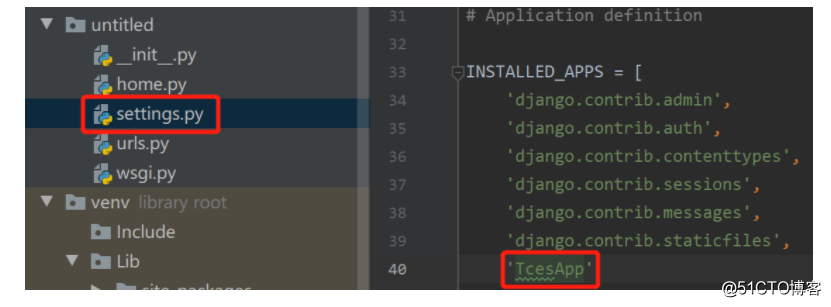
5.在setting.py中添加app名称(上边的名称 django-admin startapp TcesApp 的名称):
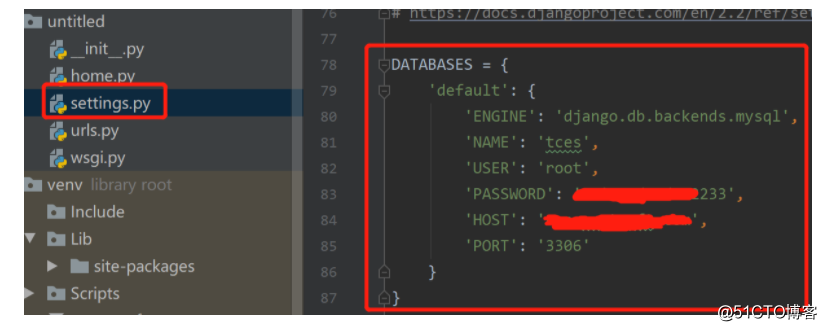
6.还是在settings.py中修改DATABASES内容如下:
完整配置:1
2
3
4
5
6
7
8
9
10
11
12
13DATABASES = {
'default' : {
'ENGINE' : 'django.db.backends.mysql' ,
'NAME' : 'tces' ,
'USER' : 'root' ,
'PASSWORD' : 'Unity3du#d112233' ,
'HOST' : 'nas.yeatsoft.com' ,
'PORT' : '3306' ,
'OPTIONS' : {
"init_command" : "SET sql_mode='STRICT_TRANS_TABLES'" ,
}
}
}
其中NAME是你的数据库名称,HOST是数据库地址,其它的大家都知道。
7.接下来我们到views.py(或者自己创建的py文件)中编写代码主要看 addExam 这个方法:1
2
3
4
5
6
7
8
9
10
11
12
13
14
15
16
17
18
19
20
21
22from django.http import HttpResponse
from django.shortcuts import render
from TcesApp.models import e_exams
def hello(request):
return HttpResponse( 'home page!' )
def helloworld(request):
context = {}
context[ 'value' ] = 'hello world!'
return render(request, 'helloworld.html' , context)
def addExam(request):
exam = e_exams()
exam. ID = '100001'
exam.SceneID = '1001' ,
exam.ExamName = '期末考试'
exam.save()
context = {}
context[ 'value' ] = exam.ExamName + '数据添加成功!'
return render(request, 'helloworld.html' ,context)
其中helloworld.html是放在templates中的前端页面:
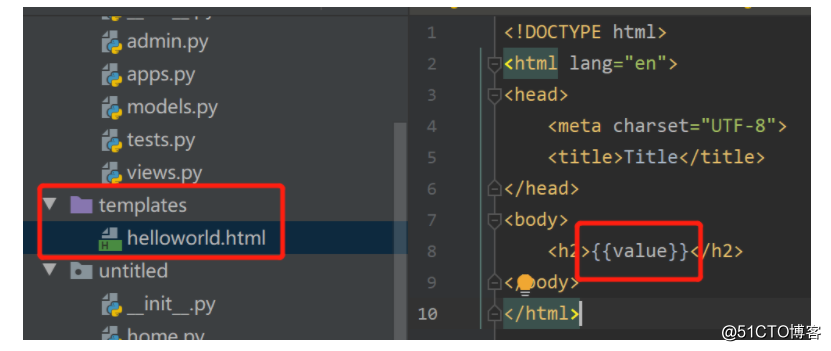
context['value']就是html页面中的{{value}}
8.到urls.py中添加路径完整代码如下:1
2
3
4
5
6
7
8
9
10from django.contrib import admin
from django.urls import path
from . import home
urlpatterns = [
path( 'admin/' , admin.site.urls),
path( 'home/' , home.hello),
path( 'helloworld/' , home.helloworld),
path( 'add/' ,home.addExam)
]


 1856
1856


 被折叠的 条评论
为什么被折叠?
被折叠的 条评论
为什么被折叠?
 到【灌水乐园】发言


