


目录
什么是ConstraintLayout
简要介绍
ConstraintLayout名为约束布局,如它的名字所示,ConstrainLayout可以通过约束一个控件相对于另一个控件的位置来得到你想要的布局。这么一说,似乎RelativeLayout也能做到,但是ConstraintLayout的功能远比RelativeLayout强,也正是因为如此,从 Android Studio 2.3 起,Android Studio官方的模板默认使用 ConstraintLayout。
如何使用ConstraintLayout
配置依赖
要想用到ConstraintLayout首先要在app/grandle下添加ConstrainLayout依赖,如下(版本号根据需求自定):
dependencies {
compile 'com.android.support.constraint:constraint-layout:1.0.2'
}
注:Android Studio 2.3以后自带这个包,不需要手动添加。
基本属性
前文说到RelativeLayout与ConstraintLayout有异曲同工之妙,ConstrainLayout的属性值可以是某个id,也可以是父组件"parent"。下面通过一个表格归纳ConstraintLayout与RelativeLayout的各种相似属性,当然ConstraintLayout的属性远不止这些,其余属性在后面会稍作介绍:
| ConstraintLayout属性 | RelativeLayout属性 |
|---|---|
| layout_constraintBaseline_toBaselineOf | layout_alignBaseline |
| layout_constriantBottom_toBottomOf | layout_alignBottom |
| layout_constraintBottom_toTopOf | layout_above |
| layout_constraintEnd_toEndOf | layout_alignEnd |
| layout_constraintEnd_toStartOf | layout_toStartOf |
| layout_constraintLeft_toLeftOf | layout_alignLeft |
| layout_constraintLeft_toRightOf | layout_toRightOf |
| layout_constraintRight_toRightOf | layout_alignRight |
| layout_constraintRight_toLeftOf | layout_toLeftOf |
| layout_constraintStart_toStartOf | layout_slignStart |
| layout_constraintStart_toEndOf | layout_toStartOf |
| layout_constraintTop_toTopOf | layout_alignTop |
| layout_constraintTop_toBottomOf | layout_below |
注:需要注意的是当属性的值为parent时,这些属性需要成对出现,否则起不到约束效果,所谓的成对指的是若约束了layout_constraintLeft_toLeft/RightOf 必要约束layout_constraintRight_toLeft/RightOf,bottom与Top同理。
用法示例
居中
居中包括在约定方向上居中和在整个布局居中即处于页面正中心。
在约定方向上的居中,这里举的是垂直居中即该组件处于页面高度的一半的位置:
app:layout_constraintBottom_toBottomOf="parent"
app:layout_constraintTop_toTopOf="parent"
在页面正中心的实现也一样,只不过多了水平方向上的约束
app:layout_constraintBottom_toBottomOf="parent"
app:layout_constraintEnd_toEndOf="parent"
app:layout_constraintStart_toStartOf="parent"
app:layout_constraintTop_toTopOf="parent"
在LTR布局方式下(一般情况下 Android Studio默认此布局),View开始部分就是左边,即Start和Left等价,End和Right等价,所以以上代码也可以写成
app:layout_constraintBottom_toBottomOf="parent"
app:layout_constraintRight_toRightOf="parent"
app:layout_constraintLeft_toLeftOf="parent"
app:layout_constraintTop_toTopOf="parent"
需要注意的是,有的语言目前为止还是按照从右往左的顺序来书写的,例如阿拉伯语,此时需要采用RTL布局,即Right等价于Start,Left等价于End,如果在布局的时候需要适配不同的国家,以下有个参数要设置
android:supportsRtl="true"
偏移
偏移的实现主要有两种做法:
- 约束组件的相对位置后通过规定margin属性来实现,是通过规定具体的数值来约束偏移量的。
比如以下代码:
android:layout_marginTop="30dp"
app:layout_constraintBottom_toBottomOf="parent"
app:layout_constraintEnd_toEndOf="parent"
app:layout_constraintStart_toStartOf="parent"
app:layout_constraintTop_toTopOf="parent"
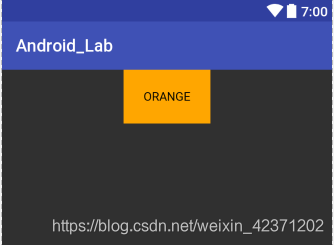
此代码最终实现的效果是在处于页面正中心的前提下,通过设置marginTop属性的值,使得该组件与页面上方的距离为30dp,以下为示例图:

2. 通过规定layout_constraintHorizontal_bias属性的数值实现水平偏移,通过规定layout_constraintVertical_bias属性的数值实现垂直偏移。需要注意的是和margin不同,bias的值是一个比例值,是相对于布局的比例属性。
下面是layout_constraintHorizontal_bias的一个示例:
app:layout_constraintEnd_toEndOf="parent"
app:layout_constraintHorizontal_bias="1"
app:layout_constraintStart_toStartOf="parent"
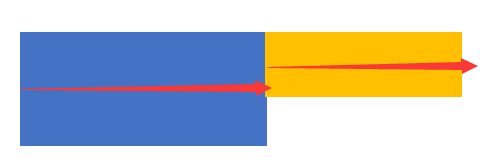
此代码最终实现的效果是在水平居中后,偏向布局最右端。
以下为示例图:

下面通过一个表格来说明水平偏移中bias的值对偏移的影响:
| layout_constraintHorizontal_bias | 该组件位置 |
|---|---|
| 0 | 布局最左端 |
| 1 | 布局最右端 |
| 0.5 | 布局的水平居中处 |
| >0.5 | 偏向布局的水平靠右端 |
| <0.5 | 偏向布局的水平靠左端 |
垂直偏移量layout_constraintVertical_bias与上述水平偏移相似,不再赘述。
基线对齐
这个功能主要与layout_constraintBaseline_toBaselineOf这个属性有关,首先要知道什么是基线。基线通俗地来讲就是该组件的水平位置上一条居中的线。
基线未对齐:
基线对齐:

那么如何使两个组件的基线对齐呢,以下是示例代码
 <TextView
        android:id="@+id/组件1"
        .../>

    <TextView
        android:id="@+id/组件2"
        ...
        app:layout_constraintLeft_toRightOf="@+id/组件1"
        app:layout_constraintBaseline_toBaselineOf="@+id/组件1"/>
实例
介绍了如上三点的主要内容后,接下来是一个结合了上面三点即居中,偏移,基线实现的小案例,以供参考:
<?xml version="1.0" encoding="utf-8"?>
<android.support.constraint.ConstraintLayout xmlns:android="http://schemas.android.com/apk/res/android"
    xmlns:app="http://schemas.android.com/apk/res-auto"
    xmlns:tools="http://schemas.android.com/tools"
    android:layout_width="match_parent"
    android:layout_height="match_parent">

    <TextView
        android:id="@+id/red"
        android:layout_width="wrap_content"
        android:layout_height="wrap_content"
        android:background="#F00"
        android:padding="23dp"
        android:text="RED"
        android:textColor="#050500" />

    <TextView
        android:id="@+id/org"
        android:layout_width="wrap_content"
        android:layout_height="wrap_content"
        android:background="#FFA600"
        android:padding="23dp"
        android:text="ORANGE"
        android:textColor="#050500"
        app:layout_constraintEnd_toEndOf="parent"
        app:layout_constraintStart_toStartOf="parent" />

    <TextView
        android:id="@+id/yellow"
        android:layout_width="wrap_content"
        android:layout_height="wrap_content"
        android:background="#FFFF00"
        android:padding="23dp"
        android:text="YELLOW"
        android:textColor="#050500"
        app:layout_constraintEnd_toEndOf="parent"
        app:layout_constraintHorizontal_bias="1"
        app:layout_constraintStart_toStartOf="parent" />

    <TextView
        android:id="@+id/blue"
        android:layout_width="wrap_content"
        android:layout_height="wrap_content"
        android:layout_marginTop="30dp"
        android:background="#0000FF"
        android:padding="23dp"
        android:text="BLUE"
        android:textColor="#FFFFFF"
        app:layout_constraintBottom_toBottomOf="parent"
        app:layout_constraintEnd_toEndOf="parent"
        app:layout_constraintStart_toStartOf="parent"
        app:layout_constraintTop_toTopOf="parent" />

    <TextView
        android:id="@+id/green"
        android:layout_width="wrap_content"
        android:layout_height="wrap_content"
        android:layout_marginRight="10dp"
        app:layout_constraintBaseline_toBaselineOf="@id/blue"
        android:background="#00FF00"
        android:padding="23dp"
        android:text="GREEN"
        android:textColor="#050500"
        app:layout_constraintBottom_toBottomOf="parent"
        app:layout_constraintEnd_toStartOf="@id/blue"
        app:layout_constraintTop_toTopOf="parent" />

    <TextView
        android:layout_width="wrap_content"
        android:layout_height="wrap_content"
        android:layout_marginLeft="10dp"
        app:layout_constraintBaseline_toBaselineOf="@id/blue"
        android:background="#4A0084"
        android:padding="23dp"
        android:text="INDIGO"
        android:textColor="#FFFFFF"
        app:layout_constraintBottom_toBottomOf="parent"
        app:layout_constraintStart_toEndOf="@id/blue"
        app:layout_constraintTop_toTopOf="parent" />

    <TextView
        android:layout_width="fill_parent"
        android:layout_height="wrap_content"
        android:layout_marginLeft="10dp"
        android:layout_marginTop="30dp"
        android:background="#EE82EE"
        android:padding="23dp"
        android:text="VIOLET"
        android:textAlignment="center"
        android:textColor="#050500"
        app:layout_constraintBottom_toBottomOf="parent" />
</android.support.constraint.ConstraintLayout>
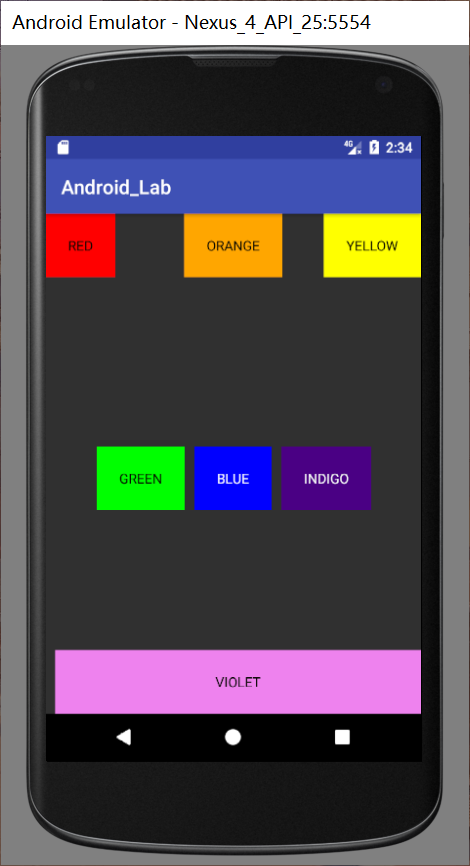
实现效果:
Guideline
Guideline 顾名思义是一条导航线,它的作用主要是分割布局。在LinearLayout中我们想要分割布局通常是使用设置权重的方式来分割,比如
android:layout_weight="1"
而Guideline在ConstraintLayout中也能帮助实现这样的分割,首先,先介绍Guideline的一些属性:
| 属性 | 含义 |
|---|---|
| android:orientation | vertical / horizontal |
| layout_constraintGuide | 开始位置 左 / 上 |
| layout_constraintGuide_end | 结束位置 右 / 下 |
| layout_constraintGuide_percent | 距离顶部 / 左边的百分比 |
需要注意的是Guideline是一条在实际运行过程中看不见的线,只是起到一个辅助作用,所以设置Guideline的width和height是没有任何意义的。
若要实现布局的三等分,基本的框架如下:
<ConstraintLayout>
    <View,右边约束分割线1/>
    <分割线1,距离左边33%/>
    <View,左边约束分割线1,右边约束分割线2/>
    <分割线2,距离左边66%/>
    <View,左边约束分割线2/>
</ConstraintLayout>
Group
Group可以把需要进行同样操作的组件归为一组,方便了操作,使代码不会过于繁琐,使用方式也较为简单,只要在constraint_referenced_ids属性中定义要归为一组的组件的id,用逗号隔开就可以实现。
对于上述实例可以将red和yellow两个组件设置成一组,并规定不可见。
<android.support.constraint.Group
    android:id="@+id/group"
    android:layout_width="wrap_content"
    android:layout_height="wrap_content"
    android:visibility="invisible"
    app:constraint_referenced_ids="yellow,red"/>
实现效果:
Barrier
Barrier意为屏障,它的主要用途为约束组件的位置。通常在组件的大小不确定的情况下使用。
如以下这种情况:
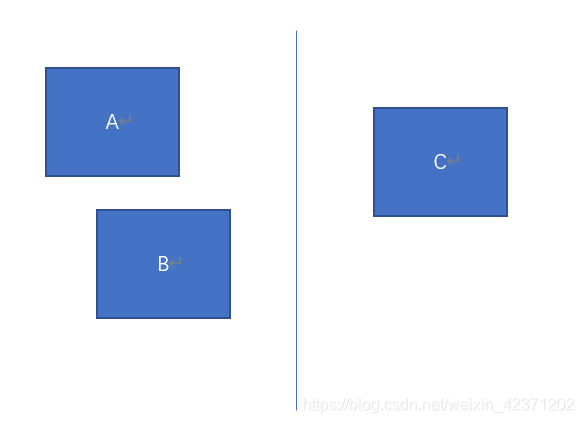
如图有三个组件A、B、C。其中AB组件的宽度为wrap_content即不确定,此时若要求C处于A、B的右端,如果将C约束在A右端或B右端,都是不合理的,A或B的宽度一旦改变,C就有可能不处于A、B的右端。这时候Barrier就派上用场了。要实现上面的效果可以用以下的方式:
<TextView
        android:id="@+id/A"
        android:layout_width="wrap_content"
        android:layout_height="wrap_content" />

    <TextView
        android:id="@+id/B"
        android:layout_width="wrap_content"
        android:layout_height="wrap_content"
        app:layout_constraintTop_toBottomOf="@+id/A" />

    <android.support.constraint.Barrier
        android:id="@+id/barrier"
        android:layout_width="wrap_content"
        android:layout_height="wrap_content"
        app:barrierDirection="right"
        app:constraint_referenced_ids="A,B" />

    <TextView
        android:id="@+id/C"
        android:layout_width="wrap_content"
        android:layout_height="wrap_content"
        app:layout_constraintLeft_toRightOf="@+id/barrier" />
其中app:barrierDirection的值除了right还有left,start,end,bottom,top。app:constraint_referenced_ids为Barrier引用的组件id名,本例中设置的barrier在A,B的右边,所以
app:barrierDirection="right"
app:constraint_referenced_ids="A,B"
如何利用ConstraintLayout创建动画
前文我们已经介绍了ConstraintLayout的基本属性及属性的应用方法,相信大家已经能初步掌握ConstraintLayout的基本使用了,接下来将介绍如何利用ConstraintLayout制作动画。
基本思想
① 创建两个不同的布局
② 每个布局设置不同的约束
③ 利用动画框架来进行两种约束之间的切换。
以下将依靠实例说明使用方式
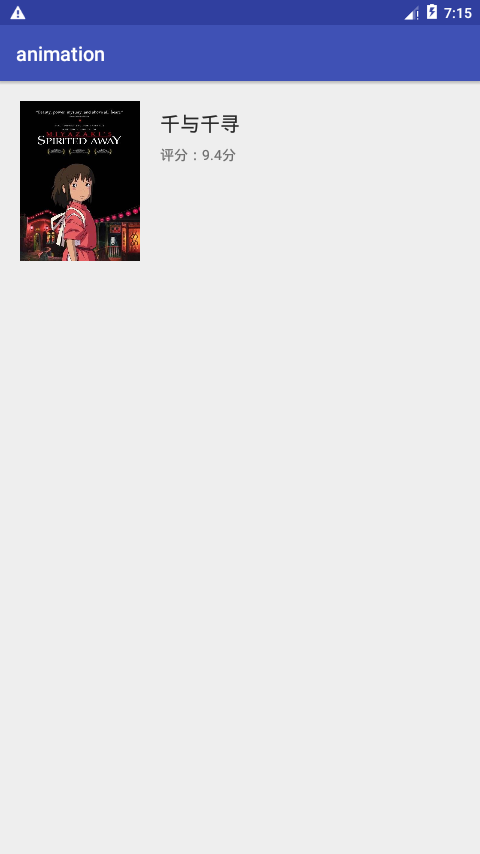
1.创建动画的初始布局——activity_main.xml
<?xml version="1.0" encoding="utf-8"?>
<android.support.constraint.ConstraintLayout xmlns:android="http://schemas.android.com/apk/res/android"
    xmlns:app="http://schemas.android.com/apk/res-auto"
    xmlns:tools="http://schemas.android.com/tools"
    android:id="@+id/animation"
    android:layout_width="match_parent"
    android:layout_height="match_parent"
    tools:context="cn.edu.fjnu.cl.animation.MainActivity">

    <TextView
        android:id="@+id/tv_score"
        android:layout_width="wrap_content"
        android:layout_height="wrap_content"
        android:layout_marginTop="8dp"
        android:text="评分:9.4分"
        app:layout_constraintStart_toStartOf="@+id/tv_name"
        app:layout_constraintTop_toBottomOf="@+id/tv_name" />

    <TextView
        android:id="@+id/tv_name"
        android:layout_width="wrap_content"
        android:layout_height="wrap_content"
        android:layout_marginLeft="20dp"
        android:layout_marginTop="8dp"
        android:text="千与千寻"
        android:textColor="#282828"
        android:textSize="20sp"
        app:layout_constraintStart_toEndOf="@+id/iv_poster"
        app:layout_constraintTop_toTopOf="@+id/iv_poster" />

    <ImageView
        android:id="@+id/iv_poster"
        android:layout_width="120dp"
        android:layout_height="160dp"
        android:layout_marginLeft="20dp"
        android:layout_marginTop="20dp"
        android:scaleType="centerCrop"
        app:layout_constraintStart_toStartOf="parent"
        app:layout_constraintTop_toTopOf="parent"
        app:srcCompat="@drawable/poster" />

</android.support.constraint.ConstraintLayout>
布局效果如下
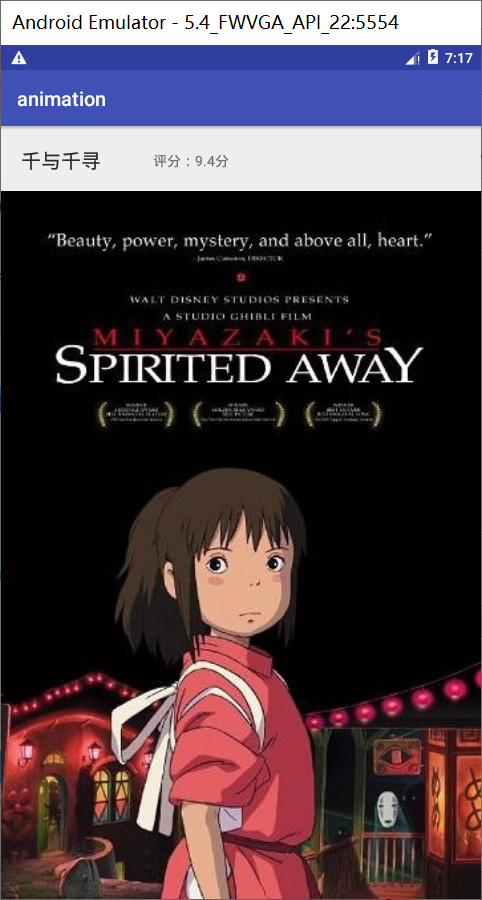
2.创建动画变动后的布局——animation_layout.xml
<?xml version="1.0" encoding="utf-8"?>
<android.support.constraint.ConstraintLayout xmlns:android="http://schemas.android.com/apk/res/android"
    xmlns:app="http://schemas.android.com/apk/res-auto"
    xmlns:tools="http://schemas.android.com/tools"
    android:id="@+id/animation"
    android:layout_width="match_parent"
    android:layout_height="match_parent"
    tools:context="cn.edu.fjnu.cl.animation.MainActivity">

    <TextView
        android:id="@+id/tv_score"
        android:layout_width="wrap_content"
        android:layout_height="wrap_content"
        android:layout_marginLeft="52dp"
        android:text="评分:9.4分"
        app:layout_constraintBottom_toBottomOf="@+id/tv_name"
        app:layout_constraintStart_toEndOf="@+id/tv_name"
        app:layout_constraintTop_toTopOf="@+id/tv_name" />

    <TextView
        android:id="@+id/tv_name"
        android:layout_width="wrap_content"
        android:layout_height="wrap_content"
        android:layout_marginLeft="20dp"
        android:layout_marginTop="20dp"
        android:text="千与千寻"
        android:textColor="#282828"
        android:textSize="20sp"
        app:layout_constraintStart_toStartOf="parent"
        app:layout_constraintTop_toTopOf="parent" />

    <ImageView
        android:id="@+id/iv_poster"
        android:layout_width="0dp"
        android:layout_height="0dp"
        android:layout_marginTop="65dp"
        android:scaleType="centerCrop"
        app:layout_constraintBottom_toBottomOf="parent"
        app:layout_constraintEnd_toEndOf="parent"
        app:layout_constraintStart_toStartOf="parent"
        app:layout_constraintTop_toTopOf="parent"
        app:srcCompat="@drawable/poster" />

</android.support.constraint.ConstraintLayout>
布局效果如下
3.利用Android的TransitionManager结合ConstraintSet实现动画效果
package cn.edu.fjnu.cl.animation;

import android.support.constraint.ConstraintLayout;
import android.support.constraint.ConstraintSet;
import android.support.v7.app.AppCompatActivity;
import android.os.Bundle;
import android.transition.TransitionManager;

public class MainActivity extends AppCompatActivity {

    private ConstraintLayout mConstraintLayout;
    private boolean mIsDetail;

    @Override
    protected void onCreate(Bundle savedInstanceState) {
        super.onCreate(savedInstanceState);
        setContentView(R.layout.activity_main);
        mConstraintLayout = (android.support.constraint.ConstraintLayout)findViewById(R.id.animation);

        ConstraintSet constraintSet1 = new ConstraintSet();
        ConstraintSet constraintSet2 = new ConstraintSet();

        constraintSet2.clone(this, R.layout.animation_layout);
        constraintSet1.clone(mConstraintLayout);

        findViewById(R.id.iv_poster).setOnClickListener(v -> {
            TransitionManager.beginDelayedTransition(mConstraintLayout);
            if (!mIsDetail) {
                constraintSet2.applyTo(mConstraintLayout);
                mIsDetail = true;
            } else {
                constraintSet1.applyTo(mConstraintLayout);
                mIsDetail = false;
            }
        });
    }
}
其中ConstraintSet是一个约束集合,保存了布局上所有元素的约束,因为我们需要在两个布局之间执行动画,所以我们需要创建两个约束集合的对象。
ConstraintSet constraintSet1 = new ConstraintSet();
ConstraintSet constraintSet2 = new ConstraintSet();
创建完约束集对象后设置每个约束集对应的约束,即将当前布局的约束应用到constraintSet1中,将目标布局的约束应用到constraintSet2中。
constraintSet2.clone(this, R.layout.animation_layout);
constraintSet1.clone(mConstraintLayout);
动画的执行过程
TransitionManager.beginDelayedTransition(mConstraintLayout);
# 从constraintSet1过渡到constraintSet2
constraintSet2.applyTo(mConstraintLayout);

# 从constraintSet2过渡到constraintSet1
constraintSet1.applyTo(mConstraintLayout);
动画效果
总结
本篇博客主要介绍了ConstraintLayout中一些常用的属性和基本的使用方法、利用ConstraintSet结合TransitionManager实现动画的制作两部分内容。
当然ConstraintLayout中的属性与能实现的功能远不止这些,希望这篇博客能帮助大家初步了解ConstraintLayout,若有不正确之处,欢迎指正。
附上官方学习文档ConstrainLayout部分的链接。
链接: ConstraintLayout.


 483
483


 被折叠的 条评论
为什么被折叠?
被折叠的 条评论
为什么被折叠?
 到【灌水乐园】发言


