


SpingBoot
一、SpingBoot简介
二、★★★自动装配原理★★★
springboot的核心依赖都在父工程中。因为父工程里有这些依赖的版本仓库,所以并不需要指定版本
从springboot的启动类来分析

1.@SpringBootApplication 注解解析
@SpringBootApplication 内最主要的三个注解
简单描述
@SpringBootConfiguration (简称为一号注解方便下面描述)
	springboot的一些配置类
@EnableAutoConfiguration (二号注解)
	@Import({
   AutoConfigurationImportSelector.class})
		AutoConfigurationImportSelector 类提供了一个 selectImports 方法,该方法的作用就是将若干的bean注入IOC容器当中

@ComponentScan (三号注解)
	将一些包扫描到容器当中
文字描述:
SpringBoot如何实现自动注入Bean
	主启动类中有一个 @SpringBootApplication注解,该注解主要由【一、二、三号注解】组成。
		【一号注解】主要负责【在上下文中注册额外的 bean 或导入其他配置类】,
		【三号注解】主要负责【扫描启动类所在的包下所有的类】,
		【二号注解】则是主要负责【实现Bean的注入】。
			【三号注解】中导入了一个【AutoConfiguartionImportSelector类】,该类提供了一个【selecImports】方法,该方法【获取所有符合条件的类的全限定类名】,
			会在SpringBoot启动的时候把spring.factories (文件都是配置类全路径名称) 这些配置类加载到IoC 容器中

SpringBoot如何读取配置文件、注入bean
	当SpringBoot启动后,会加载【spring.factories】文件中的类,从而实现读取配置文件
2.启动 springboot 应用解析
(1) SpringApplication 类的实例化,执行init加载初始化
SpringApplication 类主要负责
	(1) 推断 SprintBoot 应用的类型 (是普通项目还是 Web 项目)
	(2) 查找并加载【初始化器】,添加到【initializers】属性中
	(3) 查找并加载所有【监听器】,添加到【listeners】属性中
	(4) 推断设置 main 方法的定义类,加载主类
(2) 对实例对象执行 run 方法
三、SpringBoot配置
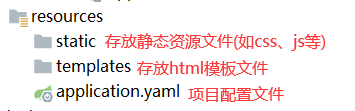
1.SpringBoot项目下的文件夹说明
2.SpringBoot的配置文件
SpringBoot使用一个全局的配置文件 名称二选一,推荐使用application.yaml,yaml格式书写灵活简便
使用的优先级:application.properties > application.yaml
application.properties,语法结构:
	key=value

application.yaml,语法结构 (采用键值对形式,对空格及其敏感):
	(1) 普通形式
		key: value
	(2) 写对象
		object:
			key1: value1
			key2: value2
		或 object: {
   key1: value1, key2: value2}
	(3) 写数组
		array:
			- value1
			- value2
		或 array: [value1, value2]
3.配置文件的多环境配置 (profile)
application.yaml 配置文件可在项目中的多个位置存放,不影响使用越靠近根目录优先级越高
项目内部配置文件的加载顺序
	优先级1:项目【根路径】的【config文件夹】中的配置文件
	优先级2:项目【根路径】下的【配置文件】
	优先级3:【资源路径】下【config文件夹】中配置文件
	优先级4:【资源路径】下的【配置文件】
多个环境设置的优势:可以用于在【不同环境中】指定【不同端口】等,方便开发或测试
(1) 【application.properties 格式的配置文件】设置【多环境配置】
	主配置文件编写的时候,可以使用【application-xx.properties】来指定多个环境,如
		application-test.properties,代表测试环境配置
		application-dev.properties,代表开发环境配置

	springboot的多环境配置默认不开启,但是需要在【主配置文件 application.properties】中选择激活
		application-test.properties,开启测试环境配置
		spring.profiles.active=dev,开启开发环境配置

(2) 【application.yaml 格式的配置文件】设置【多环境配置】
	server:
	  port: 8081
	#在【主server中】通过【active】选择要激活那个环境块
	spring:
	  profiles:
	    active: prod

	---
	server:
	  port: 8083
	spring:
	  profiles: dev		#配置环境的名称

	---
	server:
	  port: 8084
	spring:
	  profiles: prod	#配置环境的名称
4.使用注解为实体类赋值
(1) 【@Value注解】给实体类赋值特点:要一个一个赋值,当实体类属性过多时很繁琐
//实体类
@Data
@AllArgsConstructor
@NoArgsConstructor
@ToString
@EqualsAndHashCode
@Component
public class Dog {

    //sping原始赋值方法
    @Value("旺财")
    private String name;
    @Value("3")
    private Integer age;
}

//测试
@SpringBootTest
class SpringbootStudyApplicationTests {

    @Resource
    private Dog dog;

    @Test
    void contextLoads() {

        System.out.println(dog);
    }
}

//结果
Dog{

	name='旺财',
	age=3
}
(2) 使用yaml给实体类赋值需要将idea的编码格式统一调成UTF-8,不然可能会乱码

方式一:@ConfigurationProperties(prefix = "配置文件名")
方式二:@PropertySource(value = "classpath:指定配置文件名")
方式一
//在pom.xml文件中添加依赖
<!--使用yaml文件为实体类赋值的依赖-->
<dependency>
    <groupId>org.springframework.boot</groupId>
    <artifactId>spring-boot-configuration-processor</artifactId>
    <optional>true</optional>
</dependency>

//实体类 (1.添加实体类注解,2.用【@ConfigurationProperties】注解声明要指向的yaml文件中的对象)
@Data
@AllArgsConstructor
@NoArgsConstructor
@ToString
@EqualsAndHashCode
@Component
@ConfigurationProperties(prefix = "person")		//声明要指向的yaml文件内的对象
public class Person {

    private String name;
    private Integer age;
    private Boolean happy;
    private Date birth;
    private Map<String, Object> maps;
    private List<Object> lists;
    private Dog dog;

// 在application.yaml文件中为实体类赋值
person:
  name: 张三${random.uuid}
  age: 18$(random.int)
  happy: false
  birth: 1998/09/06
  maps: {
   key1: value1, key2: value2}
  lists:
    - code
    - music
    - girl
  dog:
    name: ${person.key1:key2}-旺财
    //表示如果person对象内如果有key1,则该name会输出为:key1-旺财,否则name输出为:key2-旺财
    age: 3

//测试
@SpringBootTest
class SpringbootStudyApplicationTests {

    @Resource
    private Person person;

    @Test
    void contextLoads() {

        System.out.println(person);
    }
}

//结果
Person{

	name='张三',
	age=18,
	happy=false,
	birth=Sun Sep 06 00:00:00 CST 1998,
	maps={
   key1=value1, key2=value2},
	lists=[code, music, girl],
	dog=Dog{

		name='张三',
		age=3
	}
}

方式二 (类似原生spring赋值)
//实体类
@Data
@AllArgsConstructor
@NoArgsConstructor
@ToString
@EqualsAndHashCode
@Component
@PropertySource(value = "classpath:Person.properties")
public class Person {

	@Value("${name}")
    private String name;
    @Value("${age}")
    private Integer age;
    @Value("${happy}")
    private Boolean happy;
    @Value("${birth}")
    private Date birth;
    @Value("${maps}")
    private Map<String, Object> maps;

//在Person.properties文件中赋值
name=张三
age=18
happy=false
birth=1998/09/06
maps={
   key1: value1, key2: value2}
5.yaml方式与原生spring方式对实体类赋值的不同

四、SpringBoot简单web开发
1.静态资源的访问问题
将静态资源放于指定目录下
SpringBoot项目中,public、static、/**、resources目录下的资源可被直接访问 (没有就新建)
	优先级:resources > static(默认使用) > public

2.存放jsp页面
不推荐使用jsp,springboot推荐使用 Thymeleaf 前端模板
3.添加对jsp的解析依赖
<!--springboot内嵌tomcat对jsp页面的解析依赖-->
<dependency>
   <groupId>org.apache.tomcat.embed</groupId>
    <artifactId>tomcat-embed-jasper</artifactId>
</dependency>

<!--
	Springboot项目默认推荐使用的前端引擎是thymeleaf
    现在我们要使用springboot集成jsp,手动指定jsp最后编译的路径
    而且springboot集成jsp编译jsp的路径是springboot规定好的位置META-INF/resources
-->
<resource>
    <!--源文夹-->
    <directory>src/main/webapp</directory>
    <!--指定编译到META-INF /resources-->
    <targetPath>META-INF / resources</targetPath>
    <!--指定源文件夹中的哪个资源要编译进行-->
    <includes>
        <include>*.*</include>
    </includes>
</resource>
4.解析jsp
在 application.yaml 中配置视图解析器
#配置视图解析器
spring.mvc.view.prefix=/
spring.mvc.view.suffix=.jsp
5.通过Controller进行页面跳转
@Controller
public class MyThymeleafController {

    @RequestMapping("/jspHello")
    public ModelAndView jspHello(){

        ModelAndView mv = new ModelAndView();
        mv.addObject("username", "张三");
        mv.addObject("age", "18");
        mv.setViewName("hello-jsp");

        return mv;
    }
}
五、SpringBoot整合模板
1.使用【Freemarker】模板引擎渲染web视图
基础使用:https://blog.csdn.net/weixin_39222112/article/details/84984935
1.pom.xml中引入依赖
<!--引入freeMarken的依赖包-->
<dependency>
    <groupId>org.springframework.boot</groupId>
    <artifactId>spring-boot-starter-freemarker</artifactId>
</dependency>
2.application.yaml 中添加 .ftl 文件说明
spring:
  freemarker:
    request-context-attribute: req
    suffix: .ftl
    content-type: text/html
    cache: false
    template-loader-path: classpath:/templates
    charset: UTF-8
    check-template-location: true
    expose-request-attributes: false
    expose-session-attributes: false
3.在 resources 包下的 templates 包下新建 ftl 文件
welcome ${name}  to freemarker!<br>
性别是:
<#if sex=='0'>
    男
    <#elseif sex=='1'>
        女
    <#else>
        其它
</#if>
<br>
根据年龄判断,是:
<#if age gt 18>
    成年人
    <#else>
        未成年人
</#if>
<br>
<#list userList as user>
    ${user}
</#list>
4.在Controller层进行页面跳转
@Controller
//注意不能使用 @RestController,因为要进行页面跳转而不是返回json数据
public class FreemarkerIndexController {

    @RequestMapping("/freemarkerIndex")
    public String freemarkerIndex(Map<String, Object> map){

        //设置数据以供前端页面使用 freemarker 语法进行判断
        map.put("name", "张三");  //等价于 request.setAttribute("name", "张三");
        map.put("sex", "0");
        map.put("age", 12);
        ArrayList<String> list = new ArrayList<>();
        list.add("李四");
        list.add("王五");
        map.put("userList", list);

        return "freemarkerIndex";
    }
}
5.可能会遇到的问题
(1) 无法访问 templates 包下的 ftl 文件
	可能原因:Maven版本冲突,或 ftl 声明无效
(2) 页面始终无法正常运行
	可能原因:Controller层使用了 @RestController 注解,应该使用 @Controller
(3) 上面两个都没错,但是仍然访问不了页面
	注意 【@RequestMapping 中设置的路径】与【返回的视图路径】的区别,要通过@RequestMapping 中设置的路径来进行页面跳转
2.使用【Thymeleaf】模板引擎渲染web视图
基础使用:
1.pom.xml中引入依赖
<!--Spring SpringMVC-->
<dependency>
	<groupId>org.springframework.boot</groupId>
	<artifactId>spring-boot-starter-web</artifactId>
</dependency>
<!--引入thymeLeaf的依赖-->
<dependency>
	<groupId>org.springframework.boot</groupId>
	<artifactId>spring-boot-starter-thymeleaf</artifactId>
</dependency>
2.创建实体类
@Component
public class User {

    private String username;
    private Integer age;
    private String password;

    public User() {
    }
    public User(String username, Integer age, String password) {

        this.username = username;
        this.age = age;
        this.password = password;
    }

    public String getUsername() {
    return username; }
    public void setUsername(String username) {
    this.username = username; }
    public Integer getAge() {
    re
最低0.47元/天 解锁文章


 4万+
4万+


 被折叠的 条评论
为什么被折叠?
被折叠的 条评论
为什么被折叠?
 到【灌水乐园】发言


