


Nacos服务端+集群搭建
每天多学一点点~
话不多说,这就开始吧…
文章目录
1.前言
阿里,阿里爸爸,阿里爸爸就是牛批~
2.下载
下载地址:https://github.com/alibaba/Nacos/releases

3.windows环境启停

双击startup.cmd
访问路径
http://127.0.0.1:8848/nacos/index.html
默认账号和密码 nacos nacos
注意:路径中不要带中文

4.linux环境启停
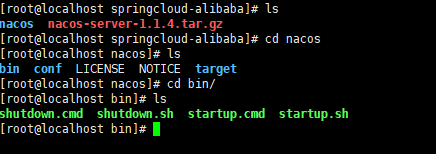
3.1 解压
把我们的Nacos包解压 tar -zxvf nacos-server-1.1.4.tar.gz
cd nacos
cd bin
sh startup.sh -m standalone # 单独启动要加上 -m standalone 集群启动直接就是 startup.sh
cat /usr/local/springcloud-alibaba/nacos/logs/start.out 查看日志 默认端口8848


http://192.168.73.132:8848/nacos/index.html
默认账号和密码 nacos nacos
5.Nacos client服务端的搭建
- 加入依赖
<dependency>
    <groupId>com.alibaba.cloud</groupId>
    <artifactId>spring‐cloud‐alibaba‐nacos‐discovery</artifactId>
</dependency>
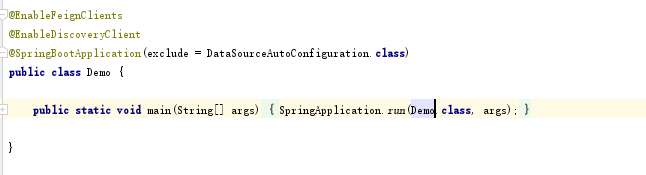
- 加注解@EnableDiscoveryClient ,高版本也可以不加
- appication.yml文件
spring:
  cloud:
    nacos:
      discovery:
        server-addr: 192.168.73.132:8848 # #配置nacos的配置中心         132虚拟机
  application:
    name: nacos-test

- 验证我们的order-center注册到我们的nacos上
@RequestMapping
@RestController
public class TestController {
    @Autowired
    private DiscoveryClient discoveryClient;

    @GetMapping("/getServiceList")
    public List<ServiceInstance> getServiceList() {

        List<ServiceInstance> serviceInstanceList = discoveryClient.getInstances("nacos-test");
        return serviceInstanceList;
    }

}
访问 http://localhost:8080/getServiceList

6.Nacos集群搭建

6.1 启动nginx
nginx  #启动nginx
nginx -s quit  #快速停止nginx
nginx -V #查看版本,以及配置文件地址
nginx -v #查看版本
nginx -s reload|reopen|stop|quit   #重新加载配置|重启|快速停止|安全关闭nginx
nginx -h #帮助
./nginx -c /usr/local/nginx/conf/nginx-nacoscluster.conf  #以配置文件启动
nginx配置
user root;
worker_processes  1;

pid        /usr/local/nginx/logs/nginx.pid;

events {
    worker_connections  1024;
}


http {
    include       mime.types;
    default_type  application/octet-stream;
    # 负载均衡配置  配置在http模块
    upstream nacoscluster{
     server 192.168.73.132:8849;
     server 192.168.73.132:8850;
     server 192.168.73.132:8851;
   }

    server {
          listen                   8847;
          server_name              localhost;
          location /mynacos/ {
                proxy_pass         http://nacoscluster/nacos/;
          }
        }
}
访问地址 http://192.168.73.132:8847/mynacos/
6.2 安装 我们的nacosserver
(搭建三个集群端口分别为8849 ,8850,8851)
我们以配置一台为例(8849)为例
- 修改nacos8849/conf文件 application.properties
server.port=8849   #要改的端口号

spring.datasource.platform=mysql
# 数据库实例数量
db.num=1
#自己数据库的连接信息
db.num=1
#自己数据库的连接信息
db.url.0=jdbc:mysql://192.168.174.1:3306/nacos_test?characterEncoding=utf8&connectTimeout=
1000&socketTimeout=3000&autoReconnect=true
db.user=root
db.password=root
- 将cluster.conf.example改成cluster.conf
将集群ip记录下来
192.168.73.132:8849
192.168.73.132:8850
192.168.73.132:8851
- 需要修改nacos-server的 启动脚本jvm参数 (原谅我的笔记本内存太小)
vim startup.sh

虚拟机较小,修改为
-Xms512m -Xmx512m -Xmn256m
- 最后一步:创建一个数据库(需要自己创建一个数据库) 脚本的位置在 nacos/conf/nacos-mysql.sql
- 启动
sh startup.sh
cat /usr/local/springcloud-alibaba/nacos-cluster/nacos8849/logs/start.out  查看日志 默认端口8848

分别访问
http://192.168.73.132:8849/nacos/index.html
http://192.168.73.132:8850/nacos/index.html
http://192.168.73.132:8851/nacos/index.html
ng访问
http://192.168.73.132:8847/mynacos/

配置完了集群,以后java’代码就可以直接写 8847的ng地址呢
spring:
  cloud:
    nacos:
      discovery:
        server-addr: 192.168.73.132:8847 # ngix配置的集群地址
  application:
    name: nacos-test
7.结语
世上无难事,只怕有心人,每天积累一点点,fighting!!!


 2万+
2万+


 被折叠的 条评论
为什么被折叠?
被折叠的 条评论
为什么被折叠?
 到【灌水乐园】发言


