


这篇文章主要介绍了关于laravel dingo/api添加jwt-auth认证,有着一定的参考价值,现在分享给大家,有需要的朋友可以参考一下
前面我们学了laravel dingo/api创建简单的api,这样api是开放给所有人的,如何查看和限制api的调用呢?可以用jwt-auth来验证,JSON Web Token Authentication
1,首先安装jwt-auth插件,在命令行中用composer安装
composer require tymon/jwt-auth '0.5.*'
2,然后发布
php artisan vendor:publish --provider="Tymon\JWTAuth\Providers\JWTAuthServiceProvider"
在/config/生成了一个jwt.php文件
3,生成key
php artisan jwt:generate
如果命令无法运行,可以在/config/jwt.php文件中修改changeme为自己设置的密匙
'secret' => env('JWT_SECRET', 'changeme'),
4,修改/app/Api/Controllers/HelloController.php为
namespace App\Api\Controllers;
use Illuminate\Http\Request;
use App\Http\Controllers\Controller;
//添加jwt-auth认证
use JWTAuth;
use Tymon\JWTAuth\Exceptions\JWTException;
class HelloController extends Controller
{
public function index()
{
return '{content:Helloworld!}';
}
//添加jwt-auth认证
public function authenticate(Request $request)
{
// grab credentials from the request
$credentials = $request->only('email', 'password');
try {
// attempt to verify the credentials and create a token for the user
if (! $token = JWTAuth::attempt($credentials)) {
return response()->json(['error' => 'invalid_credentials'], 401);
}
} catch (JWTException $e) {
// something went wrong whilst attempting to encode the token
return response()->json(['error' => 'could_not_create_token'], 500);
}
// all good so return the token
return response()->json(compact('token'));
}
}
5,添加路由(/routes/web.php)
$api->post('auth', 'App\Api\Controllers\HelloController@authenticate');
6,测试路由:php artisan api:routes,如果出现如下提示表示正确

访问url:***.com/api/auth显示错误,因为没加token
重新修改hellocontrol和loutes
namespace App\Api\Controllers;
use Illuminate\Http\Request;
use App\Http\Controllers\Controller;
use JWTAuth;
use Tymon\JWTAuth\Exceptions\JWTException;
class HelloController extends Controller
{
/**
* Create a new controller instance.
*
* @return void
*/
/**
* Show the application dashboard.
*
* @return \Illuminate\Http\Response
*/
public function index()
{
return '{content:Helloworld!}';
}
public function authenticate(Request $request)
{
// grab credentials from the request
$credentials = $request->only('email', 'password');
try {
// attempt to verify the credentials and create a token for the user
if (! $token = JWTAuth::attempt($credentials)) {
return response()->json(['error' => 'invalid_credentials'], 401);
}
} catch (JWTException $e) {
// something went wrong whilst attempting to encode the token
return response()->json(['error' => 'could_not_create_token'], 500);
}
// all good so return the token
return response()->json(compact('token'));
}
//添加user
public function user()
{
JWTAuth::parseToken();
$user = JWTAuth::parseToken()->authenticate();
return $user;
}
}
Route::get('/', function () {
return view('welcome');
});
Auth::routes();
Route::get('/home', 'HomeController@index')->name('home');
$api = app('Dingo\Api\Routing\Router');
$api->version('v1', function ($api) {
$api->get('helloworld', 'App\Api\Controllers\HelloController@index');
$api->post('auth', 'App\Api\Controllers\HelloController@authenticate');
$api->get('auth', 'App\Api\Controllers\HelloController@user');
});
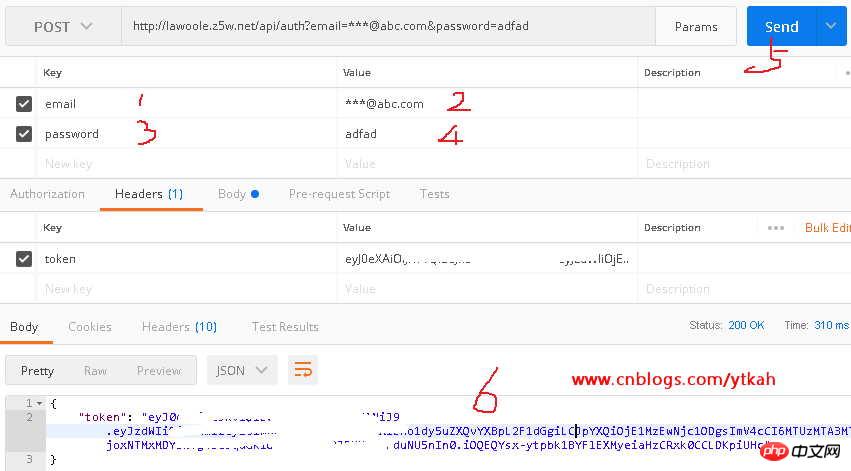
用谷歌浏览器postman插件获取token,注意是post方法,步骤如下图所示
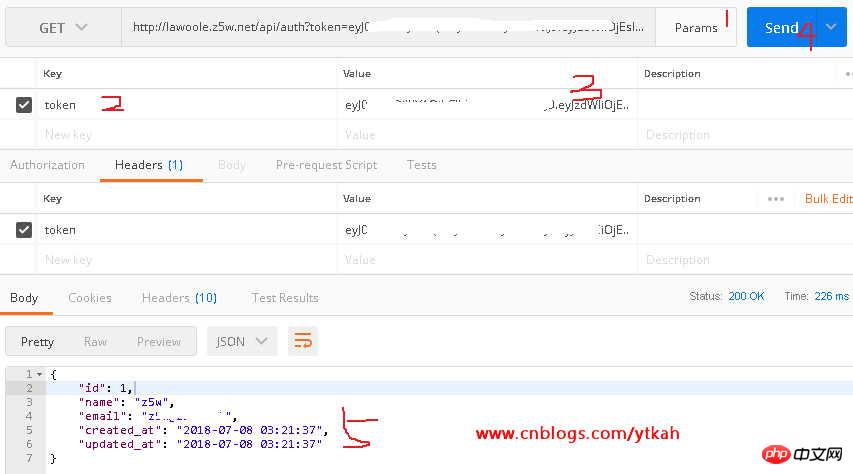
将获取的token复制,黏贴到第二步的用户验证token中,下图5中就是我们刚刚注册的用户
以上就是本文的全部内容,希望对大家的学习有所帮助,更多相关内容请关注PHP中文网!
相关推荐:


 1645
1645


 被折叠的 条评论
为什么被折叠?
被折叠的 条评论
为什么被折叠?
 到【灌水乐园】发言


