


ssm项目整合(Spring+SpringMVC+Mybatis)
该项目实现的功能有
1.用户登录
2.新增用户信息
3.返回所有用户信息
4.更新用户信息
5删除用户信息
项目结构:
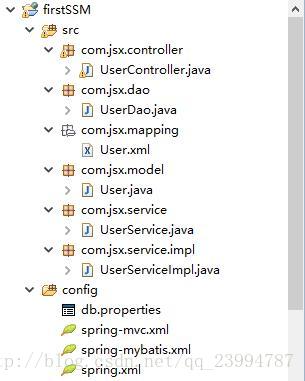
具体搭建步骤:
创建数据库和对应的表结构
-
SET FOREIGN_KEY_CHECKS=0; -
-- ---------------------------- -
-- Table structure for `adminuser` -
-- ---------------------------- -
DROP TABLE IF EXISTS `adminuser`; -
CREATE TABLE `adminuser` ( -
`id` int(11) NOT NULL AUTO_INCREMENT, -
`username` varchar(255) DEFAULT NULL, -
`password` varchar(255) DEFAULT NULL, -
PRIMARY KEY (`id`) -
) ENGINE=MyISAM AUTO_INCREMENT=6 DEFAULT CHARSET=utf8; -
-- ---------------------------- -
-- Records of adminuser -
-- ---------------------------- -
INSERT INTO `adminuser` VALUES ('1', '小落', 'qwe');
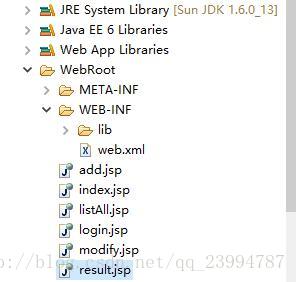
1.新建一个web项目 在WebRoot/WEB-INF/lib下导入必须的jar包
-
aopalliance-1.0.jar -
aspectjweaver-1.7.1.jar -
commons-fileupload-1.2.2.jar -
commons-logging-1.1.1.jar -
druid-0.2.9.jar -
jstl-1.2.jar -
junit-4.11.jar -
mybatis-3.1.1.jar -
mybatis-spring-1.1.1.jar -
mysql-connector-java-5.1.21.jar -
servlet-api-3.0-alpha-1.jar -
spring-aop-3.2.0.RELEASE.jar -
spring-beans-3.2.0.RELEASE.jar -
spring-context-3.2.0.RELEASE.jar -
spring-core-3.2.0.RELEASE.jar -
spring-expression-3.2.0.RELEASE.jar -
spring-jdbc-3.1.1.RELEASE.jar -
spring-test-3.2.0.RELEASE.jar -
spring-tx-3.1.1.RELEASE.jar -
spring-web-3.2.0.RELEASE.jar -
spring-webmvc-3.2.0.RELEASE.jar
2.创建db.properties数据库连接配置文件
db.properties
-
#hibernate.dialect=org.hibernate.dialect.MySQL5InnoDBDialect -
#driverClassName=com.mysql.jdbc.Driver -
#来验证数据库连接的有效性 -
validationQuery=SELECT 1 -
jdbc_url=jdbc:mysql://localhost:3306/test?useUnicode=true&characterEncoding=UTF-8&zeroDateTimeBehavior=convertToNull -
jdbc_username=root -
jdbc_password=root
3.创建包结构
com.jsx.controller
com.jsx.dao
com.jsx.mapping
com.jsx.model
com.jsx.service
com.jsx.service.impl
4.创建spring.xml配置文件
spring.xml
-
<?xml version="1.0" encoding="UTF-8"?> -
<beans xmlns="http://www.springframework.org/schema/beans" xmlns:xsi="http://www.w3.org/2001/XMLSchema-instance" xmlns:context="http://www.springframework.org/schema/context" xsi:schemaLocation=" -
http://www.springframework.org/schema/beans -
http://www.springframework.org/schema/beans/spring-beans-3.0.xsd -
http://www.springframework.org/schema/context -
http://www.springframework.org/schema/context/spring-context-3.0.xsd -
"> -
<!-- 引入属性文件 --> -
<context:property-placeholder location="classpath:db.properties" /> -
<!-- 自动扫描(自动注入) --> -
<context:component-scan base-package="com.jsx.service..*" /> -
</beans>
5.创建spring-mybatis.xml配置文件
spring-mybatis.xml
-
<?xml version="1.0" encoding="UTF-8"?> -
<beans xmlns="http://www.springframework.org/schema/beans" xmlns:xsi="http://www.w3.org/2001/XMLSchema-instance" xmlns:tx="http://www.springframework.org/schema/tx" xmlns:aop="http://www.springframework.org/schema/aop" xsi:schemaLocation=" -
http://www.springframework.org/schema/beans -
http://www.springframework.org/schema/beans/spring-beans-3.0.xsd -
http://www.springframework.org/schema/tx -
http://www.springframework.org/schema/tx/spring-tx-3.0.xsd -
http://www.springframework.org/schema/aop -
http://www.springframework.org/schema/aop/spring-aop-3.0.xsd -
"> -
<!-- 配置数据源 -
Druid是Java语言中最好的数据库连接池。Druid能够提供强大的监控和扩展功能。 -
--> -
<bean name="dataSource" class="com.alibaba.druid.pool.DruidDataSource" init-method="init" destroy-method="close"> -
<property name="url" value="${jdbc_url}" /> -
<property name="username" value="${jdbc_username}" /> -
<property name="password" value="${jdbc_password}" /> -
<!-- 初始化连接大小 --> -
<property name="initialSize" value="0" /> -
<!-- 连接池最大使用连接数量 --> -
<property name="maxActive" value="20" /> -
<!-- 连接池最大空闲 --> -
<property name="maxIdle" value="20" /> -
<!-- 连接池最小空闲 --> -
<property name="minIdle" value="0" /> -
<!-- 获取连接最大等待时间 --> -
<property name="maxWait" value="60000" /> -
<!-- mysql 不支持 poolPreparedStatements--> -
<!-- -
<property name="poolPreparedStatements" value="true" /> -
<property name="maxPoolPreparedStatementPerConnectionSize" value="33" /> -
--> -
<!-- 验证数据库连接的查询语句,这个查询语句必须是至少返回一条数据的SELECT语句。 --> -
<property name="validationQuery" value="${validationQuery}" /> -
<!-- 申请连接时执行validationQuery检测连接是否有效,做了这个配置会降低性能。 --> -
<property name="testOnBorrow" value="false" /> -
<!-- 归还连接时执行validationQuery检测连接是否有效,做了这个配置会降低性能 --> -
<property name="testOnReturn" value="false" /> -
<!-- 建议配置为true,不影响性能,并且保证安全性。申请连接的时候检测, -
如果空闲时间大于timeBetweenEvictionRunsMillis,执行validationQuery检测连接是否有效。 --> -
<property name="testWhileIdle" value="true" /> -
<!-- 配置间隔多久才进行一次检测,检测需要关闭的空闲连接,单位是毫秒 --> -
<property name="timeBetweenEvictionRunsMillis" value="60000" /> -
<!-- 配置一个连接在池中最小生存的时间,单位是毫秒 --> -
<property name="minEvictableIdleTimeMillis" value="25200000" /> -
<!-- 打开removeAbandoned功能 --> -
<property name="removeAbandoned" value="true" /> -
<!-- 1800秒,也就是30分钟 --> -
<property name="removeAbandonedTimeout" value="1800" /> -
<!-- 关闭abanded连接时输出错误日志 --> -
<property name="logAbandoned" value="true" /> -
<!-- 开启Druid的监控统计功能 监控数据库 -
<property name="filters" value="stat" /> --> -
<property name="filters" value="mergeStat" /> -
</bean> -
<!-- myBatis文件 -
创建工厂 bean -
SqlSessionFactoryBean 实现了 Spring 的 FactoryBean 接口 -
--> -
<bean id="sqlSessionFactory" class="org.mybatis.spring.SqlSessionFactoryBean"> -
<!-- 可以是任意 的 DataSource,其配置应该和其它 Spring 数据库连接是一样的。--> -
<property name="dataSource" ref="dataSource" /> -
<!-- 自动扫描entity目录, 省掉Configuration.xml里的手工配置 --> -
<property name="mapperLocations" value="classpath:com/jsx/mapping/*.xml" /> -
</bean> -
<!-- -
Mybatis MapperScannerConfigurer 自动扫描 将Mapper接口生成代理注入到Spring -
MapperFactoryBean 创建的代理类实现了 UserMapper 接口,并且注入到应用程序中。 -
因为代理创建在运行时环境中(Runtime,译者注) ,那么指定的映射器必须是一个接口,而 不是一个具体的实现类。 -
缺点有很多的配置文件时 全部需要手动编写。 -
没有必要在 Spring 的 XML 配置文件中注册所有的映射器。相反,你可以使用一个 MapperScannerConfigurer , -
它 将 会 查 找 类 路 径 下 的 映 射 器 并 自 动 将 它 们 创 建 成 MapperFactoryBean。 -
MapperScannerConfigurer 支 持 过 滤 由 指 定 的 创 建 接 口 或 注 解 创 建 映 射 器 。 annotationClass 属性指定了要寻找的注解名称。 -
markerInterface 属性指定了要寻找的父 接口。如果两者都被指定了,加入到接口中的映射器会匹配两种标准。 -
默认情况下,这两个 属性都是 null,所以在基包中给定的所有接口可以作为映射器加载。 -
--> -
<bean class="org.mybatis.spring.mapper.MapperScannerConfigurer"> -
<property name="basePackage" value="com.jsx.dao" /> -
<property name="sqlSessionFactoryBeanName" value="sqlSessionFactory" /> -
</bean> -
<!-- 配置事务管理器 --> -
<bean id="transactionManager" class="org.springframework.jdbc.datasource.DataSourceTransactionManager"> -
<property name="dataSource" ref="dataSource" /> -
</bean> -
<!-- 注解方式配置事物 --> -
<!-- <tx:annotation-driven transaction-manager="transactionManager" /> --> -
<!-- 拦截器方式配置事物 -
spring有很多事物管理,其中很多都是被淘汰的了,企业一直在用,最好配置方法如下,配置事务之后,用切面直接切入所有servic层 -
--> -
<tx:advice id="transactionAdvice" transaction-manager="transactionManager"> -
<tx:attributes> -
<tx:method name="add*" propagation="REQUIRED" /> -
<tx:method name="append*" propagation="REQUIRED" /> -
<tx:method name="insert*" propagation="REQUIRED" /> -
<tx:method name="save*" propagation="REQUIRED" /> -
<tx:method name="update*" propagation="REQUIRED" /> -
<tx:method name="modify*" propagation="REQUIRED" /> -
<tx:method name="edit*" propagation="REQUIRED" /> -
<tx:method name="delete*" propagation="REQUIRED" /> -
<tx:method name="remove*" propagation="REQUIRED" /> -
<tx:method name="repair" propagation="REQUIRED" /> -
<tx:method name="delAndRepair" propagation="REQUIRED" /> -
<tx:method name="get*" propagation="SUPPORTS" /> -
<tx:method name="find*" propagation="SUPPORTS" /> -
<tx:method name="load*" propagation="SUPPORTS" /> -
<tx:method name="search*" propagation="SUPPORTS" /> -
<tx:method name="datagrid*" propagation="SUPPORTS" /> -
<tx:method name="*" propagation="SUPPORTS" /> -
</tx:attributes> -
</tx:advice> -
<aop:config> -
<aop:pointcut id="transactionPointcut" expression="execution(* com.jsx.service..*Impl.*(..))" /> -
<aop:advisor pointcut-ref="transactionPointcut" advice-ref="transactionAdvice" /> -
</aop:config> -
<!-- 配置druid监控spring jdbc -
至于Druid是一个用于大数据实时查询和分析的高容错、高性能开源分布式系统,旨在快速处理大规模的数据,并能够实现快速查询和分析。 -
尤其是当发生代码部署、机器故障以及其他产品系统遇到宕机等情况时,Druid仍能够保持100%正常运行。 -
创建Druid的最初意图主要是为了解决查询延迟问题,当时试图使用Hadoop来实现交互式查询分析,但是很难满足实时分析的需要。 -
而Druid提供了以交互方式访问数据的能力,并权衡了查询的灵活性和性能而采取了特殊的存储格式 -
Druid是为OLAP工作流的探索性分析而构建,它支持各种过滤、聚合和查询等类; -
Druid的低延迟数据摄取架构允许事件在它们创建后毫秒内可被查询到; -
Druid的数据在系统更新时依然可用,规模的扩大和缩小都不会造成数据丢失; -
Druid已实现每天能够处理数十亿事件和TB级数据; -
--> -
<bean id="druid-stat-interceptor" class="com.alibaba.druid.support.spring.stat.DruidStatInterceptor"></bean> -
<bean id="druid-stat-pointcut" class="org.springframework.aop.support.JdkRegexpMethodPointcut" scope="prototype"> -
<property name="patterns"> -
<list> -
<value>com.jsx.service.*</value> -
</list> -
</property> -
</bean> -
<aop:config> -
<aop:advisor advice-ref="druid-stat-interceptor" pointcut-ref="druid-stat-pointcut" /> -
</aop:config> -
</beans>
6.创建spring-mvc.xml配置文件
spring-mvc.xml
-
<?xml version="1.0" encoding="UTF-8"?> -
<beans xmlns="http://www.springframework.org/schema/beans" xmlns:mvc="http://www.springframework.org/schema/mvc" xmlns:xsi="http://www.w3.org/2001/XMLSchema-instance" xmlns:p="http://www.springframework.org/schema/p" xmlns:context="http://www.springframework.org/schema/context" xsi:schemaLocation="http://www.springframework.org/schema/beans -
http://www.springframework.org/schema/beans/spring-beans-3.0.xsd -
http://www.springframework.org/schema/context -
http://www.springframework.org/schema/context/spring-context-3.0.xsd -
http://www.springframework.org/schema/mvc -
http://www.springframework.org/schema/mvc/spring-mvc-3.0.xsd"> -
<!-- 自动扫描controller包下的所有类,使其认为spring mvc的控制器 --> -
<context:component-scan base-package="com.jsx.controller" /> -
<!-- 对模型视图名称的解析,即在模型视图名称添加前后缀 controller方法返回值+.jsp--> -
<bean class="org.springframework.web.servlet.view.InternalResourceViewResolver" p:prefix="/" p:suffix=".jsp" /> -
</beans>
7.在WebRoot/WEB-INF/web.xml下配置上述配置文件和其他属性
web.xml
-
<?xml version="1.0" encoding="UTF-8"?> -
<web-app version="3.0" -
xmlns="http://java.sun.com/xml/ns/javaee" -
xmlns:xsi="http://www.w3.org/2001/XMLSchema-instance" -
xsi:schemaLocation="http://java.sun.com/xml/ns/javaee -
http://java.sun.com/xml/ns/javaee/web-app_3_0.xsd"> -
<display-name></display-name> -
<!-- -
通过contextConfigLocation配置spring,contextConfigLocation参数定义了要装入的 Spring 配置文件。 -
如果想装入多个配置文件,可以在 <param-value>标记中用逗号作分隔符。 -
在web.xml里需配置ContextLoaderListener -
--> -
<context-param> -
<param-name>contextConfigLocation</param-name> -
<param-value>classpath:spring.xml;classpath:spring-mybatis.xml</param-value> -
</context-param> -
<!-- 过滤通过用于处理项目中的乱码问题,该过滤器位于org.springframework.web.filter包中,指向类CharacterEncodingFilter --> -
<filter> -
<description>字符集过滤器</description> -
<filter-name>encodingFilter</filter-name> -
<filter-class>org.springframework.web.filter.CharacterEncodingFilter</filter-class> -
<init-param> -
<description>字符集编码</description> -
<param-name>encoding</param-name> -
<param-value>UTF-8</param-value> -
</init-param> -
</filter> -
<filter-mapping> -
<filter-name>encodingFilter</filter-name> -
<url-pattern>/*</url-pattern> -
</filter-mapping> -
<!-- -
自动装配ApplicationContext的配置信息。 -
因为它实现了ServletContextListener这个接口,在web.xml配置这个监听器,启动容器时,就会默认执行它实现的方法。 -
--> -
<listener> -
<description>spring监听器</description> -
<listener-class>org.springframework.web.context.ContextLoaderListener</listener-class> -
</listener> -
<!-- -
servlet标准不允许在web容器内自行做线程管理 -
主要负责处理由 JavaBeans Introspector的使用而引起的缓冲泄露。清除Introspector的唯一方式是刷新整个缓冲 -
--> -
<listener> -
<listener-class>org.springframework.web.util.IntrospectorCleanupListener</listener-class> -
</listener> -
<!-- -
DispatcherServlet是前端控制器设计模式的实现,提供Spring Web MVC的集中访问点,而且负责职责的分派, -
而且与Spring IoC容器无缝集成,从而可以获得Spring的所有好处。 -
DispatcherServlet主要用作职责调度工作,本身主要用于控制流程,主要职责如下: -
1、文件上传解析,如果请求类型是multipart将通过MultipartResolver进行文件上传解析; -
2、通过HandlerMapping,将请求映射到处理器(返回一个HandlerExecutionChain,它包括一个处理器、多个HandlerInterceptor拦截器); -
3、通过HandlerAdapter支持多种类型的处理器(HandlerExecutionChain中的处理器); -
4、通过ViewResolver解析逻辑视图名到具体视图实现; -
5、本地化解析; -
6、渲染具体的视图等; -
7、如果执行过程中遇到异常将交给HandlerExceptionResolver来解析。 -
--> -
<servlet> -
<description>spring mvc servlet</description> -
<servlet-name>springMvc</servlet-name> -
<servlet-class>org.springframework.web.servlet.DispatcherServlet</servlet-class> -
<init-param> -
<description>spring mvc 配置文件</description> -
<param-name>contextConfigLocation</param-name> -
<param-value>classpath:spring-mvc.xml</param-value> -
</init-param> -
<load-on-startup>1</load-on-startup> -
</servlet> -
<servlet-mapping> -
<servlet-name>springMvc</servlet-name> -
<url-pattern>*.do</url-pattern> -
</servlet-mapping> -
<!-- -
Session是由浏览器和服务器之间维护的。 -
Session超时理解为:浏览器和服务器之间创建了一个Session,由于客户端长时间(休眠时间)没有与服务器交互, -
服务器将此Session销毁,客户端再一次与服务器交互时之前的Session就不存在了。 -
--> -
<session-config> -
<session-timeout>15</session-timeout> -
</session-config> -
<welcome-file-list> -
<welcome-file>index.jsp</welcome-file> -
</welcome-file-list> -
</web-app>
8.在model下创建User实体类
User.java
-
package com.jsx.model; -
public class User { -
private int id; -
private String username; -
private String password; -
public int getId() { -
return id; -
} -
public void setId(int id) { -
this.id = id; -
} -
public String getUsername() { -
return username; -
} -
public void setUsername(String username) { -
this.username = username == null ? null : username.trim(); -
} -
public String getPassword() { -
return password; -
} -
public void setPassword(String password) { -
this.password = password == null ? null : password.trim(); -
} -
}
9.在mapping下创建User.xml定义实体类要实现的功能 (其中定义你的功能,对应要对数据库进行的那些操作)
User.xml
-
<?xml version="1.0" encoding="UTF-8" ?> -
<!DOCTYPE mapper PUBLIC "-//mybatis.org//DTD Mapper 3.0//EN" -
"http://mybatis.org/dtd/mybatis-3-mapper.dtd" > -
<mapper namespace="com.jsx.dao.UserDao" > -
<resultMap id="UserMap" type="com.jsx.model.User" > -
<id column="id" property="id" jdbcType="VARCHAR" /> -
<result column="username" property="username" jdbcType="VARCHAR" /> -
<result column="password" property="password" jdbcType="VARCHAR" /> -
</resultMap> -
<sql id="Base_Column_List" > -
id, username, password -
</sql> -
<select id="selectByPrimaryKey" resultMap="UserMap" parameterType="com.jsx.model.User" > -
select -
<include refid="Base_Column_List" /> -
from adminuser -
where id = #{id} -
</select> -
<select id="selectByUsernameAndPassword" resultMap="UserMap" parameterType="com.jsx.model.User" > -
select * from adminuser -
where username = #{username} and password = #{password} -
</select> -
<delete id="deleteByPrimaryKey" parameterType="com.jsx.model.User" > -
delete from adminuser -
where id = #{id} -
</delete> -
<insert id="insert" parameterType="com.jsx.model.User" useGeneratedKeys="true" keyProperty="id"> -
insert into adminuser (username, password) -
values (#{username,jdbcType=VARCHAR}, #{password,jdbcType=VARCHAR}) -
</insert> -
<insert id="insertSelective" parameterType="com.jsx.model.User" > -
insert into adminuser -
<trim prefix="(" suffix=")" suffixOverrides="," > -
<if test="username != null" > -
username, -
</if> -
<if test="password != null" > -
password, -
</if> -
</trim> -
<trim prefix="values (" suffix=")" suffixOverrides="," > -
<if test="username != null" > -
#{username,jdbcType=VARCHAR}, -
</if> -
<if test="password != null" > -
#{password,jdbcType=VARCHAR}, -
</if> -
</trim> -
</insert> -
<update id="updateByPrimaryKeySelective" parameterType="com.jsx.model.User" > -
update adminuser -
<set > -
<if test="username != null" > -
username = #{username,jdbcType=VARCHAR}, -
</if> -
<if test="password != null" > -
password = #{password,jdbcType=VARCHAR}, -
</if> -
</set> -
where id = #{id} -
</update> -
<update id="updateByPrimaryKey" parameterType="com.jsx.model.User" > -
update adminuser -
set username = #{username,jdbcType=VARCHAR}, -
password = #{password,jdbcType=VARCHAR} -
where id = #{id} -
</update> -
<select id="getAll" resultMap="UserMap"> -
SELECT * FROM adminuser -
</select> -
</mapper>
10.在dao创建UserDao将将User.xml中的操作按照id映射成Java函数。
UserDao.java
-
package com.jsx.dao; -
import java.util.List; -
import com.jsx.model.User; -
public interface UserDao { -
int insert(User user); -
int insertSelective(User user); -
int deleteByPrimaryKey(int id); -
int updateByPrimaryKeySelective(User user); -
int updateByPrimaryKey(User user); -
User selectByPrimaryKey(int id); -
List<User> getAll(); -
User selectByUsernameAndPassword(User user); -
}
11.在service下创建UserService接口 (为控制层提供服务,接受控制层的参数,完成相应的功能,并返回给控制层。)
UserService.java
-
package com.jsx.service; -
import java.util.List; -
import com.jsx.model.User; -
public interface UserService { -
String addInfo(User addInfo); -
List<User> getAll(); -
String delete(int id); -
User findById(int id); -
String update(User addInfo); -
User login(User user); -
}
12.在service.impl下创建UserService接口实现类UserServiceImpl
UserServiceImpl.java
-
package com.jsx.service.impl; -
import java.util.List; -
import org.springframework.beans.factory.annotation.Autowired; -
import org.springframework.stereotype.Service; -
import com.jsx.dao.UserDao; -
import com.jsx.model.User; -
import com.jsx.service.UserService; -
@Service("userService") -
public class UserServiceImpl implements UserService{ -
@Autowired -
private UserDao userDao; -
public UserDao getUserDao() { -
return userDao; -
} -
public void setUserDao(UserDao userDao) { -
this.userDao = userDao; -
} -
//表示一个方法声明的目的是覆盖父类方法声明。如果一个方法是注释,该注释类型但不重写基类方法,编译器必须生成一个错误消息。 -
@Override -
public String addInfo(User addInfo) { -
if (userDao.insertSelective(addInfo) == 1) { -
return "添加成功"; -
} -
return "添加失败"; -
} -
@Override -
public List<User> getAll() { -
return userDao.getAll(); -
} -
@Override -
public String delete(int id) { -
if (userDao.deleteByPrimaryKey(id) == 1) { -
return "删除成功"; -
} -
return "删除失败"; -
} -
@Override -
public User findById(int id) { -
return userDao.selectByPrimaryKey(id); -
} -
@Override -
public String update(User addInfo) { -
if (userDao.updateByPrimaryKeySelective(addInfo) == 1) { -
return "更新成功"; -
} -
return "更新失败"; -
} -
@Override -
public User login(User user) { -
return userDao.selectByUsernameAndPassword(user); -
} -
}
13.在controller下创建UserController处理由DispatcherServlet 分发的请求
UserController.java
-
package com.jsx.controller; -
import java.util.List; -
import java.util.UUID; -
import javax.servlet.http.HttpServletRequest; -
import org.springframework.beans.factory.annotation.Autowired; -
import org.springframework.stereotype.Controller; -
import org.springframework.web.bind.annotation.RequestMapping; -
import com.jsx.model.User; -
import com.jsx.service.UserService; -
@Controller -
public class UserController { -
@Autowired -
private UserService userService; -
public UserService getUserService() { -
return userService; -
} -
public void setUserService(UserService userService) { -
this.userService = userService; -
} -
@SuppressWarnings("finally") -
@RequestMapping("addInfo") -
public String add(User user,HttpServletRequest request){ -
try { -
// user.setId(UUID.randomUUID().toString()); -
System.out.println(user.getId() + ":::::" + user.getUsername() + ":::::" + user.getPassword()); -
String str = userService.addInfo(user); -
System.out.println(str); -
request.setAttribute("InfoMessage", str); -
} catch (Exception e) { -
e.printStackTrace(); -
request.setAttribute("InfoMessage", "添加信息失败!具体异常信息:" + e.getMessage()); -
} finally { -
return "result"; -
} -
} -
@RequestMapping("getAll") -
public String getAddInfoAll(HttpServletRequest request){ -
try { -
List<User> list = userService.getAll(); -
System.out.println("------User_list-----"+list.size()); -
request.setAttribute("addLists", list); -
return "listAll"; -
} catch (Exception e) { -
e.printStackTrace(); -
request.setAttribute("InfoMessage", "信息载入失败!具体异常信息:" + e.getMessage()); -
return "result"; -
} -
} -
@SuppressWarnings("finally") -
@RequestMapping("del") -
public String del(int id,HttpServletRequest request){ -
try { -
String str = userService.delete(id); -
request.setAttribute("InfoMessage", str); -
} catch (Exception e) { -
e.printStackTrace(); -
request.setAttribute("InfoMessage", "删除信息失败!具体异常信息:" + e.getMessage()); -
} finally { -
return "result"; -
} -
} -
@RequestMapping("modify") -
public String modify(int id,HttpServletRequest request){ -
try { -
User user = userService.findById(id); -
request.setAttribute("add", user); -
return "modify"; -
} catch (Exception e) { -
e.printStackTrace(); -
request.setAttribute("InfoMessage", "信息载入失败!具体异常信息:" + e.getMessage()); -
return "result"; -
} -
} -
@SuppressWarnings("finally") -
@RequestMapping("update") -
public String update(User user,HttpServletRequest request){ -
try { -
String str = userService.update(user); -
request.setAttribute("InfoMessage", str); -
} catch (Exception e) { -
e.printStackTrace(); -
request.setAttribute("InfoMessage", "更新信息失败!具体异常信息:" + e.getMessage()); -
} finally { -
return "result"; -
} -
} -
@RequestMapping("login") -
public String login(User user,HttpServletRequest request){ -
try { -
System.out.println("------login--qian----"+user.getUsername()+","+user.getPassword()+"."); -
User loginUser = null; -
loginUser=userService.login(user); -
if(loginUser!=null){ -
request.setAttribute("loginUser", loginUser.getUsername()); -
return "index"; -
}else{ -
request.setAttribute("loginUser", "登录失败"); -
return "index"; -
} -
} catch (Exception e) { -
e.printStackTrace(); -
request.setAttribute("InfoMessage", "登录失败!具体异常信息:" + e.getMessage()); -
return "result"; -
} -
} -
}
(连接页面请求和服务层,获取页面请求的参数,通过自动装配,映射不同的URL到相应的处理函数,并获取参数,对参数进行处理,之后传给服务层)
14.创建jsp页面
add.jsp
-
<%@ page language="java" import="java.util.*" pageEncoding="UTF-8"%> -
<!DOCTYPE HTML PUBLIC "-//W3C//DTD HTML 4.01 Transitional//EN"> -
<html> -
<head> -
<title>添加数据</title> -
</head> -
<body> -
<form action="<%=request.getContextPath() %>/addInfo.do" method="post"> -
用户名:<input type="text" name="username"> -
密码:<input type="password" name="password"> -
<input type="submit" value="提交数据"> -
</form> -
</body> -
</html>
index.jsp
-
<%@ page language="java" import="java.util.*" pageEncoding="UTF-8"%> -
<!DOCTYPE HTML PUBLIC "-//W3C//DTD HTML 4.01 Transitional//EN"> -
<html> -
<head> -
<title>My JSP 'index.jsp' starting page</title> -
</head> -
<body> -
<h1>---${loginUser}---</h1> -
<a href="add.jsp">新增数据</a> -
<a href="getAll.do">查看全部数据</a> -
</body> -
</html>
listAll.jsp
-
<%@ page language="java" import="java.util.*" pageEncoding="UTF-8"%> -
<%@taglib prefix="c" uri="http://java.sun.com/jsp/jstl/core" %> -
<% -
String path = request.getContextPath(); -
String basePath = request.getScheme()+"://"+request.getServerName()+":"+request.getServerPort()+path+"/"; -
%> -
<!DOCTYPE HTML PUBLIC "-//W3C//DTD HTML 4.01 Transitional//EN"> -
<html> -
<head> -
<title>所有用户所有信息</title> -
</head> -
<body> -
<h3><center>所有用户所有信息</center></h3> -
<table width="300px" border="1" cellpadding="0" cellspacing="0" align="center"> -
<tr> -
<td>编号</td> -
<td>用户名</td> -
<td>密码</td> -
<td>操作</td> -
</tr> -
<c:forEach var="list" items="${addLists}"> -
<tr> -
<td>${list.id}</td> -
<td>${list.username}</td> -
<td>${list.password}</td> -
<td><a href="modify.do?id=${list.id}">更新</a> <a href="del.do?id=${list.id}">删除</a></td> -
</tr> -
</c:forEach> -
</table> -
</body> -
</html>
login.jsp
-
<%@ page language="java" import="java.util.*" pageEncoding="UTF-8"%> -
<!DOCTYPE HTML PUBLIC "-//W3C//DTD HTML 4.01 Transitional//EN"> -
<html> -
<head> -
<title>用户登录</title> -
</head> -
<body> -
<form action="<%=request.getContextPath() %>/login.do" method="post"> -
用户名:<input type="text" name="username" > -
密码:<input type="password" name="password" > -
<input type="submit" value="登录"> -
</form> -
</body> -
</html>
modify.jsp
-
<%@ page language="java" import="java.util.*" pageEncoding="UTF-8"%> -
<!DOCTYPE HTML PUBLIC "-//W3C//DTD HTML 4.01 Transitional//EN"> -
<html> -
<head> -
<title>修改数据</title> -
</head> -
<body> -
<form action="<%=request.getContextPath() %>/update.do" method="post"> -
用户名:<input type="text" name="username" value="${add.username}"> -
密码:<input type="password" name="password" value="${add.password}"> -
<input type="hidden" name="id" value="${add.id }"> -
<input type="submit" value="提交数据"> -
</form> -
</body> -
</html>
result.jsp
-
<%@ page language="java" import="java.util.*" pageEncoding="UTF-8"%> -
<% -
String path = request.getContextPath(); -
String basePath = request.getScheme()+"://"+request.getServerName()+":"+request.getServerPort()+path+"/"; -
%> -
<!DOCTYPE HTML PUBLIC "-//W3C//DTD HTML 4.01 Transitional//EN"> -
<html> -
<head> -
<title>结果页</title> -
</head> -
<body> -
${InfoMessage} -
<a href="<%=basePath%>">返回首页</a> -
</body> -
</html>


 2650
2650


 被折叠的 条评论
为什么被折叠?
被折叠的 条评论
为什么被折叠?
 到【灌水乐园】发言


