


让两台Web服务器使用同一个数据库来为用户提供discuz的论坛服务
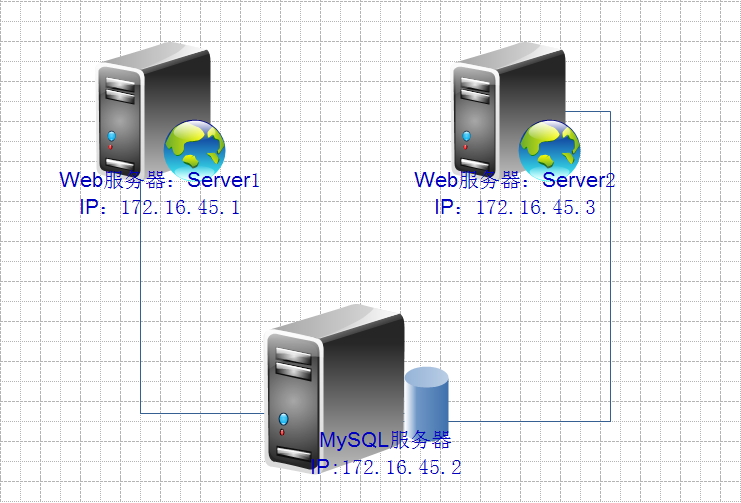
实验环境:
系统: Linux 5.8
所需的rpm包(系统光盘上自带的有):
httpd ,php53, php53-mbsting, php53-mysql, mysql, mysql-server
以及Discuz_7.2_FULL_SC_GBK.zip的源码包
首先请关闭selinux
# setenforce 0
1.在Server1上安装相关的rpm包
# yum -y install httpd php53 php53-mbstring php53-mysql
# /etc/init.d/httpd start
Starting httpd: [ OK ]
# chkconfig httpd on
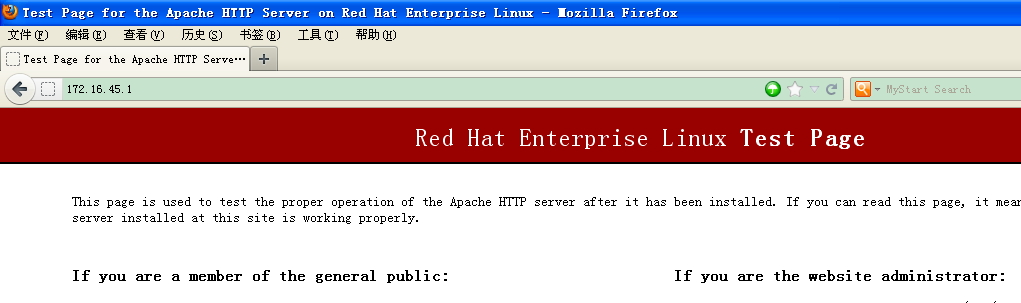
测试apache是否能正常工作
# vi /etc/httpd/conf/httpd.conf
DirectoryIndex index.php -->编辑这一项
# cd /var/www/html/
# vi index.php
phpinfo();
?>
# /etc/init.d/httpd restart
Stopping httpd: [ OK ]
Starting httpd: [ OK ]
测试php页面
2.安装discuz
# unzip Discuz_7.2_FULL_SC_GBK.zip -d /var/www/html/
# cd /var/www/html/
# rm -rf index.php readme utilities
# mv upload/* ./
# setfacl -m u:apache:rwx ./config.inc.php ./p_w_uploads/ ./forumdata/ ./forumdata/cache/ ./forumdata/templates/ ./forumdata/threadcaches/ ./forumdata/logs/ ./uc_client/data/cache/
3.更改php主配置文件
# vi /etc/php.ini
short_open_tag=On
date.timezone=Asia/Shanghai
解决乱码
# vi /etc/httpd/conf/httpd.conf
注释掉: AddDefaultCharsetUTF-8
4. 在172.16.45.2 上安装mysql
# yum -y install mysql mysql-server
# /etc/init.d/mysql start --> 初始化数据库
# mysql
mysql>use mysql 设定当前默认操作的表
Reading table information for completion of table and column names
You can turn off this feature to get a quicker startup with -A
Databasechanged
mysql>SELECThost,user,passwordFROMuser; 查看用户信息
+-----------------------+------+----------+
| host | user|password|
+-----------------------+------+----------+
| localhost | root | |
| station90.example.com | root | |
| 127.0.0.1 | root | |
| localhost | | |
| station90.example.com | | |
+-----------------------+------+----------+
5 rowsinset(0.01 sec)
mysql>UPDATEuserSETpassword=password('redhat')WHEREuser='root'; 为所有root用户更改密码
Query OK, 3 rowsaffected (0.00 sec)
Rowsmatched: 3 Changed: 3 Warnings: 0
mysql>SELECThost,user,passwordFROMuser;
+-----------------------+------+------------------+
| host | user|password|
+-----------------------+------+------------------+
| localhost | root | 27c30f0241a5b69f |
| station90.example.com | root | 27c30f0241a5b69f |
| 127.0.0.1 | root | 27c30f0241a5b69f |
| localhost | | |
| station90.example.com | | |
+-----------------------+------+------------------+
5 rowsinset(0.00 sec)
mysql>DROPUSER''@localhost; 删除匿名用户
Query OK, 0 rowsaffected (0.00 sec)
mysql>DROPUSER''@station90.example.com;
Query OK, 0 rowsaffected (0.00 sec)
mysql>SELECThost,user,passwordFROMuser;
+-----------------------+------+------------------+
| host | user|password|
+-----------------------+------+------------------+
| localhost | root | 27c30f0241a5b69f |
| station90.example.com | root | 27c30f0241a5b69f |
| 127.0.0.1 | root | 27c30f0241a5b69f |
+-----------------------+------+------------------+
3 rowsinset(0.00 sec)
mysql>CREATEDATABASEdiscuz_db; 为discuz创建所需的数据库
Query OK, 1 row affected (0.00 sec)
mysql>GRANTALLONdiscuz_db.*TOdiscuz@'172.16.45.1'IDENTIFIEDBY'redhat'; 为discuz这个用户授权
Query OK, 0 rowsaffected (0.00 sec)
mysql>GRANTALLONdiscuz_db.*TOdiscuz2@'172.16.45.3'IDENTIFIEDBY'redhat'; 为discuz2这个用户授权
Query OK, 0 rowsaffected (0.00 sec)
mysql>FLUSH PRIVILEGES; 更新授权表
Query OK, 0 rowsaffected (0.00 sec)
mysql> \q
Bye
# /etc/init.d/mysqld restart
Stopping MySQL: [ OK ]
Starting MySQL: [ OK ]
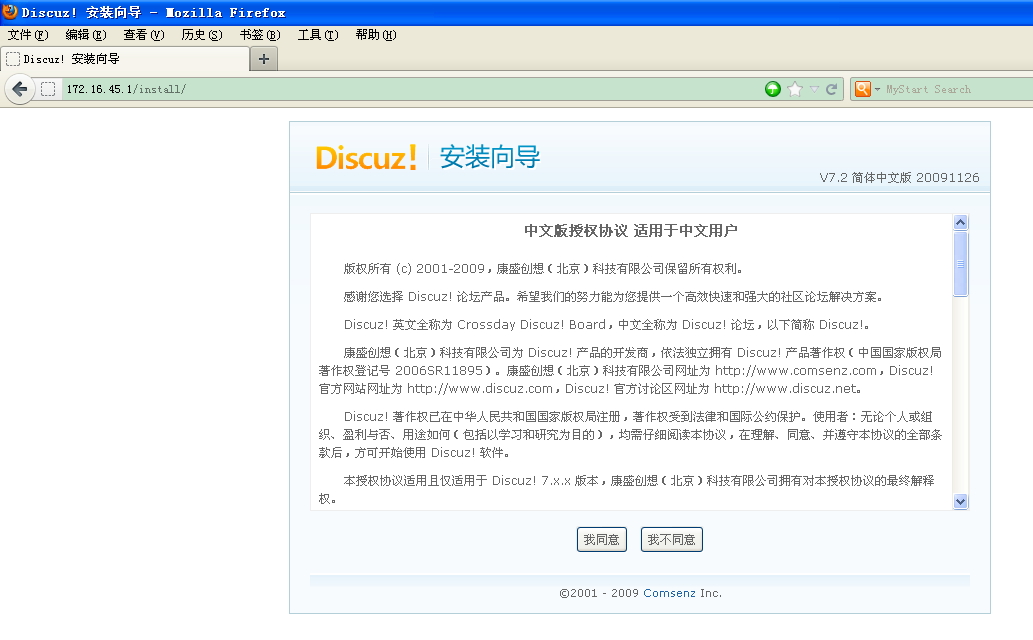
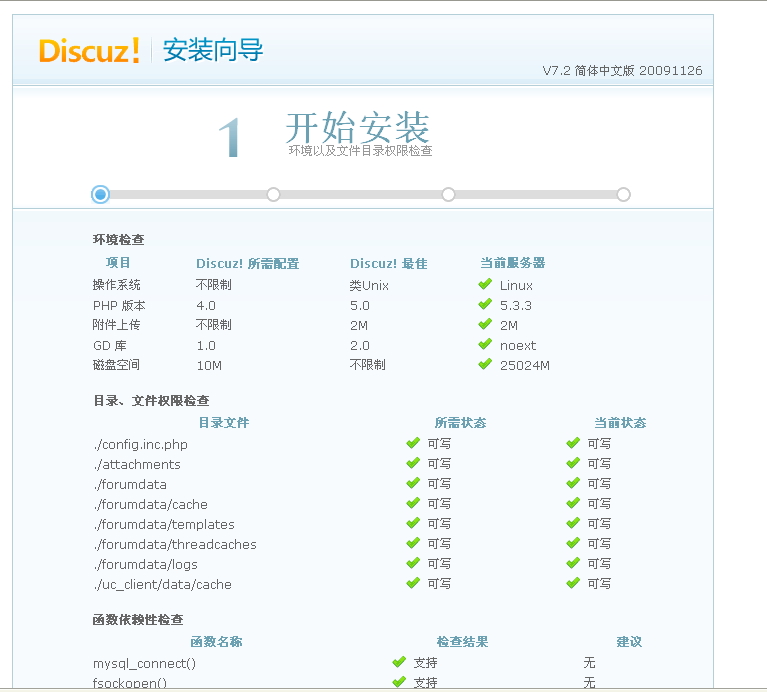
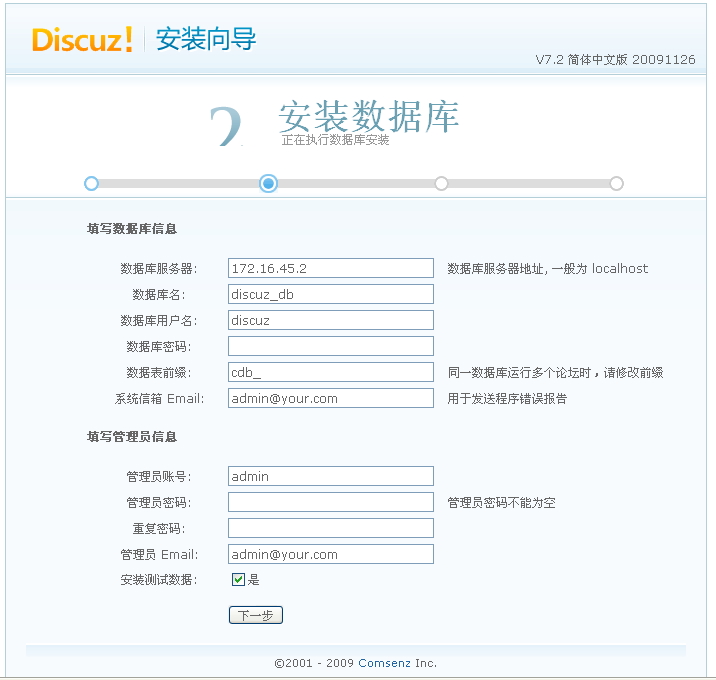
在浏览器中输入:172.16.45.1/install 进入discuz的安装配置界面

5. 按照前面的方法在Server2上安装并配置好httpd、php和discuz
6.在浏览器中输入:172.16.45.3/intsall 安装配置Server2上的discuz
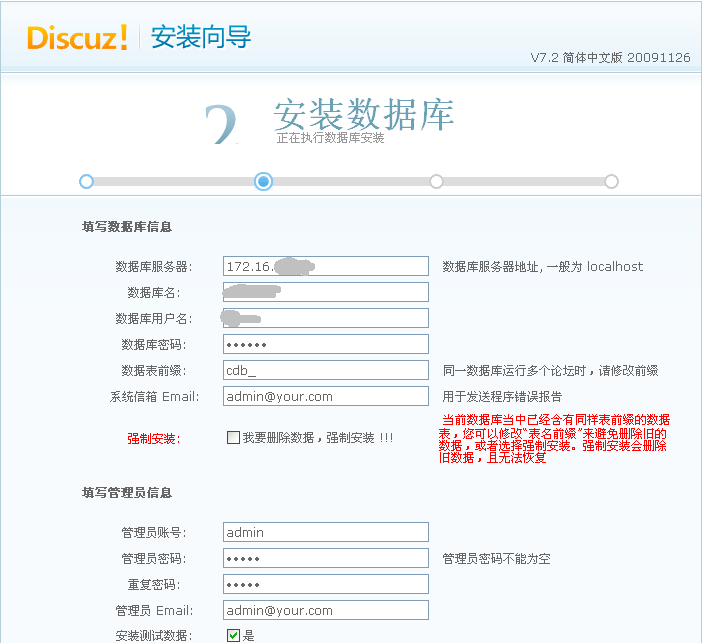
选择强制安装
7.共享172.16.45.1的数据
(1).编辑 /etc/exports
添加:/var/www/html/p_w_uploads 172.16.45.3(ro)
8.在172.16.45.3上挂载共享目录
# mount -t nfs 172.16.45.1:/var/www/html/p_w_uploads /var/www/html/p_w_uploads
开机自动挂载: 编辑/etc/fstab
172.16.45.1:/var/www/html/p_w_uploads /var/www/html/p_w_uploads nfs defaults 0 0
over!


 743
743


 被折叠的 条评论
为什么被折叠?
被折叠的 条评论
为什么被折叠?
 到【灌水乐园】发言


