


 本文介绍了如何通过Oracle的DBLINK连接到MySQL数据库,包括检查Oracle和DBLINK位数、安装ODBC Driver Manager和MySQL ODBC驱动、配置ODBC数据源、设置tnsnames.ora和listener.ora、创建数据库链接,以及解决连接问题的步骤。详细步骤涵盖了从下载组件到验证连接的全过程。
Oracle直连MySQL的方式。
版本信息:
Oracle: 11.2.0.1.0 OS: CentOS 5.9
MySQL: 5.5.27 OS: CentOS 5.8
原理:
Oracle使用DG4ODBC数据网关连接其它非Oracle数据库,其原理图如下:
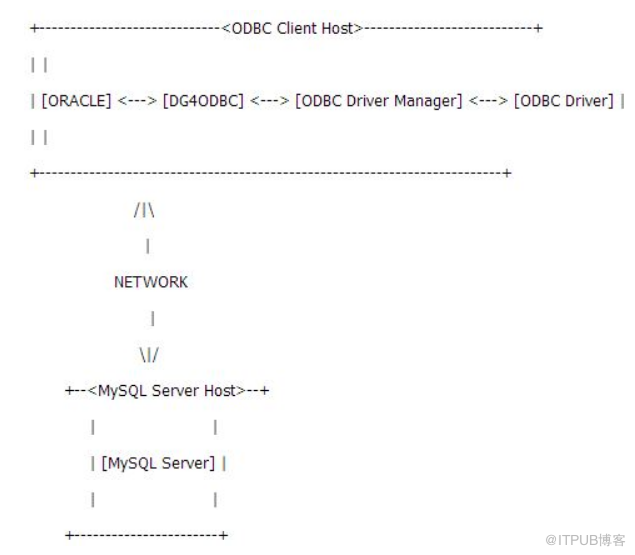
从上图可知,Oracle连接MySQL需要涉及到如下组件:DG4ODBC, ODBC Driver Manager, ODBC Driver,本文将一一讲解它们的配置。
1)判断32位还是64位
因为32位和64位的配置不一样,64位更复杂一些,因此我们首先得确定Oracle和DG4ODBC是32位还是64位:
[oracle@lx16 ~]$ file $ORACLE_HOME/bin/dg4odbc
/home/oracle/app/oracle/product/11.2.0/dbhome_1/bin/dg4odbc: ELF 64-bit LSB executable, AMD x86-64, version 1 (SYSV), for GNU/Linux 2.6.9, dynamically linked (uses shared libs), not stripped
从上面的输出可知是64位。
2)下载并安装ODBC Driver Manager
到这个页面(
http://www.unixodbc.org/download.html)根据你的OS下载unixodbc(注意:版本不能低于2.2.14)
$ wget http://sourceforge.net/projects/unixodbc/files/unixODBC/2.2.14/unixODBC-2.2.14-linux-x86-64.tar.gz/download
解压缩:
$ tar -zxvf unixODBC-2.2.14-linux-x86-64.tar.gz
解压缩后会在当前目录下自动创建usr的目录,我们创建一个目录(~/app/unixodbc-2.2.14)用于放置unixodbc,然后把usr 迁移到该目录下:
$ mkdir ~/app/unixodbc-2.2.14
$ mv usr ~/app/unixodbc-2.2.14
3)下载并按照ODBC Driver for MySQL
$ wget http://dev.mysql.com/get/Downloads/Connector-ODBC/5.2/mysql-connector-odbc-5.2.5-linux-glibc2.5-x86-64bit.tar.gz/from/http://cdn.mysql.com/
$ tar -zxvf mysql-connector-odbc-5.2.5-linux-glibc2.5-x86-64bit.tar.gz
解压缩成功后是一个文件夹,把该文件夹迁移至~/app目录下,并给它创建一个软链接:
$ mv mysql-connector-odbc-5.2.5-linux-glibc2.5-x86-64bit ~/app
$ cd ~/app
$ ln -s mysql-connector-odbc-5.2.5-linux-glibc2.5-x86-64bit myodbc-5.2.5
4)配置ODBC Driver
在~/etc目录下创建odbc.ini如下:
[myodbc5]
Driver = /home/oracle/app/myodbc-5.2.5/lib/libmyodbc5w.so
Description = Connector/ODBC 5.2 Driver DSN
SERVER = 192.168.1.15
PORT = 3306
USER = mysql_user
PASSWORD = mysql_pwd
DATABASE = mysql_db
OPTION = 0
TRACE = OFF
其中,Driver指向第3步上按照的ODBC Driver,这里要特别注意:MySQL的Datbase是大小写敏感的。
5)验证ODBC连接
$ export ODBCINI=/home/oracle/etc/odbc.ini
$ export LD_LIBRARY_PATH=/home/oracle/app/unixodbc-2.2.14/usr/local/lib:$LD_LIBRARY_PATH
$ cd ~/app/unixodbc-2.2.14/usr/local/bin
$ ./isql myodbc5 -v
+---------------------------------------+
| Connected! |
| |
| sql-statement |
| help [tablename] |
| quit |
| |
+---------------------------------------+
上面显示连接成功。
6)配置tnsnames.ora
myodbc5 =
(DESCRIPTION=
(ADDRESS=
(PROTOCOL=TCP) (HOST=localhost) (PORT=1521)
)
(CONNECT_DATA=
(SID=myodbc5)
)
(HS=OK)
)
7)配置listener.ora
SID_LIST_LISTENER=
(SID_LIST=
(SID_DESC=
(SID_NAME=myodbc5)
(ORACLE_HOME=/home/oracle/app/oracle/product/11.2.0/dbhome_1)
(PROGRAM=dg4odbc)
(ENVS=LD_LIBRARY_PATH=/home/oracle/app/unixodbc-2.2.14/usr/local/lib:/home/oracle/app/oracle/product/11.2.0/dbhome_1/lib)
)
)
如上所示,为了避免和其它已存在的ODBC Driver Manager冲突,强烈设置LD_LIBRARY_PATH在listener.ora
8)创建
init.ora文件
创建文件$ORACLE_HOME/hs/admin/initmyodbc5.ora,内容如下:
HS_FDS_CONNECT_INFO=myodbc5 # Data source
name
in
odbc.ini
HS_FDS_SHAREABLE_NAME=/home/oracle/app/unixodbc-2.2.14/usr/
local
/lib/libodbc.so
HS_FDS_SUPPORT_STATISTICS=
FALSE
HS_LANGUAGE=AMERICAN_AMERICA.WE8ISO8859P15
# ODBC env variables
set
ODBCINI=/home/oracle/etc/odbc.ini
9)使上述配置文件生效
$ lsnrctl reload
$ lsnrctl status
Service
"myodbc5"
has 1 instance(s).
Instance
"myodbc5"
, status UNKNOWN, has 1 handler(s)
for
this service...、
10)验证配置是否正确
$ tnsping myodbc5
TNS Ping Utility
for
Linux: Version 11.2.0.1.0 - Production
on
29-AUG-2013 10:54:46
Copyright (c) 1997, 2009, Oracle.
All
rights reserved.
Used parameter files:
/home/oracle/app/oracle/product/11.2.0/dbhome_1/network/admin/sqlnet.ora
Used TNSNAMES adapter
to
resolve the alias
Attempting
to
contact (DESCRIPTION= (ADDRESS= (PROTOCOL=TCP) (HOST=localhost) (PORT=1521)) (CONNECT_DATA= (SID=myodbc5)) (HS=OK))
OK (0 msec)
11)创建dblink
SQL>
create
public
database
link mysqltest
connect
to
"mysql_user"
identified
by
"mysql_pwd"
using
'myodbc5'
;
SQL>
select
count
(*)
from
trans_expert_map@mysqltest;
COUNT
(*)
----------
371
Detailed Overview of Connecting Oracle to MySQL Using DG4ODBC Database Link (文档 ID 1320645.1)
In this Document
APPLIES TO:
MySQL Connectors - Version 3.51 to 6.8 [Release 3.51 to 6.8]
Oracle Database - Enterprise Edition - Version 11.1.0.6 to 12.1.0.2 [Release 11.1 to 12.1]
MySQL Server - Version 5.5 to 5.7 [Release 5.5 to 5.7]
Information in this document applies to any platform.
ODBC, UnixODBC, DG4ODBC, MySQL, ODBCINI, Database Link
GOAL
How to connect Oracle to MySQL Server through ODBC database link
SOLUTION
Oracle database server uses DG4ODBC as the data gateway for connecting
to non-Oracle RDBMS. This requires the proper setup for all components
involved in transferring data from Oracle to MySQL and back. These
components interact with each other in the following way:
+--------------------------------------------------------+
| |
| [ORACLE] [DG4ODBC] [ODBC Driver Manager] [ODBC Driver] |
| |
+--------------------------------------------------------------------------+
/|\
|
NETWORK
|
\|/
+----+
| |
| [MySQL Server] |
| |
+-----------------------+
In this article we will configure each component and diagnose problems
that are most likely to be encountered during the setup process. NOTE:
There are few articles in the internet that skip [ODBC Driver Manager]
and connect directly [DG4ODBC] [ODBC Driver]. It might
work for some
drivers such as DataDirect or specific configurations, but beware that
MySQL [ODBC Driver] (versions 3.51.x and 5.1.x) is not supposed to be
loaded directly. The recommended driver manager is UnixODBC v.2.2.14 or
newer. Configuring ODBC connections in 32-bit OS might be slightly
easier than in 64-bit OS. The latter can execute 32 and 64-bit code and
more attention must be paid to the components versions. In other words,
when configuring ODBC you cannot mix 32-bit and 64-bit components within
the Client Host
 最低0.47元/天 解锁文章


 1400
1400


 被折叠的 条评论
为什么被折叠?
被折叠的 条评论
为什么被折叠?
 到【灌水乐园】发言


