


如果您在工作单位使用的是笔记本,而且常常要带着笔记本到处跑,那么总是需要修改网卡参数。而且每到一个新的地方,就需要问清楚该地方的服务器所提供烦人网络参数,对于这种情况,动态主机设置协议DHCP就可以派上用场了。DHCP服务器可以给客户端自动分配IP与相关的网络参数,并可以让客户端自动以主机提供的参数设置其网络,用户只要将自己的笔记本设置好,经由DHCP取得网络参数后,插上网线即可享受Internet的服务,以下就是我配置DHCP服务器的过程与步骤:
1.场景
某单位需要配置一台 DHCP 服务器给桌面 PC 机分配 IP 地址。
这些 PC 机分配到三个 VLAN 中
网络IP 地址范围网关备注
VLAN1192.168.181.91-192.168.181.253/24
排除 192.168.181.150 到 192.168.181.159192.168.181.1
VLAN2192.168.182.100-192.168.182.253/24192.168.182.1
VLAN3192.168.183.100-192.168.183.253/24192.168.183.1
DHCP 服务器 IP 地址为 192.168.181.11。
此单位的 DNS 服务器的地址为 192.168.181.11、192.168.181.12
需要将 192.168.181.111 保留给无法配置静态 IP 地址的打印机,其 MAC 地址为:
00:40:95:30:43:B4
2. 实验环境
2.1. 网络配置
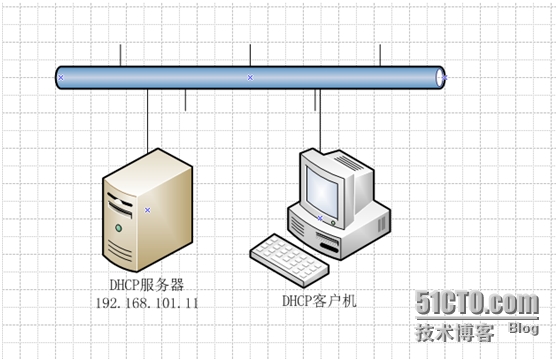
上图的DHCP服务器IP应为192.168.181.11
为了避免实验用的 DHCP 服务器对现有网络的影响。在 VMware Workstation 环境中,可
以将 DHCP 服务器及客户机的网络配置为仅主机(Host Only)模式。同时禁用此网络上的
DHCP 功能,具体操作如下:
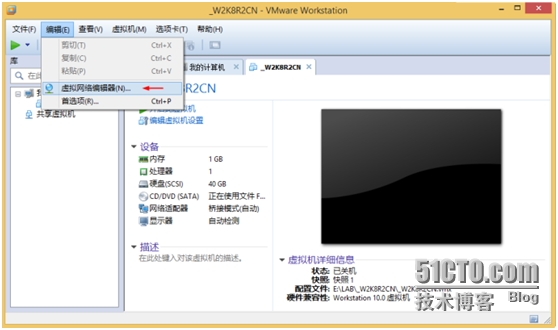
进入虚拟网络编辑器。
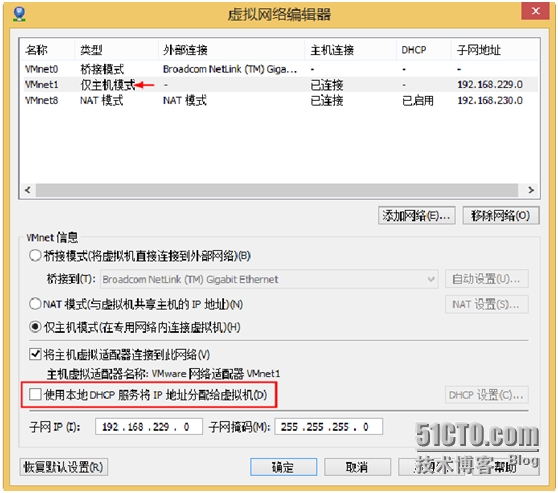
在网络连接中选择 VMnet1(仅主机模式) ,清除使用本地 DHCP 服务将 IP 地址分配给
虚拟机复选框。
2.2. 服务器安装
根据《01 RHEL 安装-文本最小化安装.docx》进行的最小化安装。
安装了 core 及 base 两个组。# cat /etc/redhat-release
Red Hat Enterprise Linux Server release 6.4 (Santiago)
# uname -a
Linux localhost.localdomain 2.6.32-358.el6.x86_64 #1 SMP Tue Jan 29
11:47:41 EST 2013 x86_64 x86_64 x86_64 GNU/Linux
2.3. 服务器基本配置
修改 IP 地址。 (注意:根据您的实现环境进行配置)# vi /etc/sysconfig/network-scripts/ifcfg-eth0
DEVICE=eth0
TYPE=Ethernet
ONBOOT=yes
NM_CONTROLLED=yes
BOOTPROTO=static
IPADDR=192.168.181.11
NETMASK=255.255.255.0
GATEWAY=192.168.181.1
# service network restart
为了方便实验,将防火墙关闭。# service iptables stop
# chkconfig iptables off
同时关闭 selinux(这个事比较重要的,如果不关闭,会有许多实验不能完成)。
# vi /etc/sysconfig/selinux
# This file controls the state of SELinux on the system.
# SELINUX= can take one of these three values:
# enforcing - SELinux security policy is enforced.
# permissive - SELinux prints warnings instead of enforcing.
# disabled - No SELinux policy is loaded.
#SELINUX=enforcing
SELINUX=disabled
# SELINUXTYPE= can take one of these two values:
# targeted - Targeted processes are protected,
# mls - Multi Level Security protection.
SELINUXTYPE=targeted
重新启动以便生效。
# reboot
3. DHCP 服务器安装与配置
3.1. 安装 DHCP 服务器组件# mkdir /mnt/cdrom
# mount /dev/cdrom /mnt/cdrom/
mount: block device /dev/sr0 is write-protected, mounting read-only
# cd /mnt/cdrom/Packages/
# ls dhcp*
dhcp-4.1.1-34.P1.el6.x86_64.rpm
dhcp-common-4.1.1-34.P1.el6.x86_64.rpm
# rpm -Uvh dhcp-4.1.1-34.P1.el6.x86_64.rpm
error: Failed dependencies:
portreserve is needed by dhcp-12:4.1.1-34.P1.el6.x86_64
解决包的依赖性
# rpm -Uvh dhcp-4.1.1-34.P1.el6.x86_64.rpm \
portreserve-0.0.4-9.el6.x86_64.rpm
Preparing... ########################### [100%]
1:portreserve ########################### [ 50%]
2:dhcp ########################### [100%]
3.2. 考察配置文件
查看配置文件# rpm -qc dhcp
/etc/dhcp/dhcpd.conf
/etc/dhcp/dhcpd6.conf
/etc/openldap/schema/dhcp.schema
/etc/portreserve/dhcpd
/etc/sysconfig/dhcpd
/etc/sysconfig/dhcpd6
/etc/sysconfig/dhcrelay
/var/lib/dhcpd/dhcpd.leases
/var/lib/dhcpd/dhcpd6.leases
其中,/etc/dhcp/dhcpd.conf 为主配置文件。
# cd /etc/dhcp/
# ls
dhclient.d dhcpd6.conf dhcpd.conf
# cat dhcpd.conf
#
# DHCP Server Configuration file.
# see /usr/share/doc/dhcp*/dhcpd.conf.sample
# see 'man 5 dhcpd.conf'
#
/usr/share/doc/dhcp*/dhcpd.conf.sample 是示例文件
3.3. 配置 DHCP 服务器
编辑配置文件 dhcpd.conf。 为了简化操作, 可以先将原配置文件中的信息全部删除。
# vi /etc/dhcp/dhcpd.conf
option domain-name "abc.local";
option domain-name-servers 192.168.181.11, 192.168.181.12;
default-lease-time 600;
max-lease-time 7200;
subnet 192.168.181.0 netmask 255.255.255.0 {
range dynamic-bootp 192.168.181.91 192.168.181.149;
range dynamic-bootp 192.168.181.160 192.168.181.253;
option routers 192.168.181.1;
}
subnet 192.168.182.0 netmask 255.255.255.0 {
range dynamic-bootp 192.168.182.100 192.168.182.253;
option routers 192.168.102.1;
}
subnet 192.168.183.0 netmask 255.255.255.0 {
range dynamic-bootp 192.168.183.100 192.168.183.253;
option routers 192.168.183.1;
}
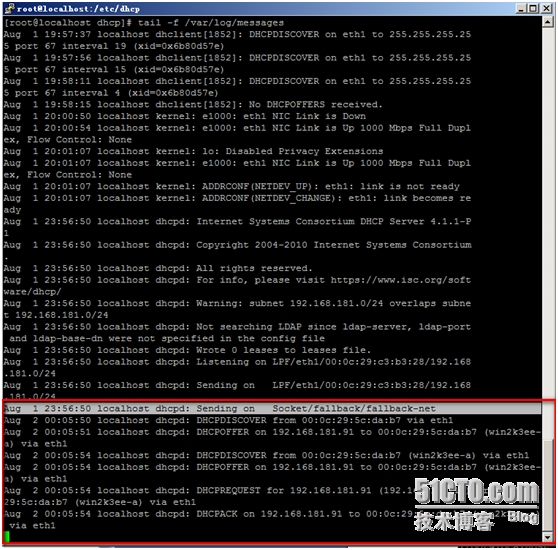
新开一个会话,通过 tail -f 命令观察日志:
# tail -f /var/log/messages
启动服务。
# service dhcpd start
Starting dhcpd: [ OK ]
查看日志,会看以下信息:
Internet Systems Consortium DHCP Server 4.1.1-P1
Copyright 2004-2010 Internet Systems Consortium.
All rights reserved.
For info, please visit https://www.isc.org/software/dhcp/
Not searching LDAP since ldap-server, ldap-port and ldap-base-dn were not specified in the configfile
Wrote 0 leases to leases file.
Listening on LPF/eth0/00:50:56:b2:32:e5/192.168.101.0/24
Sending on LPF/eth0/00:50:56:b2:32:e5/192.168.101.0/24
Sending on Socket/fallback/fallback-net
配置服务自动启动。
# chkconfig dhcpd on
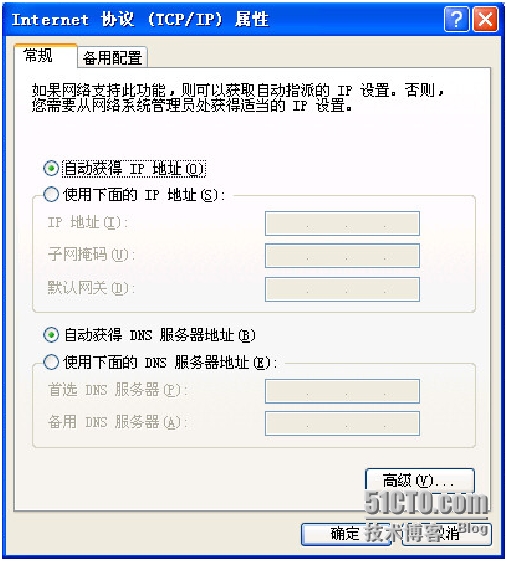
3.4. 配置 DHCP 客户机
以 XP 为例,设置 IP 地址为自动获得

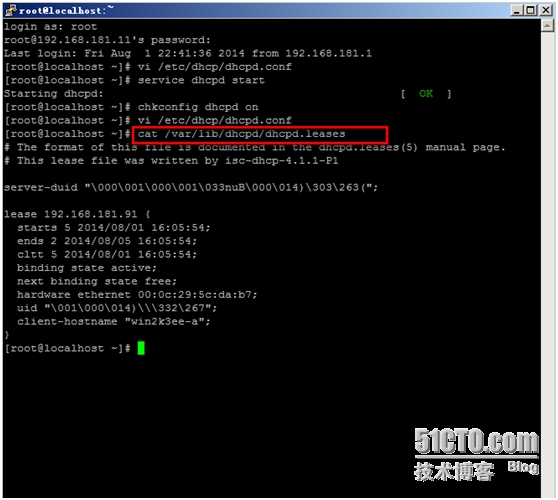
查看地址租用信息
# cat /var/lib/dhcpd/dhcpd.leases
4. 排错
4.1. 查看日志
DHCP 服务器常见错误是由于配置文件的书写造成的。所以需要通过查看日志来判断错
误的原因。
Internet Systems Consortium DHCP Server 4.1.1-P1
Copyright 2004-2010 Internet Systems Consortium.
All rights reserved.
For info, please visit https://www.isc.org/software/dhcp/
/etc/dhcp/dhcpd.conf line 2: expecting a parameter or declaration
max-lease-time 518400;
^
/etc/dhcp/dhcpd.conf line 4: semicolon expected.
domain-name-servers 192.168.181.11
^
/etc/dhcp/dhcpd.conf line 5: semicolon expected.
ddns-ddns-update-style interim;
^
Configuration file errors encountered -- exiting
This version of ISC DHCP is based on the release available
on ftp.isc.org. Features have been added and other changes
have been made to the base software release in order to make
it work better with this distribution.
Please report for this software via the Red Hat Bugzilla site:
http://bugzilla.redhat.com
exiting.
4.2. 使用 tcpdump
通过 tcpD
# tcpdump port 67 and 68
如果希望查看更多的信息,可使用以下命令:
# tcpdump -vvv port 67 and 68


 1536
1536


 被折叠的 条评论
为什么被折叠?
被折叠的 条评论
为什么被折叠?
 到【灌水乐园】发言


