


类似极验的滑块验证码,要实现的功能就是设定一个按钮,将预先绘制好的方块图跟着按钮滑动事件一起移动,最终将方块图移动至指定区域,以达到完美契合的效果。Github 源码链接放在了文末的扩展链接中,有需要的可以看看。主要实现的功能逻辑:
- 设定按钮,绑定滑动事件
- 绘制方块,并结合按钮事件进行移动
- 方块图移动后的位置校验

验证码的最终效果
绘制背景图
直接调用 Canvas 的 drawImage 方法进行绘制。为了避免跨域问题,统一将图片转成 base64,当然也可以采用 xhr 异步请求的方式(一下 size / _background 为 data 中定义的变量)。
imageToBase64(callback: Function) { const elem = new Image() const canvas = document.createElement('canvas') const ctx = canvas.getContext('2d') canvas.width = this.size.width canvas.height = this.size.height elem.crossOrigin = '' elem.src = this._background elem.onload = () => { ctx.drawImage( elem, 0, 0, this.size.width, this.size.height ) this._background = canvas.toDataURL() if (callback) callback.apply(this) }}转成 base64 后,赋予 _background 变量后,再进行图片绘制工作。必须在 onload 事件内调用,避免未加载完成前执行了一些不该执行的操作。
const elem = new Image()elem.src = this._backgroundelem.onload = () => this.initImage(elem)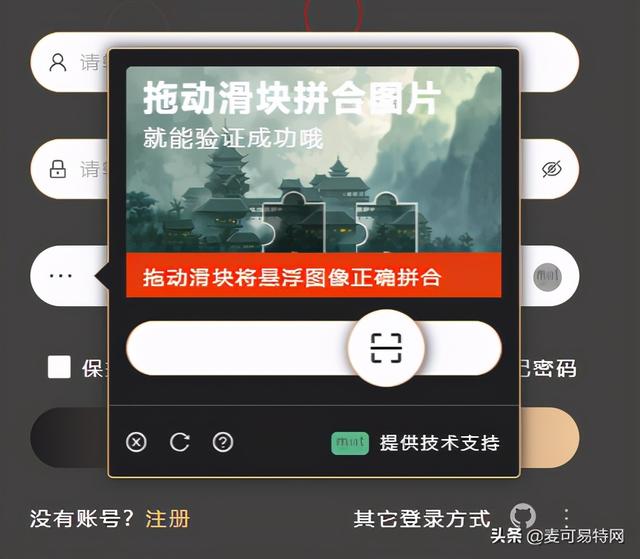
验证不通过的效果(带震动)
绘制方块
结合 Canvas 的 arc 方法来绘制不规则的方块。需要绘制两个,一个作为校验的基准方块,一个作为移动的方块。基准校验的方块,固定不动,直接绘制到背景图中即可,而移动的方块则需要裁剪出方块内容,绘制到另外一个 Canvas 中,与背景图所在的 Canvas 相互叠加。
// 此处绘制的方块,top 和 right 两个方向的半圆不固定,// 可通过传参的形式来生成不同的方块,而 left 和 bottom// 两个方向则固定,皆为向内凹的半圆drawBlock( ctx: CanvasRenderingContext2D, direction: any = {}, operation: string) { ctx.beginPath() ctx.moveTo(this.coordinate.x, this.coordinate.y) const direct = direction.direction const type = direction.type /** top */ if (direct === 'top') { ctx.arc( this.coordinate.x + this.block.size / 2, this.coordinate.y, this.block.radius, -this.block.PI, 0, type === 'inner' ) } ctx.lineTo(this.coordinate.x + this.block.size, this.coordinate.y) /** right */ if (direct === 'right') { ctx.arc( this.coordinate.x + this.block.size, this.coordinate.y + this.block.size / 2, this.block.radius, 1.5 * this.block.PI, 0.5 * this.block.PI, type === 'inner' ) } ctx.lineTo(this.coordinate.x + this.block.size, this.coordinate.y + this.block.size) /** bottom */ ctx.arc( this.coordinate.x + this.block.size / 2, this.coordinate.y + this.block.size, this.block.radius, 0, this.block.PI, true ) ctx.lineTo(this.coordinate.x, this.coordinate.y + this.block.size) /** left */ ctx.arc( this.coordinate.x, this.coordinate.y + this.block.size / 2, this.block.radius, 0.5 * this.block.PI, 1.5 * this.block.PI, true ) ctx.lineTo(this.coordinate.x, this.coordinate.y) ctx.shadowColor = 'rgba(0, 0, 0, .001)' ctx.shadowBlur = 20 ctx.lineWidth = 1.5 ctx.fillStyle = 'rgba(0, 0, 0, .4)' ctx.strokeStyle = 'rgba(255, 255, 255, .8)' ctx.stroke() ctx.closePath() ctx[operation]()}方块定位
Canvas 区域大小固定,随机生成两个区域内的点作为方块绘制的原点(x,y),并将该原点记录,便于后面的校验,再调用上述的方块绘制方法进行绘制。
drawBlockPosition() { const x = this.$tools.randomNumberInRange( this.block.real + 20, this.size.width - (this.block.real + 20) ) const y = this.$tools.randomNumberInRange(55, this.size.height - 55) const direction = this.drawBlockDirection() this.coordinate.x = x this.coordinate.y = y // 需要绘制两个方块 // 一个为 fill // 一个为 clip this.drawBlock(this.ctx.image, direction, 'fill') this.drawBlock(this.ctx.block, direction, 'clip')}绘制整体效果
方块绘制的方式确定后,在第一步中背景图加载完成,onload 事件中调用方块定位方法,该方法内再调用方块绘制方法(其内包含两个 Canvas,即代码中的 this.ctx.image 和 this.ctx.block,注意先后顺序,如下分别以 image 和 block 代表 2 个不同的 Canvas):
- 先绘制背景图(image)
- 再绘制背景图中的说明文字(image)
- 设置图层叠加关系(block)
- 接着绘制两个方块(image & block)
- 再次绘制背景图(block)
- 定位方块位置
- 抠取指定区域的内容(block)
- 重设 Canvas 大小(block)
- 再次绘制抠取的内容(block)
initImage(elem: HTMLElement) { if ( this.ctx.image && this.ctx.block ) { /** image */ this.ctx.image.drawImage( elem, 0, 0, this.size.width, this.size.height ) /** text */ this.ctx.image.beginPath() this.ctx.image.fillStyle = '#FFF' this.ctx.image.shadowColor = 'transparent' this.ctx.image.shadowBlur = 0 this.ctx.image.font = 'bold 24px MicrosoftYaHei' this.ctx.image.fillText('拖动滑块拼合图片', 12, 30) this.ctx.image.font = '16px MicrosoftYaHei' this.ctx.image.fillText('就能验证成功哦', 12, 55) this.ctx.image.closePath() /** block */ this.ctx.block.save() this.ctx.block.globalCompositeOperation = 'destination-over' this.drawBlockPosition() this.ctx.block.drawImage( elem, 0, 0, this.size.width, this.size.height ) /** image data */ const coordinateY = this.coordinate.y - this.block.radius * 2 + 1 const imageData = this.ctx.block.getImageData( this.coordinate.x, coordinateY, this.block.real, this.block.real ) const block = this.$refs[selectors.block] block.width = this.block.real this.ctx.block.putImageData( imageData, this.coordinate.offset, coordinateY ) this.ctx.block.restore() this.loading = false }}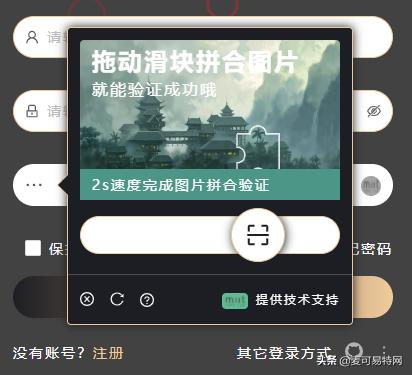
验证通过的效果
滑动效果
滑动效果相对就更好实现了,绑定相应的按下,移动,弹起等事件即可。比如 pointerdown,touchstart,pointermove,touchmove,pointerup,touchend 等。
this.$tools.on(this.elements.slider, 'pointerdown', this.dragStart)this.$tools.on(this.elements.slider, 'touchstart', this.dragStart)this.$tools.on(this.elements.slider, 'pointermove', this.dragMoving)this.$tools.on(this.elements.slider, 'touchmove', this.dragMoving)this.$tools.on(this.elements.slider, 'pointerup', this.dragEnd)this.$tools.on(this.elements.slider, 'touchend', this.dragEnd)// dragStart 主要是完成初始定位dragStart(event: any) { const x = event.clientX || event.touches[0].clientX const sliderRef = this.$refs[selectors.slider] const sliderBtnRef = this.$refs[`${selectors.slider}-btn`] const sliderRect = this.getBoundingClientRect(sliderRef) const sliderBtnRect = this.getBoundingClientRect(sliderBtnRef) this.drag.originX = Math.round(sliderRect.left * 10) / 10 this.drag.originY = Math.round(sliderRect.top * 10) / 10 this.drag.offset = Math.round((x - sliderBtnRect.left) * 10) / 10 this.drag.moving = true this.time.start = Date.now()}// dragMoving 实时更新移动dragMoving(event: any) { if (!this.drag.moving || this.check.being) return const x = event.clientX || event.touches[0].clientX const moveX = Math.round((x - this.drag.originX - this.drag.offset) * 10) / 10 if (moveX < 0 || moveX + 54 >= this.size.width) { this.checkVerificationCode() return false } this.elements.slider.style.left = `${moveX}px` this.elements.block.style.left = `${moveX}px` this.check.value = moveX}// dragEnd 弹起事件的后续处理(校验)dragEnd() { if (!this.drag.moving) return this.time.end = Date.now() this.checkVerificationCode()}结果校验
验证码的校验,根据方块定位中生成的原点(x,y)进行匹配校验,误差在 1 个像素内即可。此处可以加入远程校验,比如在验证码初始化的时候就生成一个对应的 key 值,位置校验通过后再进行该 key 值的校验,双重保障。
async checkVerificationCode() { const coordinateX = Math.round(this.check.value + this.coordinate.offset) if (this.check.being) return this.check.being = true const error = (msg = null) => { setTimeout(() => { this.dragReset() }, 1000) this.check.num++ this.check.correct = false if (msg) this.check.tip = msg } if ( this.coordinate.x - 1 <= coordinateX && this.coordinate.x + 1 >= coordinateX ) { const key = this.$storage.get(this.$g.caches.storages.captcha.login) await this.$http.post(this.action ?? this.api.captcha.verification, {key}).then((res: any) => { if (res.ret.code === 1) { const taking = Math.round(((this.time.end - this.time.start) / 10)) / 100 this.check.tip = `${taking}s速度完成图片拼合验证` this.check.correct = true setTimeout(() => { this.close('success', res.data) }, 600) } else error(res.ret.message) }).catch((err: any) => { error(err.message) }) } else error() this.$refs[selectors.result].style.bottom = 0 if (this.check.num <= this.check.tries) this.check.show = true setTimeout(() => { this.drag.moving = false this.$refs[selectors.result].style.bottom = '-32px' }, 1000) setTimeout(() => { this.check.show = false this.check.being = false if (this.check.num >= this.check.tries) this.close('frequently') }, 1600)}总结
主要的功能点差不多已经完成了,最后再加上 props 相关的一些自定义参数,比如背景图 background 等,这样定制性就更好了。


 2901
2901

 被折叠的 条评论
为什么被折叠?
被折叠的 条评论
为什么被折叠?
 到【灌水乐园】发言


