auto关键字
1 auto关键字被赋予的新含义
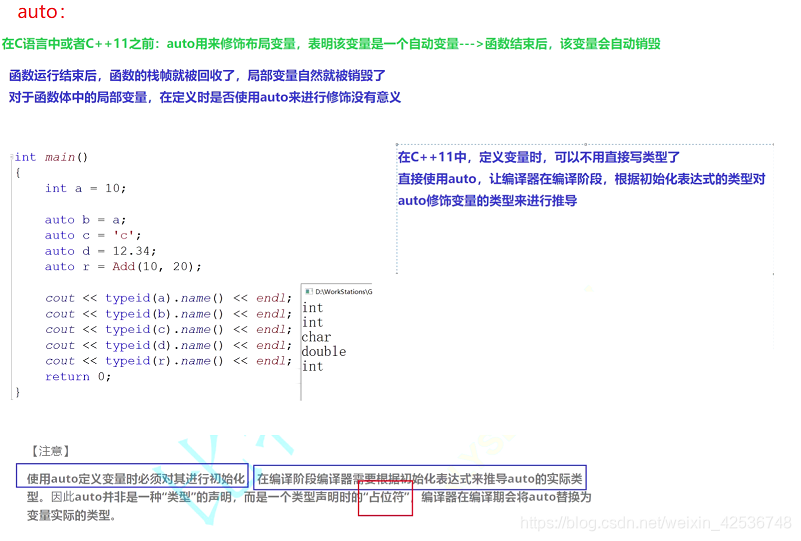
在c/c++11之前,auto用来修饰局部变量,表明该变量是一个自动变量,函数结束后该变量销毁。
C++11中,赋予auto全新的含义。即:auto不再是一个存储类型指示符,而是作为一个新的类型指示符来指示编译器,auto声明的变量必须由编译器在编译时期推导而得。
- 1、根据初始化表达式自动推导实际数据类型;
- 2、一定要对其进行初始化。
#if 0
int Add(int left, int right)
{
	return left + right;
}

int main()
{
	int a = 10;

	auto b = a;
	auto c = 'c';
	auto d = 12.34;
	auto r = Add(10, 20);

	cout << typeid(a).name() << endl;
	cout << typeid(b).name() << endl;
	cout << typeid(c).name() << endl;
	cout << typeid(d).name() << endl;
	cout << typeid(r).name() << endl;

	auto aa;//必须进行初始化
	return 0;
}
#endif
注意:使用auto定义变量时必须对其进行初始化,在编译阶段编译器需要根据初始化表达式来推导auto的实际类型。
因此,auto并非是一种“类型”的声明,而是一个类型声明时的“占位符”,编译器在编译期会将auto替换为变量实际的类型。
auto关键字修饰的变量,具有自动存储器的局部变量。

2 auto使用规则
- 1、用auto声明指针类型时,用auto和auto*没有任何区别;
- 2、用auto声明引用类型时则必须加&。
2.1 auto和指针结合使用 —都一样
#if 0
int main()
{
	int a = 10;

	auto* pa1 = &a;
	auto  pa2 = &a;

	// pa1和pa2最终打印的都是int*
	// auto定义指针类型变量时,加*和不加* 没有区别
	cout << typeid(pa1).name() << endl;
	cout << typeid(pa2).name() << endl;

	return 0;
}
#endif
2.2 auto和引用结合使用 —要加&区分
#if 0
int main()
{
	int b = 10;
	// rb1是新定义了一个整形的变量
	auto rb1 = b;  //rb1的地址和b的地址不一样
	// rb2是b的别名
	auto& rb2 = b; //rb2的地址和b的地址一样

	// 使用auto来定义引用类型变量时,必须要分&的标记,不加就定义了一个新的变量,加了就是引用
	cout << typeid(rb1).name() << endl;
	cout << typeid(rb2).name() << endl;

	auto  a1 = 10, a2 = 20;

	//auto b1 = 10, b2 = 12.34;
	return 0;
}
#endif
2.3 auto可以定义多个变量–必须同一类型
#if 0
int main()
{
	auto  a1 = 10, a2 = 20;
	//auto b1 = 10, b2 = 12.34;//错误
	return 0;
}
#endif
3 auto不能使用的场景
3.1 auto不能作为函数的参数
原因:
并不是所有的参数都有初始化表达式,因此编译器无法推演a的实际类型
#if 0
void TestAuto(auto a)
{
	printf("%d", a);
}

int main()
{
	return 0;
}
#endif
3.2 auto不能直接来声明数组
#if 0
int main()
{
	//根据类型给数组开辟空间
	int array1[] = { 1, 2, 3 };
	auto array2[] = { 3, 4, 5 };
	return 0;
}
#endif
4 auto的使用场景
4.1 复杂类型的推演
#if 0
#include <map>
#include <string>
int main()
{
	std::map<std::string, std::string> m{ { "apple", "苹果" }, {"orange","橙子"} };

	std::map<std::string, std::string>::iterator it1 = m.begin();
	auto it2 = m.begin();
	return 0;
}
#endif
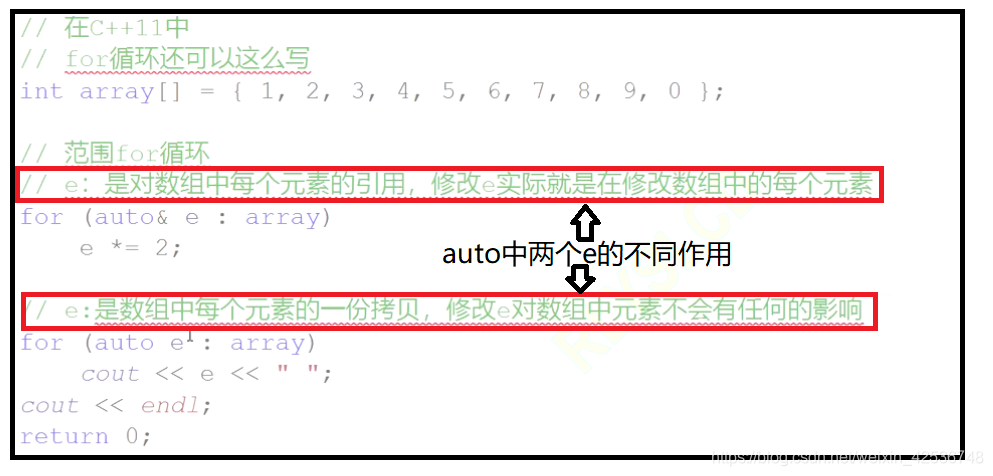
4.2 范围for循环
给数组中的每个元素乘2:
常规代码:
#if 0
int main()
{
	int a1[] = { 1, 2, 3, 4, 5, 6, 7, 8, 9, 0 };

	for (int i = 0; i < sizeof(a1) / sizeof(a1[0]); ++i)
		a1[i] *= 2;

	for (int i = 0; i < sizeof(a1) / sizeof(a1[0]); ++i)
		cout << a1[i] << " ";
	cout << endl;
	return 0;
}
#endif
auto优化后代码:
#if 0
auto在for循环中的使用
int main()
{
	// 在C++11中
	// for循环还可以这么写
	int array[] = { 1, 2, 3, 4, 5, 6, 7, 8, 9, 0 };

	// 范围for循环
	for (auto& e : array)
		e *= 2;

	for (auto e : array)
		cout << e << " ";
	cout << endl;

	return 0;
}
#endif

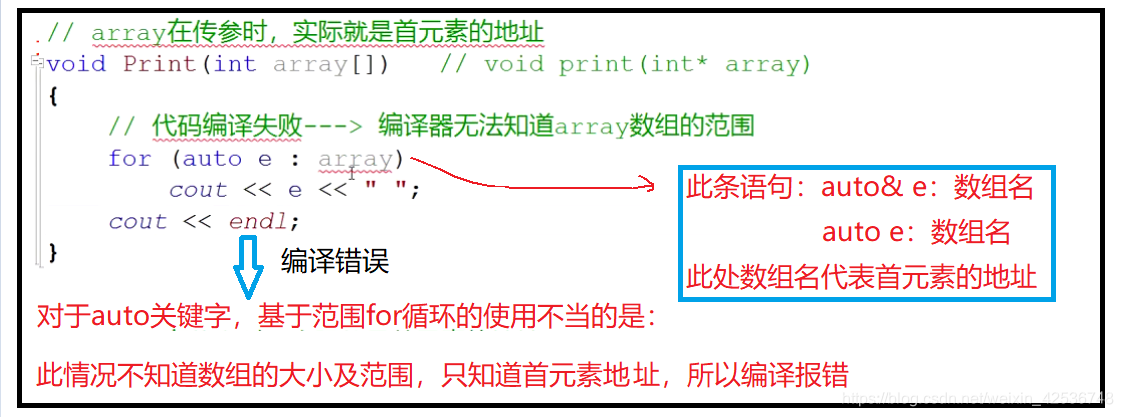
没有明确for循环范围而编译出错

往期链接:
cpp_5.1 内联函数
cpp_5 const修饰的变量和宏
cpp_4 引用
cpp_3 函数重载/传址调用/引用
cpp_2 输入输出/函数/重载
cpp_1 命名空间/输入输出


 本文详细介绍了C++11中auto关键字的新含义及使用规则,包括如何根据初始化表达式推导变量类型、与指针及引用结合的用法、多变量定义限制等,并探讨了auto在函数参数及数组声明上的不适用性。


 被折叠的 条评论
为什么被折叠?


