


core文件生成及调试
1 代码
#include
int main()
{
int *p = NULL;
*p = 0;
return 0;
}shell
2 在当前shell执行ulimit -c unlimited
注意:该命令只在当前shell生效,其余shell会失效ulimit -c是0,生成core文件失败。
3 设置core文件格式和生成路径,默认在执行程序当前目录下,执行如下两条命令:
echo "1" > /proc/sys/kernel/core_uses_pid
echo "/corefile/core-%e-%p-%t" > /proc/sys/kernel/core_patternapp
将core文件统一辈子成到/corefile目录下,产生的文件名为core-命令名-pid-时间戳
注意:/corefile目录须要本身建立。
如下是参数列表:
%p - insert pid into filename 添加pid(进程id)
%u - insert current uid into filename 添加当前uid(用户id)
%g - insert current gid into filename 添加当前gid(用户组id)
%s - insert signal that caused the coredump into the filename 添加致使产生core的信号
%t - insert UNIX time that the coredump occurred into filename 添加core文件生成时的unix时间
%h - insert hostname where the coredump happened into filename 添加主机名
%e - insert coredumping executable name into filename 添加致使产生core的命令名
4 生成及调试core文件
gcc -o test test.c
./test
Segmentation fault (core dumped)
这里出现段错误并生成core文件了ui
在/corefile目录下发现core-test-31421-1476266571
开始调试
gdb ./test core-test-31421-1476266571unix
5 ulimit -c ulimited 设置永久生效调试
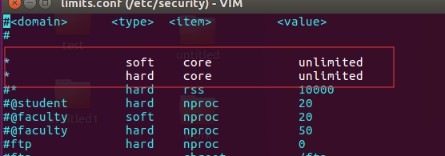
打开 /etc/security/limits.conf文件blog
添加红框中两行:进程
* soft core unlimitedit
* hard core unlimitedio


 1525
1525


 被折叠的 条评论
为什么被折叠?
被折叠的 条评论
为什么被折叠?
 到【灌水乐园】发言


