


一、 简介
MapBox是一个开源的矢量地图SDK。此框架的承诺是在开发视频游戏方面将提供优质的渲染速度和平滑度。如果你有兴趣将地图功能集成到你的应用程序,那么MapBox将是值得你考虑的选择方案之一。

二、权限设置
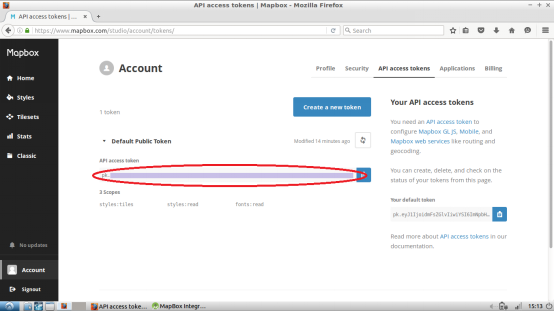
要想在你的应用程序如使用Mapbox,你需要一个API访问令牌。为此,你需要先创建一个Mapbox帐户,你可以在网站https://www.mapbox.com/studio/account/tokens处找到你需要的有类数据。
然后,把令牌添加到你的Android程序的文件strings.xml中:
Your access token
接下来,在配置文件AndroidManifest.xml中加入如下所示的Internet和位置访问权限:
请注意:在Android Marshmallow (API 23)及更高的版本中在运行时是需要上述权限的。
三、安装MapBox
接下来,打开配置文件build.gradle(对应于Module: app文件夹下的那个),添加对MapBox的依赖。请参考如下所示配置代码:
repositories {
mavenCentral()
}
dependencies {
. . .
compile('com.mapbox.mapboxsdk:mapbox-android-sdk:3.2.0@aar') {
transitive=true
}
compile ('com.mapbox.mapboxsdk:mapbox-android-directions:1.0.0@aar'){
transitive=true
}
}
上面代码中的***处配置描述了Mapbox,后面的配置则对应于目录库(Directions library)描述,用于向应用程序提供驾车、步行以及跨自行车等调用函数,并支持在地图中绘制其行踪。
四、MapBox布局
接下来,打开布局文件content_main.xml,使用如下内容替换原来的内容:
xmlns:mapbox="http://schemas.android.com/apk/res-auto"
xmlns:tools="http://schemas.android.com/tools"
android:layout_width="match_parent"
android:layout_height="match_parent"
tools:context="com.example.valdio.mapboxintegration.MainActivity"
tools:showIn="@layout/activity_main">
android:id="@+id/mapview"
android:layout_width="fill_parent"
android:layout_height="fill_parent"
mapbox:access_token="@string/accessToken"/>
接下来,初始化你需要在MainActivity文件中使用的变量:
public class MainActivity extends AppCompatActivity {
private MapView mapView=null;
private String MAPBOX_ACCESS_TOKEN="";
private DirectionsRoute currentRoute=null;
...
接下来,在MainActivity.java文件中,把onCreate()方法中的创建工具栏和浮动按钮的代码删除,添加如下代码来初始化地图:
StringMAPBOX_ACCESS_TOKEN=getResources().getString(R.string.accessToken);
// Set up a standard Mapbox map
MapView mapView= (MapView) findViewById(R.id.mapview);
mapView.setAccessToken(MAPBOX_ACCESS_TOKEN);
mapView.setStyleUrl(Style.MAPBOX_STREETS); // specify the map style
mapView.setZoom(14); // zoom level
mapView.onCreate(savedInstanceState);
Mapbox需要实现Activity的生命同期方法以避免运行时错误;因此,需要添加如下的重写函数:
@Override
protected void onStart() {
super.onStart();
mapView.onStart();
}
@Override
protected void onStop() {
super.onStop();
mapView.onStop();
}
@Override
protected void onDestroy() {
super.onDestroy();
mapView.onDestroy();
}
@Override
protected void onResume() {
super.onResume();
mapView.onResume();
}
@Override
protected void onPause() {
super.onPause();
mapView.onPause();
}
@Override
protected void onSaveInstanceState(Bundle outState) {
super.onSaveInstanceState(outState);
mapView.onSaveInstanceState(outState);
}
好了。现在配置好了Mapbox,可以构建应用程序了。
五、把标记添加到地图中
现在,请把如下代码添加到MainActivity的onCreate函数的***部:
@Override
protected void onStart() {
super.onStart();
mapView.onStart();
}
@Override
protected void onStop() {
super.onStop();
mapView.onStop();
}
@Override
protected void onDestroy() {
super.onDestroy();
mapView.onDestroy();
}
@Override
protected void onResume() {
super.onResume();
mapView.onResume();
}
@Override
protected void onPause() {
super.onPause();
mapView.onPause();
}
@Override
protected void onSaveInstanceState(Bundle outState) {
super.onSaveInstanceState(outState);
mapView.onSaveInstanceState(outState);
}
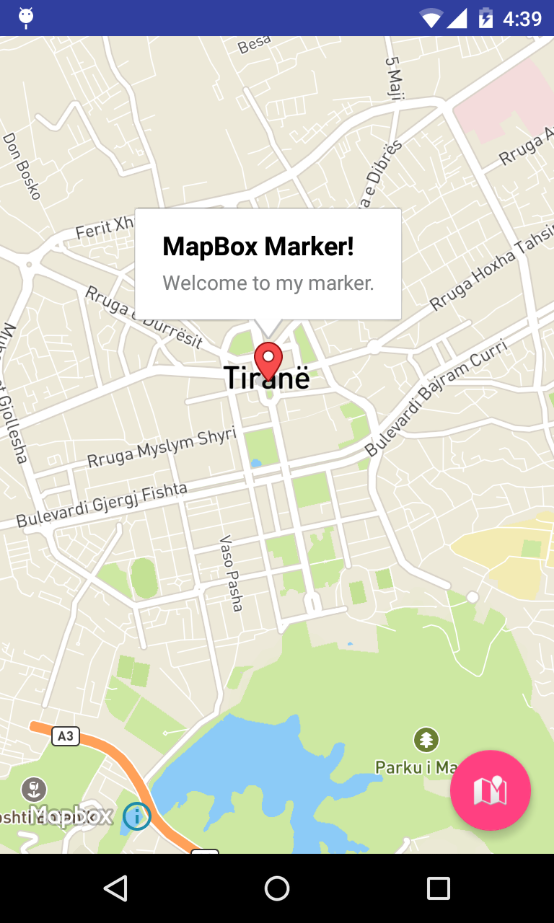
这段代码中的CameraPosition是一个非常有用的Mapbox类,可用于设置用户视图的位置、角度、缩放和倾斜度,等等信息。
到现在,我们的地图看起来是如下所示的模样:
六、获取设备位置
为了使Mapbox能够访问到设置的位置信息,必须启动设置的位置服务,程序应当有使用它们的权限。如前面所提到的,在Android Marshmallow (API 23)及后续更高的版本中,在运行时是需要这些权限的。
现在,我们来创建一个新的函数,在其中加入取得当前位置的代码:
private void myLocation() {
if (ActivityCompat.checkSelfPermission(this, Manifest.permission.ACCESS_FINE_LOCATION) != PackageManager.PERMISSION_GRANTED && ActivityCompat.checkSelfPermission(this, Manifest.permission.ACCESS_COARSE_LOCATION) != PackageManager.PERMISSION_GRANTED) {
// TODO: Consider calling
// ActivityCompat#requestPermissions
// here to request the missing permissions, and then overriding
// public void onRequestPermissionsResult(int requestCode, String[] permissions,
// int[] grantResults)
// to handle the case where the user grants the permission. See the documentation
// for ActivityCompat#requestPermissions for more details.
return;
}
mapView.setMyLocationEnabled(true);
mapView.setMyLocationTrackingMode(MyLocationTracking.TRACKING_FOLLOW);
mapView.getMyLocation();
}
然后,在地图初始化代码后添加如下函数调用:
...
mapView.onCreate(savedInstanceState);
myLocation();
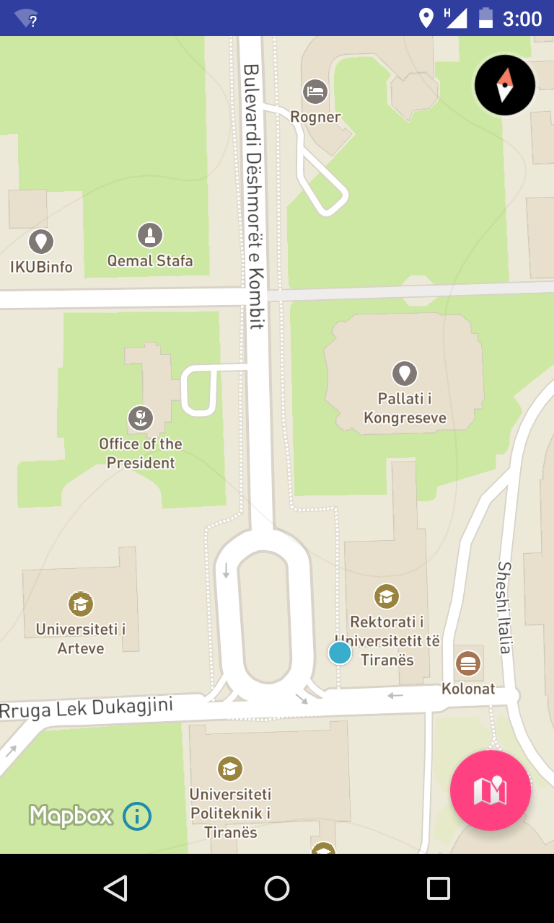
在现在的情况中,我们把跟踪方式设置为TRACKING_FOLLOW,这意味着用户的位置将持续不断地被监控,而且地图会不断地随着变化不断更新。
七、在地图上绘制线路
现在,我们创建了标记与位置,接下来就是在地图上绘制线路了。
这要使用前面在依赖性设置时所导入的第二个库(Directions library),这也是Mapbox团队自行开发的。
下面描述了其工作原理:
1、创建两个航点位置,一个是出发点,一个对应目的地。
2、创建一个MapboxDirections生成器对象,用于向Mapbox API发出网络请求,其中的数据包含对应于出发点和目的点的航点位置信息,还有方向路线有关的配置信息(驾驶、步行或骑自行车等)。
3、异步执行方向要求。其中,MapboxDirections类提供了一个使用Retrofit API的内置的异步请求。具体地说,是使用enqueue()函数来执行请求。
4、OnResponse()方法返回Retrofit响应结果,这是一个标准的JSON API响应。
5、响应正文中包含位置坐标对信息,稍后这些坐标将绘制在地图上。
6、采用Mapbox Polyline函数把坐标绘制在地图上。折线(Polyline)是一种几何特征,通过多条线段首尾相连而形成一条不封闭的折线。
为了使用Direction库,我们需要获得设备的位置作为起源航点,以及由用户通过长按方式来指定目的地航点的位置信息。
八、加入航点位置并在目标地添加标记
现在,请把如下代码添加到onCreate方法的***面:
mapView.setOnMapLongClickListener(new MapView.OnMapLongClickListener() {
@Override
public void onMapLongClick(LatLng point) {
//Remove previously added markers
//Marker is an annotation that shows an icon image at a geographical location
//so all markers can be removed with the removeAllAnnotations() method.
mapView.removeAllAnnotations();
// Set the origin waypoint to the devices location
Waypoint origin=newWaypoint(mapView.getMyLocation().getLongitude(), mapView.getMyLocation().getLatitude());
// Set the destination waypoint to the location point long clicked by the user
Waypoint destination=newWaypoint(point.getLongitude(), point.getLatitude());
// Add marker to the destination waypoint
mapView.addMarker(new MarkerOptions()
.position(new LatLng(point))
.title("Destination Marker")
.snippet("My destination"));
// Get route from API
getRoute(origin, destination);}
});
九、创建MapboxDirections网络请求并异步运行
接下来,再创建一个如下所示的方法,以便取得***路由信息:
private void getRoute(Waypoint origin, Waypoint destination) {
MapboxDirections directions=newMapboxDirections.Builder()
.setAccessToken(MAPBOX_ACCESS_TOKEN)
.setOrigin(origin)
.setDestination(destination)
.setProfile(DirectionsCriteria.PROFILE_WALKING)
.build();
directions.enqueue(new Callback() {
@Override
public void onResponse(Responseresponse, Retrofit retrofit) {
// Display some info about the route
currentRoute=response.body().getRoutes().get(0);
showToastMessage(String.format("You are %d meters \nfrom your destination", currentRoute.getDistance()));
// Draw the route on the map
drawRoute(currentRoute);
}
@Override
public void onFailure(Throwable t) {
showToastMessage("Error: " + t.getMessage());
}
});
}
十、使用地图上的坐标点绘制折线
再添加一个如下方法来实现路由绘制:
private void drawRoute(DirectionsRoute route) {
// Convert Listinto LatLng[]
Listwaypoints=route.getGeometry().getWaypoints();
LatLng[] point=newLatLng[waypoints.size()];
for (int i=0; i
point[i] = new LatLng(
waypoints.get(i).getLatitude(),
waypoints.get(i).getLongitude());
}
// Draw Points on MapView
mapView.addPolyline(new PolylineOptions()
.add(point)
.color(Color.parseColor("#38afea"))
.width(5));
}
private void showToastMessage(String message) {
Toast.makeText(this, message, Toast.LENGTH_SHORT).show();
}
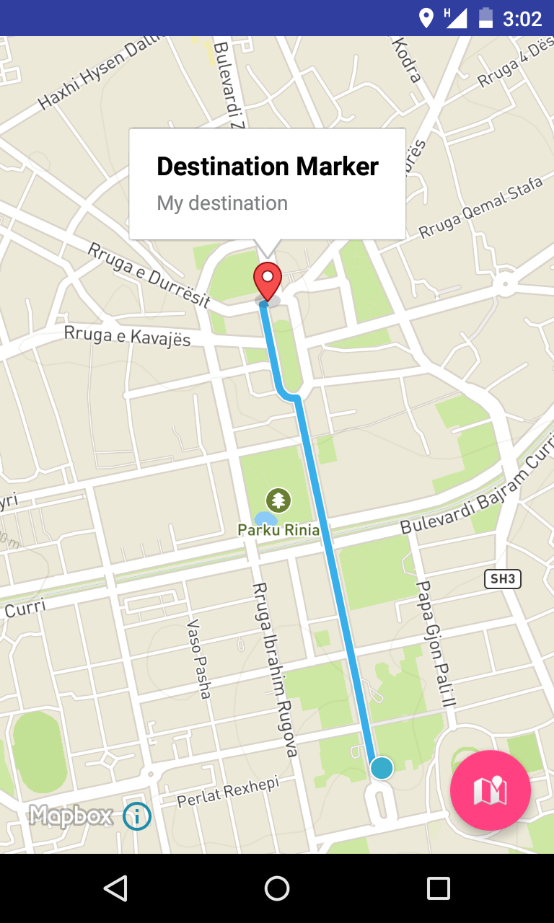
好了,现在运行你的工程。在地图上选择两个点,你会观察到类似于下图所示结果:
十一、小结
本文中,我们介绍了使用MapBox SDK及其Directory库的基本知识。其实,MapBox还有更多更丰富的内容可应用于你的程序中,例如不同的地图风格,实现定制的矢量地图绘制等等。
作为本文补充,我还推荐另一个库Geocoding(https://github.com/mapbox/mapbox-geocoder-android)。这个库可以把坐标信息转换成地图,或者实现相反的转换。当然,要想了解更多的有关MapBox信息,建议学习其移动应用有关实例(https://www.mapbox.com/mobile/)。在这个网址中你会发现更多的库可用。
【编辑推荐】
【责任编辑:李英杰 TEL:(010)68476606】
点赞 0


 1023
1023


 被折叠的 条评论
为什么被折叠?
被折叠的 条评论
为什么被折叠?
 到【灌水乐园】发言


