


vue3学习(第三天)
组件和生命周期
一、组件基础
vue3中的组件导入后可以直接使用:
<script setup>
import ComponentA from './ComponentA.vue'
</script>

<template>
  <ComponentA />
</template>
每一个.vue 文件都可以充当组件来使用。
每一个组件都可以复用。
二、组件的生命周期
Vue3 组合式API 是没有 beforeCreate 和 created 这两个生命周期的,setup替代了这两个。
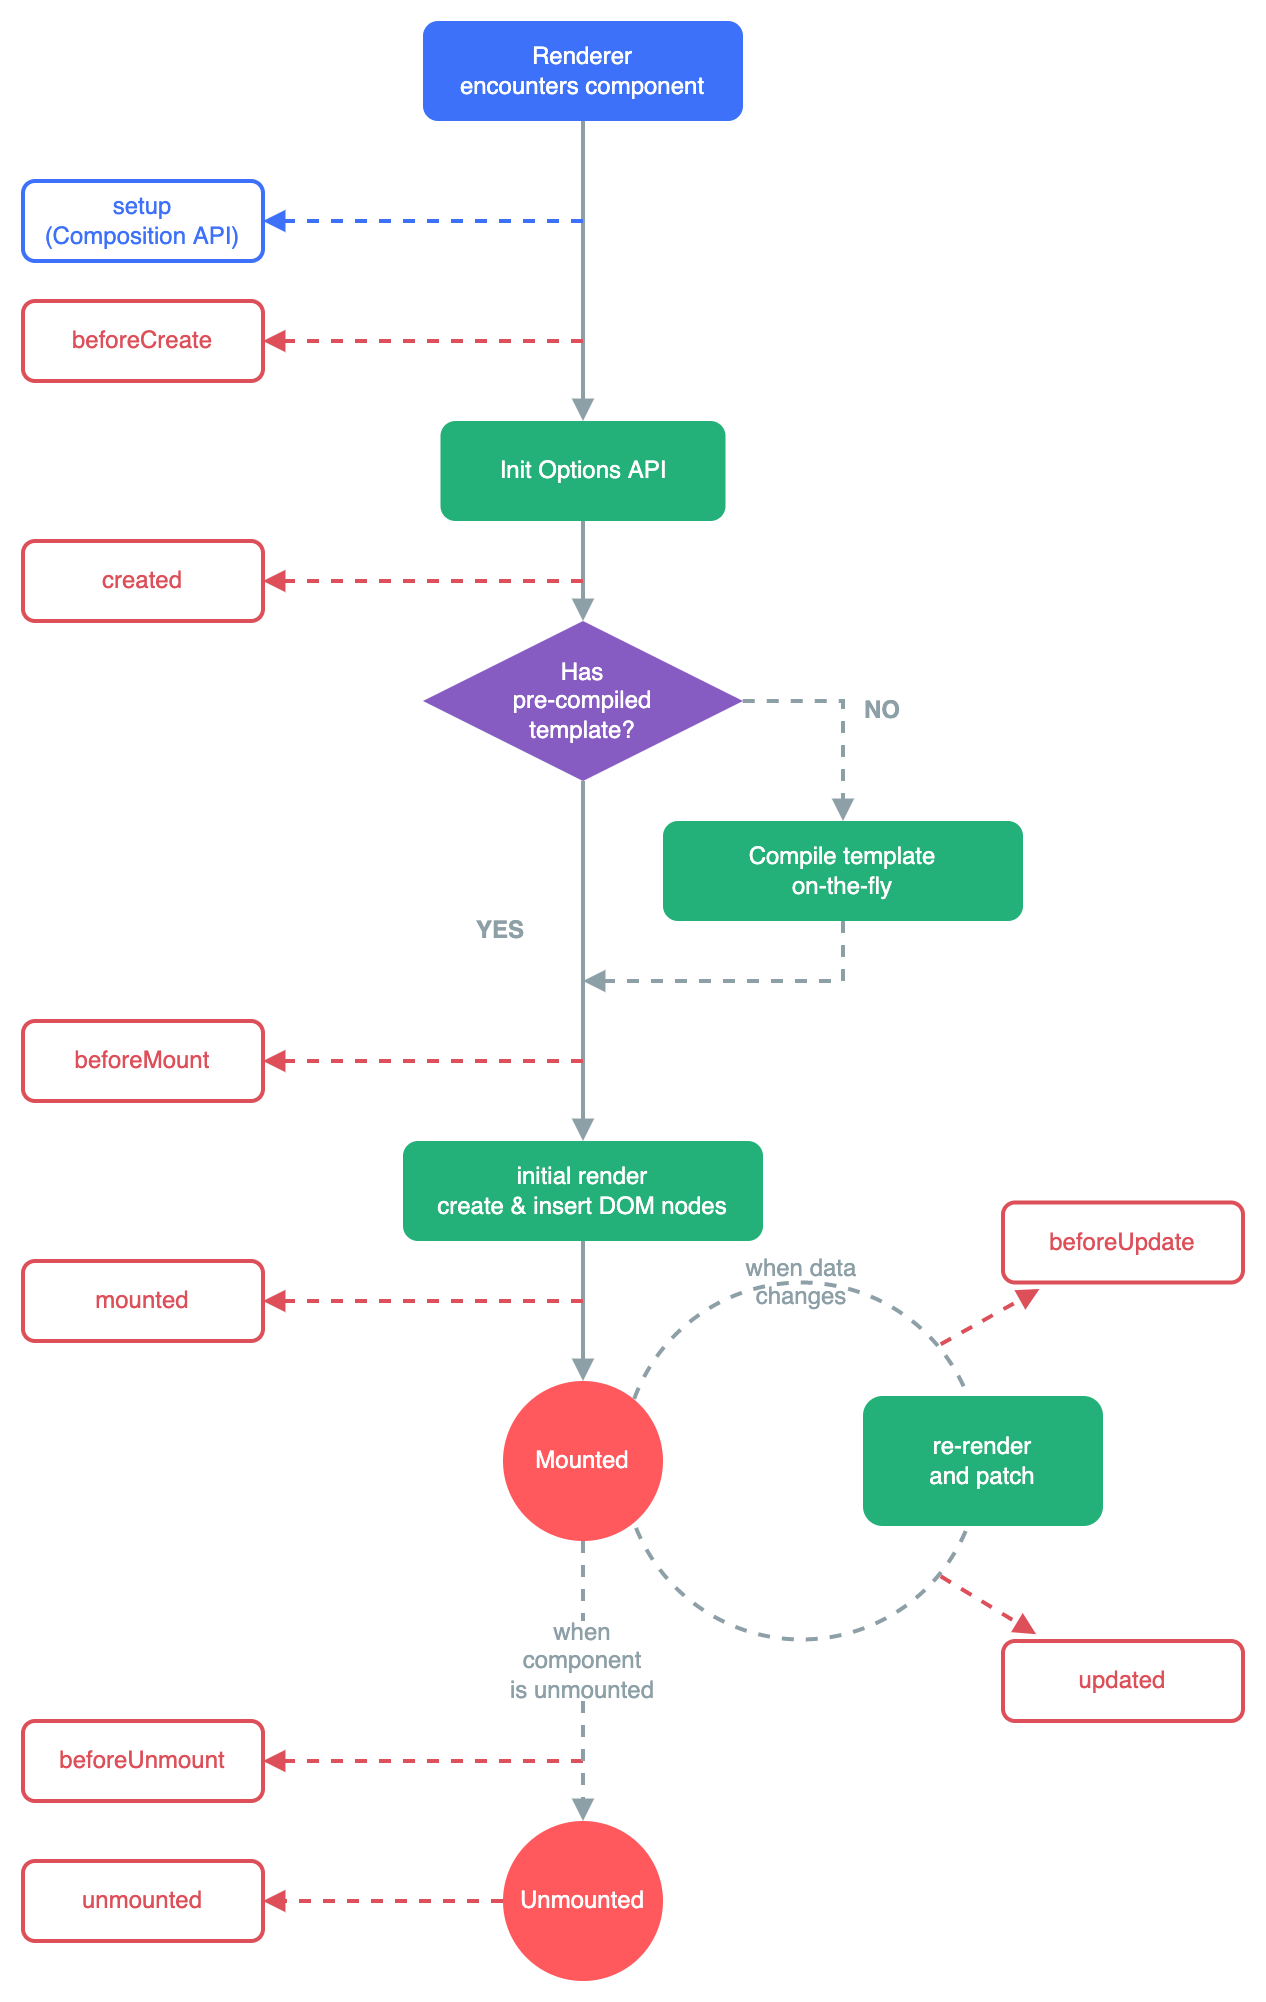
onBeforeMount()

在组件DOM实际渲染安装之前调用。在这一步中,根元素还不存在。

onMounted()

在组件的第一次渲染后调用,该元素现在可用,允许直接DOM访问

onBeforeUpdate()

数据更新时调用,发生在虚拟 DOM 打补丁之前。

onUpdated()

DOM更新后,updated的方法即会调用。

onBeforeUnmount()

在卸载组件实例之前调用。在这个阶段,实例仍然是完全正常的。

onUnmounted()

卸载组件实例后调用。调用此钩子时,组件实例的所有指令都被解除绑定,所有事件侦听器都被移除,所有子组件实例被卸载。
三、父子组件传值
在setup语法糖中父子组件传值:
1.父组件给子组件传值(defineProps)
父组件通过v-bind绑定一个数据,然后子组件通过defineProps接受传过来的值。
//父组件
<template>
	<BlogPost :title="title"></BlogPost>
</template>
//子组件
<script setup>
defineProps(['title'])
</script>

<template>
  <h4>{{ title }}</h4>
</template>
2.子组件给父组件传值(defineEmits)
//子组件
<script setup>
defineEmits(['enlarge-text'])
</script>

<template>
  <div class="blog-post">
    <h4>{{ title }}</h4>
    <button @click="$emit('enlarge-text')">Enlarge text</button>
  </div>
</template>

//或
<template>
  <div class="blog-post">
    <h4>{{ title }}</h4>
    <button @click="send">Enlarge text</button>
  </div>
</template>
<script setup>
const emit = defineEmits(['enlarge-text'])
const send = () => {
	emit('enlarge-text','1111')
}

</script>
//父组件
  <BlogPost :title="title"
      @enlarge-text="enlarge-text"
    ></BlogPost>
const enlarge-text=(val)=>{
console.log(val) //val为传递的值
}
四、全局组件
一些使用频率非常高的组件可以注册成全局组件,创建好组件后在main.ts文件中引入:
import { createApp } from 'vue'
import App from './App.vue'

import Table from './components/Table/index.vue'


createApp(App).component('Table',table).mount('#app')
使用组件时无需引入,直接写就行:
<template>
 <Table></Table>
</template>
五、动态组件
动态组件 :让多个组件使用同一个挂载点,并动态切换,这就是动态组件。
在挂载点使用component标签,然后使用v-bind:is=”组件”
用法如下
引入组件
import A from './A.vue'
import B from './B.vue'
  <component :is="A"></component>
通过is 切换 A B 组件
使用场景tab切换居多
六、Teleport组件
Teleport 是一种能够将我们的模板渲染至指定DOM节点,不受父级style、v-show等属性影响,但data、prop数据依旧能够共用的技术;类似于 React 的 Portal。
主要解决的问题 因为Teleport节点挂载在其他指定的DOM节点下,完全不受父级style样式影响。
使用方法
通过to 属性 插入指定元素位置 to=“body” 便可以将Teleport 内容传送到指定位置
<Teleport to="body">
    <Loading></Loading>
</Teleport>
也可以自定义传送位置 支持 class id等 选择器
类似于fixed。


 181
181


 被折叠的 条评论
为什么被折叠?
被折叠的 条评论
为什么被折叠?
 到【灌水乐园】发言


