


摘要: 简介 物联网设备开发过程中,嵌入式GUI(用户图形界面)的开发是一个重要的组成部分。许多智能设备如智能家电、智能手表、智能仪表上都会涉及到GUI开发。AliOS Things集成开源图形库littlevGL,可以在linux上进行图形界面开发。
简介
物联网设备开发过程中,嵌入式GUI(用户图形界面)的开发是一个重要的组成部分。许多智能设备如智能家电、智能手表、智能仪表上都会涉及到GUI开发。AliOS Things集成开源图形库littlevGL,可以在linux上进行图形界面开发。开发完成后将代码添加到相应的工程并完成显示和输入设备驱动的对接,程序即可在相应的硬件上运行,方便用户进行嵌入式GUI开发。
littlevGL是一个开源的嵌入式图形库,采用C语言开发,使用MIT协议,并在持续更新中。该图形库支持常用的控件,如按钮、列表、滑块、选择框、仪表盘、键盘、波形等。并支持触摸、鼠标、键盘等多种输入方式。其官方网站为:https://littlevgl.com。
linux模拟开发步骤
1、环境安装
a、按照AliOS Things Linux Environment Setup安装基本环境。
b、按照如下命令安装SDL2图形库。
sudo apt-get install libsdl2-2.0:i386
sudo apt-get install libxkbcommon-dev:i386
sudo apt-get install libmircommon-dev:i386
sudo apt-get install libmirclient-dev:i386
sudo apt-get install libegl1-mesa-dev:i386
sudo apt-get install libglib2.0-dev:i386
sudo apt-get install libpulse-dev:i386
sudo apt-get install libsdl2-dev:i386
2、拷贝代码
3、模拟运行
编译运行命令:aos make littlevgl_simulate@linuxhost
编译通过之后会自动运行生成的可执行文件,界面如
下
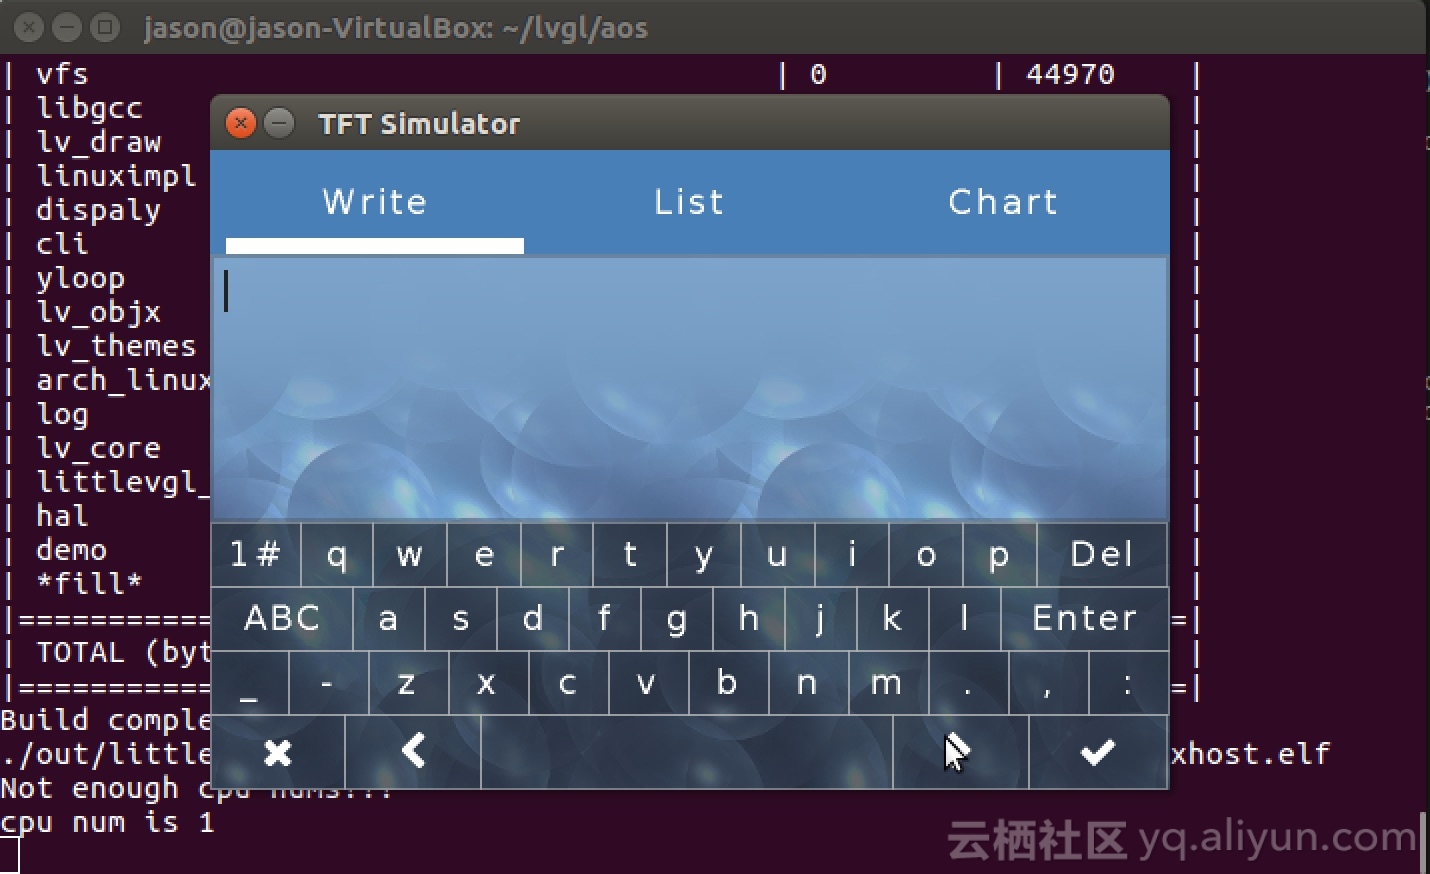
用户可以自行添加应用代码,开发完成后将代码添加到相应的工程并完成显示和输入设备驱动的对接,程序即可在相应的硬件上运行。
example/littlevgl_simulate/lv_examples目录下包含demo程序以及各个控件使用的示例程序,可参考进行界面开发。
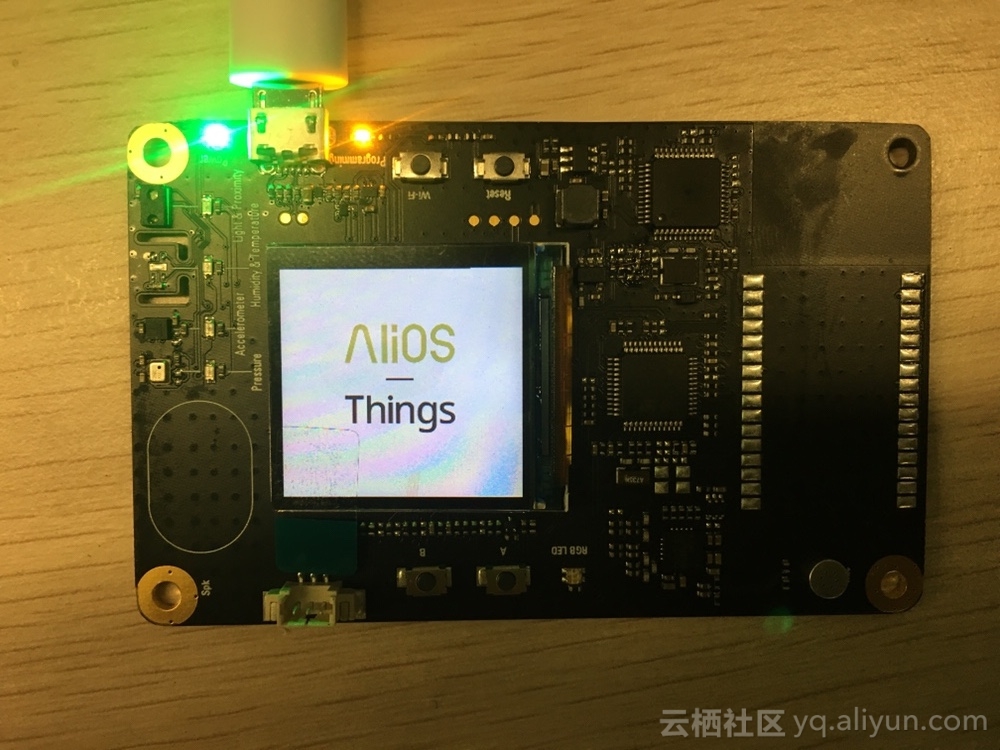
AliOS Things开发版开发步骤:
在starterkit的开发版上已经移植littlevgl,用户直接运行命令即可编译GUI工程。
编译命令:aos make littlevgl_starterkit@starterkit
编译完成后下载到starterkit即可。
其他CPU开发步骤:
1、显示驱动实现
a、使用内部缓冲区(lv_conf.h的LV_VDB_SIZE > 0)
必须实现如下函数,其功能为对一片矩形区域填充颜色,注意该函数的最后必须调用lv_flush_ready()函数。
/*Write the internal buffer (VDB) to the display. 'lv_flush_ready()' has to be called when finished*/
void my_disp_flush(int32_t x1, int32_t y1, int32_t x2, int32_t y2, const lv_color_t * color_p)
{
/*TODO Copy 'color_p' to the specified area*/
/*Call 'lv_fluh_ready()' when ready*/
lv_flush_ready();
}
b、使用硬件加速(USE_LV_GPU = 1 且使用内部缓冲区)
必须实现如下函数:
/*Blend two memories using opacity (GPU only)*/
void my_mem_blend(lv_color_t * dest, const lv_color_t * src, uint32_t length, lv_opa_t opa)
{
/*TODO Copy 'src' to 'dest' but blend it with 'opa' alpha */
}
/*Fill a memory with a color (GPU only)*/
void my_mem_fill(lv_color_t * dest, uint32_t length, lv_color_t color)
{
/*TODO Fill 'length' pixels in 'dest' with 'color'*/
}
c、不使用缓冲区
必须实现如下函数:
/*Fill an area with a color on the display*/
void my_disp_map(int32_t x1, int32_t y1, int32_t x2, int32_t y2, const lv_color_t * color_p)
{
/*TODO Copy 'color_p' to the specified area*/
}
*Write pixel map (e.g. image) to the display*/
void my_disp_fill(int32_t x1, int32_t y1, int32_t x2, int32_t y2, lv_color_t color)
{
/*TODO Fill the specified area with 'color'*/
}
2、输入驱动实现
a、触摸或者鼠标等点输入设备
必须使用如下函数,获取点坐标
bool my_input_read(lv_indev_data_t *data)
{
data->point.x = touchpad_x;
data->point.y = touchpad_y;
data->state = LV_INDEV_EVENT_PR or LV_INDEV_EVENT_REL;
return false; /*No buffering so no more data read*/
}
b、键盘设备
必须使用如下函数:
bool keyboard_read(lv_indev_data_t *data)
{
data->key = last_key();
if(key_pressed()) {
data->state = LV_INDEV_EVENT_PR;
} else {
data->state = LV_INDEV_EVENT_REL;
}
return false; /*No buffering so no more data read*/
}
3、初始化
a、将framework/GUI/littlevGL目录下的文件添加到工程。
b、根据需要配置lv_conf.h中相应的宏定义。
c、调用lv_init()初始化littlevGL。
d、初始化显示和输入(键盘、鼠标、触摸等)设备。
e、调用lv_disp_drv_init初始化显示驱动,调用lv_disp_drv_register注册显示驱动。调用lv_indev_drv_init初始化输入驱动,调用lv_indev_drv_register注册输入驱动,示例代码见附录。
f、在时钟中断中调用lv_tick_inc(1),为littlevGL提供心跳。
g、创建一个低优先级任务,在其中重复调用lv_task_handler函数,进行图像的刷新和输入事件的响应。
4、APP编写
用户可以自行添加相应的应用代码。
其他
AliOS Things也支持STemwin,在starterkit的开发版上已经移植STemwin,用户直接运行命令即可编译GUI工程。
编译命令:aos make starterkitgui@starterkit
附录
驱动初始化和注册示例代码如下:
lv_disp_drv_t dis_drv;
lv_indev_drv_t indev_drv;
void lvgl_drv_register(void)
{
lv_disp_drv_init(&dis_drv);
dis_drv.disp_flush = my_disp_flush;
dis_drv.disp_fill = my_disp_fill;
dis_drv.disp_map = my_disp_map;
lv_disp_drv_register(&dis_drv);
lv_indev_drv_init(&indev_drv);
indev_drv.type = LV_INDEV_TYPE_POINTER;
indev_drv.read = my_input_read;
lv_indev_drv_register(&indev_drv);
}
void my_disp_flush(int32_t x1, int32_t y1, int32_t x2, int32_t y2, const lv_color_t * color_p)
{
int32_t x = 0;
int32_t y = 0;
for (y = y1; y <= y2; y++) /*Pick the next row*/
{
for (x = x1; x <= x2; x++) /*Pick the a pixel in the row*/
{
BSP_LCD_DrawPixel(x,y, color_p);
color_p++;
}
}
lv_flush_ready();
}
void my_disp_fill(int32_t x1, int32_t y1, int32_t x2, int32_t y2, lv_color_t color)
{
int32_t i =0;
int32_t j =0;
for (i = x1; i <= x2; i++)
{
for (j = y1; j <= y2; j++)
{
BSP_LCD_DrawPixel(i,j, color.full);
}
}
}
void my_disp_map(int32_t x1, int32_t y1, int32_t x2, int32_t y2, const lv_color_t * color_p)
{
int32_t i =0;
int32_t j =0;
for (i = x1; i <= x2; i++)
{
for (j = y1; j <= y2; j++)
{
BSP_LCD_DrawPixel(i,j, color_p->full);
color_p++;
}
}
}
bool my_input_read(lv_indev_data_t *data)
{
__IO TS_StateTypeDef ts;
BSP_TS_GetState((TS_StateTypeDef *)&ts);
ts.touchX[0] = TouchScreen_Get_Calibrated_X(ts.touchX[0]);
ts.touchY[0] = TouchScreen_Get_Calibrated_Y(ts.touchY[0]);
if((ts.touchX[0] >= 240) ||(ts.touchY[0] >= 240) )
{
ts.touchX[0] = 0;
ts.touchY[0] = 0;
}
if((TS_State_cur.Pressed != ts.touchDetected )||
(TS_State_cur.x != ts.touchX[0]) ||
(TS_State_cur.y != ts.touchY[0]))
{
TS_State_cur.Pressed = ts.touchDetected;
if(ts.touchDetected)
{
TS_State_cur.x = ts.touchX[0];
TS_State_cur.y = ts.touchY[0];
data->point.x = TS_State_cur.x;
data->point.y = 240 - TS_State_cur.y;
if(TS_State_cur.Pressed == ts.touchDetected)
{
data->state = 1;
}
else
{
data->state = 0;
}
}
else
{
TS_State_cur.x = 0;
TS_State_cur.y = 0;
}
}
return false; /*No buffering so no more data read*/
}


 被折叠的 条评论
为什么被折叠?
被折叠的 条评论
为什么被折叠?
 到【灌水乐园】发言


