


Nginx前言:
Nginx是一个高性能的HTTP和反向代理web(网页)服务器。Nginx因稳定性,丰富的功能集,简单的配置文件和地系统资源的消耗而闻名。
Nginx是web服务器及反向代理服务器及电子邮件代理服务器。
特点是占有内存少,并发能力强,中国使用nginx网站用户有:百度,京东,腾讯,网易等
HTTP
超文本传输协议(HTTP)是一个简单的请求-相应协议,通常运行在TCP之上。
它指定了客户端可能发送给服务器什么样的消息以及得到什么样的相应。
请求和响应消息的头以ASCII形式给出;而消息内容则具有一个类似MIME的格式

# 知识储备:
TCP : 传输控制协议(TCP)是一种传输层通信协议
反向代理web服务器
反向代理服务器位于用户与目标服务器之间,但是对于用户,反向代理服务器就相当于目标服务器。

用户直接访问反向代理服务器就可以获得目标服务器资源,并且用户不需要知道目标服务器的地址,也不需要在用户端作任何的设定。

反向代理是为服务端服务的,反向代理可以帮助服务器接收来自客户端的请求,帮助服务器做请求转发,负载均衡等。
说到反向代理就需要提一下正向代理
正向代理
正向代理意思是一个位于客户端和原始服务器之间的服务器,为了从原始服务器获取内容,客户端向代理一个请求并指定目标(原始服务器),然后代理向原始服务器转交请求并将获取到的内容返回给客户端

正向代理是为我们服务即为客户端服务,客户端可以根据正向代理访问到它本身无法访问到的服务器资源

正向代理对服务端而言是非透明的,即服务端并不知道自己收到的是来自代理的访问还是来自真实客户端的访问
负载均衡
如果请求数过大,单个服务器解决不了,我们增加服务器的数量,然后将请求分发到各个服务器上,将原先请求集中到单个服务器的情况改为请求分发到多个服务器上,就是负载均衡。web 服务就是B/S架构
web服务器软件
1.apache

网络模型:
	select : apache , windows
	poll
	epoll等于poll升级版

2.nginx
官网:https://nginx.org/
软件:https://nginx.org/download/
部署nginx
1、yum安装
1、yum安装
[root@web01 ~]# vim /etc/yum.repos.d/nginx.repo

进入https://nginx.org/ --> 右侧边documentatin --> Installing nginx -->
Installation on Linux 下的 For Linux, nginx "packages" from nginx.org can be used
--> RHEL/CentOS --> [nginx-stable] 开头代码复制到第一步

[root@web01 ~]# yum install nginx -y

[root@web01 ~]# systemctl stop httpd

[root@web01 ~]# systemctl start nginx
2.二进制安装
安装包安装3.编译安装
[root@web01 ~]#  wget https://nginx.org/download/nginx-1.20.2.tar.gz

	[root@web01 ~]# tar -xf nginx-1.20.2.tar.gz

	[root@web01 nginx-1.20.2]# ./configure

	[root@web01 nginx-1.20.2]# make

	[root@web01 nginx-1.20.2]# make install
平滑增加nginx模块
增加模块必须重新编译。
[root@web01 ~]# tar -xf nginx-1.20.2.tar.gz
[root@web01 ~]# cd nginx-1.20.2
[root@web01 ~]# ./configure --help 查看模块
[root@web01 nginx-1.20.2]#./configure  --with-http_ssl_module
[root@web01 nginx-1.20.2]#make
[root@web01 nginx-1.20.2]#make install
nginx命令
1. -v : 打印版本号 (安装成功前提)
[root@web01 ~]# nginx -v
nginx version: nginx/1.20.2

2、-V : 打印版本号和配置项
[root@web01 ~]# nginx -V
nginx version: nginx/1.20.2
built by gcc 4.8.5 20150623 (Red Hat 4.8.5-44) (GCC)
built with OpenSSL 1.0.2k-fips  26 Jan 2017
TLS SNI support enabled
configure arguments: --prefix=/etc/nginx

3、-t : 检查配置文件
[root@web01 ~]# nginx -t
nginx: the configuration file /etc/nginx/nginx.conf syntax is ok
nginx: configuration file /etc/nginx/nginx.conf test is successful

4、-T : 测试配置文件并启动

5、-q :打印错误日志

6、-s : 操作进程
	stop	:停止
	quit	:退出
	reopen	:重启
	reload	:重载
7、-p : 指定nginx的工作目录

8、-e : 指定错误日志路径

9、-c : 指定配置文件的路径

10、-g : 设置一个全局的Nginx配置项
nginx配置文件
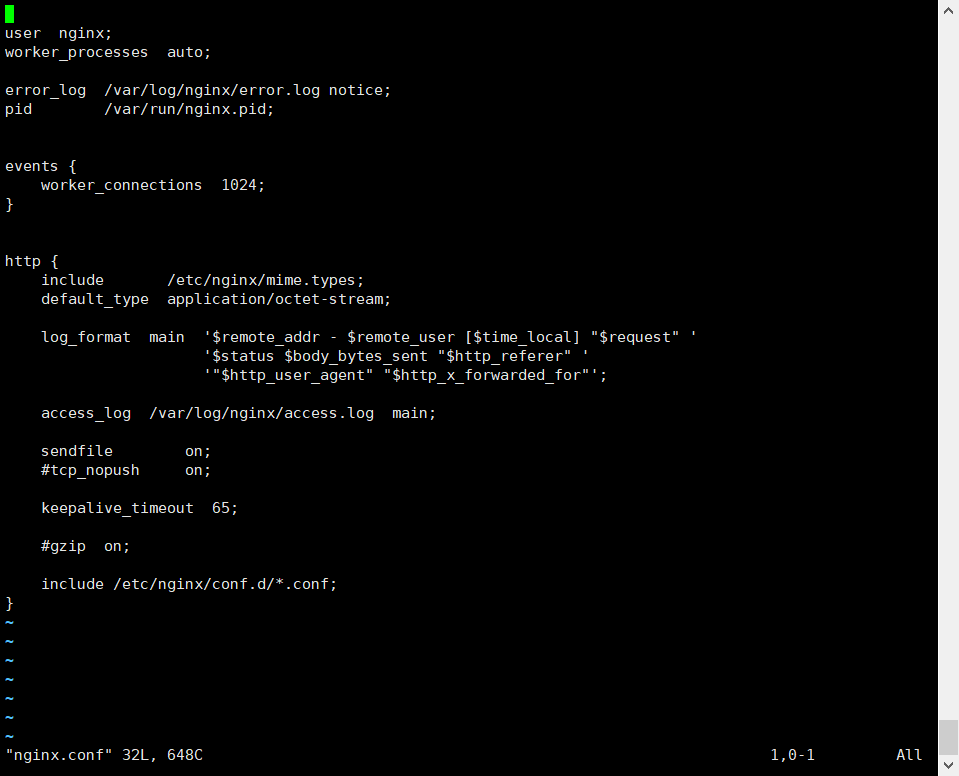
1、全局配置
	1、user : 指定Nginx的启动用户
	2、worker_processes : 定义Nginx的worker进程数
		auto === CPU数量
3、error_log : 错误日志路径
4、pid : pid的存放文件路径
5、events : 模块配置
		5.1、worker_connections :每一个worker进程最多同时接入多少个请求
		5.2、use : 指定Nginx的网络模型
6、http : web服务的模块
		6.1、include : 加载外部的配置项
		6.2、default_type : 如果找不到文件的类型,则按照指定默认类型处理
		6.3、log_format : 定义日志格式
			log_format json '{"@timestamp":"$time_iso8601",'
                  '"host":"$server_addr",'
                  '"service":"nginxTest",'
                  '"trace":"$upstream_http_ctx_transaction_id",'
                  '"log":"log",'
                  '"clientip":"$remote_addr",'
                  '"remote_user":"$remote_user",'
                  '"request":"$request",'
                  '"http_user_agent":"$http_user_agent",'
                  '"size":$body_bytes_sent,'
                  '"responsetime":$request_time,'
                  '"upstreamtime":"$upstream_response_time",'
                  '"upstreamhost":"$upstream_addr",'
                  '"http_host":"$host",'
                  '"url":"$uri",'
                  '"domain":"$host",'
                  '"xff":"$http_x_forwarded_for",'
                  '"referer":"$http_referer",'
                  '"status":"$status"}';
    		access_log /var/log/nginx/access.log json ;
    	6.4、sendfile : 高效读取文件
    	6.5、keepalive_timeout : 长连接保持连接的
    		HTTP 1.0 短链接
    		HTTP 1.1 长连接
    	6.6、server : 网址模块
    		6.6.1、listen : 监听的端口
    		6.6.2、server_name : 定义域名
    		6.6.3、location : 访问路径
    			6.6.3.1、root : 指定网址路径
    			6.6.3.2、index : 指定网址的索引文件
配置超级玛丽和象棋
"上传游戏代码,需要练手可以留言要代码"编辑配置文件
编辑配置文件
[root@web01 conf.d]# vim /etc/nginx/conf.d/maliao.conf   # 自己创建目录后缀为.conf

server {   # 配置网址模块
    listen 80;  # 指定80端口
    server_name game.kelala.com;  # 指定域名
    location / {  # 指定访问路径
        root /opt/maliao;	# 指定游戏路径
        index index.html;   #  指定网址的索引文件
    }
}
测试配置文件是否正常
3、测试配置文件是否正常
[root@web01 conf.d]# nginx -t
nginx: the configuration file /etc/nginx/nginx.conf syntax is ok
nginx: configuration file /etc/nginx/nginx.conf test is successful
重启nginx
[root@web01 conf.d]# systemctl restart nginx域名解析(window的操作)
5、域名解析(windows下操作)

找到hosts文件:
	C:\Windows\System32\drivers\etc\hosts

插入需要解析指定的域名 : 172.16.1.7 game.kelala.com

## 注意: 如果无法保存 则需要给hosts文件添加权限。

这样就可以访问了。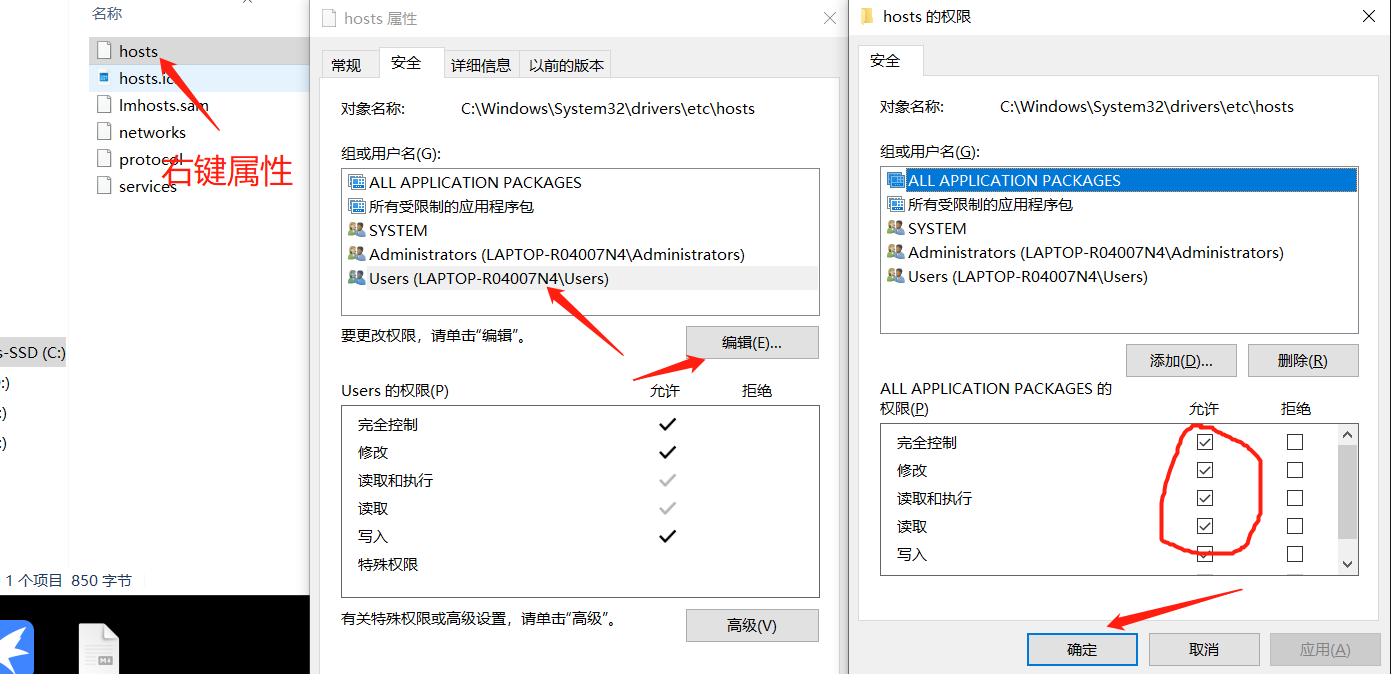


 399
399


 被折叠的 条评论
为什么被折叠?
被折叠的 条评论
为什么被折叠?
 到【灌水乐园】发言


