


前一步:
部署TIKV服务
注意:务必要在每台机器的postgres用户下配置环境变量,即
vim ~/.bashrc
添加
export PDADDR="192.168.0.103:2379,192.168.0.225:2379,192.168.0.51:2379"
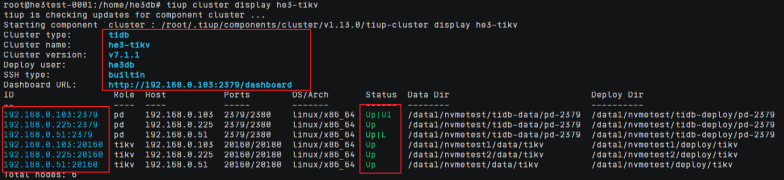
ip和端口根据实际部署机器改变,可通过以下命令查看集群机器:
tiup cluster display he3-tikv
一、远程传输He3DB二进制文件
集群的每个机器都需要进行以下步骤。
1、在远程机器上压缩app目录
cd /home/postgres
tar -czvf /home/postgres/app.tar.gz app
2、远程传输压缩文件至本地,使用外网ip
scp app.tar.gz root@1.94.9.188:/home/postgres/

3、传输完成后,解压压缩文件,看到app文件夹即完成He3DB二进制文件传输。
tar -zxvf app.tar.gz

二、集成Prometheus Client
需要在每台机器集成Prometheus Client,安装所需库,具体参考:
He3DB-部署集群(4)集成Prometheus Client
三、部署He3DB集群主节点
本次He3DB集群模式为3个节点,一个节点(master)为一主一推(即作为主节点和推进节点),另外两个节点(node1、node2)为一备一推。
切换到postgres用户
su postgres
1、在master上创建主节点和主推进节点的数据文件夹,确保为空文件夹:
mkdir -p /home/postgres/data/pgdata_m1
rm -rf /home/postgres/data/pgdata_m1/*
mkdir -p /home/postgres/data/pgdata_mp
rm -rf /home/postgres/data/pgdata_mp/*
rm -rf /home/postgres/data/logfile_*
在node1上创建备1节点和备1推进节点的数据文件夹,确保为空文件夹:
mkdir -p /home/postgres/data/pgdata_s1
rm -rf /home/postgres/data/pgdata_s1/*
mkdir -p /home/postgres/data/pgdata_sp
rm -rf /home/postgres/data/pgdata_sp/*
在node2上创建备2节点和备2推进节点的数据文件夹,确保为空文件夹:
mkdir -p /home/postgres/data/pgdata_s2
rm -rf /home/postgres/data/pgdata_s2/*
mkdir -p /home/postgres/data/pgdata_s2p
rm -rf /home/postgres/data/pgdata_s2p/*
2、在master上设置环境变量
export LD_LIBRARY_PATH=/home/postgres/app/lib:$LD_LIBRARY_PATH
export PATH=/home/postgres/app/bin:$PATH
3、初始化master推进节点
cd /home/postgres/app
./bin/initdb -D /home/postgres/data/pgdata_mp
4、复制pgdata_mp下的文件到pgdata_m1
cp -a /home/postgres/data/pgdata_mp/* /home/postgres/data/pgdata_m1/
cd /home/postgres/data/pgdata_m1/
rm -rf base global postmaster.pid
ln -sf /home/postgres/data/pgdata_mp/base base
ln -sf /home/postgres/data/pgdata_mp/global global
远程传输pgdata_mp文件夹下内容到node1
rsync -av /home/postgres/data/pgdata_mp/*
postgres@192.168.0.103:/home/postgres/data/pgdata_sp/
![]()
远程传输pgdata_mp文件夹下内容到node2
rsync -av /home/postgres/data/pgdata_mp/*
postgres@192.168.0.225:/home/postgres/data/pgdata_s2p/
5、在master输入以下命令,配置conf文件
#master
echo "host    replication     all             0.0.0.0/0               trust" >> /home/postgres/data/pgdata_m1/pg_hba.conf
echo "host    all             all             0.0.0.0/0               trust" >> /home/postgres/data/pgdata_m1/pg_hba.conf
echo "wal_recycle = off" >> /home/postgres/data/pgdata_m1/postgresql.conf
echo "fsync = off" >> /home/postgres/data/pgdata_m1/postgresql.conf
echo "checkpoint_timeout=30s" >> /home/postgres/data/pgdata_m1/postgresql.conf
echo "wal_keep_size=10000" >> /home/postgres/data/pgdata_m1/postgresql.conf
echo "full_page_writes = off" >> /home/postgres/data/pgdata_m1/postgresql.conf
echo "hot_standby=off" >> /home/postgres/data/pgdata_m1/postgresql.conf
echo "push_standby=off" >> /home/postgres/data/pgdata_m1/postgresql.conf
echo "port="1668 >> /home/postgres/data/pgdata_m1/postgresql.conf
echo "lmdb_page_directory = '"/home/postgres/data"/pgdata_m1/lmdb/page'" >> /home/postgres/data/pgdata_m1/postgresql.conf
echo "lmdb_wal_directory = '"/home/postgres/data"/pgdata_m1/lmdb/wal'" >> /home/postgres/data/pgdata_m1/postgresql.conf
echo "listen_addresses = '*'" >> /home/postgres/data/pgdata_m1/postgresql.conf
echo "wal_consistency_checking='all'" >> /home/postgres/data/pgdata_m1/postgresql.conf
echo "second_buffers=10GB" >> /home/postgres/data/pgdata_m1/postgresql.conf
#master push
echo "host    replication     all             0.0.0.0/0               trust" >> /home/postgres/data/pgdata_mp/pg_hba.conf
echo "host    all             all             0.0.0.0/0               trust" >> /home/postgres/data/pgdata_mp/pg_hba.conf
echo "primary_conninfo = 'application_name=push  dbname=postgres  user=repl password=He3@2023 host="192.168.0.51" port="1668" sslmode=disable sslcompression=0 gssencmode=disable target_session_attrs=any'" >> /home/postgres/data/pgdata_mp/postgresql.conf
echo "hot_standby = on" >> /home/postgres/data/pgdata_mp/postgresql.conf
echo "push_standby = on" >> /home/postgres/data/pgdata_mp/postgresql.conf
echo "wal_recycle=off" >> /home/postgres/data/pgdata_mp/postgresql.conf
echo "fsync = off" >> /home/postgres/data/pgdata_mp/postgresql.conf
echo "wal_keep_size=10000" >> /home/postgres/data/pgdata_mp/postgresql.conf
echo "full_page_writes = off" >> /home/postgres/data/pgdata_mp/postgresql.conf
echo "port="1669 >> /home/postgres/data/pgdata_mp/postgresql.conf
echo "lmdb_page_directory = '"/home/postgres/data"/pgdata_mp/lmdb/page'" >> /home/postgres/data/pgdata_mp/postgresql.conf
echo "lmdb_wal_directory = '"/home/postgres/data"/pgdata_mp/lmdb/wal'" >> /home/postgres/data/pgdata_mp/postgresql.conf
echo "mpush=on" >> /home/postgres/data/pgdata_mp/postgresql.conf
echo "listen_addresses = '*'" >> /home/postgres/data/pgdata_mp/postgresql.conf
touch /home/postgres/data/pgdata_mp/standby.signal
6、修改master文件夹权限
chmod -R 700 /home/postgres/data/pgdata_m1/
chmod -R 700 /home/postgres/data/pgdata_mp/
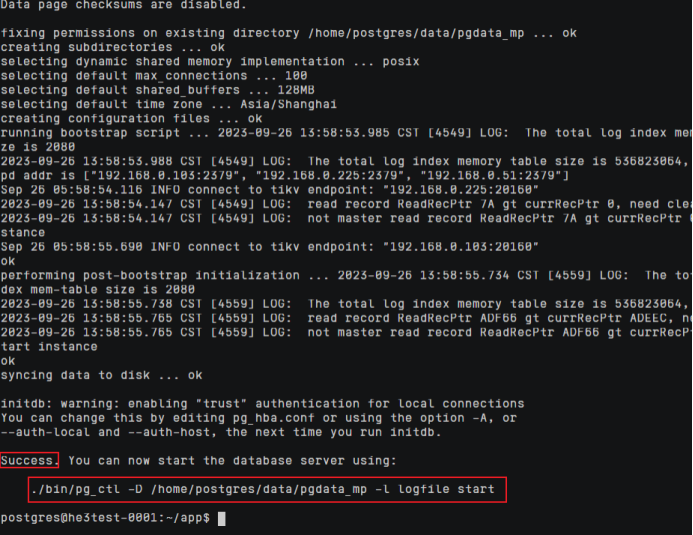
7、启动master数据库
cd /home/postgres/app
./bin/pg_ctl -D  /home/postgres/data/pgdata_m1/ -l /home/postgres/data/logfile_m1 start
创建数据库用户
./bin/psql -h 192.168.0.51 -p 1668 -d postgres -c "create role repl login replication encrypted password 'He3@2023';"
./bin/psql -h 192.168.0.51 -p 1668 -d postgres -c "grant pg_read_all_stats to repl;"
启动主推进节点
./bin/pg_ctl -D /home/postgres/data/pgdata_mp/ -l /home/postgres/data/logfile_mp start
可连接数据库确认是否成功部署:
./bin/psql -h 127.0.0.1 -p 1668

至此master节点部署完成。


 21
21


 被折叠的 条评论
为什么被折叠?
被折叠的 条评论
为什么被折叠?
 到【灌水乐园】发言


