


1. 创建微服务项目
共分为下面五个
商品服务product
存储服务ware
订单服务order
优惠券服务coupon
用户服务member
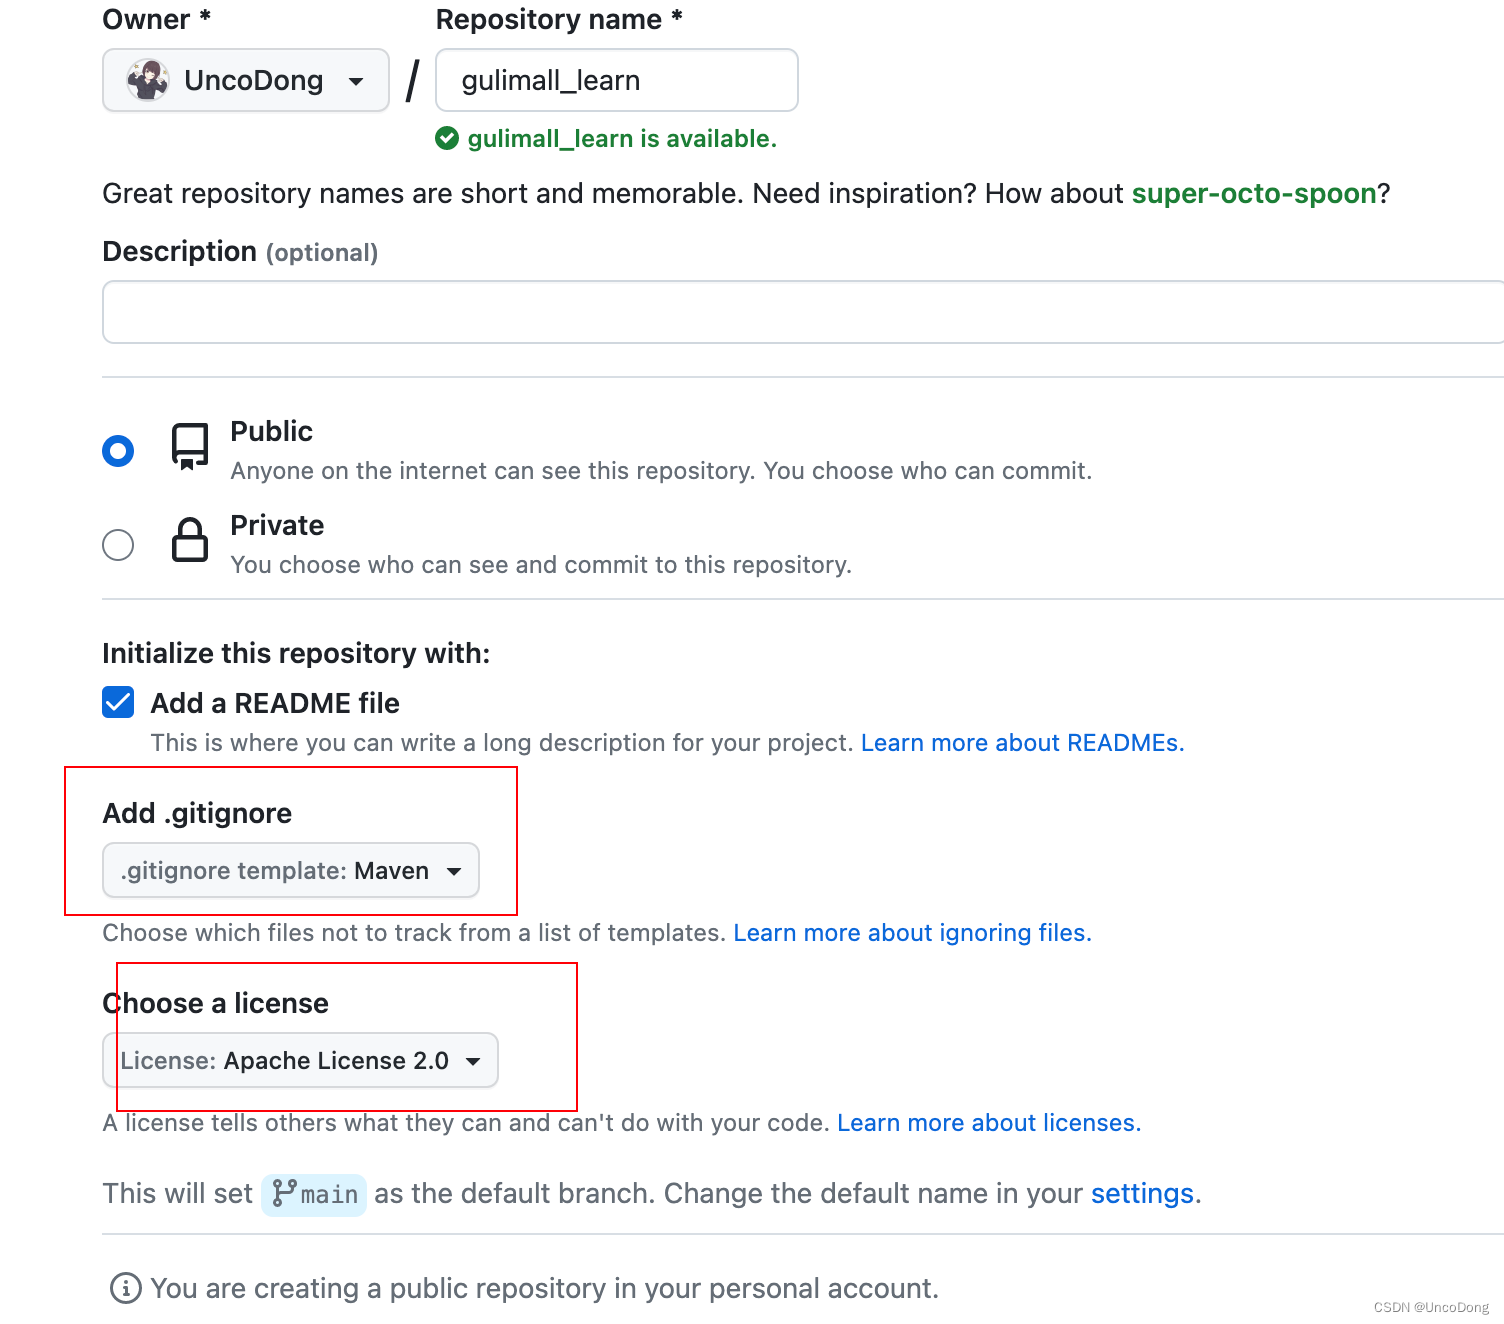
1.1 新建github/gitee项目
首先去github新建项目
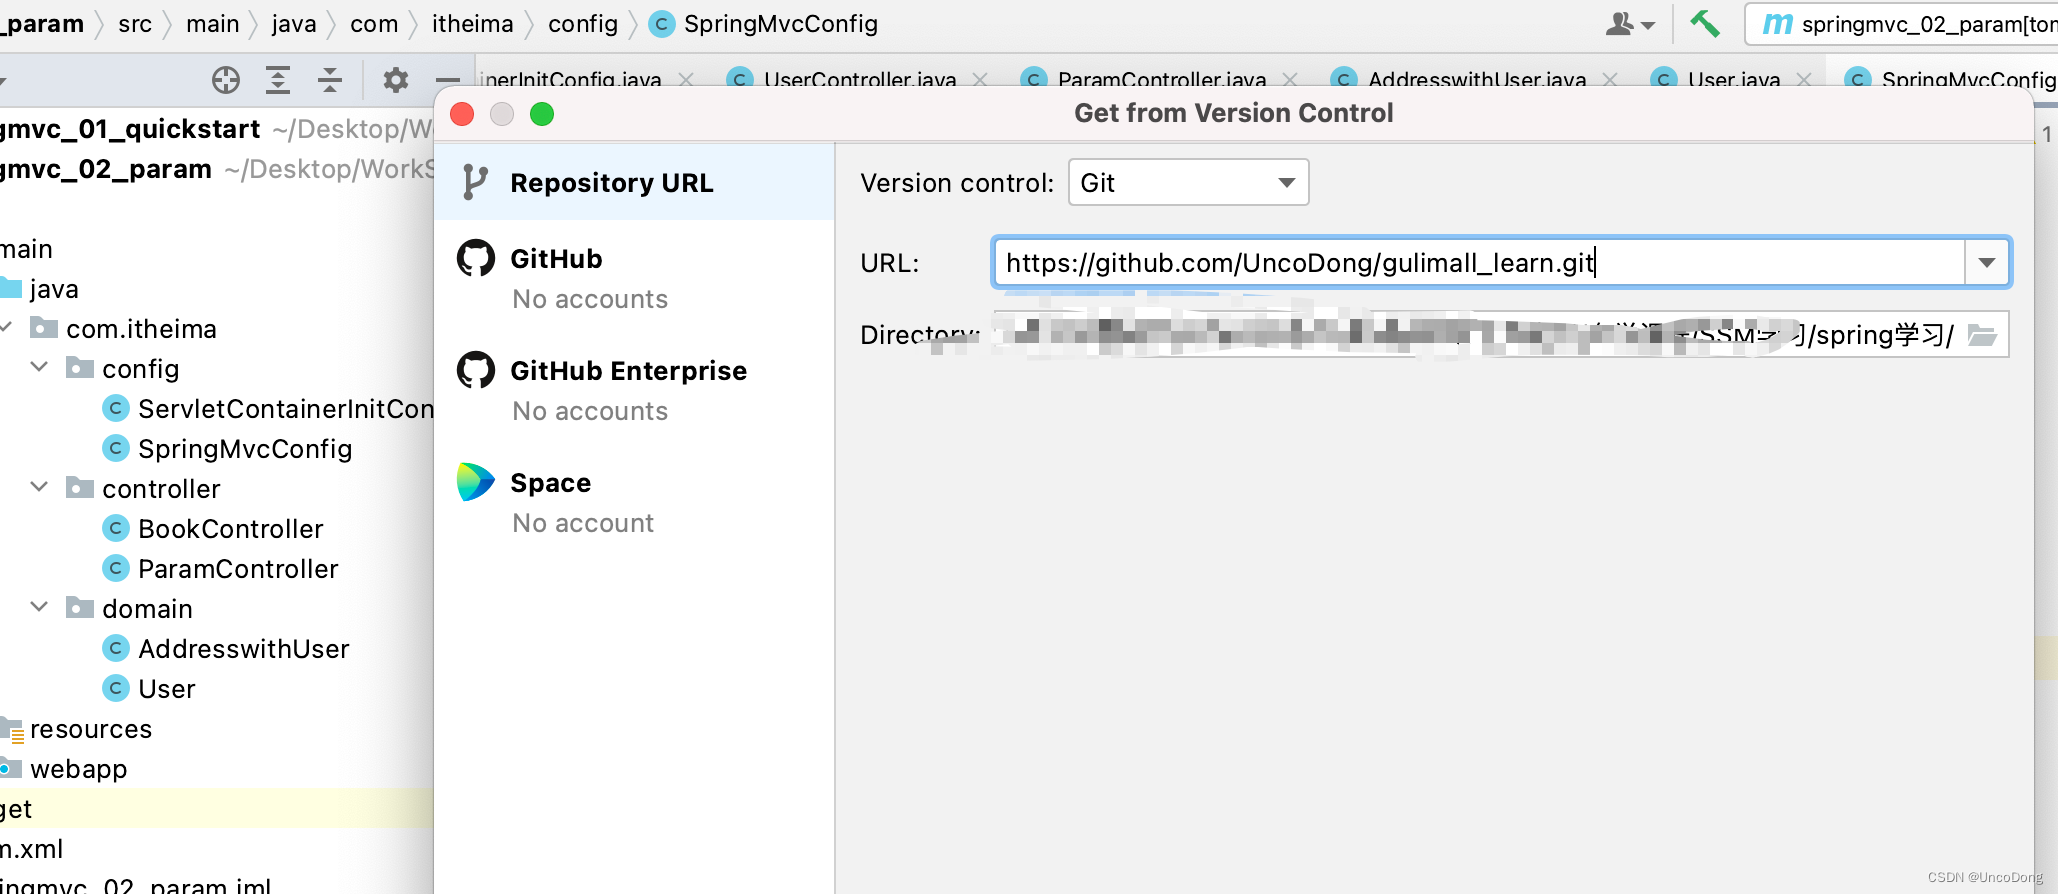
在IDEA中导入项目
从版本控制(Version Control)新建Project
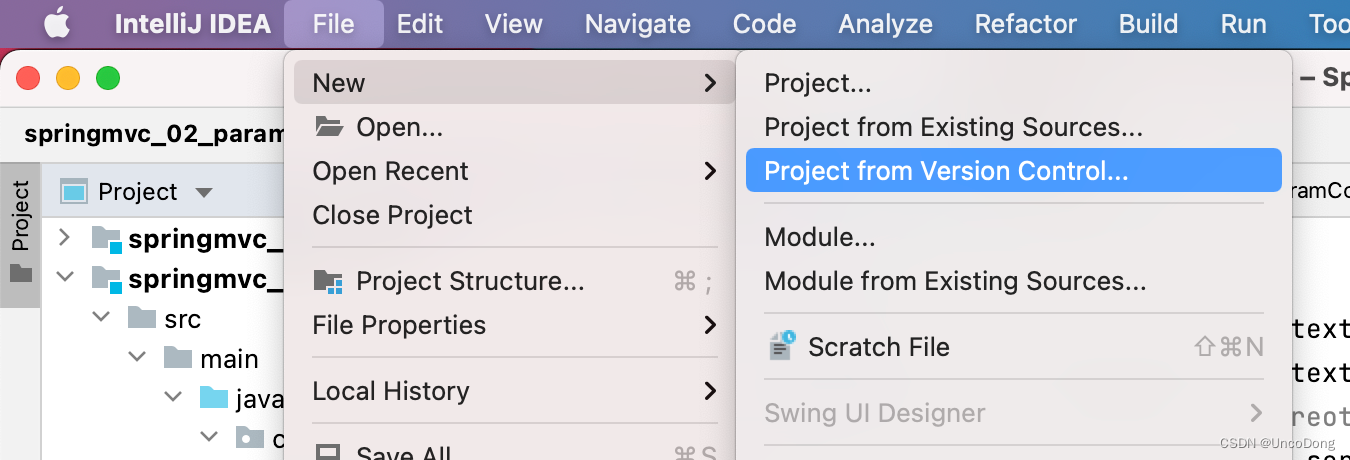
选择路径和git链接
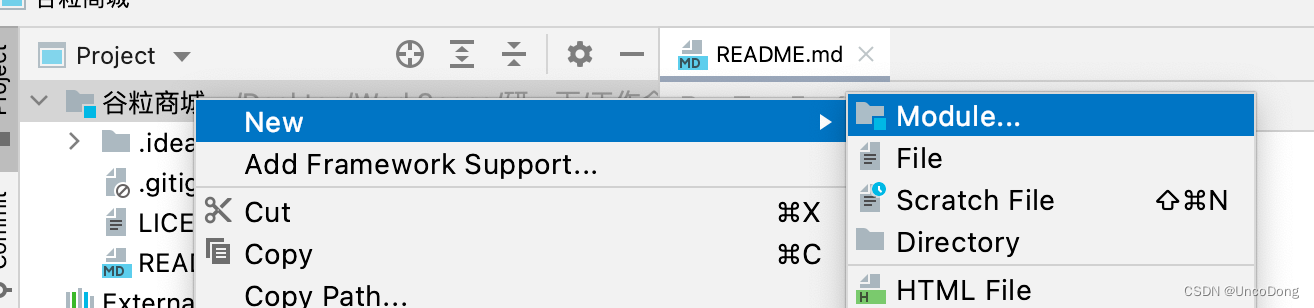
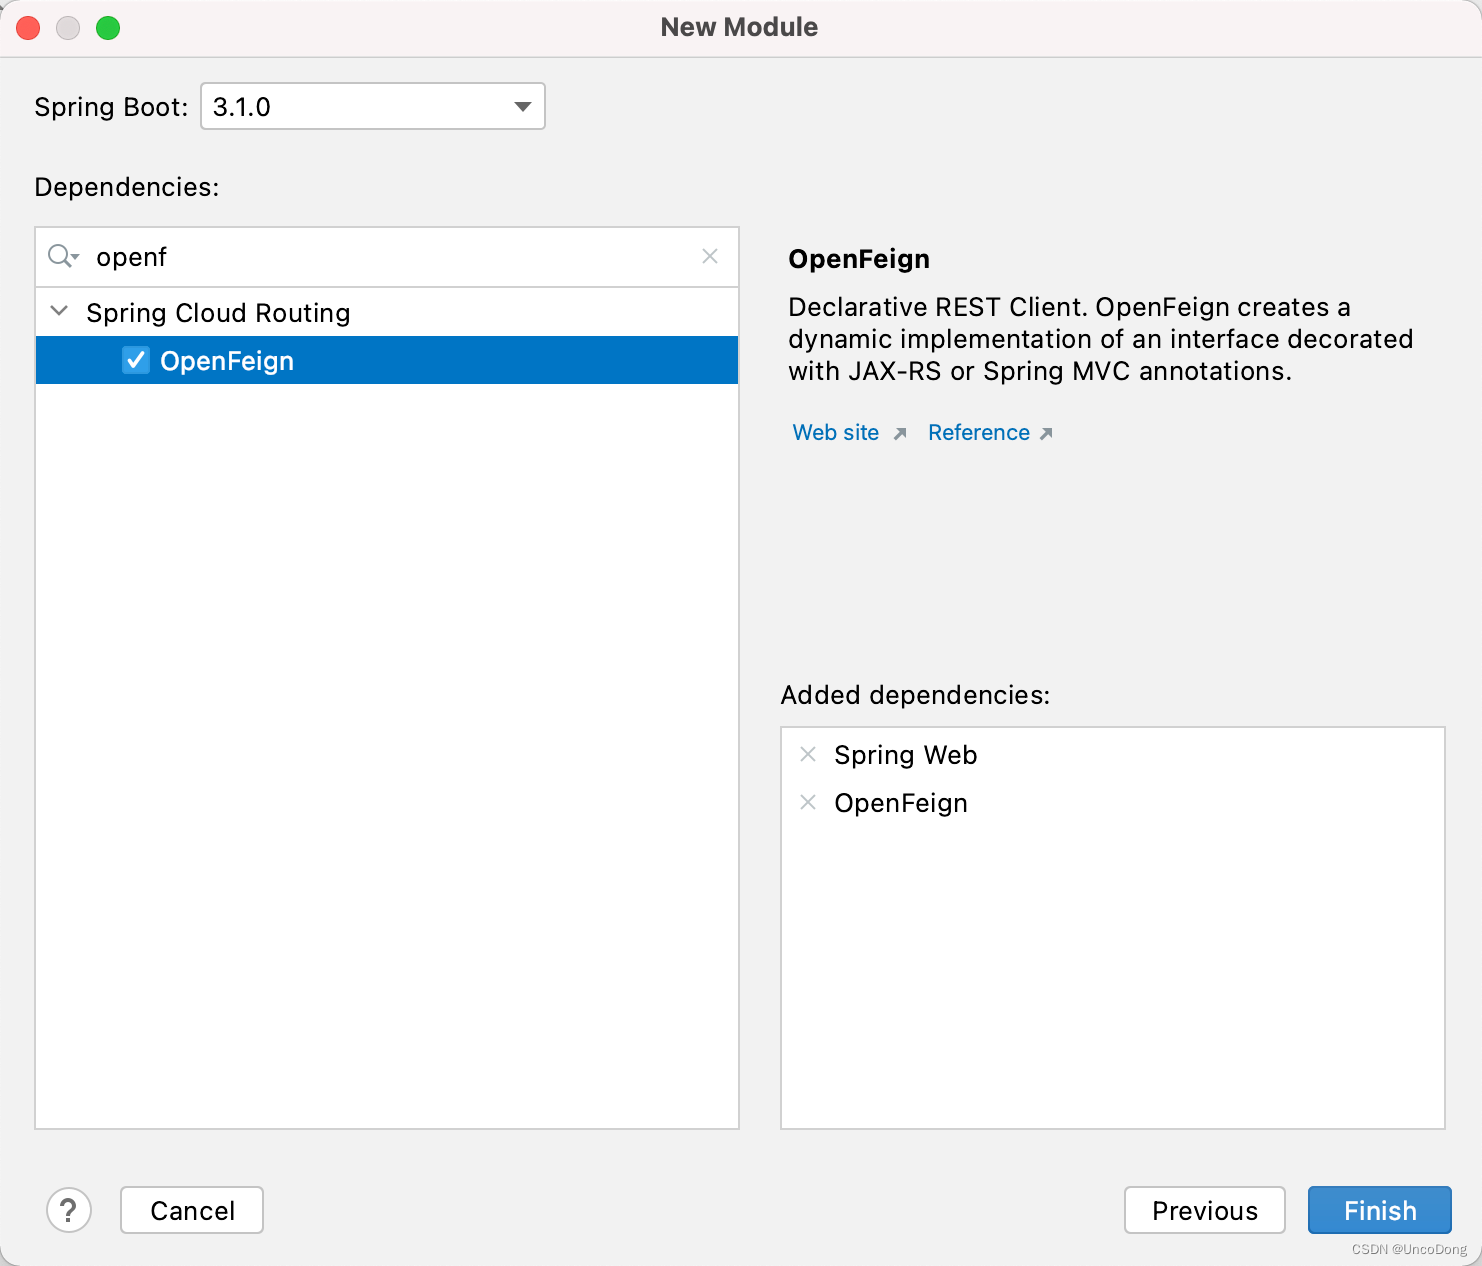
1.2 创建微服务
新建module创建微服务
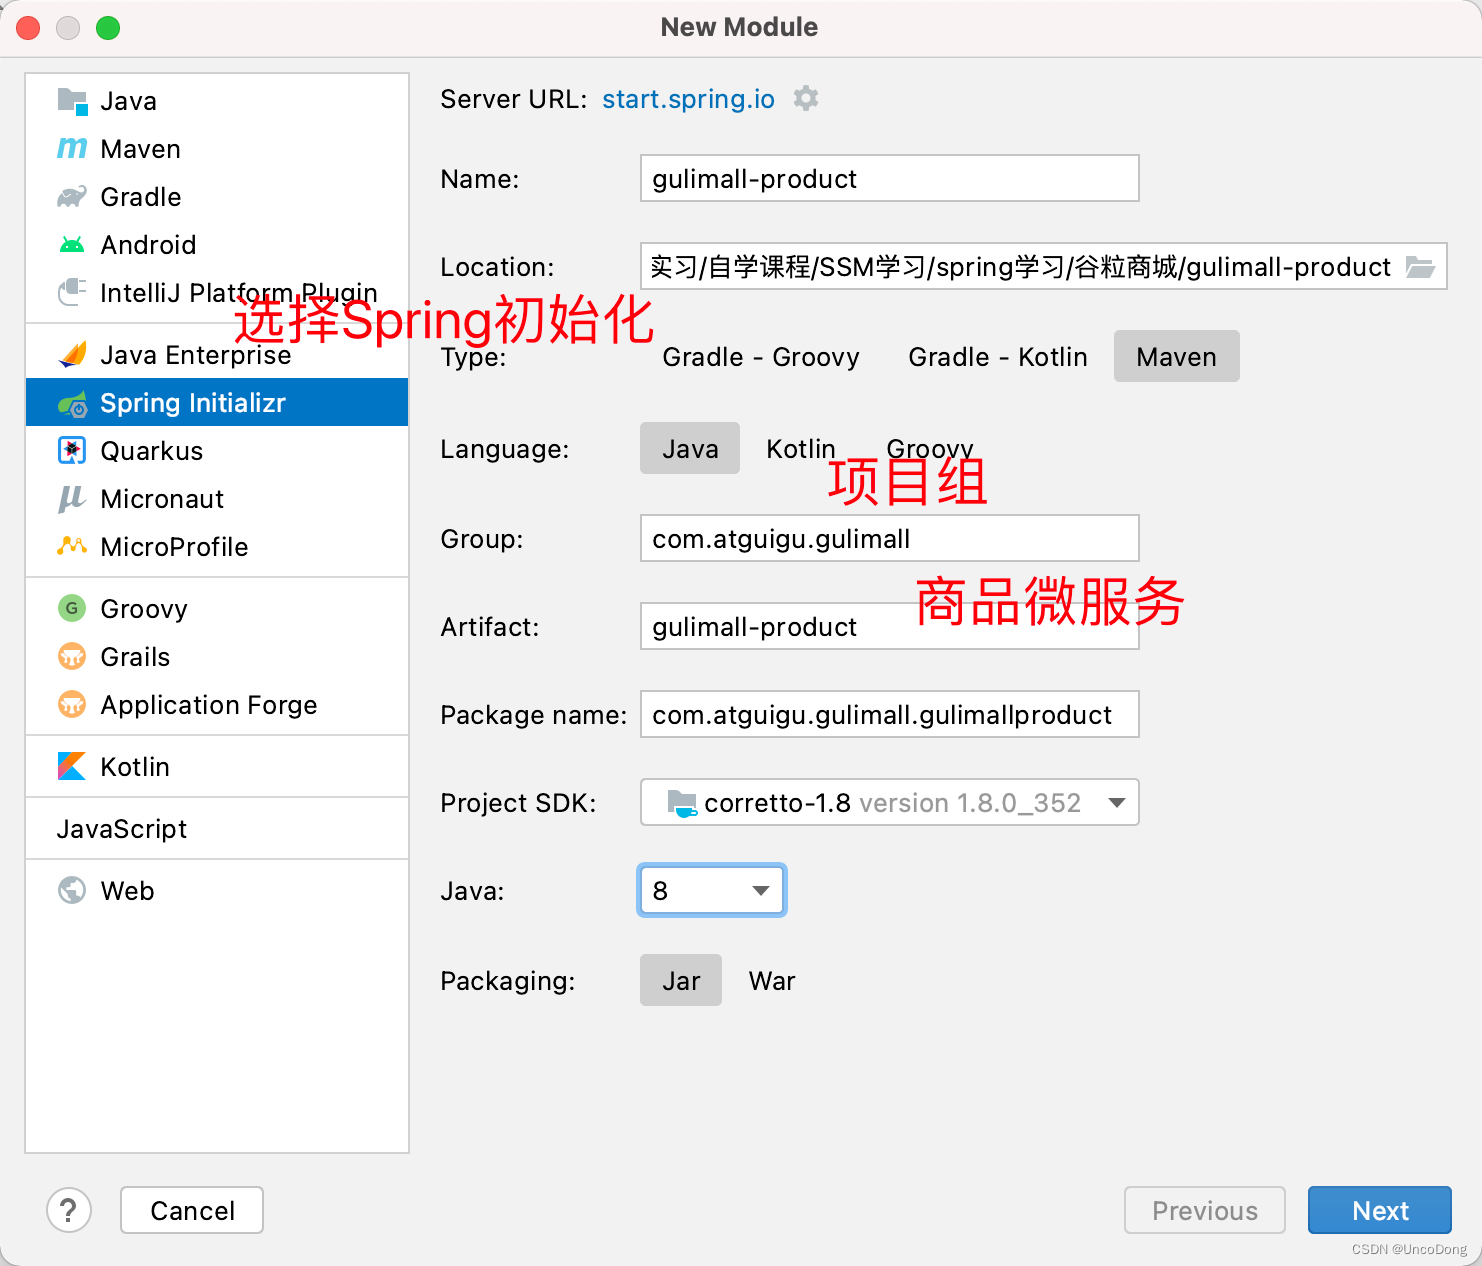
选择微服务组件
- web(Spring web基本)
- openfeign(微服务之间相互调用)
spring-boot-starter-parent和spring-boot-maven-plugin的导入爆红
参考这几篇文章
- 填坑之路!SpringBoot导包坑之spring-boot-starter-parent 相关问题常见解决方案:对maven配置进行更改
- maven详解七 、 与详解 很棒的maven配置讲解 不过这步可能不需要,只需要配置一个mirror就行了
3.ideal引入maven项目一直Resolving dependencies of配置阿里云mirror- 出现错误 Project ‘org.springframework.boot:spring-boot-starter-parent’ not found 上面几步走完还没解决问题,就试试这个。我通过这个解决了
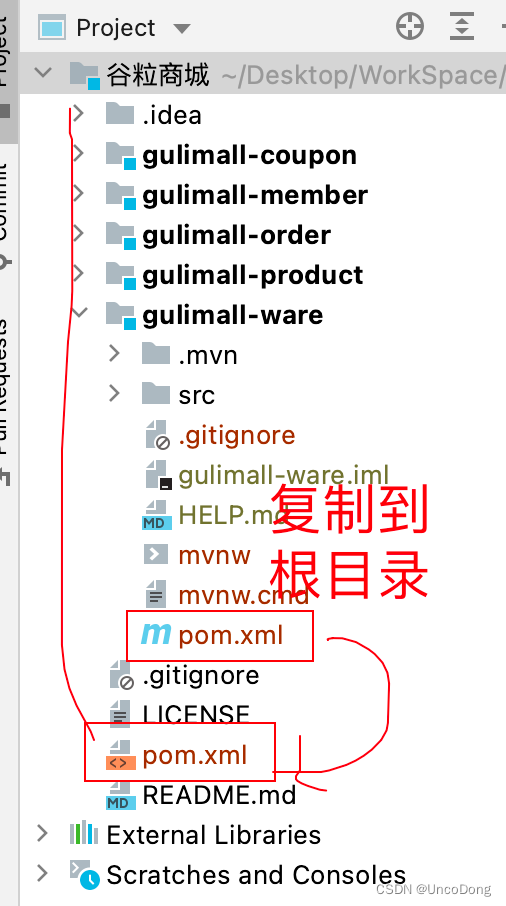
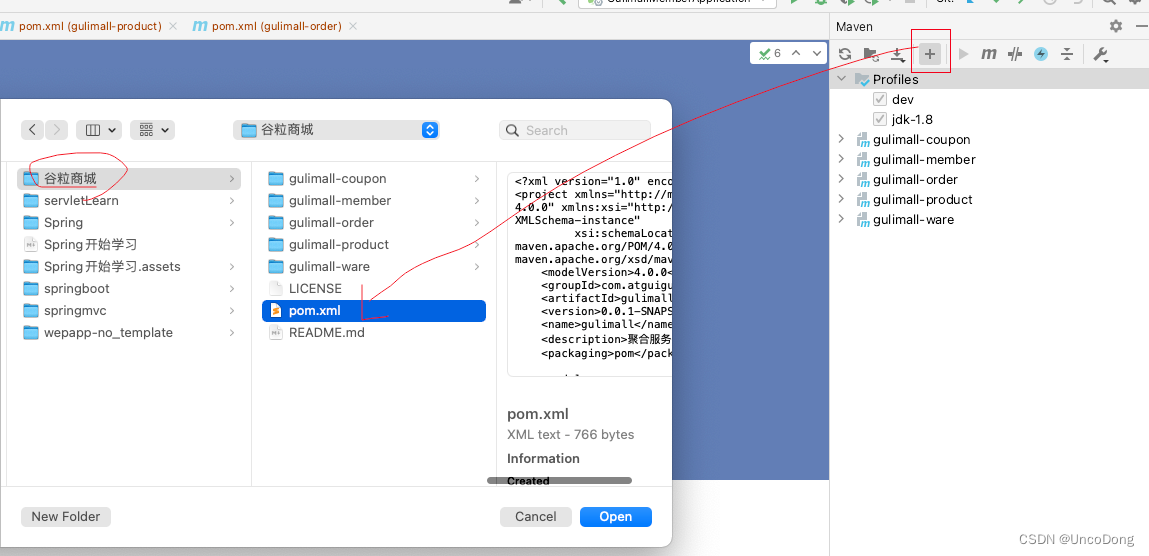
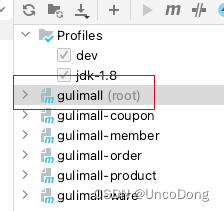
1.3 聚合全部服务
复制一个pom文件作为整合配置文件
xml中删除无用信息,进行整合
<?xml version="1.0" encoding="UTF-8"?>
<project xmlns="http://maven.apache.org/POM/4.0.0" xmlns:xsi="http://www.w3.org/2001/XMLSchema-instance"
         xsi:schemaLocation="http://maven.apache.org/POM/4.0.0 https://maven.apache.org/xsd/maven-4.0.0.xsd">
    <modelVersion>4.0.0</modelVersion>
    <groupId>com.atguigu.gulimall</groupId>
    <!--这个名字待会会显示出来-->
    <artifactId>gulimall</artifactId>
    <version>0.0.1-SNAPSHOT</version>
    <name>gulimall</name>
    <description>聚合服务</description>
    <packaging>pom</packaging>

    <modules>
        <module>gulimall-coupon</module>
        <module>gulimall-member</module>
        <module>gulimall-order</module>
        <module>gulimall-product</module>
        <module>gulimall-ware</module>
    </modules>

</project>
maven中加入这个新的pom
修改.gitignore,删除一些无用的文件
**/mvnw
**/mvnw.cmd
**/.mvn
**/target/
.idea
**/.gitignore
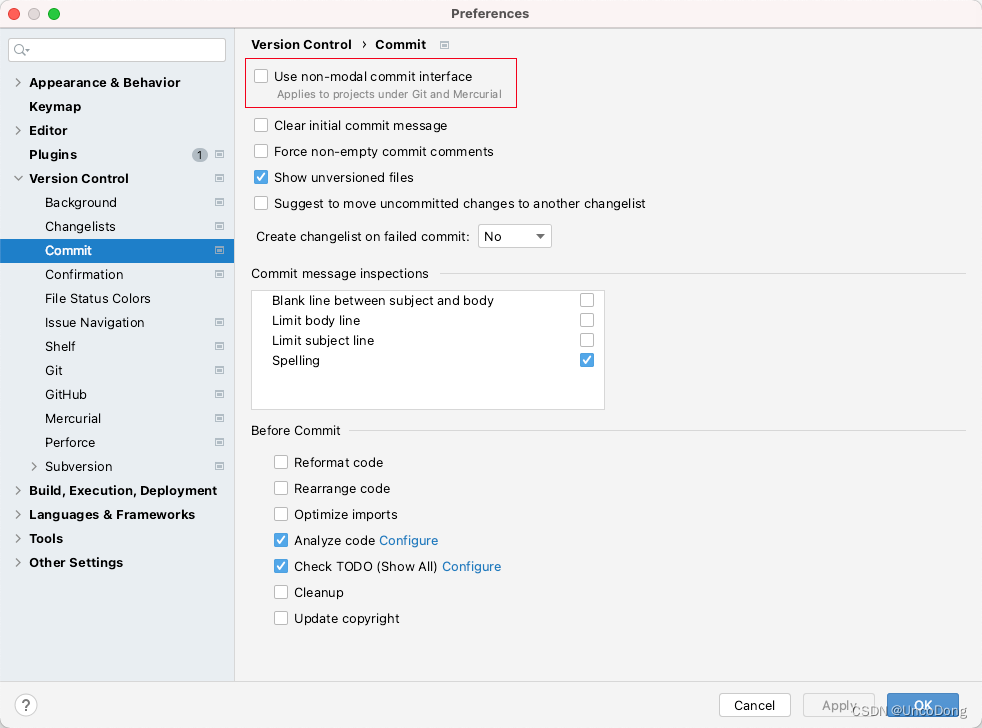
去git中查看效果,如果git没有Local changes参考IDEA新版本界面看不到Version Control窗口的Local Changes显示开启
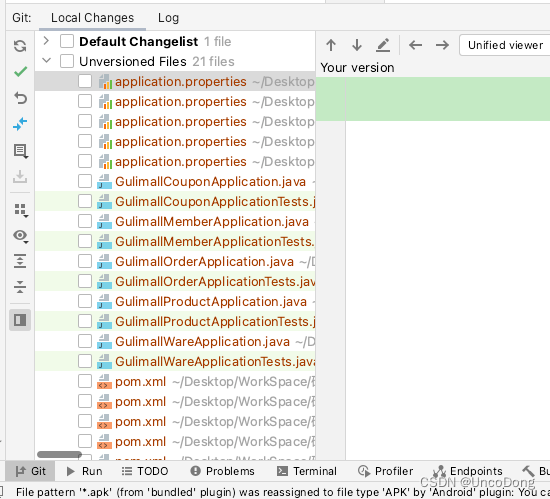
取消这个的勾选就可以
最后git push提交
如何把http的remote换成ssh的
由于已经有http的remote了,因此需要先删掉,再配置
git问题error: remote origin already exists.
1、先输入git remote rm origin 删除关联的origin的远程库
2、关联自己的仓库 git remote add origin https://gitee.com/xxxxxx.git
3、最后git push origin master,这样就推送到自己的仓库了。
git代码上传遇到报错: WARNING: REMOTE HOST IDENTIFICATION HAS CHANGED!
如何解决 Github 3月24日 更新 RSA SSH host key 之后无法克隆项目
Github Blog - We updated our RSA SSH host key 在 2023年3月24日 发布的文章中提到,他们发现 GitHub.com 的 RSA SSH private key 被提交到了一个公开的仓库,他们很快的做出反应保证用户数据安全,替换了新的密钥。
受影响的通过 SSH 与 Github 交互的用户需要替换 ~/.ssh/known_hosts 文件中的旧信息。
通过以下方法修改本地文件即可ssh-keygen -R github.com curl -L https://api.github.com/meta | jq -r '.ssh_keys | .[]' | sed -e 's/^/github.com /' >> ~/.ssh/known_hosts
2. 数据库构建与访问链接
2.1 修改数据库密码
用set password命令,首先进入到服务器后端,然后使用下面语句
set password for 用户名@localhost = password('新密码');
2.2 新建用户,可以任意ip访问
默认的root用户是localhost登陆的
create user 名字@登陆地址 identified by "密码";

grant select,update(权限) on 数据库名.表名 to 用户@登录地址 identified by '密码';

insert into mysql.user(Host,User,Password) values("localhost","test",password("1234"));
- 登陆地址host:指定该用户在哪个主机上可以登陆,如果是本地用户可用localhost,如果想让该用户可以从任意远程主机登陆,可以使用通配符%
- password:该用户的登陆密码,密码可以为空,如果为空则该用户可以不需要密码登陆服务器
- 在grant 中 privileges表示用户的操作权限,如SELECT,INSERT,UPDATE等,如果要授予所的权限则使用ALL
- tablename:表名,如果要授予该用户对所有数据库和表的相应操作权限则可用表示,如.*。
因此需要做的操作有两步
-- 新建用户
create user "名字"@"登陆地址" identified by "密码";
-- 所有ip都能访问
update user set host = '%' where user = '名字';
-- 赋予所有权限
grant all privileges on *.* to '名字'@'%';
-- 刷新
flush privileges;
用本地对navicat等工具测试链接,注意要打开服务器的3306端口
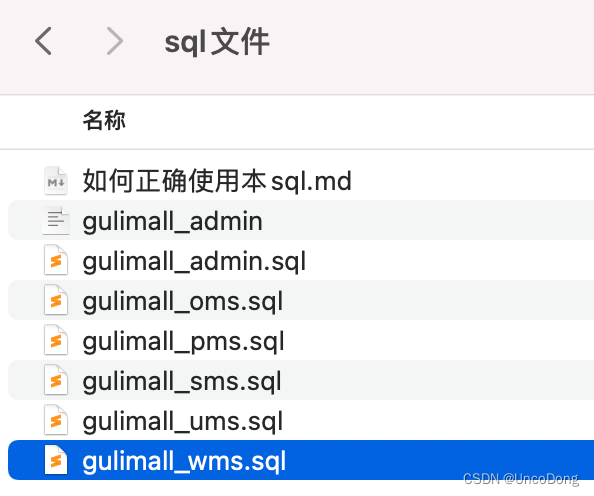
2.3 使用资料里的sql
【谷粒商城】全网最全笔记(1/4) 按照这篇博客的内容,课件的sql可能有问题,去他的github下载就可以
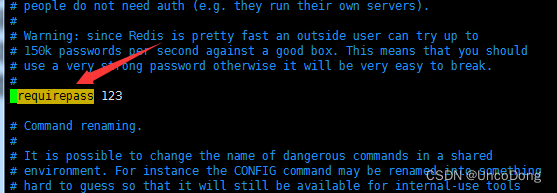
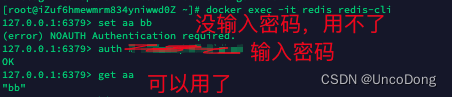
3. redis设置密码与访问
找到redis的配置文件—redis.conf文件,然后修改里面的requirepass,然后重启redisdocker restart redis
4. 人人开源项目
下载对应的工程文件,并删除git
其中,renren-fast放到项目目录下,renren-fast-vue单独启动
git clone https://gitee.com/renrenio/renren-fast.git
git clone https://gitee.com/renrenio/renren-fast-vue.git
4.1 renren-fast后台
1.添加pom依赖
在IDEA项目的整合pom.xml中添加
<modules>
    <module>gulimall-coupon</module>
    <module>gulimall-member</module>
    <module>gulimall-order</module>
    <module>gulimall-product</module>
    <module>gulimall-ware</module>

    <module>renren-fast</module>
</modules>
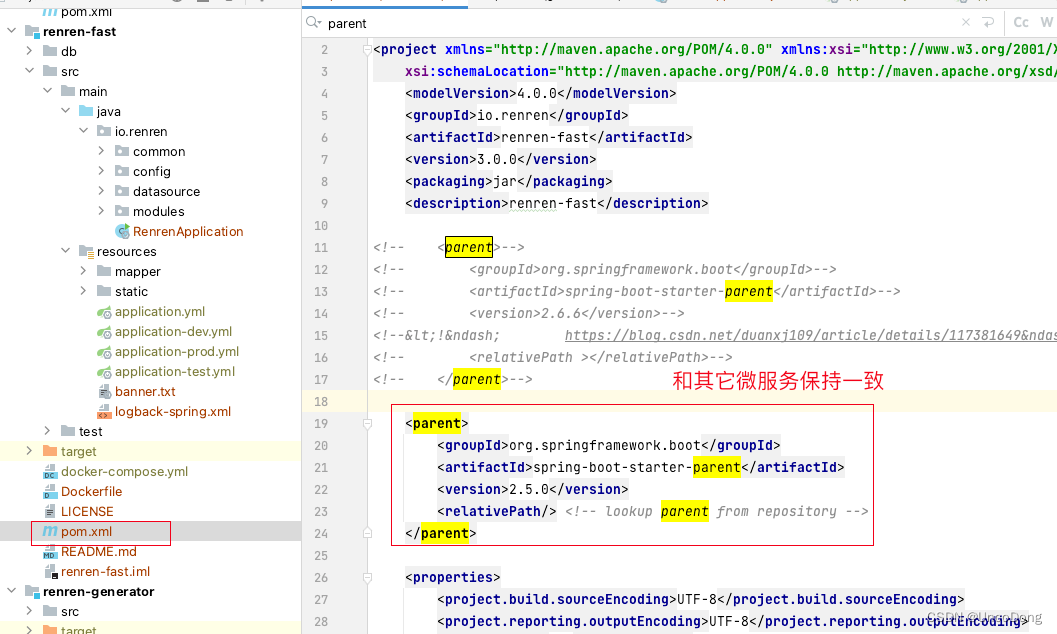
renren-fast的pom.xml和其他微服务的spring-boot-starter-parent保持一致,然后构建
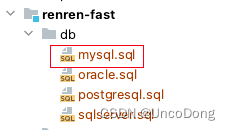
2.添加数据库
新建数据库名renren_fast,在该数据库中执行项目工程提供的sql
3.启动项目
首先去application-dev.yml中修改数据库地址和密码等
url: jdbc:mysql://{IP地址}:3306/renren_fast?useUnicode=true&characterEncoding=UTF-8&serverTimezone=Asia/Shanghai
username: root
password: root
然后运行该java项目下的RenrenApplication
浏览器输入http://localhost:8080/renren-fast/ 得到{“msg”:“invalid token”,“code”:401}就代表无误
4.2 renren-fast-vue
- 进入renren-fast-vue项目目录
- 在终端中输入命令:
npm install,安装项目所需依赖。 - 安装完成后,输入命令:
npm run dev,运行项目。


 1225
1225


 被折叠的 条评论
为什么被折叠?
被折叠的 条评论
为什么被折叠?
 到【灌水乐园】发言


