


1.vue对象和插值语法
1.想要vue工作必须new一个vue对象出来,容器依旧符合html模板规范,只是加入了一些vue的语法例如双括号{{}},
2.容器和一个vue示例对象是一一对应的,不能多个容器被一个vue对象服务
3.真实开发中一般只有一个vue示例,并且配合组件一起使用
4.{{xxxx}}xxx可以是js表达式,也可以读取vue示例中data所有的属性
5.{{}}是插值语法,使用在标签体内容读取插值,标签属性值得用指令语法v-bind:表示会把属性的值当做js语句来执行
6.v-bind:可以简写为:
7.指令语法包括v-bind:,v-if:等等,他可以用于解析标签体内容,标签属性,标签事件等
<!DOCTYPE html>
<html lang="">
<head>
    <meta charset="utf-8">
    <meta http-equiv="X-UA-Compatible" content="IE=edge">
    <meta name="viewport" content="width=device-width,initial-scale=1.0">
    <link rel="icon" href="<%= BASE_URL %>favicon.ico">
    <title><%= htmlWebpackPlugin.options.title %></title>
    <script type="text/javascript"src="vue.js"></script>
</head>

<body >

<div id="root1">
    <h1 >vue绑定啊,{{value1}}</h1>
    <h1 >vue绑定啊,{{value2}}</h1>
    <h1 >表达式时间,{{Date.now()}}</h1>
    <h1>v-bind的例子
    </h1>
    <a v-bind:href="urls.burl1">点击链接1</a>
    <hr>
    <a :href="urls.burl2">点击链接2</a>
</div>
</body>
</html>

<script >
    //1.想要vue工作必须new一个vue对象出来,容器依旧符合html模板规范,只是加入了一些vue的语法例如双括号{{}},
    //2.容器和一个vue示例对象是一一对应的,不能多个容器被一个vue对象服务
    //3.真实开发中一般只有一个vue示例,并且配合组件一起使用
    //4.{{xxxx}}xxx可以是js表达式,也可以读取vue示例中data所有的属性
    //5.{{}}是插值语法,使用在标签体内容读取插值,标签属性值得用指令语法v-bind:表示会把属性的值当做js语句来执行
    //6.v-bind:可以简写为:
    //7.指令语法包括v-bind:,v-if:等等,他可以用于解析标签体内容,标签属性,标签事件等
    const x=new Vue(
        {
            el:'#root1',//指定为哪一个容器div服务,拿到div容器作为一个vue模板后扫描有没有vue的特殊语法,有的话就数据替换
            data:{
                value1:"刘钦华",
                value2:"作业帮",
                urls:{
                    burl1:"https://www.baidu.com/",
                    burl2:"https://www.baidu.com/"
                }
            }
        }
    )
</script>
2.数据单向绑定和双向绑定
MVVM模型是什么??
M就是model:指的是data里面的数据,
V是view:是模板代码,容器,
vm是viewModel:指的就是vue实例对象,作为view和model的桥梁,data里面的数据都会作为vue实例的属性出现,data不是vue的一个属性,是他里面的k-v数据作为他的属性。最后vue原有的属性也可以像data里面的数据被view模板直接使用。
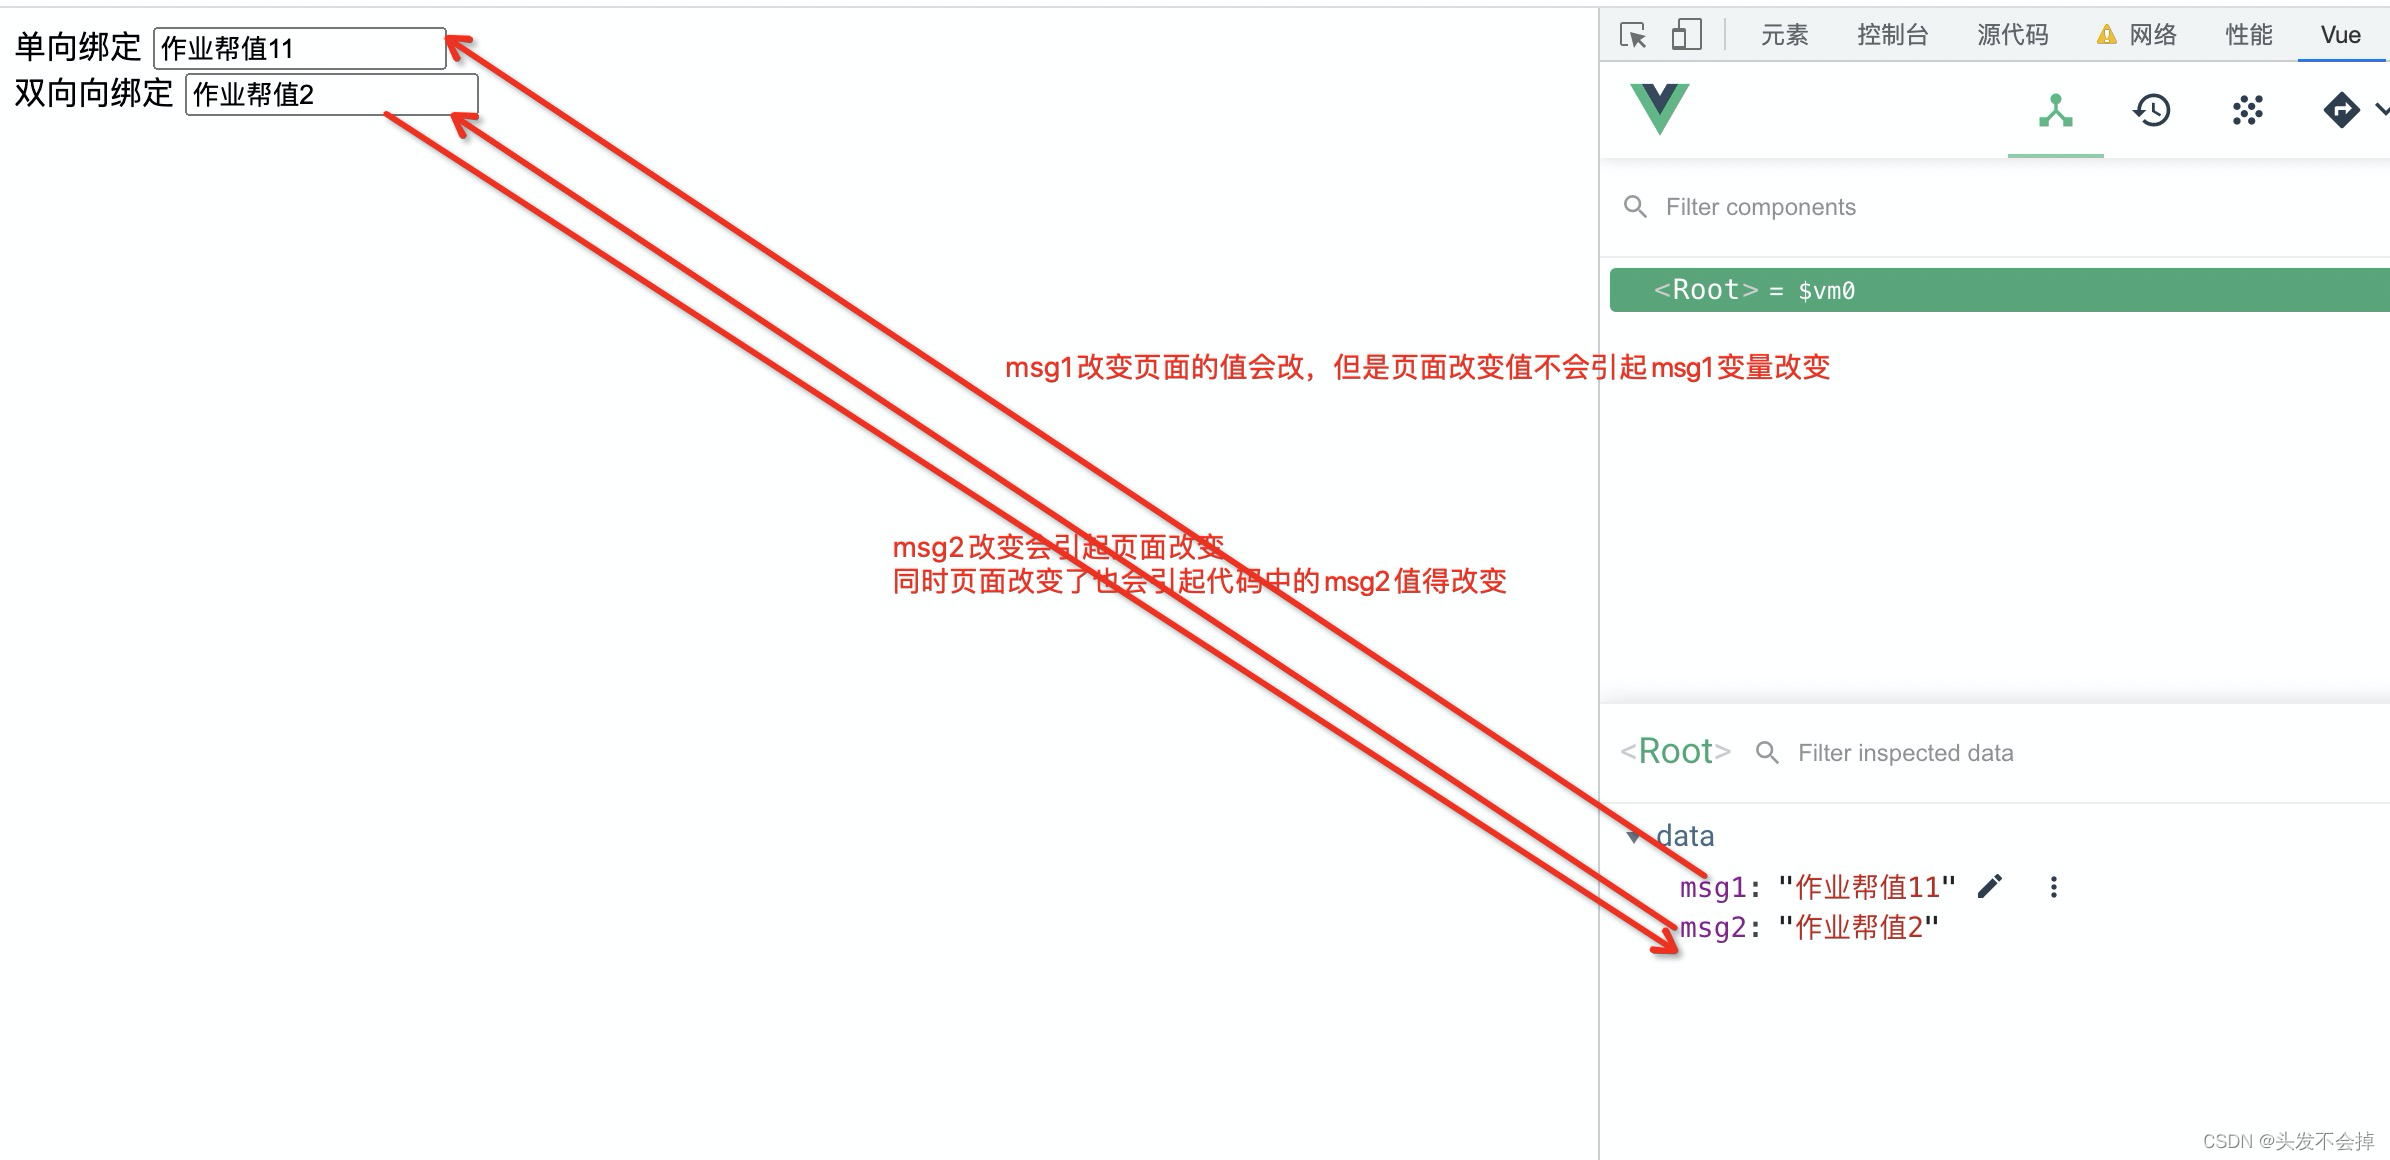
什么是单向和双向
<!DOCTYPE html>
<html lang="en">
<head>
    <meta charset="UTF-8">
    <title>Title</title>
  <script type="text/javascript"src="vue.js"></script>
</head>
<body>
<div id="root">
  单向绑定  <input v-bind:value="msg1"><br>
  双向向绑定  <input v-model:value="msg2">
<!--    v-model:只能用在表单类标签元素(输入类有value属性)例如 :input,select;
v-bind:简写为:
v-model:简写为v-model
-->
    <br>
    单向绑定简写  <input :value="msg1"><br>
    双向向绑定简写  <input v-model="msg2">
</div>


</body>
<script>
    new Vue(
        {
            el:"#root",
            data:{
                msg1:"作业帮值111",
                msg2:"作业帮值2"
            }
        }
    )
</script>
</html>
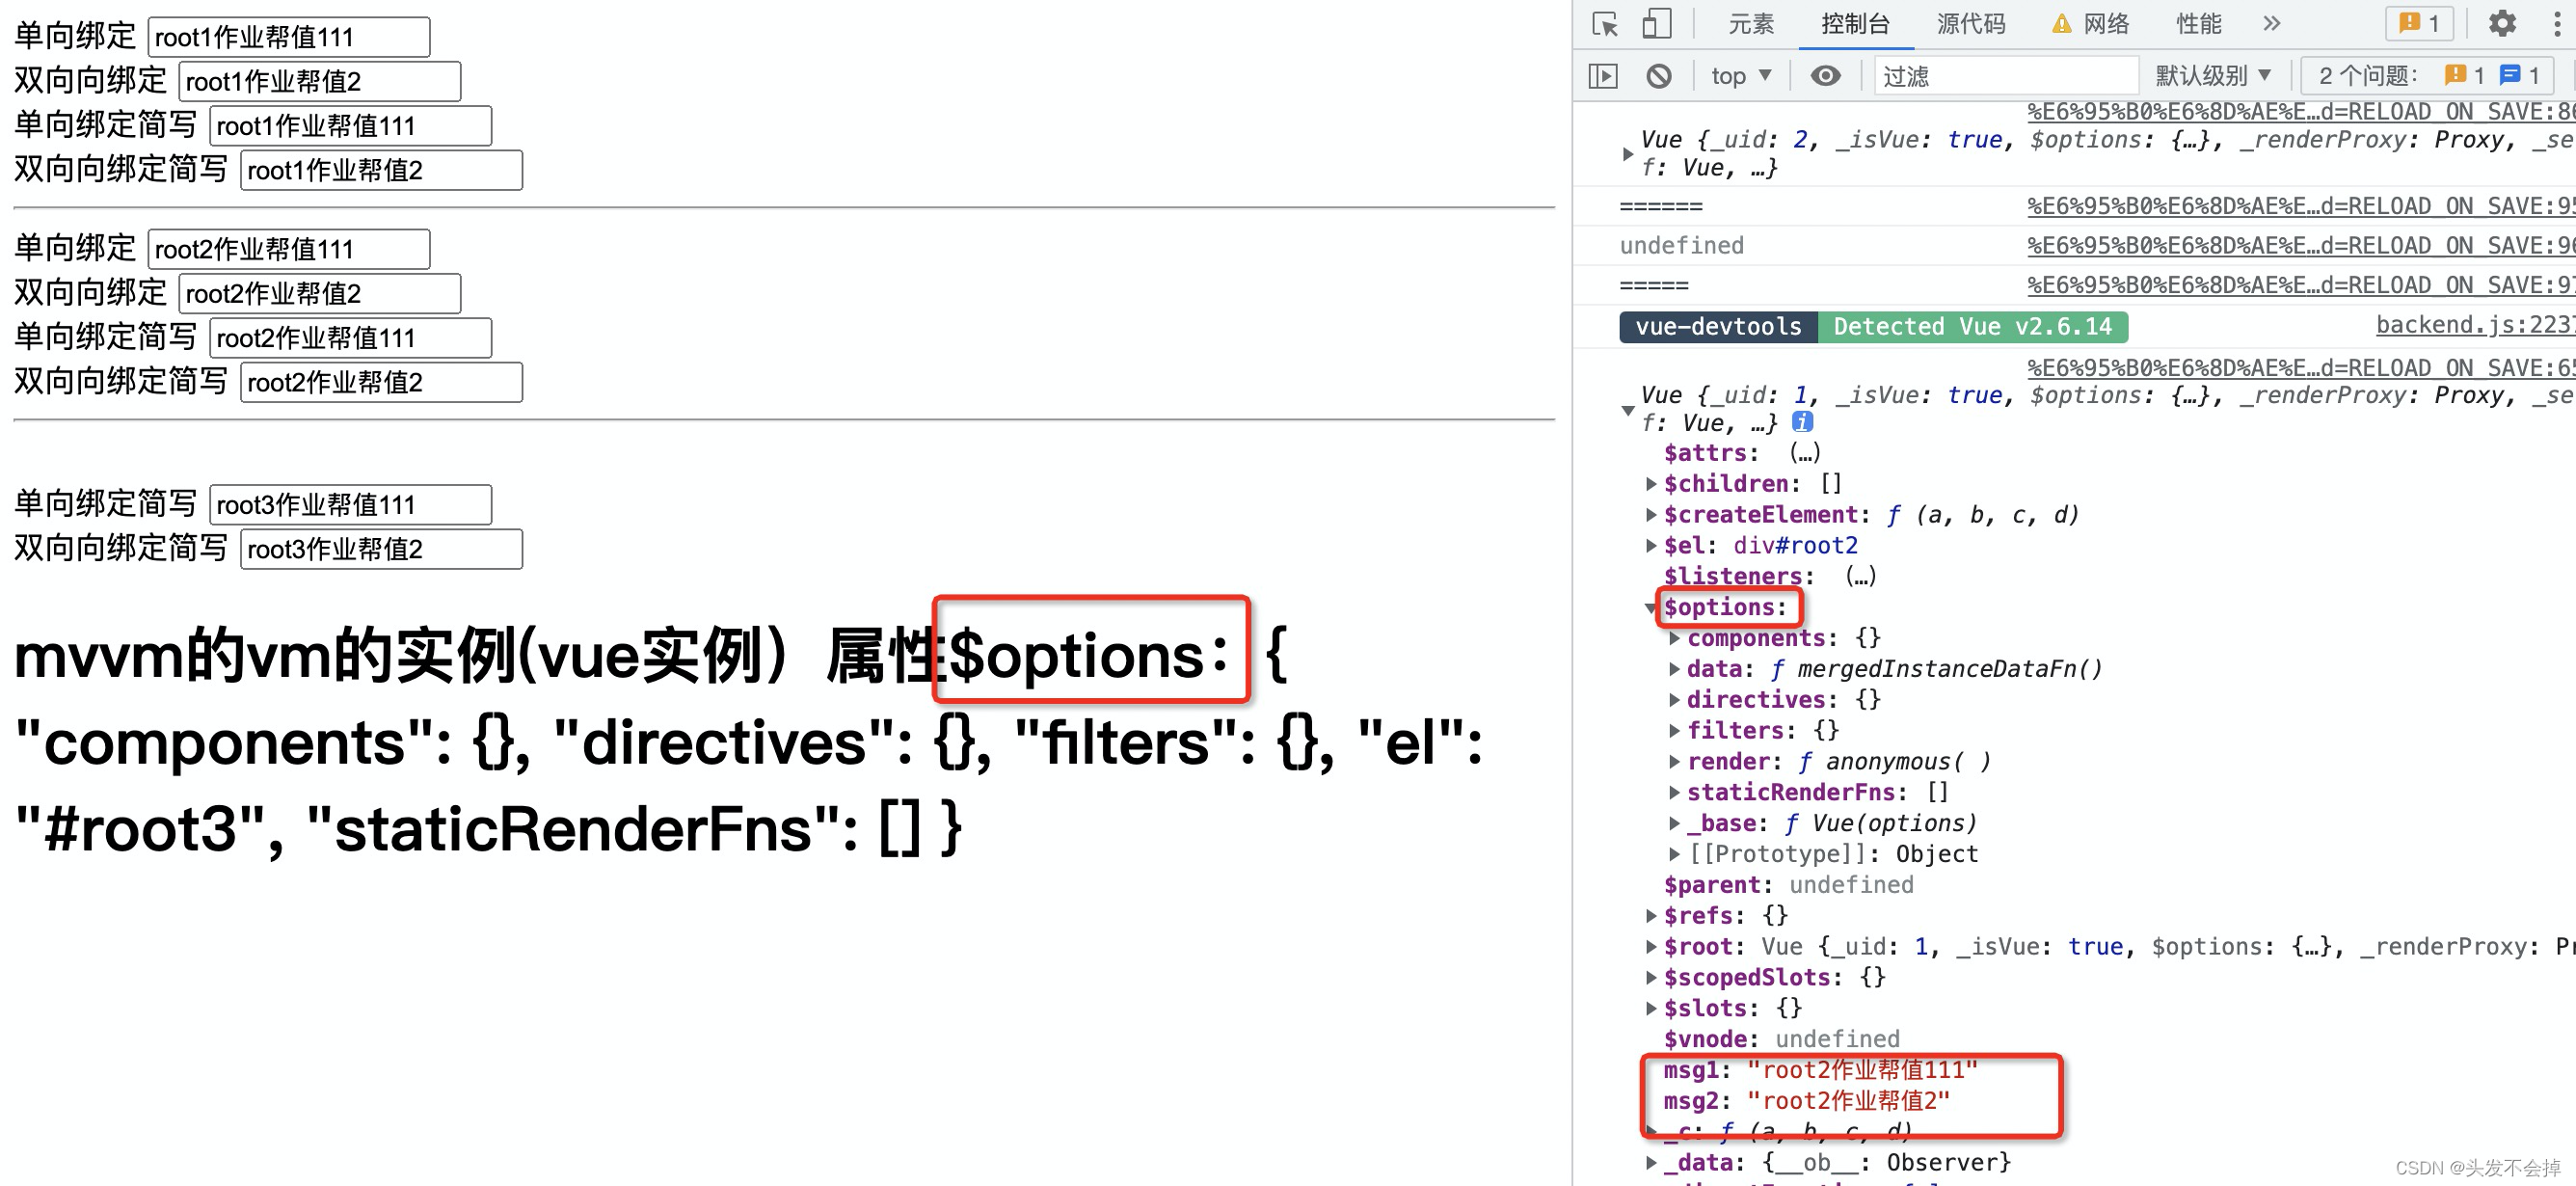
3.挂载mount和data数据的写法
<!DOCTYPE html>
<html lang="en">
<head>
    <meta charset="UTF-8">
    <title>Title</title>
  <script type="text/javascript"src="vue.js"></script>
</head>
<body>
<div id="root">
  单向绑定  <input v-bind:value="msg1"><br>
  双向向绑定  <input v-model:value="msg2">
<!--    v-model:只能用在表单类标签元素(输入类有value属性)例如 :input,select;
v-bind:简写为:
v-model:简写为v-model
-->
    <br>
    单向绑定简写  <input :value="msg1"><br>
    双向向绑定简写  <input v-model="msg2">
</div>
<hr>

<div id="root2">
    单向绑定  <input v-bind:value="msg1"><br>
    双向向绑定  <input v-model:value="msg2">
    <!--    v-model:只能用在表单类标签元素(输入类有value属性)例如 :input,select;
    v-bind:简写为:
    v-model:简写为v-model
    -->
    <br>
    单向绑定简写  <input :value="msg1"><br>
    双向向绑定简写  <input v-model="msg2">
</div>
<hr>

<div id="root3">
    <br>
    单向绑定简写  <input :value="msg1"><br>
    双向向绑定简写  <input v-model="msg2">
</div>


</body>
<script>
    new Vue(
        {
            el:"#root",
            data:{
                msg1:"root1作业帮值111",
                msg2:"root1作业帮值2"
            }
        }
    )
    //没有el使用mount挂载容器
 const  w=  new Vue(
        {
            //el:"#root",
            data:{
                msg1:"root2作业帮值111",
                msg2:"root2作业帮值2"
            }
        }
    )
    setTimeout(()=>{
        console.log(w)
        w.$mount("#root2")//vue对象绑定某一个容器
    },1000)//一秒钟之后再绑定

// data的第二种方法(组件的方式必须使用这种)
    aa={
        name:"张三",
        myfunc1:function (){
            return "aaa"
        },
        myfunc2(){//这里相当于函数名为myfunc2的函数缩写
            return "bb"
        }
    }
    console.log(aa.myfunc1())
    console.log(aa.myfunc2())
    //箭头函数没有自己的this
    const  m=  new Vue(
        {
            el:"#root3",
            data:function (){
                console.log(this)//data里面的this指的是m整个对象,且不能写成箭头函数,
                // 箭头函数里面的this是window对象不是vue对象
              return   {
                    msg1:"root3作业帮值111",
                        msg2:"root3作业帮值2"
                }
            }
        }
    )
    console.log("======")
    console.log(m.data)
    console.log("=====")

</script>
</html>```


## 4.js基础Object.defineProperty,对象属性和某一个变量挂载(setter,getter)
通过 Object.defineProperty就可以实现数据代理,数据代理就是通过一个对象可以对代理对另外一个对象的操作(读和写)
```javascript
<script type="text/javascript">
     person={
"name":"作业帮",
        "sex":"男",
    }
    number=18
    Object.defineProperty(person,"age",{
        // value:18,
        // enumerable:true,//可枚举,默认值是false
        // writable:true,//可修改,默认值是FALSE
        get:function (){
            console.log("有人读取了age属性的值是")
            return number//这个return就是把number和person这个age属性绑定了,每次读取age就是返回number
        },
        set(value){//相当于set:function(value){
            console.log("有人修改了了age属性的值是:",value)
            number=value//这个赋值就是把改变了person.age改变之后自动改变了number,每次读取age就是返回number,也是改变自己
        }

    })
</script>

vue对象里面的属性msg1和msg2是由data对象里的数据代理,Vue对象会给他属性生成setter和getter完成对data数据的绑定。
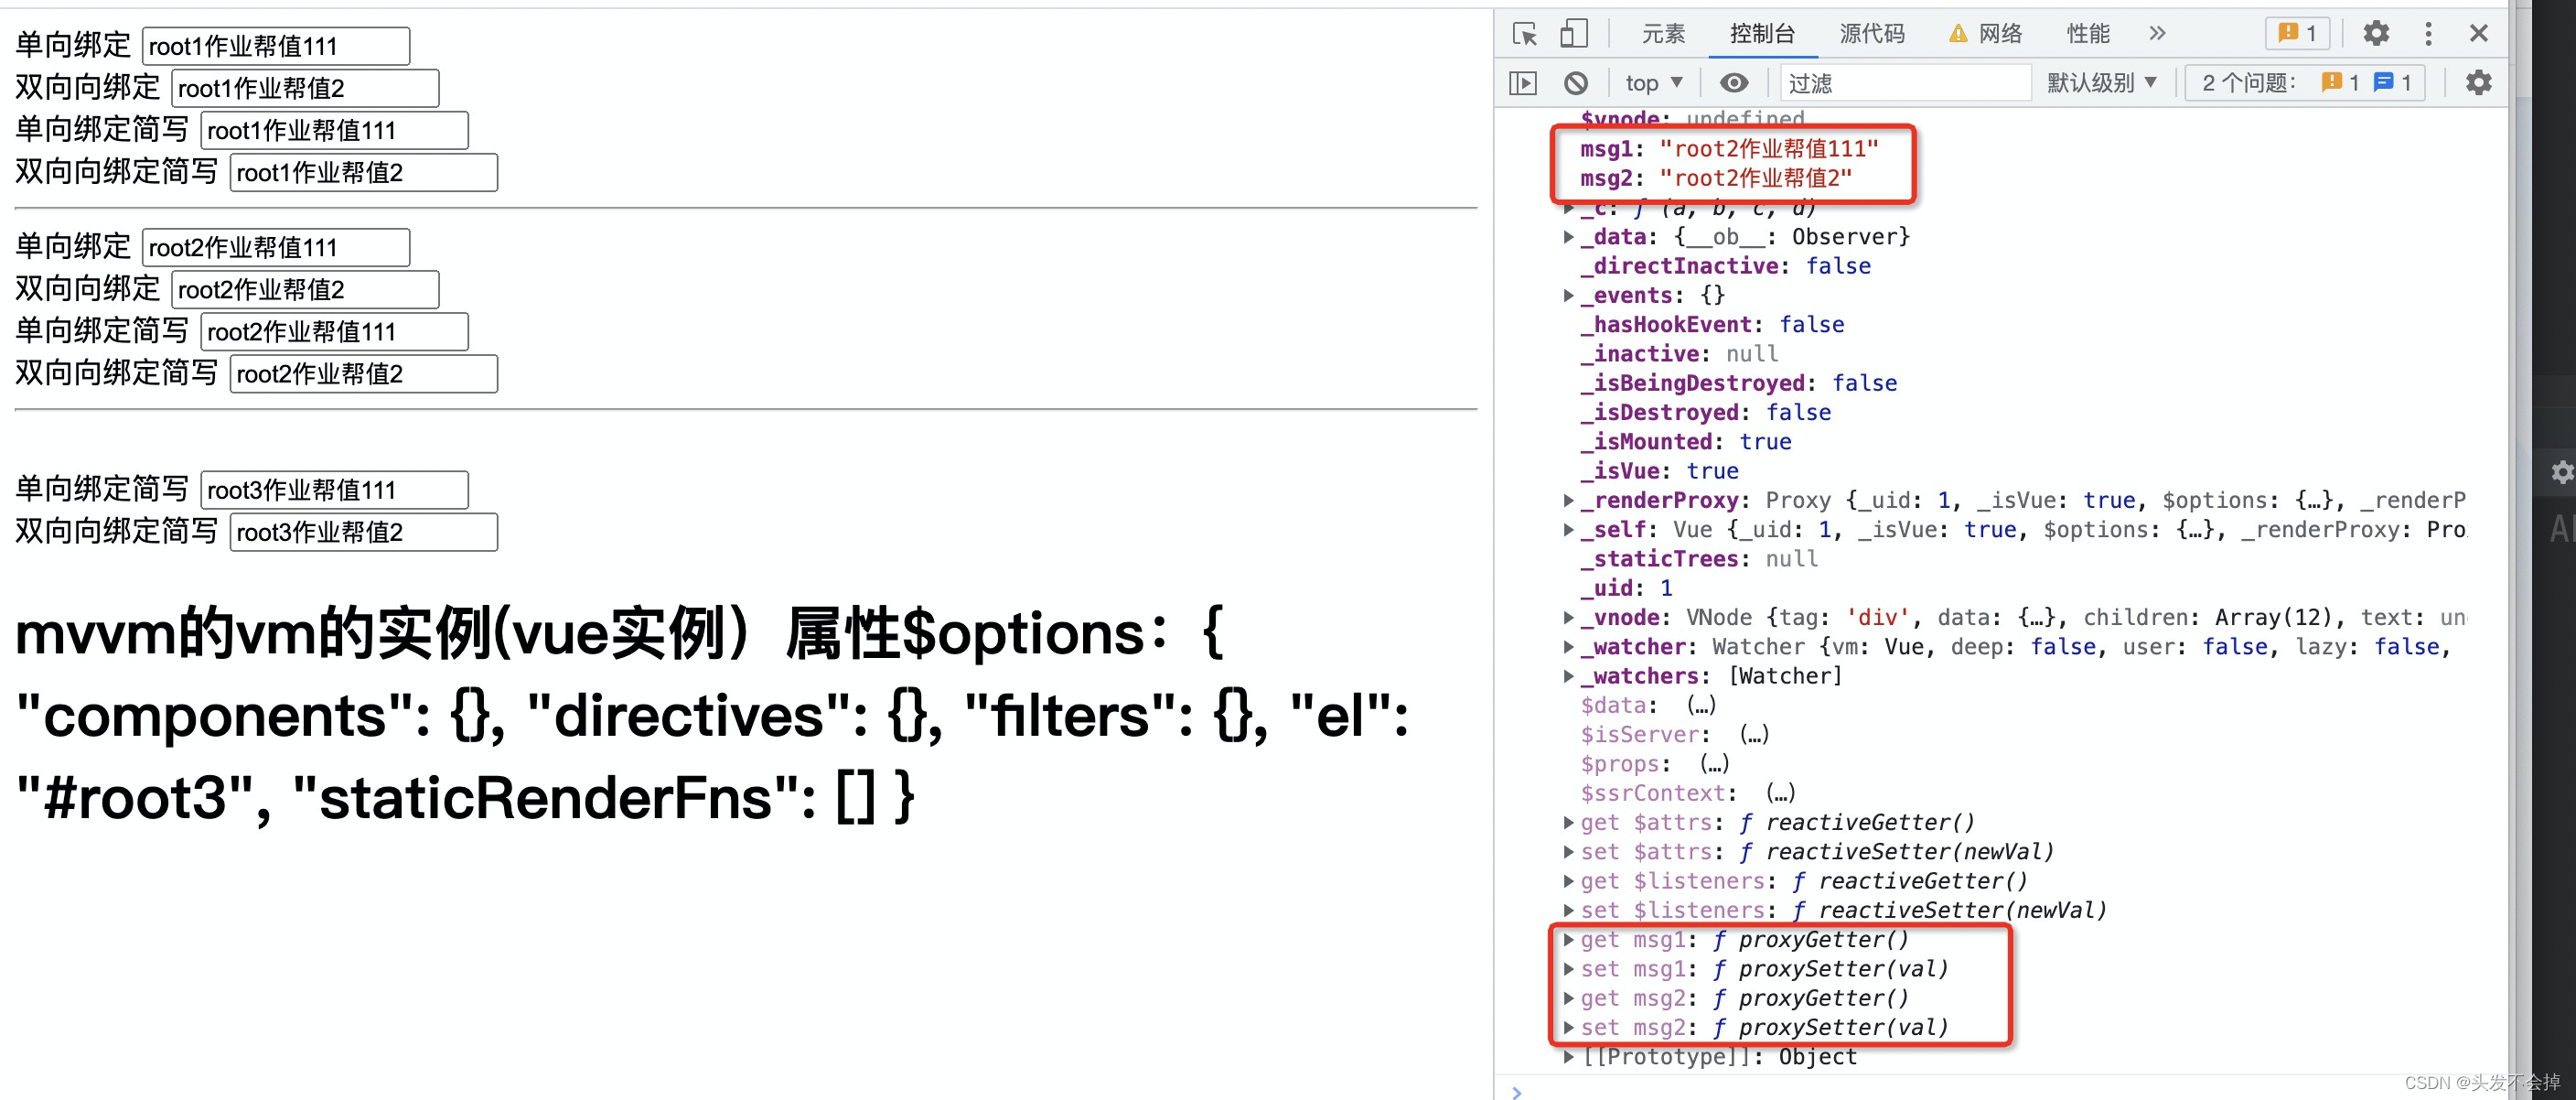

new实例化vue对象的时候实际上把data数据对象自己又存了了一份data。vue的直接属性msg1和msg2是给页面模板用,存的_data是作数据劫持的
5.vue的事件处理
1.使用v-on:xxx或者@xxx来绑定事件,作数据处理,xxx是事件名称,例如@click
2.所有事件回调函数要放在vue对象的methods里面,且回调函数不要写成箭头函数
3.事件的修饰符,vue的修饰符放在@XXX.修饰符名称=
常见事件修饰符参考:
3.1: .stop 等同于javaScript 中的event.stopPropagation(); 防止事件冒泡;
3.2: .prevent: 等同于javaScript 中event.preventDefault(); 防止执行预设的行为。
3.3: .capture: 与事件冒泡方向相反, 事件捕获由外到内。
3.4: .self: 只会触发自己范围内的事件, 不包含子元素。
3.5: .once() 事件 只会触发一次。
3.6: .passive()事件默认行为立刻执行,不会等回调函数执行完再执行默认行为
4.键盘事件参考:@keyup或则@keydown
具体要按下哪一个键才触发函数可以后面加key别名,例如@keyup.enter=“myfunc()”,按下回车键enter就会触发函数,单纯的@keyup或keydown后面没加别名,按下每一个键盘键都会触发函数。有些系统键盘别名配合事件使用是不行的
<!DOCTYPE html>
<html lang="en">
<head>
    <meta charset="UTF-8">
    <title>事件处理</title>
    <script type="text/javascript"src="vue.js"></script>
</head>
<body>
<div id="root1">
    <h1>{{msg1}}</h1>
    <button @click="funct1(msg1)">点击展示信息1</button><br>
    <button v-on:click="funct2($event,num1)">点击展示信息2</button><br>
<!--    $event是一个默认的事件对象-->
    <a @click.prevent="funct1(msg1)" href="https://www.baidu.com/">点击链接prevent不跳转</a>
    <br>
<!--    prevent防止执行预设的行为,a链接预设行为就是跳转-->
   <div @click="funct1(msg1)" id="id1">
       <div @click="funct1(msg1)" style="background-color: aqua">
           <button @click.stop="funct1(msg1)">按钮stop阻断外面两个div的click事件</button><br>
       </div>
   </div>
    <div @click="funct1(msg1)" style="background-color: aqua">
<!--        修饰符可以连续写-->
        <a @click.prevent.stop="funct1(msg1)" href="https://www.baidu.com/">@click.prevent.stop阻止外面冒泡也prevent不跳转</a>
    </div>
    <div>
        <h1>键盘事件:</h1>
        <input @keyup="keyFunc">
        <input @keyup.Control.y="keyFunc2">
<!--        @keyup.enter="keyFunc"表示回车键才出发-->
    </div>
</div>


</body>
<style>
#id1{
    padding: 10px 10px;
    background-color: red;
}
</style>
<script >
     vm =new Vue({
        data:function (){
            return {
                msg1:"作业帮11",
                num1:111
            }
        },
        methods:{
            funct1:function (m){
                console.log("func111")
                alert("funct1事件弹窗你好"+m)
            },
            funct2:function (event ,a){
                console.log("func111")
                console.log(a)
                console.log(event)
                alert("funct2事件弹窗你好"+a)
            },
            keyFunc:function (e){
                console.log(e.key)
                if (e.keyCode!=13)//13是回车键key的编码
                    return
                alert(e.target.value)//value是标签的值
            },
            keyFunc2:function (e){
                console.log(e.key)
                alert(e.target.value)//value是标签的值
            },
        }
    })
    vm.$mount("#root1")
</script>
</html>
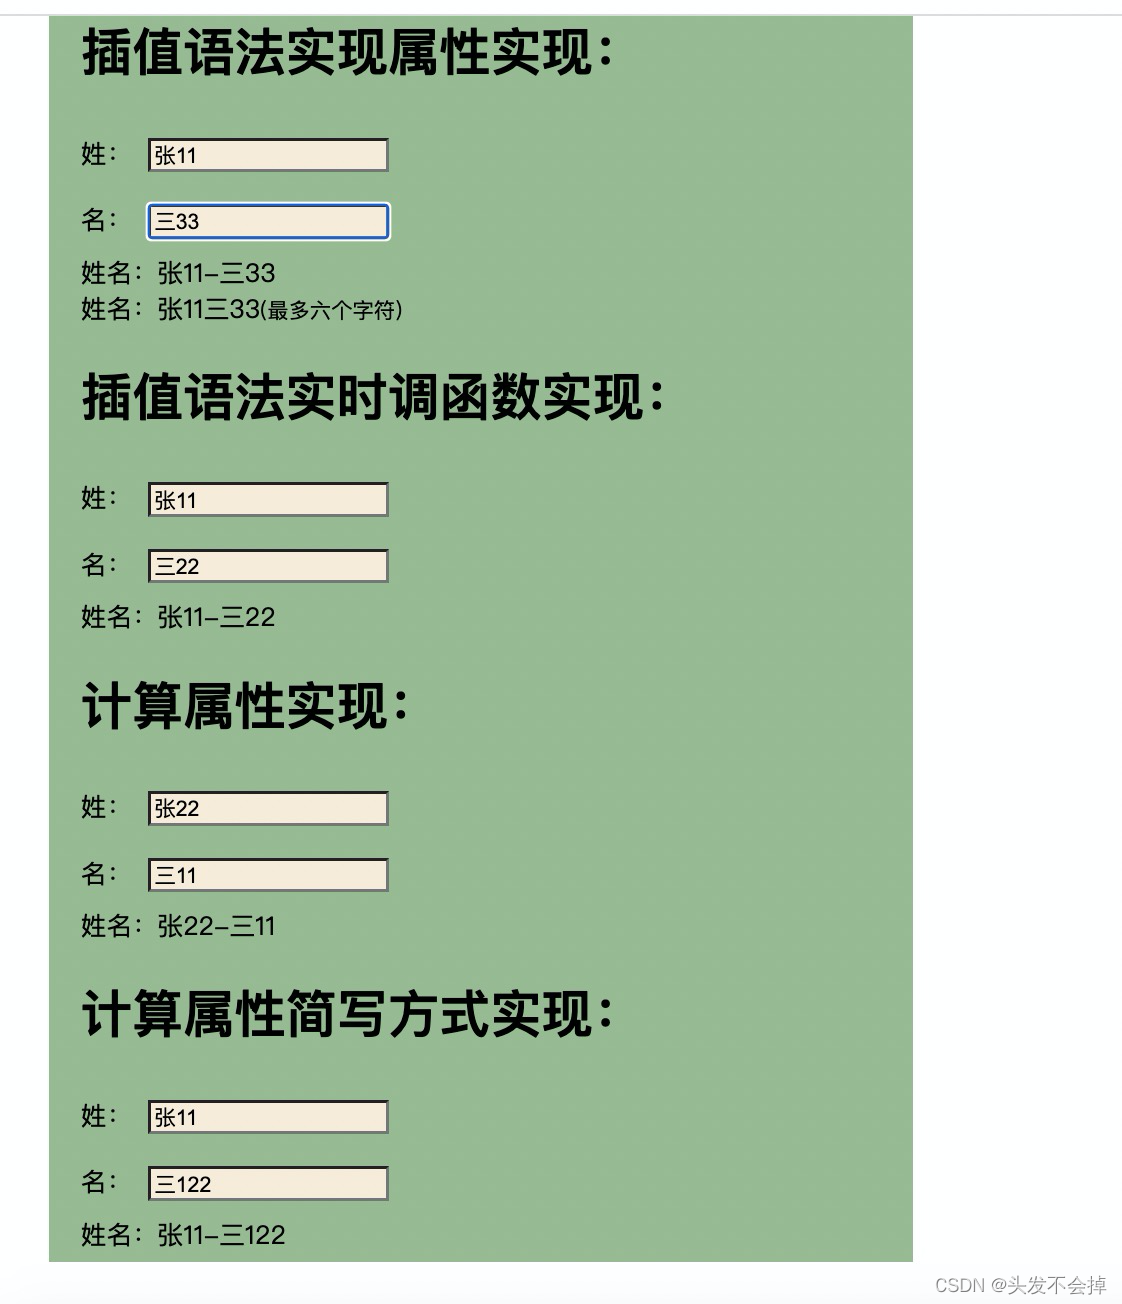
6.vue的计算属性给vue对象传computed对象
1.计算属性:要用的属性不存在data里面,需要通过其他属性计算出来的,原理也是使用defineproperty,优势是使用了缓存
2.调用get函数时机,.在初次调用的时候调用然后存在缓存,下次用直接拿缓存的。.当get依赖的数据发生变化就会调用get函数
<!DOCTYPE html>
<html lang="en">
<head>
    <meta charset="UTF-8">
    <title>计算属性</title>
    <script type="text/javascript"src="vue.js"></script>
</head>
<body>
<div id="root1" style="margin: 50px 100px">
    <h1>插值语法实现属性实现:</h1>
    姓:<input v-model:value="xing" type="text" style="background-color: antiquewhite"><br>
    名:<input v-model:value="ming" type="text" style="background-color: antiquewhite"><br>
    <span style="display: block">姓名:{{xing.slice(0,4)}}-{{ming}}</span>
    姓名:<span>{{(xing+ming).slice(0,6)}}<span style="font-size: smaller">(最多六个字符)</span></span>
    <h1>插值语法实时调函数实现:</h1>
    姓:<input v-model:value="xing2" type="text" style="background-color: antiquewhite"><br>
    名:<input v-model:value="ming2" type="text" style="background-color: antiquewhite"><br>
    <span style="display: block">姓名:{{nameFuct()}}</span>
<!--    nameFuct()不能写成nameFuct,时间调用可以不加方法括号,这个为什么页面会实时调用这个函数,来源于只要vue对象的data数据发生改变就立刻解析模板就会调用这个函数-->

    <h1>计算属性实现:</h1>
    姓:<input v-model:value="xing3" type="text" style="background-color: antiquewhite"><br>
    名:<input v-model:value="ming3" type="text" style="background-color: antiquewhite"><br>
    <span style="display: block">姓名:{{name}}</span>

    <h1>计算属性简写方式实现:</h1>
    姓:<input v-model:value="xing4" type="text" style="background-color: antiquewhite"><br>
    名:<input v-model:value="ming4" type="text" style="background-color: antiquewhite"><br>
    <span style="display: block">姓名:{{name2}}</span>
</div>


</body>
<style>
    #root1{
        width: 500px;
        height: 500px;
        background-color:darkseagreen;
        padding: 0px 20px;
        overflow: auto;
    }
    input{
        margin: 10px 0px 10px 10px;
    }
</style>
<script>
    const  vm=new Vue({
        data:function (){
            return {
                xing:"张",
                xing2:"张",
                xing3:"张",
                xing4:"张",
                ming:"三",
                ming2:"三",
                ming3:"三",
                ming4:"三",
            }
        },
        methods:{
            nameFuct:function (){
                return this.xing2+'-'+this.ming2
            }
        },
        //计算属性:要用的属性不存在data里面,需要通过其他属性计算出来的,原理也是使用defineproperty,优势是使用了缓存
        computed:{//为属性调用各自的get函数然后放在vm身上
            name:{//名字属性,不是一个函数
                get:function (){//不是name这个属性被访问就会调用,但是加了缓存,1.在初次调用的时候调用然后存在缓存,下次用直接拿缓存的
                    //2.当get依赖的数据发生变化就会调用get函数
                    console.log(this)
                    return this.xing3+'-'+this.ming3
                },
                set:function (value){
                   arr= value.split('-')
                    this.xing3=arr[0]
                    this.ming3=arr[1]
                }
            },
            name2:function (){//name2这个计算属性不会被修改,他的get函数可以这样子简写,name2作为一个属性放在vue对象下
                return this.xing4+'-'+this.ming4
            }
        }

    })
    vm.$mount("#root1")
</script>
</html>
看效果:
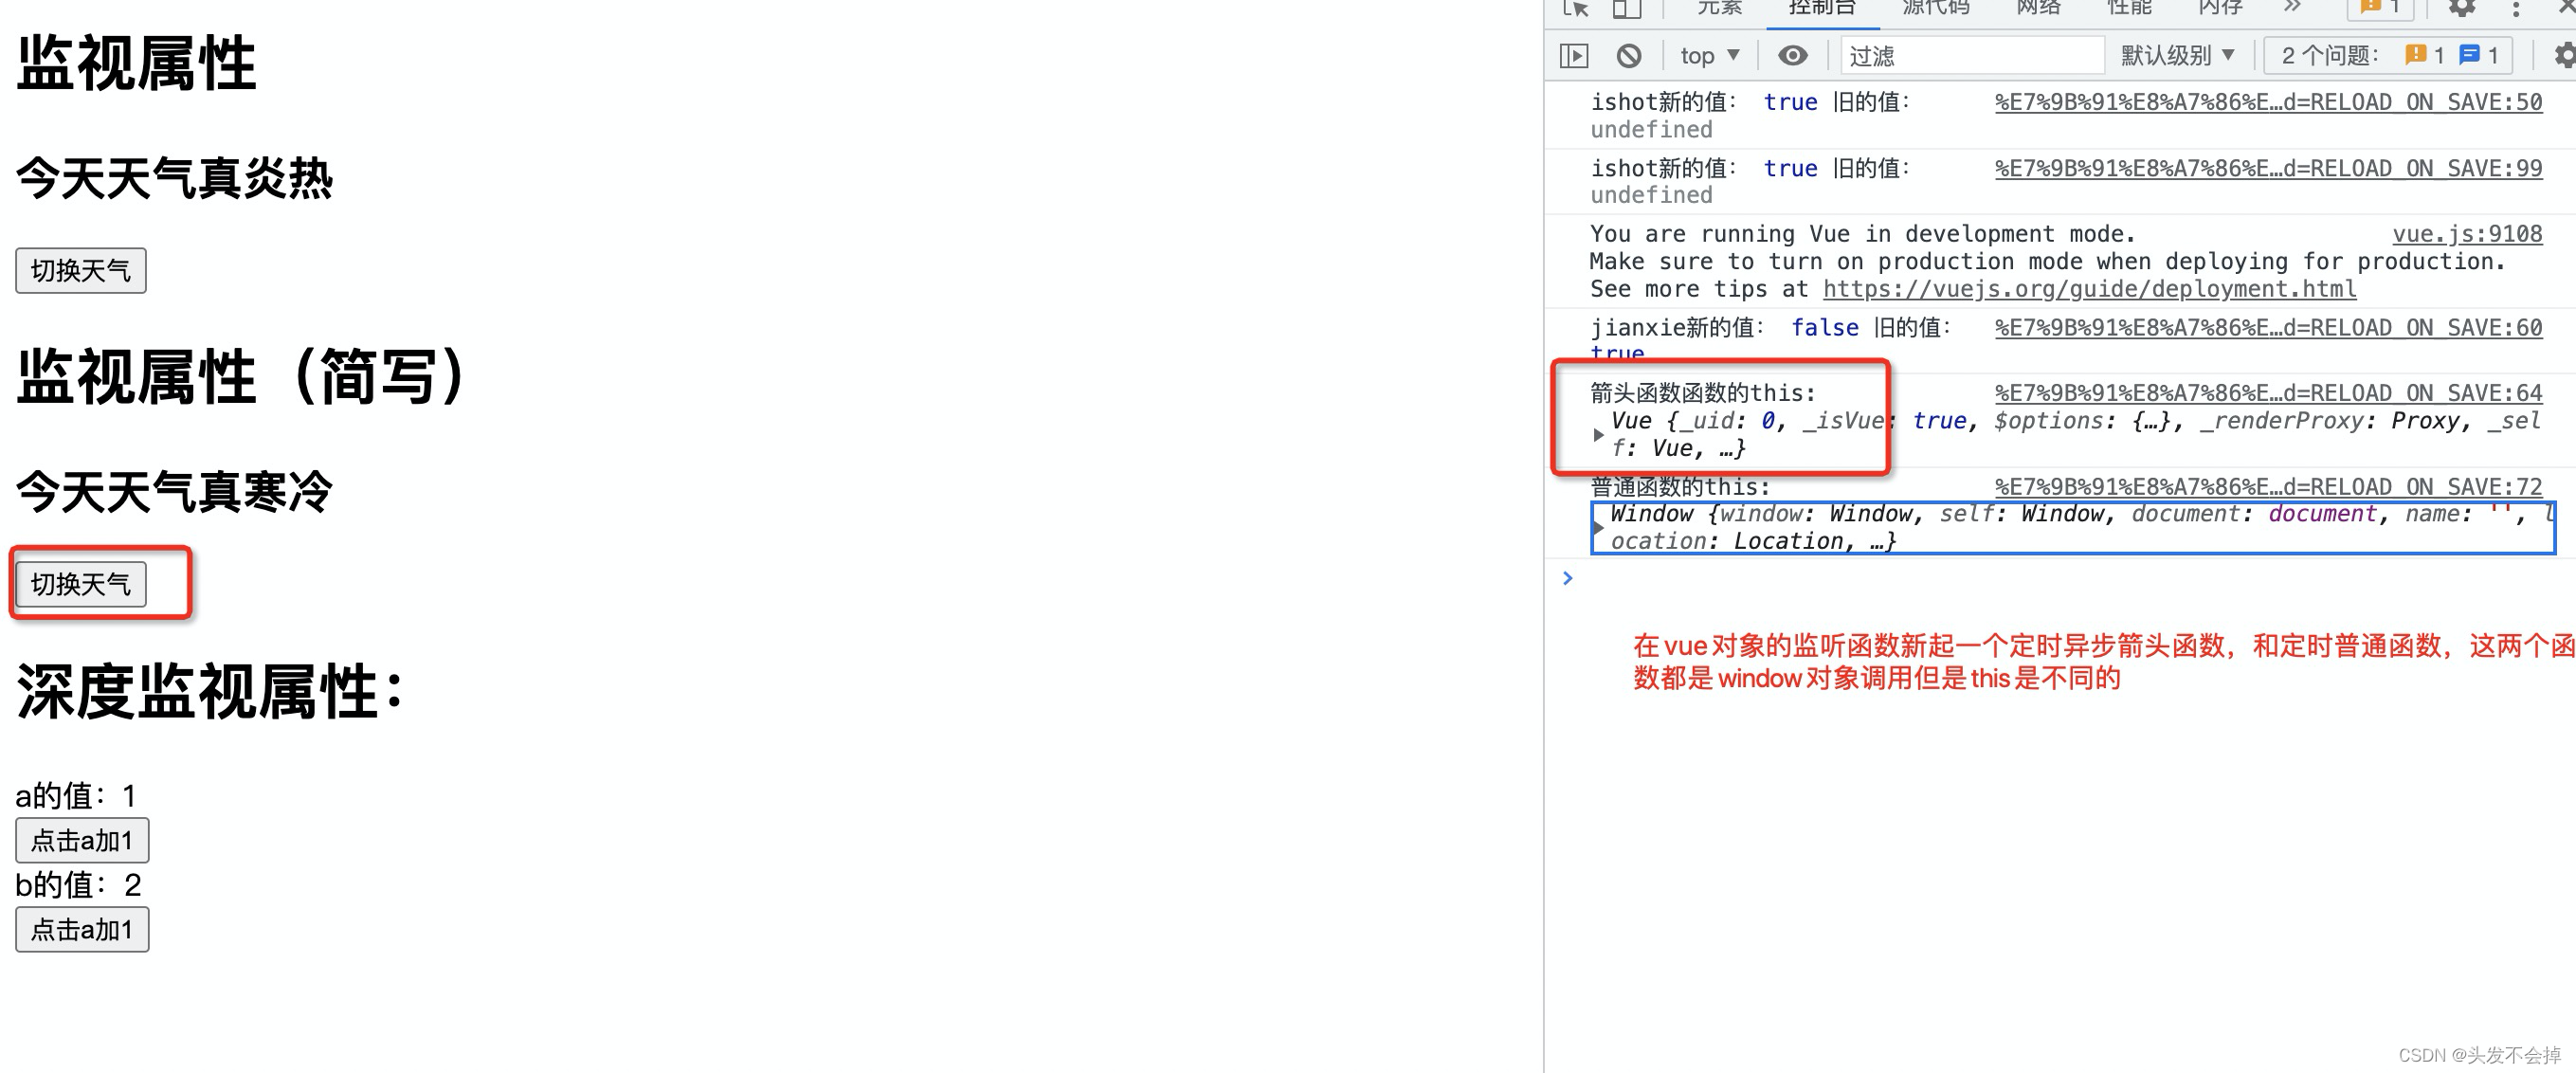
7.监视属性(watch)
1.监视属性就是监视vue对象的data属性变化,也可以监听data属性的属性,对象嵌套,这叫深度监视
2.定义给vue对象的事件回调函数,计算属性函数,监听回调函数都是在vue外面定义的,这时候箭头函数的this还不属于Vue对象是window对象的,所以这些函数被vue对象直接管理的函数不能写成箭头函数,要写成普通函数。如果是在Vue的事件回调函数,计算属性函数,监听回调函数里面写箭头函数,那这时候的箭头函数的this就是vue对象,所以一般写vue代码时不是被vue管理的函数一般写成箭头函数,都是为了让this指向vue对象。看看this在箭头函数和普通函数原本的的区别:
1.1.普通函数的this:指向它的调用者,如果没有调用者则默认指向window
2.2:箭头函数的this: 指向箭头函数定义时所处的对象,而不是箭头函数使用时所在的对象,默认使用父级的this。
3.要异步实现功能时只能用监听属性不能用计算属性
<!DOCTYPE html>
<html lang="en">
<head>
    <meta charset="UTF-8">
    <title>监视属性</title>
    <script type="text/javascript" src="vue.js"></script>
</head>
<body>
<div id="root1">
    <h1>监视属性</h1>
    <h2>今天天气真{{tianqi}}</h2>
    <button @click="qiehuan">切换天气</button>
    <h1>监视属性(简写)</h1>
    <h2>今天天气真{{jianxie}}</h2>
    <button @click="isHot2=!isHot2">切换天气</button>
    <h1>深度监视属性:</h1>
    <div>a的值:{{numbers.a}}<br>
    <button @click="numbers.a++">点击a加1</button>
    </div>

    <div>b的值:{{numbers.b}}<br>
        <button @click="numbers.b++">点击a加1</button>
    </div>

</div>
</body>
<script>
   const vm= new Vue({
        data:function (){
            return{
                tianqi:"炎热",
                jianxie:"炎热",
                isHot:true,
                isHot2:true,
                numbers:{
                    a:1,
                    b:2
                }
            }
        },
        methods:{
            qiehuan:function (){
                this.isHot=!this.isHot
            }
        },
        watch:{
            isHot:{
                immediate:true,//不用isHot这个属性发生改变也会调用,初始化立刻调用一次handle
                handler:function (newValue,oldValue){
                    console.log("ishot新的值:",newValue,"旧的值:",oldValue)
                    if (newValue==true){
                        this.tianqi='炎热'
                    }else {
                        this.tianqi='寒冷'
                    }
                    return
                }
            },
            isHot2(newValue,oldValue){//检测isHot2不需要检测加其他immediate,deep属性就可以直接用它的变量名直接作为函数名,相当于变化就调用的handler函数
                console.log("jianxie新的值:",newValue,"旧的值:",oldValue)
                //1.普通函数的this:指向它的调用者,如果没有调用者则默认指向window,这个定时器是给浏览器的window对象调用的,所以不能写成普通函数
                //2.箭头函数的this: 指向箭头函数定义时所处的对象,而不是箭头函数使用时所在的对象,默认使用父级的this.
                setTimeout(()=>{
                    console.log("箭头函数函数的this:",this)
                    if (newValue==true){
                        this.jianxie='炎热'
                    }else {
                        this.jianxie='寒冷'
                    }
                },2000)
                setTimeout(function (){
                    console.log("普通函数的this:",this)
                },2000)
                return
            },
            "numbers.a":{
                handler:function (newValue,oldValue){
                    console.log("numbers.a发生了改变,新的值:",newValue,"旧的值:",oldValue)
                }
            },
            "numbers.b":{
                handler:function (newValue,oldValue){
                    console.log("numbers.b发生了改变,新的值:",newValue,"旧的值:",oldValue)
                }
            },
            numbers:{
                deep:true,//(深度监视)不加这个是检测不了整个numbers的变化的,只要有一个属性发生改变就会执行handler
                handler:function (newValue,oldValue){
                    console.log("numbers发生了改变,新的值:",newValue,"旧的值:",oldValue)
                }
            }
        }
    })
   vm.$mount('#root1')
   vm.$watch(//监视isHot也可以这样子写
       "isHot",{
           immediate:true,//不用isHot这个属性发生改变也会调用,初始化立刻调用一次handle
           handler:function (newValue,oldValue){
               console.log("ishot新的值:",newValue,"旧的值:",oldValue)
               if (newValue==true){
                   this.tianqi='炎热'
               }else {
                   this.tianqi='寒冷'
               }
               return
           }
       },"isHot1",{//但是isHot1属性不存在,不报错
           immediate:true,//不用isHot这个属性发生改变也会调用,初始化立刻调用一次handle
           handler:function (newValue,oldValue){
               console.log("ishot新的值:",newValue,"旧的值:",oldValue)
               if (newValue==true){
                   this.tianqi='炎热'
               }else {
                   this.tianqi='寒冷'
               }
               return
           }
       },"isHot2",function (newValue,oldValue){//检测isHot2不需要检测加其他immediate,deep属性就可以直接用它的变量名直接作为函数名,相当于变化就调用的handler函数
           console.log("jianxie新的值:",newValue,"旧的值:",oldValue)
           if (newValue==true){
               this.jianxie='炎热'
           }else {
               this.jianxie='寒冷'
           }
           return
       }
   )

</script>
</html>
看效果:
8.样式绑定(:class和:style)
标签的class属性的值和style的值可以使用vue对象的data数据来指定,这就实现了样式的变化,:class和:style的值是一个表达式处理,值可以是一个z字段,对象名,数组。
<!DOCTYPE html>
<html lang="en">
<head>
    <meta charset="UTF-8">
    <title>class绑定</title>
    <script type="text/javascript"src="vue.js"></script>
</head>
<body>

<div  id="root1">
    <h1>:class绑定</h1>
    <div class="basic" :class="stl" @click="qiehuan">
class样式随机
    </div>
    <div class="basic" :class="styleObject" @click="qiehuan">
       class 样式对象绑定
    </div>
    <h1>:style绑定</h1>
    <div class="basic" :style="styleObj1" >
        样式为data属性
    </div>
    <div class="basic" :style="[styleObj1,styleObj2]" >
        样式为多个data属性的数组
    </div>
</div>


</body>
<style>
    .basic{
        border-color: black;
        border-width: 5px;
        border-style: solid;
        height: 200px;
        width: 200px;
        margin-left: 100px;
    }
    .style1{

        background-color: darkseagreen;
    }
    .style2{

        background-color:blueviolet;
        font-style: inherit;
    }
    .style2{
        background-color:yellow;
    }

</style>
<script>
const  vm=new Vue({
    data:function (){
        return {
            stl:"style1",
            styleObject:{
                "style1":true,
                "style2":false,
            },
            styleObj1:{
                fontSize:"40px",
                fontStyle:"inherit",
                backgroundColor:"yellow"
            },
            styleObj2:{
                fontSize:"40px",
                fontStyle:"inherit",
                borderBottomColor:"red"
            }
        }
    },
    methods:{
        qiehuan:function (){

            arr=['style1','style2','style3']
            index=Math.floor(Math.random()*3)//Math.random()返回0-1
            this.stl=arr[index]
            console.log("切换style:",arr[index])
        }
    }
})
vm.$mount("#root1")
</script>
</html>
9.条件渲染(v-if和v-show)
v-if和v-show可以根据布尔值控制页面某一下标签直接展示或者不展示
<!DOCTYPE html>
<html lang="en">
<head>
    <meta charset="UTF-8">
    <title>条件渲染</title>
    <script type="text/javascript"src="vue.js"></script>
</head>
<body>
<div id="root" style="margin-left: 200px">
    <h1>v-show测试:</h1>
    <div v-show="vshow">v-show根据布尔值是否展示 false相当于display:none,隐藏掉不占页面位置但是标签还在</div>
    <button @click="vshowValue">切换v-show布尔值</button>

    <h1>v-if测试:</h1>
    <div v-if="vif">v-if根据布尔值是否展示 false不是display:none,直接干掉这个标签</div>
    <button @click="vifValue">切换v-if布尔值</button>

    <h1>v-elif-else测试:</h1>
    <div>velif的值:{{velif}}</div>
    <button @click="velifValue">velif 加1</button>
    <div v-if="velif===0">v-if绑定渲染velif==0展示</div>
    <div v-else-if="velif===1">v-else-if绑定渲染velif==1展示</div>
    <div v-else>v-else绑定渲染velif==2展示</div>
    <h1>template标签只能和v-if配合使用</h1>
<template v-if="vif">
    <h3>原生html标签没有template</h3>
    <h3>template在vue解析完之后是没有这个标签的</h3>
    <h3>template只是一个模板</h3>

</template>
</div>

</body>
<script>
    const  vm=new Vue({
        data:function (){
            return {
                vshow:true,
                vif:true,
                velif:0,
            }
        },
        methods:{
            vshowValue:function (){
                this.vshow=!this.vshow
            },
            vifValue:function (){
                this.vif=!this.vif
            },

            velifValue:function (){
                this.velif++
                if (this.velif==3){
                    this.velif=0
                }
                return
            },
        }
    })
    vm.$mount("#root")
</script>
</html>
10.v-for列表渲染
v-for可以遍历生成html标签,每个标签最好根据数据的唯一值设置一个key值,详情看如下代码:
<!DOCTYPE html>
<html lang="en">
<head>
    <meta charset="UTF-8">
    <title>v-for列表</title>
    <script type="text/javascript"src="vue.js"></script>
</head>
<body>
<div id="root">
    <h1>遍历数组创建列表:</h1>
<ul>
    <li v-for="(u,index) in users">
        {{u.name}}--{{u.age}}--{{index}}
    </li>

</ul>
    <h1>遍历对象:</h1>
    <ul>
        <li v-for="(u,index) in car">
            {{u}}--{{index}}
        </li>
    </ul>
    <h1>遍历字符串:</h1>
    <ul>
        <li v-for="(u,index) in str">
            {{u}}--{{index}}
        </li>
    </ul>
    <h1>v-for不写key会出现风险:</h1>
    <button @click="unshiftPerson">列表新增老刘</button>
    <ul>
        <li v-for="(u,index) in users" :key="u.id">
<!--1.:key原理是给vue对象用的,唯一标识一个标签元素
    2.即使不加:key,也会自动以数组或者对象下标index作为key的,
    3.但是用下标作为key或者不加key都会在一个元素加入页面可输入标签例如:input出问题,具体看vue虚拟doc对比算法如何使用key,用户页面输入的内容不属于虚拟doc的内容
    4.开发中应该具体指定能唯一标识一个元素的标识,例如id,手机号
-->
            {{u.name}}--{{u.age}}--{{index}}<input >
        </li>
    </ul>
</div>
</body>
<script >
    const vm=new Vue({
        data:function (){
            return {
                users:[
                    {id:"001",name:"张三",age:18},
                    {id:"002",name:"李四",age:19},
                    {id:"003",name:"王五",age:20},
                ],
                car:{
                    name:"宝马",
                    price:"30万",
                    weight:"100kg"
                },
                str:"刘小华"
            }
        },
        methods:{
            unshiftPerson:function (){//unshift是js给数组在前面新增一个元素的方法
                this.users.unshift({id:"004",name:"老刘",age:40})
            }
        }
    })
    vm.$mount("#root")
</script>
</html>
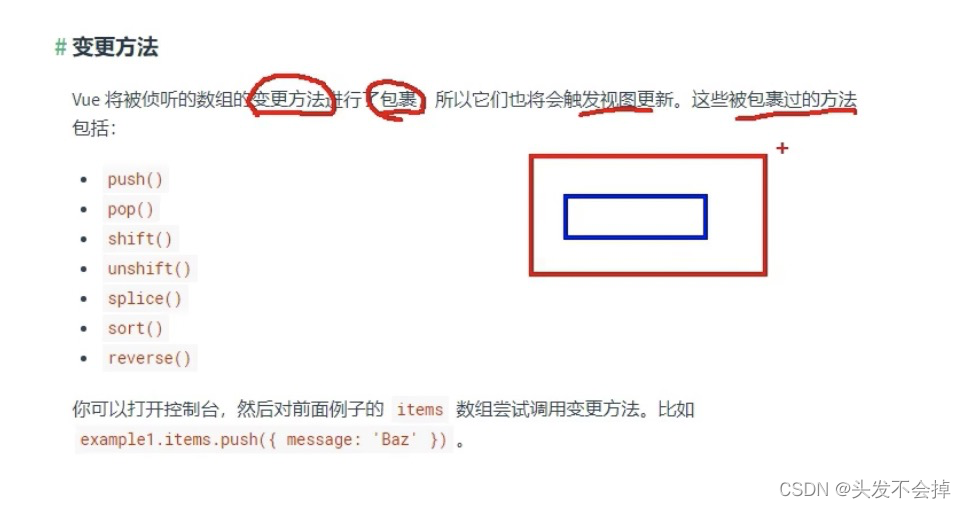
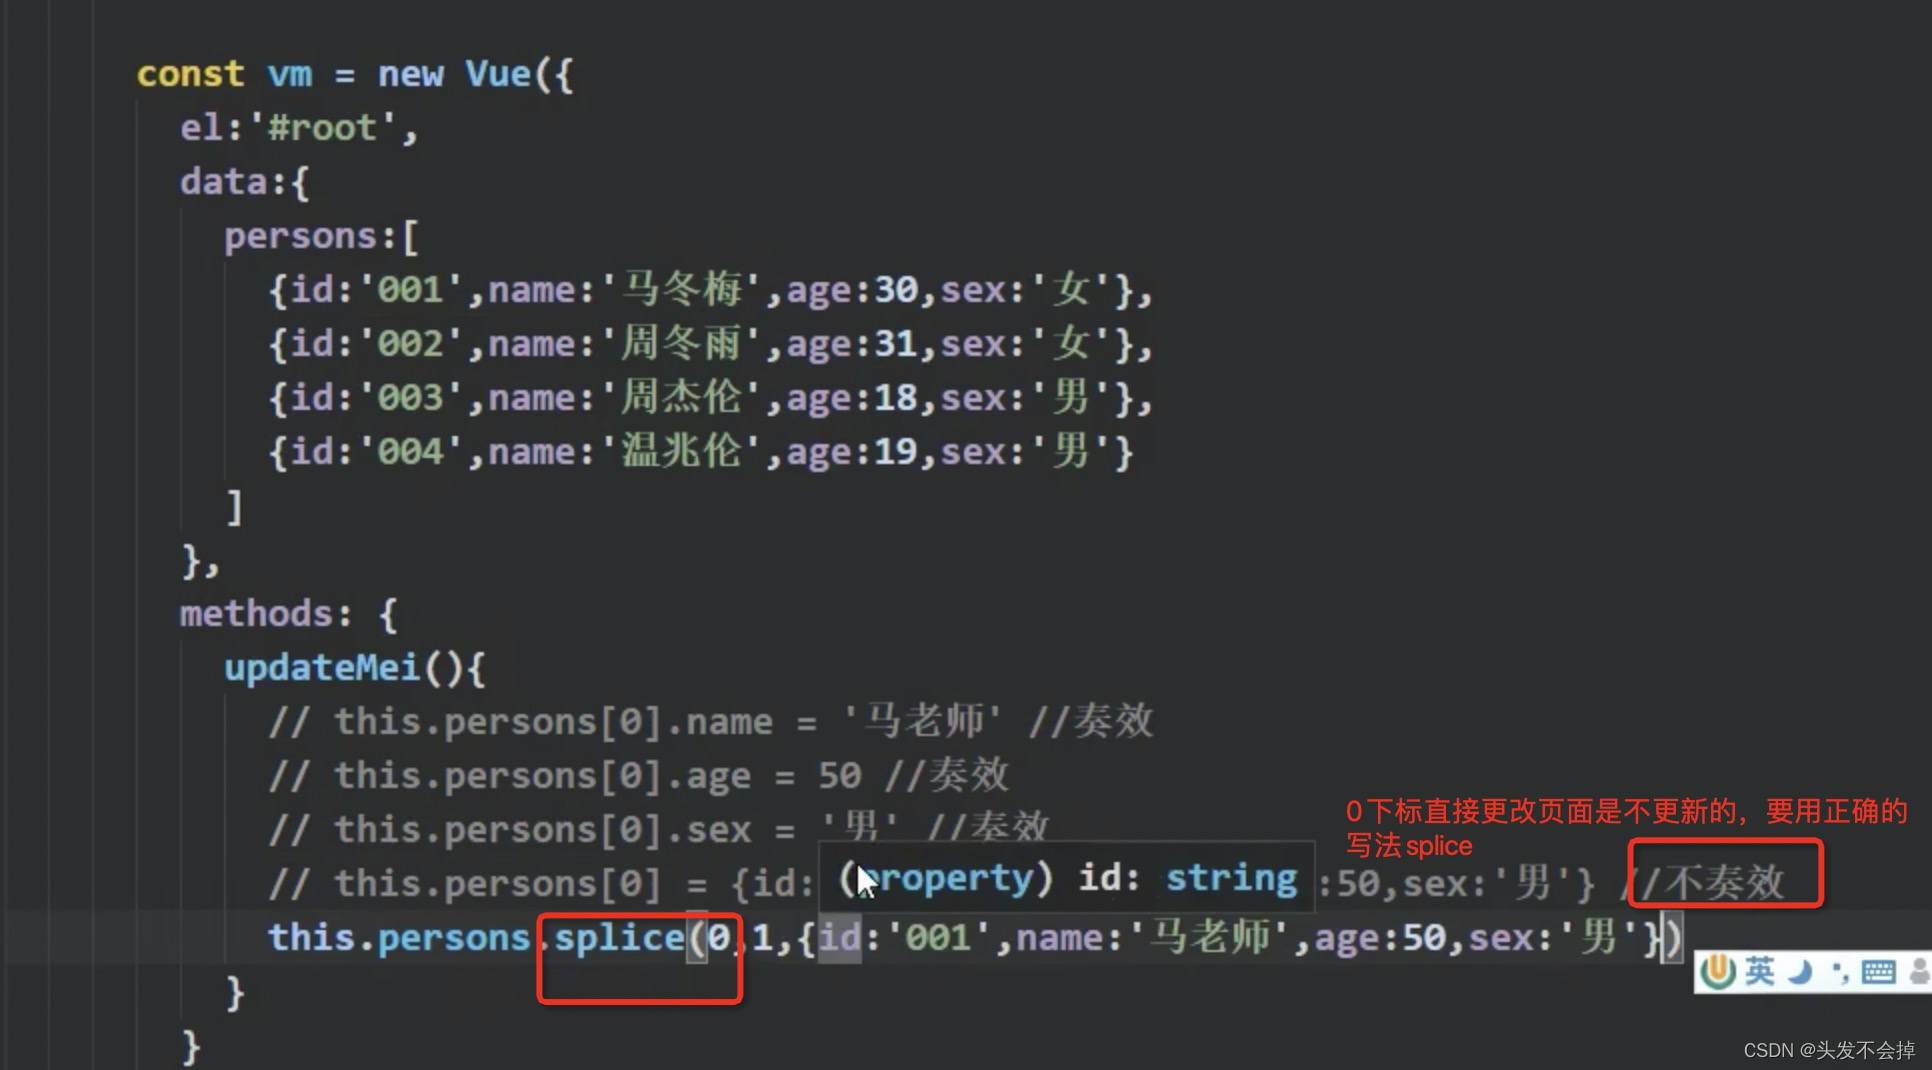
11.数组改变没渲染和setter之后会更新页面
1.setter一旦调用就回去重新渲染页面
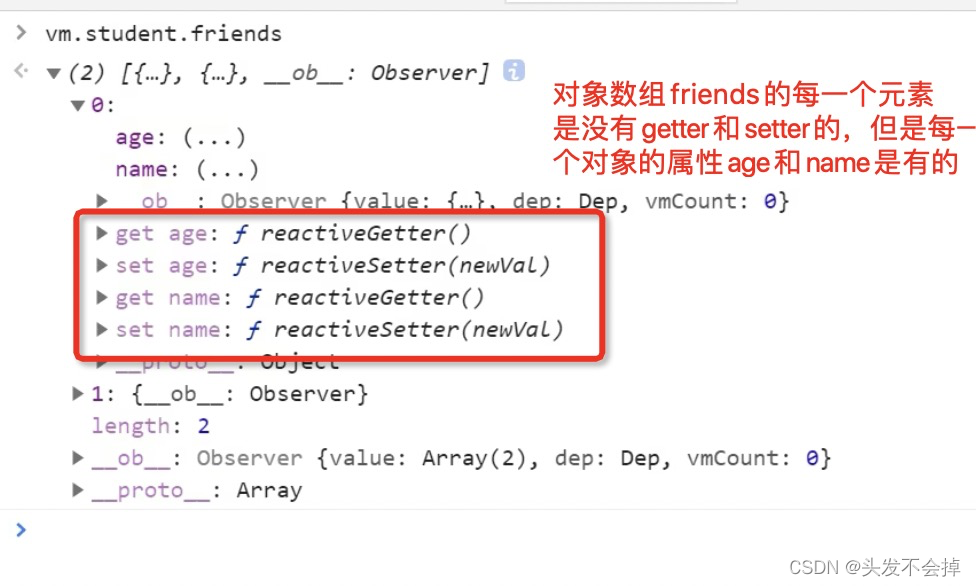
2.vue技术没有为data的数组每一个元素准备getter和setter的,所以直接根据下标index改变数组元素,是影响不到页面渲染的。。。但是给这个数组对象准备了getter和setter,可以通过下面这些数组方法进行改变数组元素会引起页面数据渲染,:
push
pop
shift
unshift 头部插入
splice 指定位置插入
sort
reverse
3.vue检测数据的原理
1.vue会监视data中所有层次的数据
2.如何监视对象中的数据
    1.通过setter实现监视,且要在new Vue时传入要监视的数据
        对对象追加睡醒Vue默认不做响应式处理
        如需要后期添加属性做响应式,请使用(但是这两个set不能给vue对象直接加属性)
            Vue.set(target,property/index,value)
            this.$set(target,property/index,value)
3.如何监视数组中的数据
    通过包装数组常用的更新元素的方法,本质做了两件事
        1.调用原生api对数组进行更新
        2.重新解析模板,进行页面更新
4.在Vue中修改数组的某个元素一定要使用如下方法
    push
    pop
    shift
    unshift 头部插入
    splice 指定位置插入
    sort
    reverse

    Vue.set() this.$set()
特别注意Vue.set() this.$set()不能给vm或者vm的根对象添加属性!!!
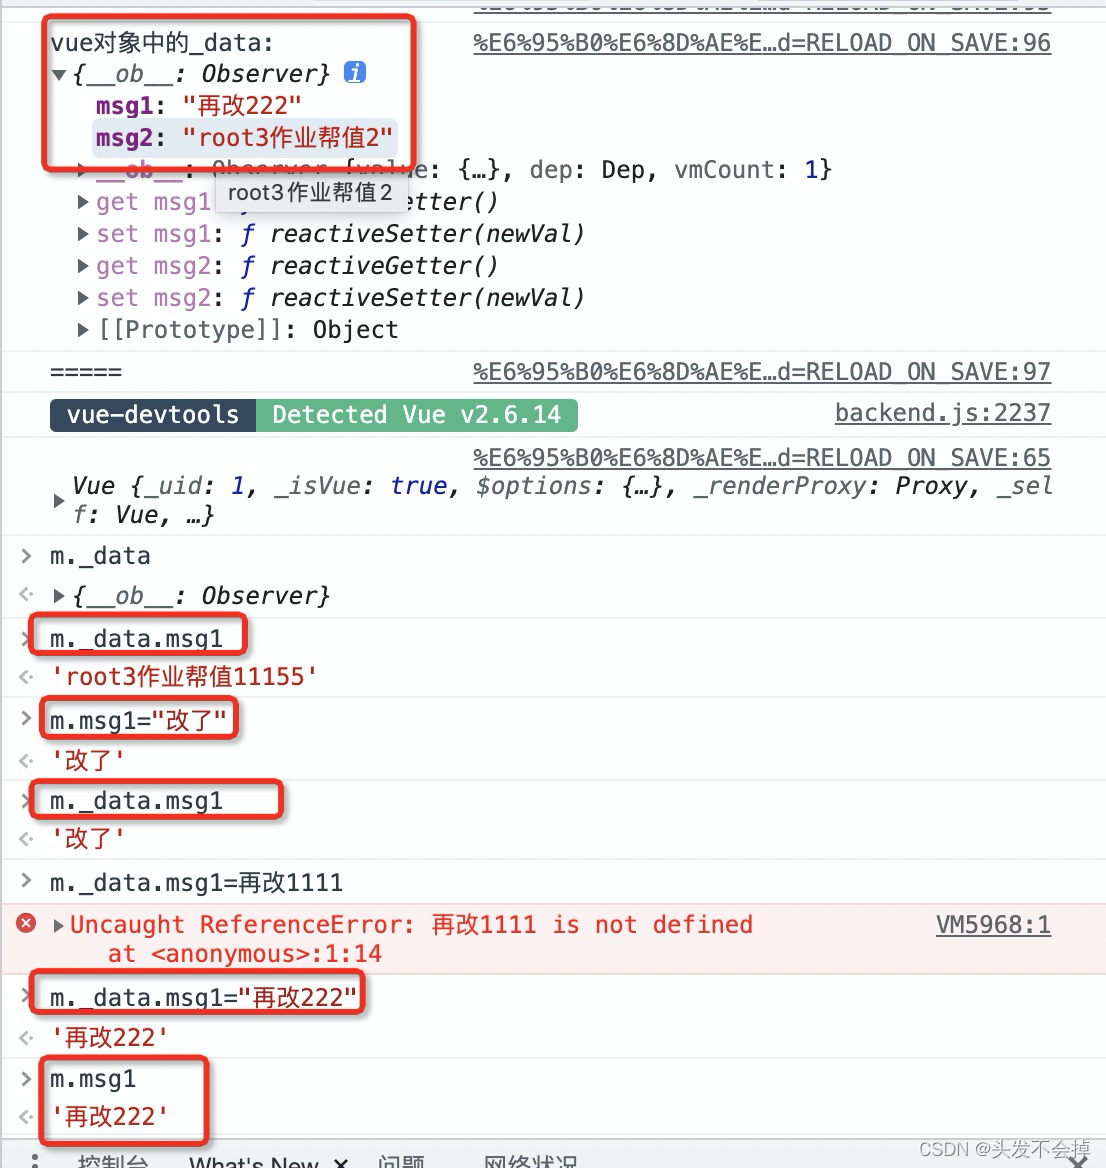
12.什么是数据劫持
_data是一个Observer监视器,_data中的数据是vm传入的要监控的数据
当有人要修改传入的数据时Observer的setter就会劫持数据的发改变,然后重新解析模板
重新渲染(劫持到后:重新改数据 > 解析模板 > 更新页面)
13.过滤器filters
过滤器能完成的计算属性都能实现,他是不会改变原的data的数据的
<!DOCTYPE html>
<html lang="en">
<head>
    <meta charset="UTF-8">
    <title>过滤器</title>
    <script type="text/javascript"src="vue.js"></script>
</head>
<body>
<div id="root">

    <h2>过滤器演示</h2>
    原先字符串:{{msg}}<br>
    fileterMethod1过滤之后:{{msg | fileterMethod1}}<br>
    fileterMethod2过滤之后:{{msg | fileterMethod2}}<br>
    fileterMethod1和fileterMethod2过滤之后:{{msg | fileterMethod1 | fileterMethod2 }}<br>
    全局过滤器过滤quanju之后:{{msg | quanju }}<br>
</div>


</body>
<script>
    Vue.filter("quanju" ,function (value){
        console.log("全局的过滤器")
        return  value.slice(0,6)
    })
const vm =new Vue({
    data:function (){
        return {
            msg:"作业帮很牛的,是真的,我说的"
        }
    },
    filters:{
        fileterMethod1:function (value){
           return  value.slice(0,6)
        },
        fileterMethod2:function (value){
            return  value.slice(value.length-3,value.length)
        }
    }
})
vm.$mount("#root")
</script>
</html>
14.v-text,v-html,v-cloak,v-once和v-pre
1.v-text能向绑定的标签渲染内容
2.v-html可以向绑定的标签渲染内容,且内容里面可以识别html标签,但是页面动态的插入v-html会存在xss攻击危险,会执行js代码拿走cookie,但是可以通过httpOnly这个限制js拿出cookie这样子就安全一点
<!DOCTYPE html>
<html lang="en">
<head>
    <meta charset="UTF-8">
    <title>v-html使用和xss攻击</title>
    <script type="text/javascript"src="vue.js"></script>

</head>
<div id="root">
    <h1>v-text使用</h1>
    <!--    v-text向他所绑定的标签写入文本内容-->
    <h5 v-text="name"></h5>

    <h1>v-html使用</h1>
    <div v-html="neirong"></div>
    <h1>v-cloak使用</h1>

    <div v-cloak >v-cloak,Vue加载使用后机会把这个属性去掉</div>
<!--   v-once表示这个标签下只渲染一次 -->
    <h1>v-once使用</h1>
    <div v-once><h6>n的初始值:{{n}}</h6></div>
    <div>n当前值:{{n}}</div>
    <div><button @click="n++">n加1</button></div>

    <h1>v-pre使用</h1>
    <div v-pre>n当前值:{{n}}</div>

</div>
<body>

</body>
<style>
    [v-cloak]{
        display: none;
    }
</style>
<script>
    const vm=new Vue({
        data:function (){
            return {
                neirong:"<a href=\"javascript:alert(document.cookie)\">点击alert</a>",
                n:1,
                name:"作业帮"
            }
        }
    })
    vm.$mount("#root")
</script>
</html>
15.自定义指令directives
指令是可以自定义的,像v-bind和v-text是指令,vue对象要加一个directives属性,可以加自己自定义的指令,具体看代码注释
<!DOCTYPE html>
<html lang="en">
<head>
    <meta charset="UTF-8">
    <title>自定义指令</title>
    <script type="text/javascript"src="vue.js"></script>
</head>
<body>
<div id="root">
    <div>{{name}},data其他数据变化也会引起所有指令的udapte函数被调用一次,包括自定义指令update函数</div>
    <button @click="name++">name++</button>
    <h1>指令写成函数式:</h1>
    <div>当前的n值:{{n}}</div>
    <div>放大10倍后的n值:<span v-big="n"></span></div>
    <button @click="n++">点击n+1</button>
<hr>
    <h1>指令写成对象式:</h1>
    <div>当前的m值:{{m}}</div>
    <div>放大10倍后的m值:<input v-fbig="m"></div>
    <button @click="m++">点击m+1</button>
    <hr>
    <h1>全局vue自定义指令:</h1>
    <div>当前的w值:{{w}}</div>
    <div>放大10倍后的w值:<input v-wbig="w"></div>
    <button @click="w++">点击w+1</button>
</div>


</body>
<script>
Vue.directive("wbig",{//bind,inserted,update这三个函数名字一定不能写错
    //指令与元素成功绑定时调用bind
    bind:function (element,binding){
        element.value=binding.value*10
        console.log("wbig的bind函数")
        element.focus()//获取鼠标焦点
    },
    //element被渲染inserted插入到到页面时调用,函数式的这个时机不会被调用
    inserted:function (element,binding){
        element.value=binding.value*10
        console.log("wbig的inserted函数")
        element.focus()
    },
    //vue模板被重新解析时调用updated
    update:function (element,binding){
        element.value=binding.value*10
        console.log("wbig的update函数")
        element.focus()
        setTimeout(()=>{
            console.log("wbig指令update函数的箭头函数里面的this",this)//是window对象
        },1)
        console.log("wbig指令update函数里的this",this)//也是是window对象
    }


})
    const  vm =new Vue({
        data:function (){
            return {
                n:1,
                m:2,
                w:3,
                name:100
            }
        },
        directives:{
            //自定义指令的函数默认传入有两个参数,一个指令是绑定的document对象,和绑定的内容bindging,包括绑定传入的值,指令名
            //调用的时机:1.指令与元素成功绑定时;2.指令所在的模板发生改变重新解析模板时
            big:function (element,binding){
                console.log("指令定义函数传入的element:",element)
                console.log("指令定义函数传入的binding:",binding)
                console.log("指令定义函数传入的指令名称:",binding.name)
                //原生的js
                element.innerHTML=binding.value*10
                return
            },
            fbig:{//bind,inserted,update这三个函数名字一定不能写错
                //指令与元素成功绑定时调用bind
                bind:function (element,binding){
                    element.value=binding.value*10
                    console.log("fbig的bind函数")
                    element.focus()//获取鼠标焦点
                },
                //element被渲染inserted插入到到页面时调用,函数式的这个时机不会被调用
                inserted:function (element,binding){
                    element.value=binding.value*10
                    console.log("fbig的inserted函数")
                    element.focus()
                },
                //vue模板被重新解析时调用updated
                update:function (element,binding){
                    element.value=binding.value*10
                    console.log("fbig的update函数")
                    element.focus()
                    setTimeout(()=>{
                        console.log("fbig指令update函数的箭头函数里面的this",this)//是window对象
                    },1)
                    console.log("fbig指令update函数里的this",this)//也是是window对象
                }


            }
        }
    })
    vm.$mount("#root")
</script>
</html>


 740
740


 被折叠的 条评论
为什么被折叠?
被折叠的 条评论
为什么被折叠?
 到【灌水乐园】发言


