


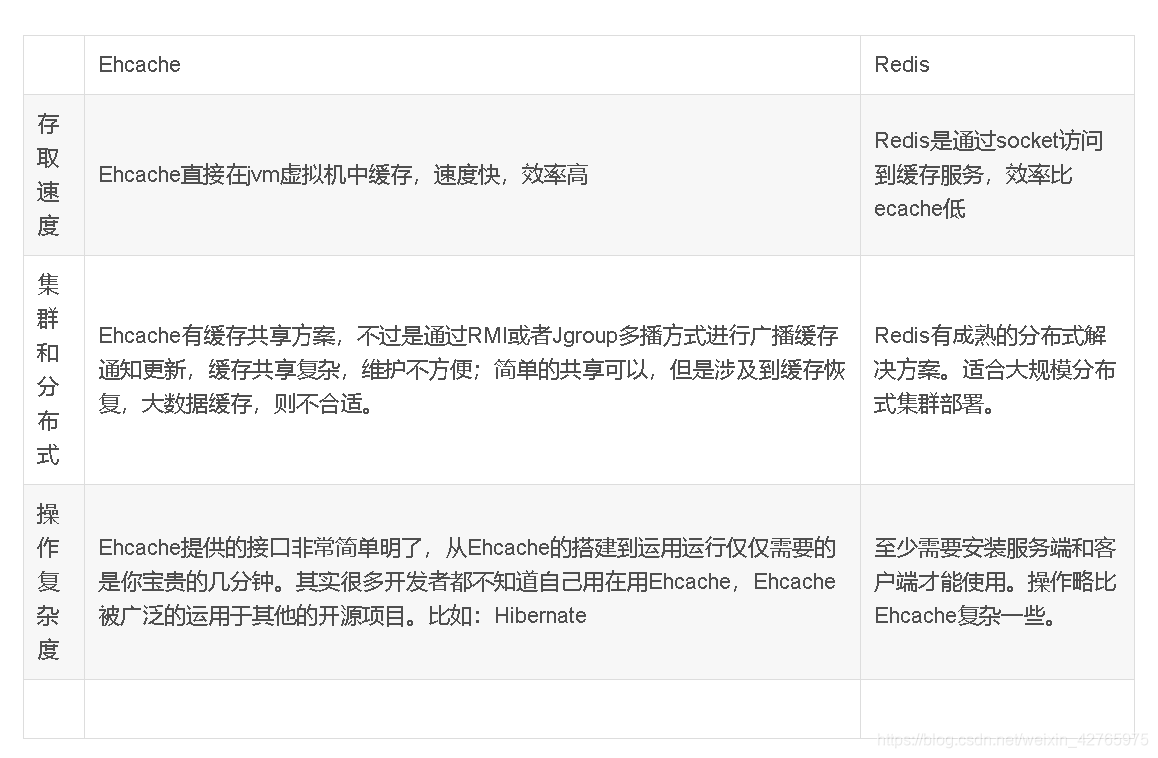
1.redis和ehcache的区别
redis:独立于java语言,要在本机安装了在使用,java是通过jedis来操纵redis的,所以每一次缓存的数据要到redis数据库里面取,
ehcache:和java语言共存亡,是在Jvm里面做缓存的,两者可以说是绑在一起的,也没有存到数据库的说法,说白了就是纯Java的进程内缓存框架
(两者在存储速度,集群分布式上的区别,在做微服务上就优先选Redis)
2. ## net.sf.ehcache是指Ehcache2.0,而org.ehcache是指Ehcache3.0
,两者的API还是比较大的,目前新版本的 Ehcache 3.X 通过支持 Terracotta 改善了2.X 版本体验不佳的分布式缓存支持;
在Spring Boot中通过@EnableCaching注解自动化配置合适的缓存管理器(CacheManager),Spring Boot根据下面的顺序去侦测缓存提供者:
Generic
JCache (JSR-107)
EhCache 2.x
Hazelcast
Infinispan
Redis
Guava
Simple
除了按顺序侦测外,我们也可以通过配置属性spring.cache.type来强制指定。默认是simple类型。
由于ehcache3.x实现了jsr-107的标准接口,而本文通过整合ehcache3.x来使用JCache的方式。
<dependency>
            <groupId>net.sf.ehcache</groupId>
            <artifactId>ehcache</artifactId>
            <version>2.10.1</version>
            <!-下面是Ehcache3.0->
       <dependency>
          <groupId>org.ehcache</groupId>
          <artifactId>ehcache</artifactId>
          <version>3.1.3</version>
        </dependency>
        <!-- JSR107 API -->
        <dependency>
          <groupId>javax.cache</groupId>
          <artifactId>cache-api</artifactId>
        </dependency>
        <dependency>
            <groupId>org.springframework.boot</groupId>
            <artifactId>spring-boot-starter-cache</artifactId>
        </dependency>
`## 3.springboot整合net.sf.ehcache的实例
``
第一步:配置类
@Configuration
@EnableCaching
public class EhCacheConfiguration implements CachingConfigurer {
    @Bean(destroyMethod="shutdown")
    public net.sf.ehcache.CacheManager ehCacheManager(){
        CacheConfiguration cacheConfiguration=new CacheConfiguration();
        cacheConfiguration.setName("firstCache");
        cacheConfiguration.setMaxEntriesLocalHeap(1000);
        net.sf.ehcache.config.Configuration configuration=new net.sf.ehcache.config.Configuration();
        configuration.addCache(cacheConfiguration); //可以创建多个cacheConfiguration,都添加到Configuration中
        return net.sf.ehcache.CacheManager.newInstance(configuration);

    }

@Bean
@Override
public CacheManager cacheManager() {
    return new EhCacheCacheManager(ehCacheManager());
}

@Override
public CacheResolver cacheResolver() {
    return null;
}

@Bean
@Override
public KeyGenerator keyGenerator() {
    return new SimpleKeyGenerator();
}

@Override
public CacheErrorHandler errorHandler() {
    return null;
}
}
第二步:在类方法上使用
@Service
public class EhcacheServiceImpl implements EhcacheService {
    /**
     * @Cacheable 表明所修饰的方法是可以缓存的:当第一次调用这个方法时,它的结果会被缓存下来,在缓存的有效时间内,
     * 以后访问这个方法都直接返回缓存结果,不再执行方法中的代码段。
     * 这个注解可以用condition属性来设置条件,如果不满足条件,就不使用缓存能力,直接执行方法。
     * 可以使用key属性来指定key的生成规则。
     *
     * value:缓存位置名称,不能为空,如果使用EHCache,就是ehcache.xml中声明的cache的name, 指明将值缓存到哪个Cache中
     *
     * key:缓存的key,默认为空,既表示使用方法的参数类型及参数值作为key,支持SpEL,如果要引用参数值使用井号加参数名,如:#userId,
     * 一般来说,我们的更新操作只需要刷新缓存中某一个值,所以定义缓存的key值的方式就很重要,最好是能够唯一,因为这样可以准确的清除掉特定的缓存,而不会影响到其它缓存值 ,
     *  本例子中使用实体加冒号再加ID组合成键的名称,如”user:1”、”order:223123”等
     *
     * condition:触发条件,只有满足条件的情况才会加入缓存,默认为空,既表示全部都加入缓存,支持SpEL
     * @param param
     * @return
     */
    @Cacheable(value="firstCache", key="#param")
    @Override
    public String getTimestamp(String param) {
        Long timestamp = System.currentTimeMillis();
        System.out.println("又执行了");//当第二次调用这个方法且传来的参数param和之前的一样,那么这个函数不会执行,更加不会输出这句话
        return timestamp.toString();
    }
}
第三步:测试
@Test
    public void testGetTimestamp() throws InterruptedException {
        System.out.println("第一次调用:" + ehcacheService.getTimestamp("param"));
        Thread.sleep(2000);
        System.out.println("2秒之后调用:" + ehcacheService.getTimestamp("param"));
        Thread.sleep(4000);
        System.out.println("再过4秒之后调用:" + ehcacheService.getTimestamp("param"));
        System.out.println("传入的参数不一样了:"+ehcacheService.getTimestamp("haha"));
    }
}
第四步:看输出
又执行了
第一次调用:1564931336064
2秒之后调用:1564931336064
再过4秒之后调用:1564931336064
又执行了
传入不一样的参数了:1564931342163
4.ehcache3.0整合springboot
ehcache.xml文件
//构建一个缓存管理器,创建一个默认的缓存 "preConfigured"
CacheManager cacheManager = CacheManagerBuilder.newCacheManagerBuilder()
.withCache("preConfigured", //缓存别名
CacheConfigurationBuilder.newCacheConfigurationBuilder(Long.class, String.class,
ResourcePoolsBuilder.heap(100)) //设置缓存堆容纳元素个数
.build())
.build(true); //创建之后立即初始化
//从缓存管理器中获取预定的缓存
Cache<Long, String> preConfigured
= cacheManager.getCache("preConfigured", Long.class, String.class);
//直接从缓存管理器创建一个新的缓存
Cache<Long, String> myCache = cacheManager.createCache("myCache",
CacheConfigurationBuilder.newCacheConfigurationBuilder(Long.class, String.class,
ResourcePoolsBuilder.heap(100)).build());
//向缓存里添加缓存键值
myCache.put(1L, "Hello World!");
//从指定缓存里获取键值
String value = myCache.get(1L);
cacheManager.close();
通过XML配置
在项目根目录创建XML配置文件:ehcache.xml
<?xml version="1.0" encoding="UTF-8"?>
<config xmlns:xsi='http://www.w3.org/2001/XMLSchema-instance'
xmlns='http://www.ehcache.org/v3'
xsi:schemaLocation="http://www.ehcache.org/v3 http://www.ehcache.org/schema/ehcache-core.xsd">
<!--缓存配置方式1:直接配置一个cache节点-->
<!--完整配置一个缓存-->
<cache alias="myCache1">
<!--储存条目索引和储存值类型配置-->
<key-type>java.lang.String</key-type> <!--缓存条目索引-->
<value-type>java.lang.String</value-type> <!--缓存条目类型-->
<!--储存层配置-->
<resources>
<heap unit="entries">2000</heap> <!--配置堆储存-->
<offheap unit="MB">20</offheap> <!--配置堆外储存-->
</resources>
</cache>
<!--缓存配置方式2:通过缓存模板配置cache节点-->
<!--配置一个缓存模板-->
<cache-template name="myDefault">
<key-type>java.lang.Long</key-type>
<value-type>java.lang.String</value-type>
<heap unit="entries">200</heap>
</cache-template>
<!--使用缓存模板配置缓存-->
<cache alias="myCache2" uses-template="myDefault" />
<cache alias="myCache3" uses-template="myDefault">
<value-type>java.lang.Number</value-type>
</cache>
</config>
   //创建缓存配置对象
        XmlConfiguration xlmconf=new XmlConfiguration(getClass().getResource("ehcache.xml"));
        //从缓存配置对象里面获得缓存管理器
        CacheManager cacheManager= CacheManagerBuilder.newCacheManager(xlmconf);
        //从缓存管理器获取缓存对象
        Cache<String,String> mycache01=cacheManager.getCache("mycache01",String.class,String.class);
        System.out.println(mycache01.get("1"));
#注意:ehcache3.x配置文件路径必须指定
spring.cache.jcache.config=classpath:ehcache.xml


 被折叠的 条评论
为什么被折叠?
被折叠的 条评论
为什么被折叠?
 到【灌水乐园】发言


