


1:继承Thread类创建线程
public class Thread01 extends Thread {

    @Override
    public void run() {
        System.out.println(Thread.currentThread().getName()+"子线程");
    }

    public static void main(String[] args) {
        // 当前是显示的名词是main主线程的名词
        System.out.println(Thread.currentThread().getName());
        Thread01 thread01 = new Thread01();
        Thread01 thread02 = new Thread01();
        Thread01 thread03 = new Thread01();

        thread01.start();
        thread02.start();
        thread03.start();
    }
}
2:实现Runnable接口实现多线程
public class ThreadRunnable implements Runnable{

    @Override
    public void run() {
        System.out.println(Thread.currentThread().getName()+"子线程");
    }

    public static void main(String[] args) {
        // 当前是显示的名词是main主线程的名词
        System.out.println(Thread.currentThread().getName());
        Thread thread = new Thread(new ThreadRunnable());
        thread.start();
    }
}
3:使用Callable和Future创建线程
public class ThreadCallable implements Callable<Integer> {

    @Override
    public Integer call() throws Exception {
        System.out.println(Thread.currentThread().getName()+"开始执行");
        Thread.sleep(3000);
        System.out.println(Thread.currentThread().getName()+"返回结果1");
        return 1;
    }

    public static void main(String[] args) throws ExecutionException, InterruptedException {
        ThreadCallable threadCallable = new ThreadCallable();
        FutureTask<Integer> integerFutureTask = new FutureTask<>(threadCallable);
        new Thread(integerFutureTask).start();
        Integer integer = integerFutureTask.get();
        System.out.println(Thread.currentThread().getName() + "," + integer);

    }

}
4:线程池创建线程
public class ThreadExecutor {

    public static void main(String[] args) {
        ExecutorService executorService = Executors.newCachedThreadPool();

        executorService.execute(new Runnable() {
            @Override
            public void run() {
                System.out.println(Thread.currentThread().getName() + "子线程");
            }
        });
    }

}
5:使用spring的异步注解@Async
使用@Async进行异步的方式
1,在启动列或者能被启动类扫描到的配置类上标注@EnableAsync
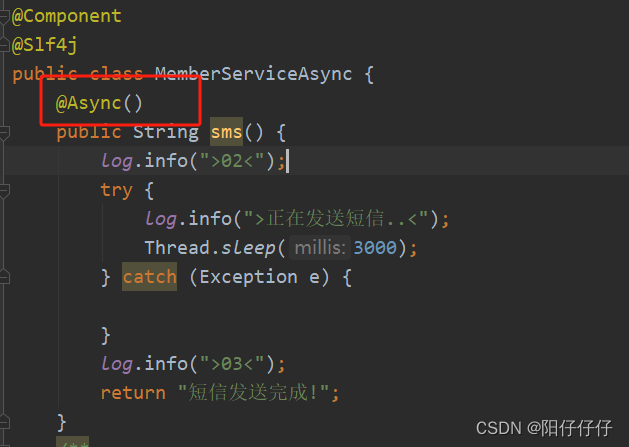
2,在方法上加上注解@Async

这个是需要异步的方法,在方法上加注解
这里是调用sms方法的地方
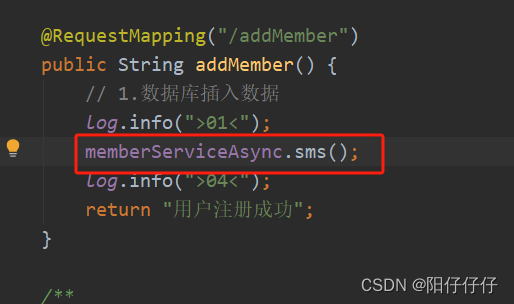
最终结果:因为异步方法加了3秒延迟,所有是最后执行,并没有按照代码的先后循序执行
使用@Async注解会出现的问题,
1:无法保证事务一致性
2:因为默认最大线程和最大列队都是Interger.Max,如果在某一瞬间并发量突然变高,系统的负载会受不了。但是允许使用自定义线程池来替换默认线程池
自定义线程池实现@Async注解异步
首先自定义一个线程池
@Configuration
@EnableAsync
public class ThreadPoolConfig {

    /**
     * 每秒需要多少个线程处理?
     * tasks/(1/taskcost)
     */
    private int corePoolSize = 3;

    /**
     * 线程池维护线程的最大数量
     * (max(tasks)- queueCapacity)/(1/taskcost)
     */
    private int maxPoolSize = 3;

    /**
     * 缓存队列
     * (coreSizePool/taskcost)*responsetime
     */
    private int queueCapacity = 10;

    /**
     * 允许的空闲时间
     * 默认为60
     */
    private int keepAlive = 100;

    @Bean
    public TaskExecutor taskExecutor() {
        ThreadPoolTaskExecutor executor = new ThreadPoolTaskExecutor();
        // 设置核心线程数
        executor.setCorePoolSize(corePoolSize);
        // 设置最大线程数
        executor.setMaxPoolSize(maxPoolSize);
        // 设置队列容量
        executor.setQueueCapacity(queueCapacity);
        // 设置允许的空闲时间(秒)
        //executor.setKeepAliveSeconds(keepAlive);
        // 设置默认线程名称
        executor.setThreadNamePrefix("thread-");
        // 设置拒绝策略rejection-policy:当pool已经达到max size的时候,如何处理新任务
        // CALLER_RUNS:不在新线程中执行任务,而是有调用者所在的线程来执行
        executor.setRejectedExecutionHandler(new ThreadPoolExecutor.CallerRunsPolicy());
        // 等待所有任务结束后再关闭线程池
        executor.setWaitForTasksToCompleteOnShutdown(true);
        return executor;
    }

}
然后指定线程池


 3万+
3万+


 被折叠的 条评论
为什么被折叠?
被折叠的 条评论
为什么被折叠?
 到【灌水乐园】发言


