


一、什么是spring的监听器
Spring事件监听机制可以理解为是一种观察者模式,有数据发布者(事件源,也称为被监听对象)、数据接受者(监听器 listener)、事件对象event。,它们能帮助开发者监听 web 中特定的事件,比如 ServletContext, HttpSession, ServletRequest 的创建和销毁;变量的创建、销毁等等。
二、 ApplicationListener
Spring的事件监听器定义为ApplicationListener,继承java.util.EventListener(Spring还定义了一个注解,也叫EventListener,在spring-context包中,两者是不同的概念。事件监听机制总体可以理解为三部分:发布事件的人---》发布什么事件---》这个事件接受的人
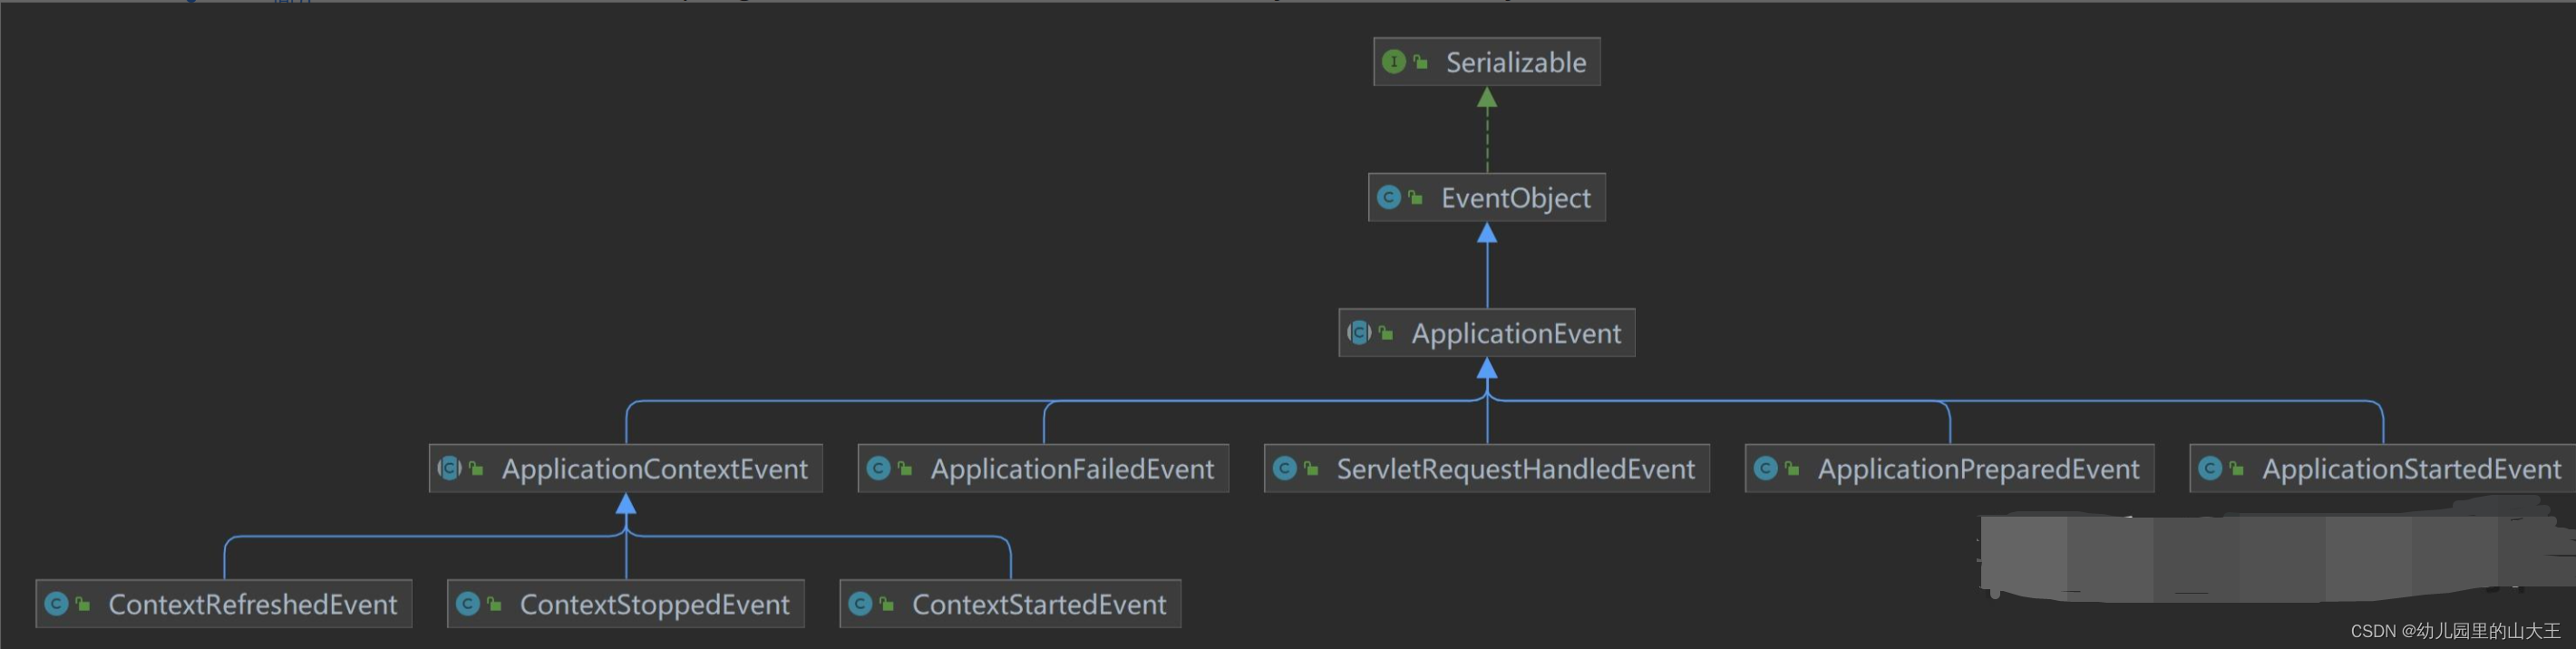
一、spring事件对象event
Spring定义了许多事件对象,事件对象都是继承java.util.EventObject对象,下面是部分事件对象:
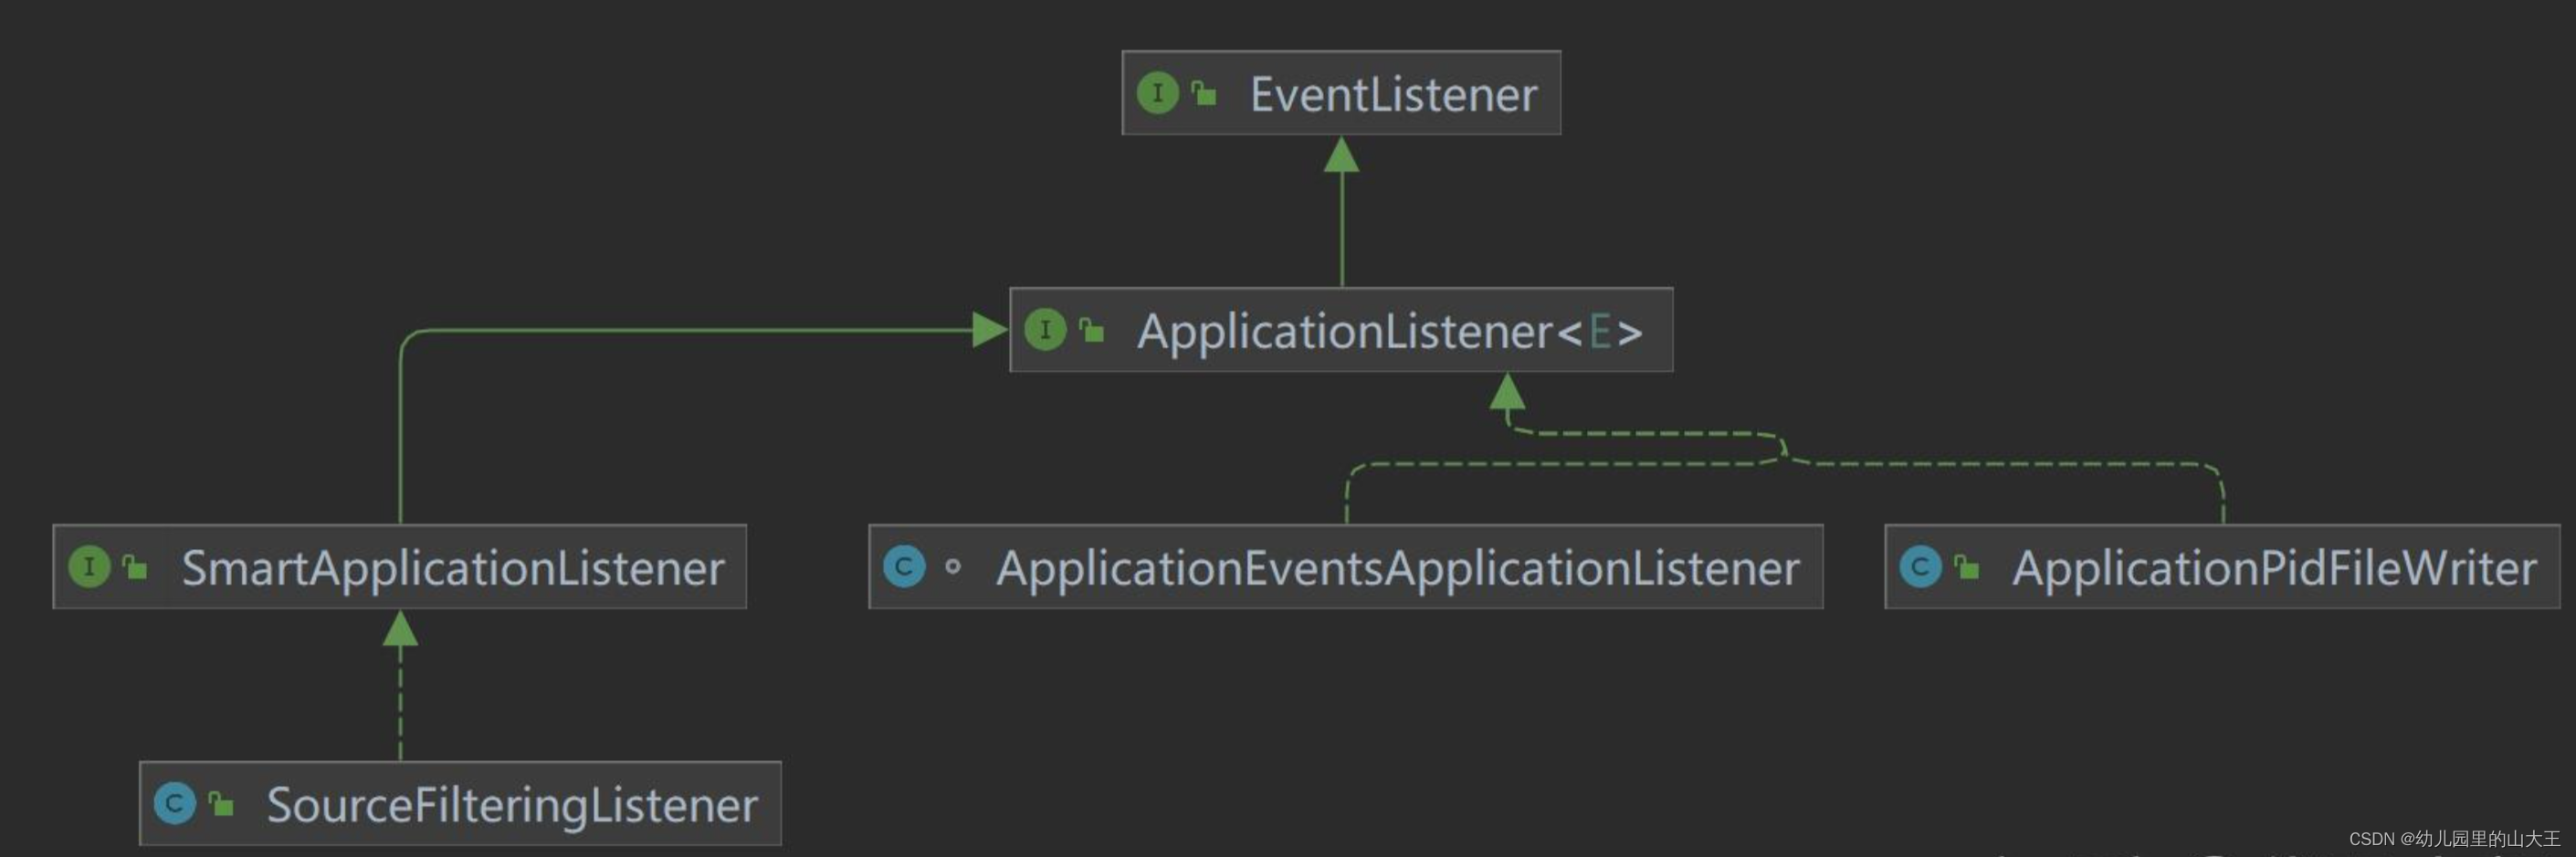
 二、spring事件监听器
Spring实现了很多事件监听器的类型,都是继承自ApplicationListener,下面是部分实现类:
监听 ApplicationEvent 及其下面的子事件
public interface ApplicationListener<E extends ApplicationEvent> extends EventListener {
    void onApplicationEvent(E var1);
}
三、使用步骤
一、基于注解驱动
一、需要定义要发布的事件,也就是你要发布啥事件
如果要自定义事件,必须继承Spring定义的接口ApplicationEvent
public class OrderEvent extends ApplicationEvent {
    private String orderId;
    private String userEmail;

    public OrderEvent(Object source, String orderId, String userEmail) {
        super(source);
        this.orderId = orderId;
        this.userEmail = userEmail;
    }

    public String getOrderId() {
        return orderId;
    }

    public String getUserEmail() {
        return userEmail;
    }
}
二、定义事件监听器实现
@Component
public class OrderConfirmationListener {

    @EventListener
    public void handleOrderEvent(OrderEvent event) {
        // 发送订单确认邮件给用户
        String userEmail = event.getUserEmail();
        System.out.println("Sending order confirmation email to " + userEmail);
        // 实际的邮件发送逻辑...
    }
}
三、发布事件
@Service
public class OrderService {
    @Autowired
    private ApplicationEventPublisher applicationEventPublisher;

    public void createOrder(String orderId, String userEmail) {
        // 创建订单逻辑...

        // 订单创建后,发布一个订单事件
        OrderEvent orderEvent = new OrderEvent(this, orderId, userEmail);
        applicationEventPublisher.publishEvent(orderEvent);
    }
}
确保所有的事件监听器和订单服务都是Spring容器管理的Bean。当OrderService的createOrder方法被调用时,它会创建一个新的订单并发布一个OrderEvent。Spring容器将自动通知所有监听OrderEvent的监听器,这些监听器将执行相应的业务逻辑,如发送确认邮件、更新库存和记录订单日志。
这样,通过Spring的事件发布/订阅机制,我们可以将业务逻辑解耦,提高代码的可维护性和可扩展性。
二、基于接口
一、和注解类型相似,需要先定义要发布的事件
public class MyEvent extends ApplicationEvent {
    public MyEvent(Object source) {
        super(source);
    }
}
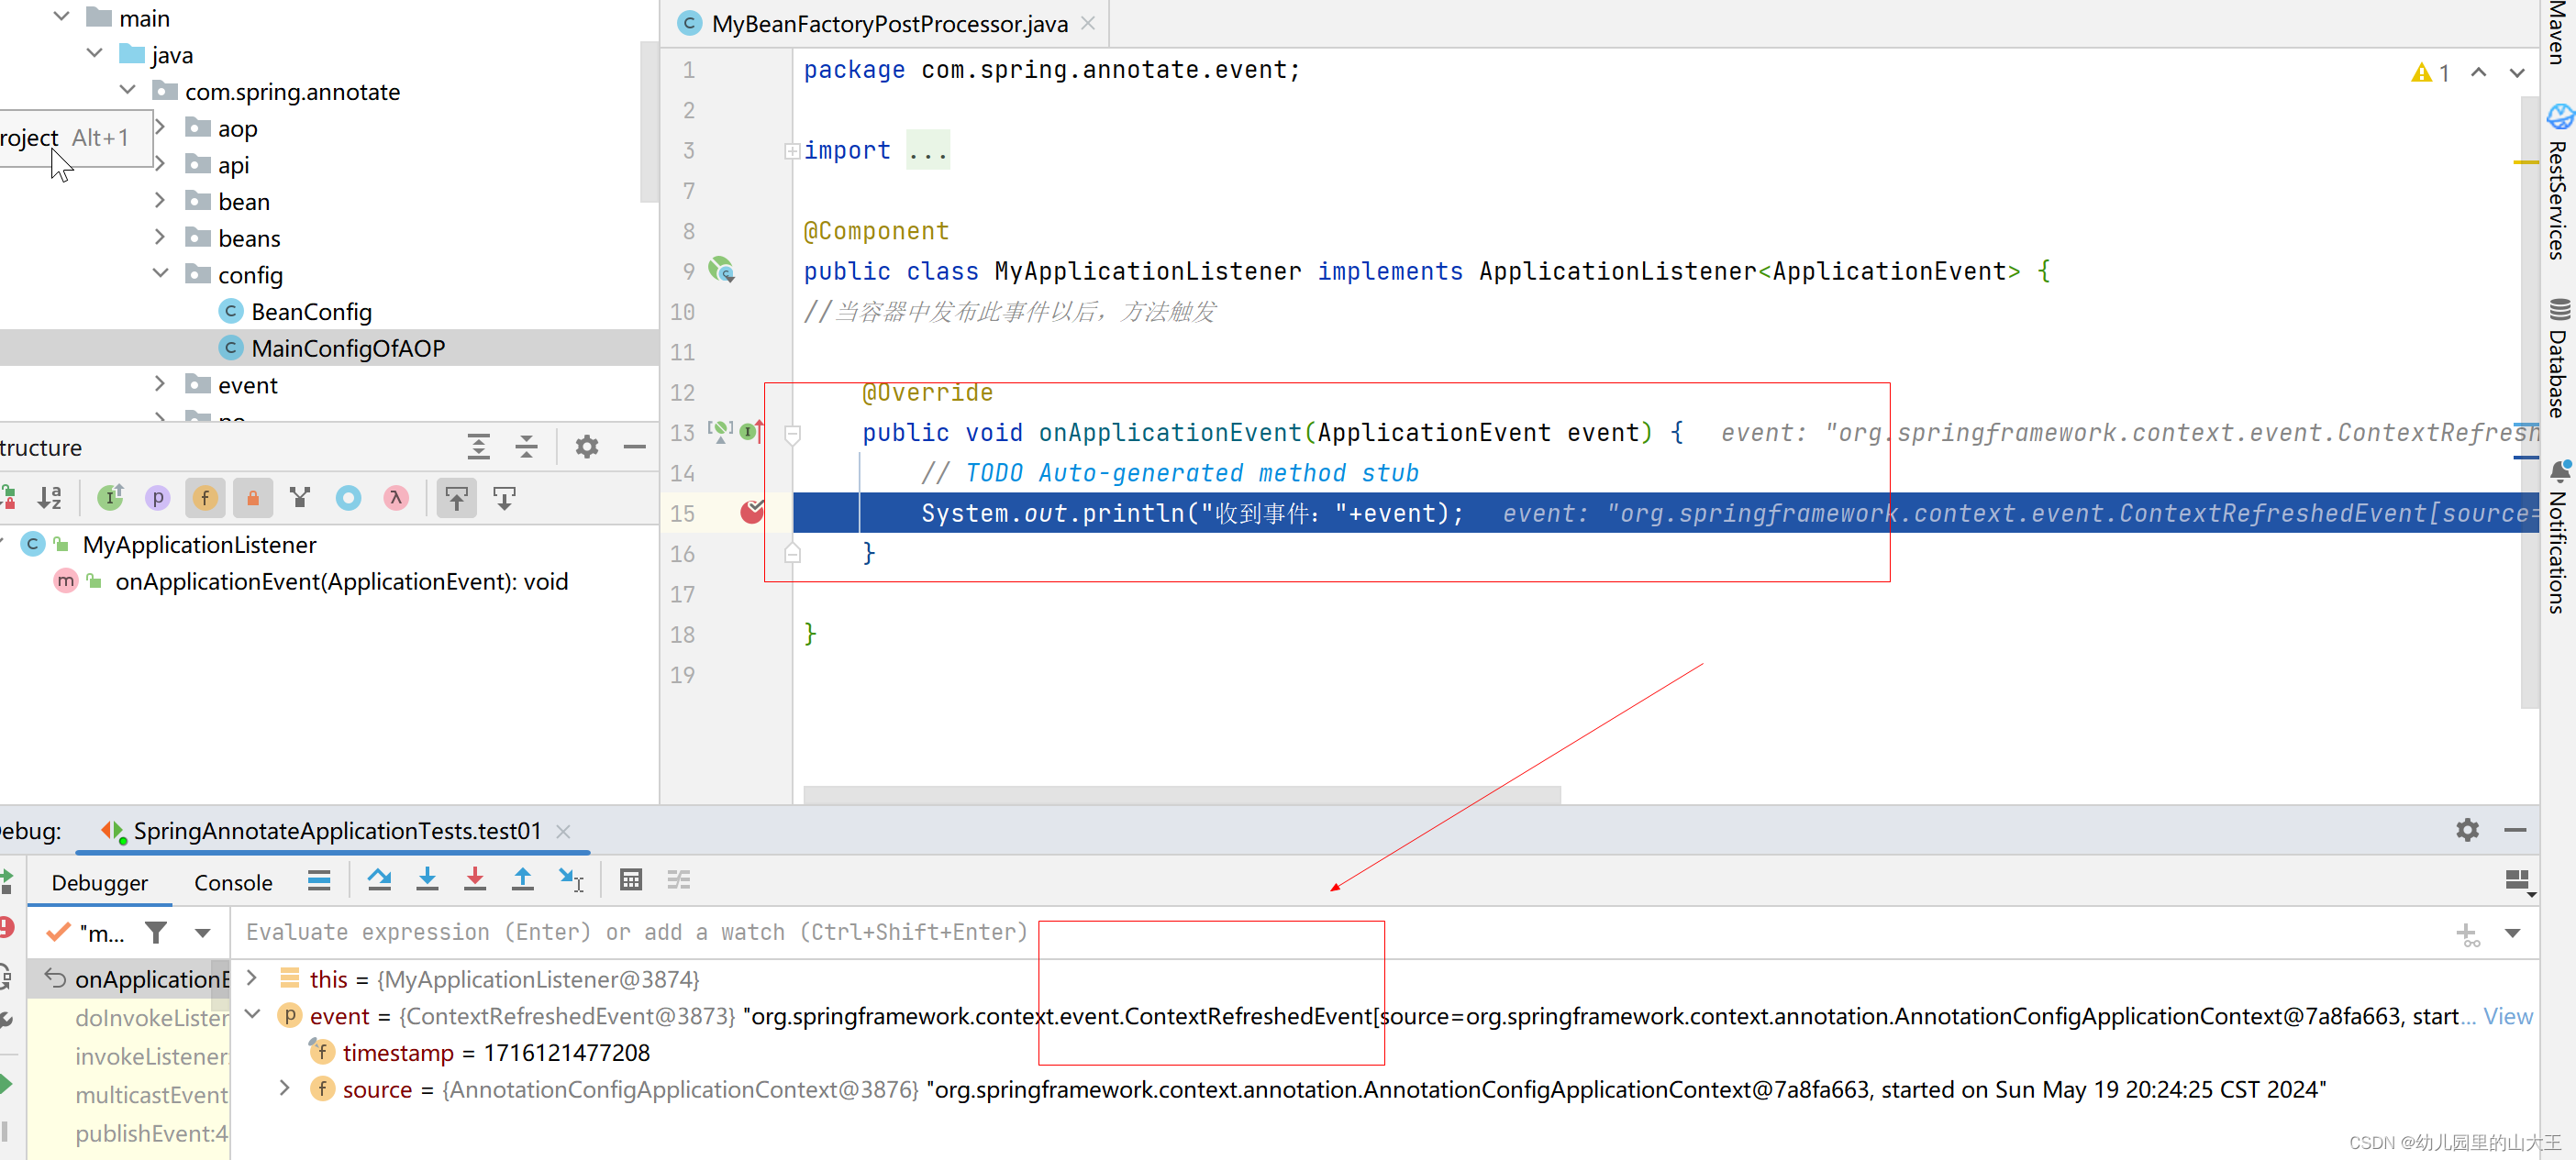
二、编写事件监听器
写一个监听器(ApplicationListener实现类)来监听某个事件(ApplicationEvent及其子类)
public class MyListener2 implements ApplicationListener<MyEvent> {

    @Override
    public void onApplicationEvent(MyEvent event) {
        System.out.println("收到基于接口驱动的事件:" + event);
    }
}
三、发布事件
public class EventMain2 {
    public static void main(String[] args) {
        AnnotationConfigApplicationContext context =
                new AnnotationConfigApplicationContext();
        // 注册自定义事件监听器
        context.addApplicationListener(new MyListener2());
        // 启动上下文
        context.refresh();
        // 发布事件,事件源为Context
        context.publishEvent(new MyEvent(context));
        // 结束
        context.close();
    }
}
四、原理
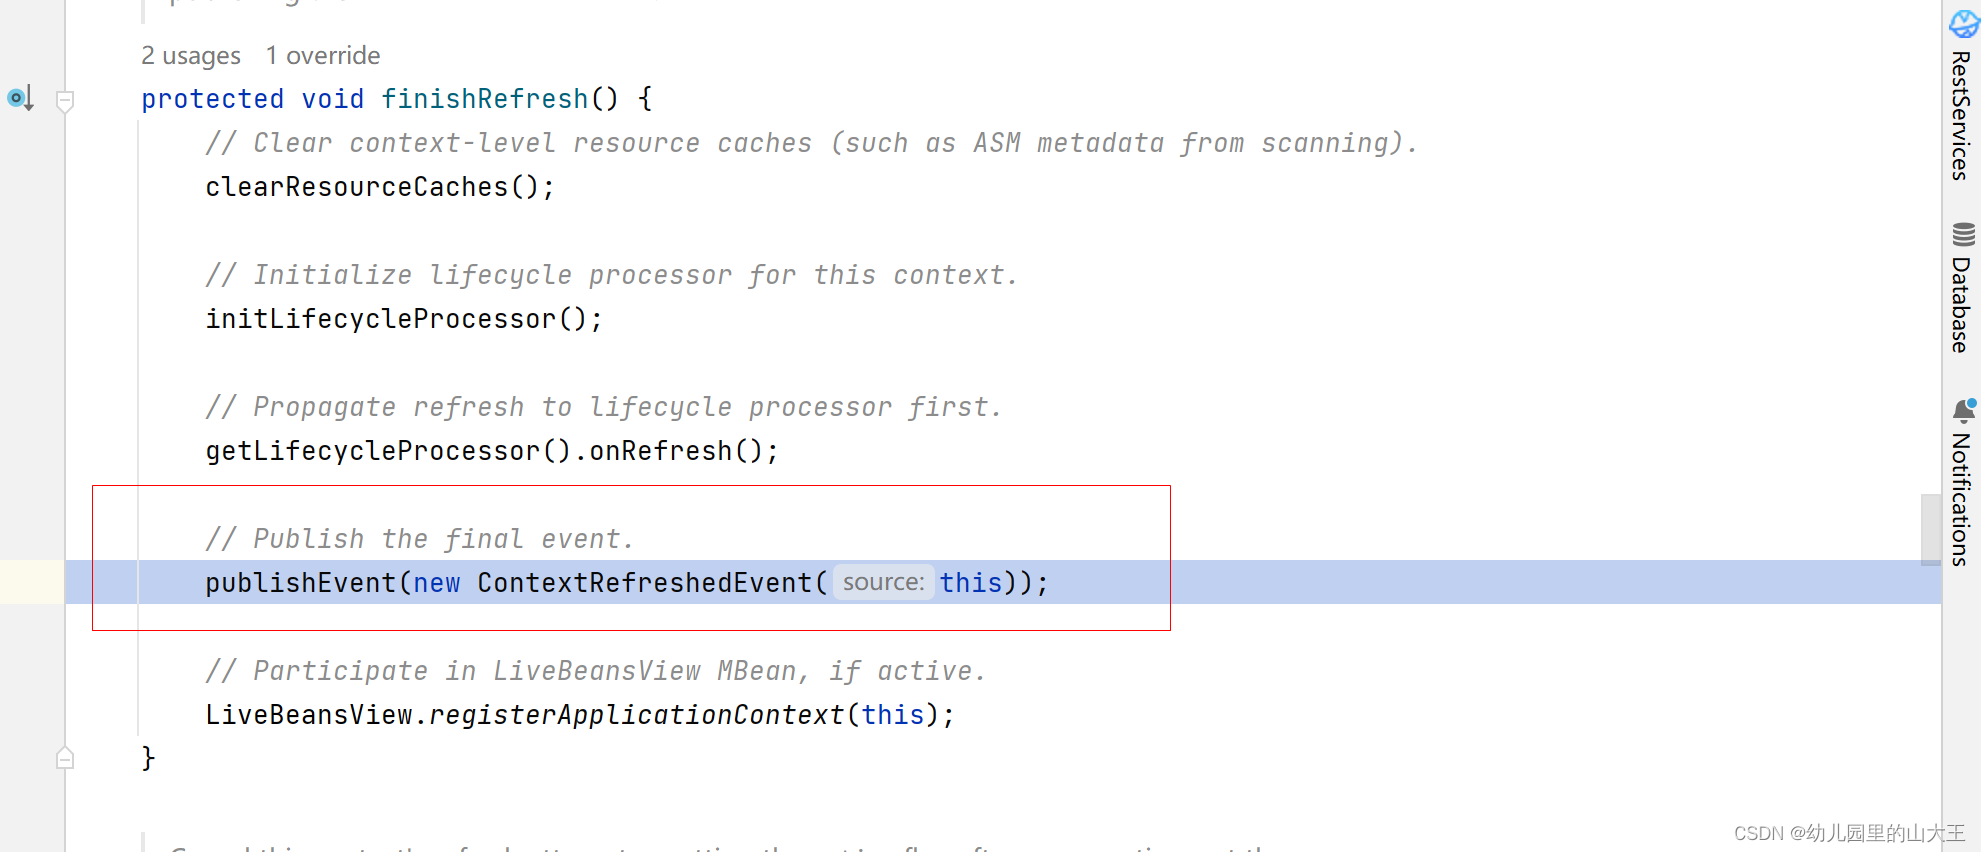
一、ContextRefreshedEvent事件:
这个是第一个收到的事件。
1)、容器创建对象,并调用refresh()进行刷新;
2)、中间还会进行各种对象的注册,最后调用finishRefresh();容器刷新完成会发布ContextRefreshedEvent事件。在publishEvent这个方法当中。这个事件的发布和自己发布事件原理都是一样的,原理写在了下方
二、自己发布事件
一、事件发布流程
之后收到的是自己发布的事件
publishEvent(new ContextRefreshedEvent(this));
一、获取事件的多播器(派发器):getApplicationEventMulticaster()
二、之后会调用multicastEvent(applicationEvent, eventType)这个方法,进行派发事件
@Override
public void multicastEvent(final ApplicationEvent event, @Nullable ResolvableType eventType) {
   ResolvableType type = (eventType != null ? eventType : resolveDefaultEventType(event));
   Executor executor = getTaskExecutor();
   for (ApplicationListener<?> listener : getApplicationListeners(event, type)) {
      if (executor != null) {
         executor.execute(() -> invokeListener(listener, event));
      }
      else {
         invokeListener(listener, event);
      }
   }
}
1、如果有Executor,可以支持使用Executor进行异步派发;
2、否则,同步的方式直接执行listener方法;invokeListener(listener, event);具体就是拿到listener(监听器)回调onApplicationEvent方法;
protected void publishEvent(Object event, @Nullable ResolvableType eventType) {
  Assert.notNull(event, "Event must not be null");
  Object applicationEvent;
  //将事件封装成事件对象ApplicationEvent
  if (event instanceof ApplicationEvent) {
      applicationEvent = (ApplicationEvent)event;
  } else {
      applicationEvent = new PayloadApplicationEvent(this, event);
      if (eventType == null) {
          eventType = ((PayloadApplicationEvent)applicationEvent).getResolvableType();
      }
  }
   广播事件
  if (this.earlyApplicationEvents != null) {
      //earlyApplicationEvents。它是一个set,用来存放一些容器启动时需要发布的事件。
      //在earlyApplicationEvents中的事件被发布、容器彻底启动后,它将被置空
      this.earlyApplicationEvents.add(applicationEvent);
  } else {
      //我们自定义的事件以及容器启动后发送的事件都会走else分支,      重点是这一行代码!!!
      this.getApplicationEventMulticaster().multicastEvent((ApplicationEvent)applicationEvent, eventType);
  }

   如果有父容器,则在父容器内也进行广播
  if (this.parent != null) {
      if (this.parent instanceof AbstractApplicationContext) {
          ((AbstractApplicationContext)this.parent).publishEvent(event, eventType);
      } else {
          this.parent.publishEvent(event);
      }
  }

}
二、事件多播器(派发器)
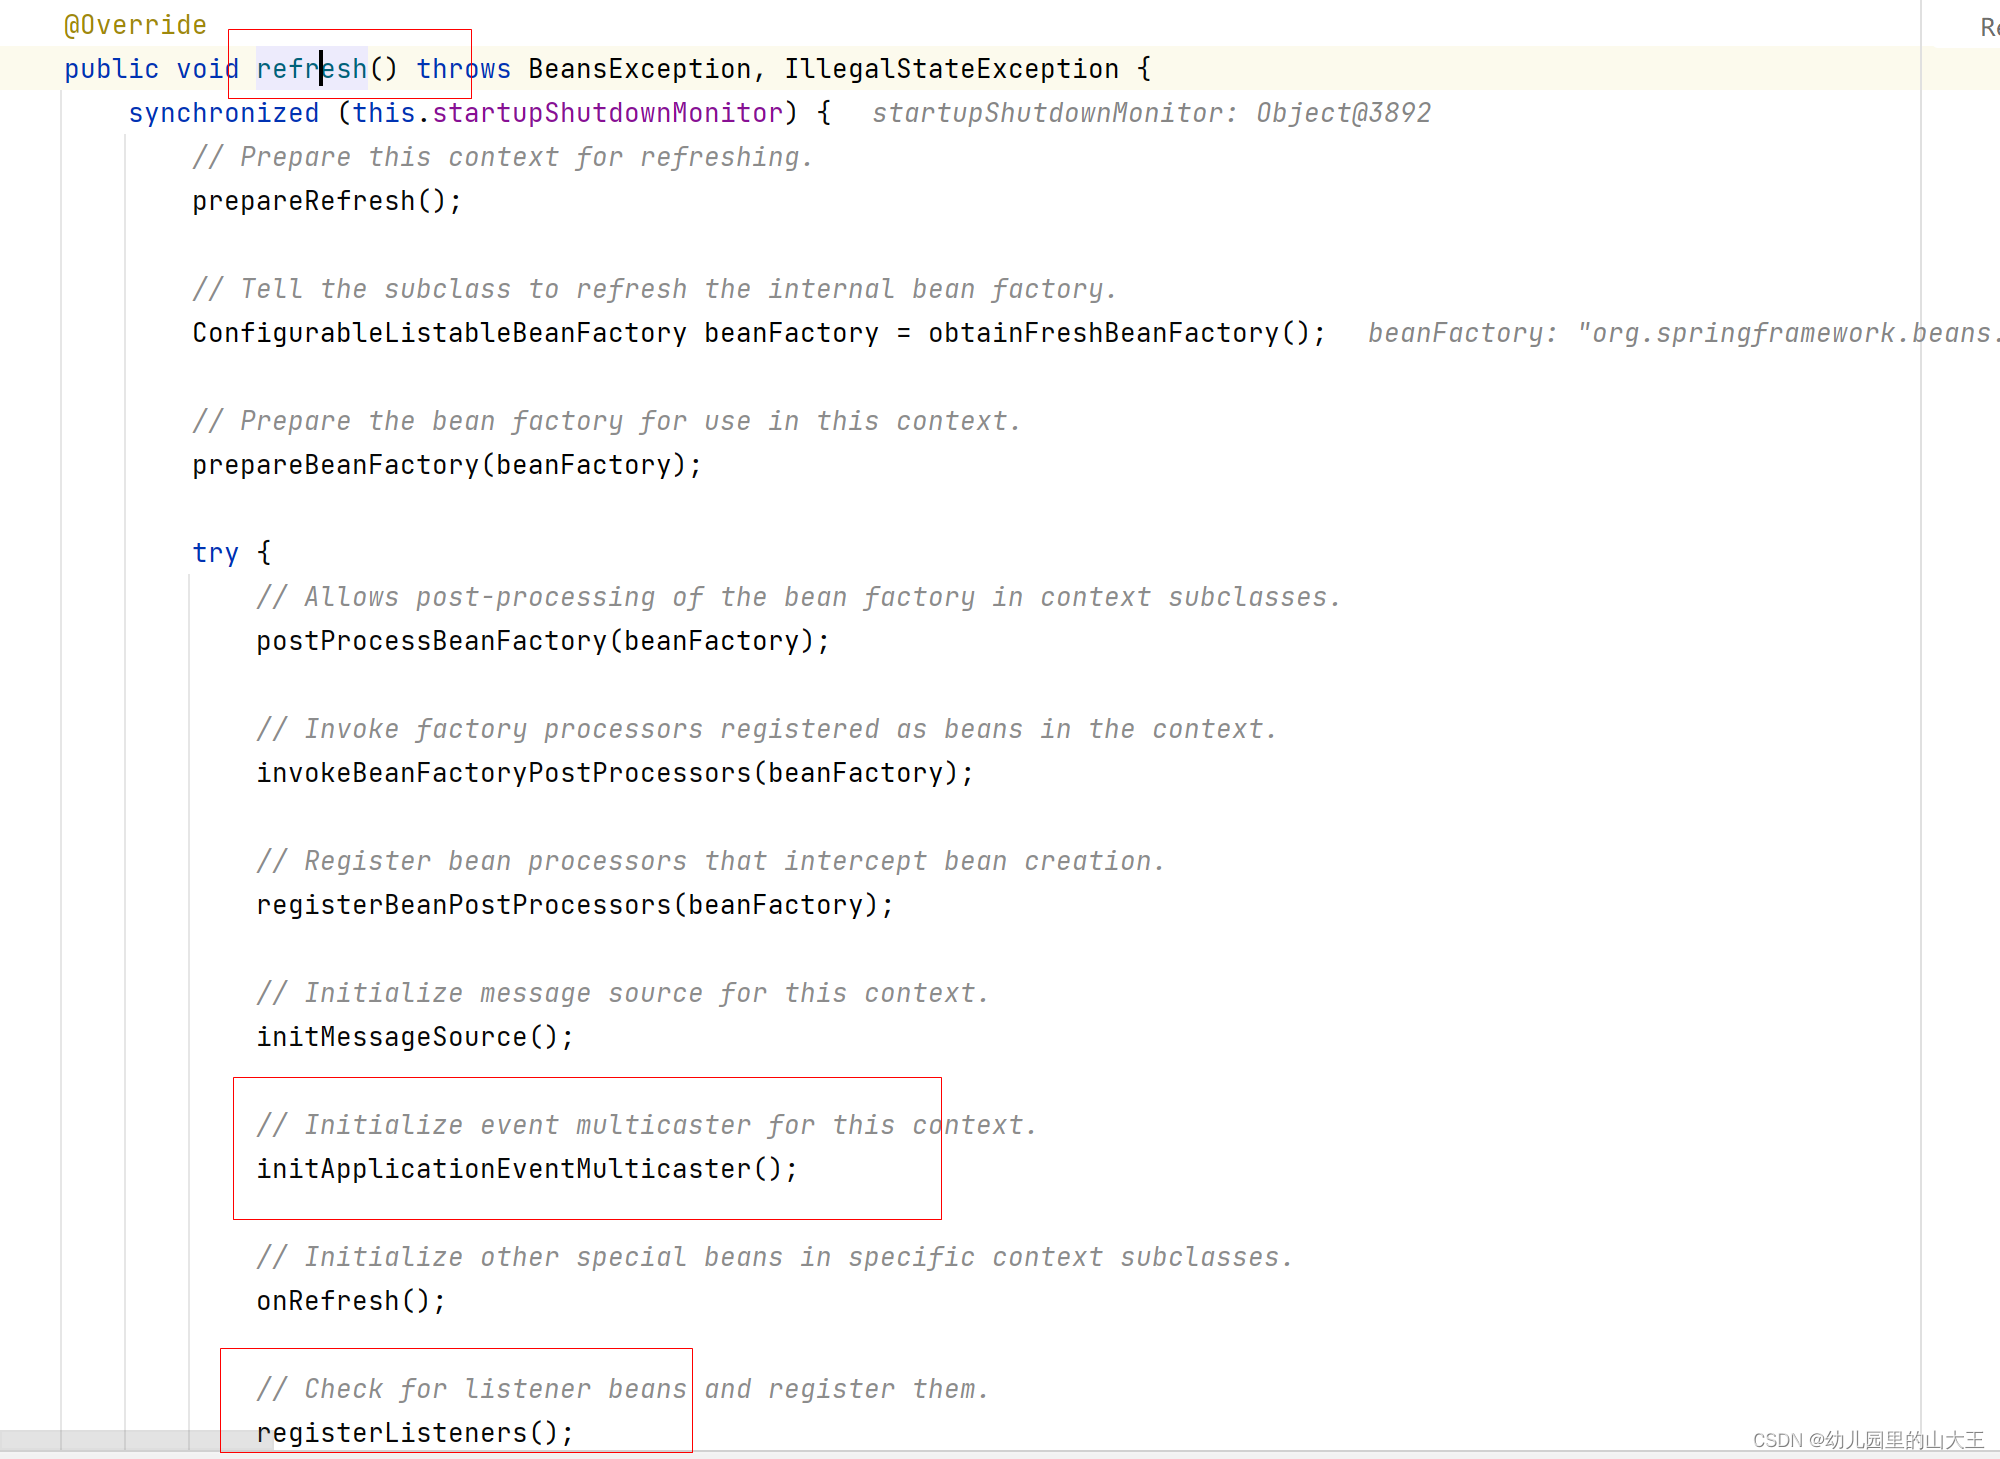
一、容器创建对象,会调用refresh()
二、在创建其他对象的过程中,有一步initApplicationEventMulticaster();会初始化ApplicationEventMulticaster(也就是事件派发器);
1、先去容器中找有没有id=“applicationEventMulticaster”的组件;
2、如果没有,this.applicationEventMulticaster = new SimpleApplicationEventMulticaster(beanFactory); 并且加入到容器中,我们就可以在其他组件要派发事件,自动注入这个applicationEventMulticaster;
protected void initApplicationEventMulticaster() {
   ConfigurableListableBeanFactory beanFactory = getBeanFactory();
        // 先去容器中找有没有id=“applicationEventMulticaster”的组件;
   if (beanFactory.containsLocalBean(APPLICATION_EVENT_MULTICASTER_BEAN_NAME)) {
      this.applicationEventMulticaster =
            beanFactory.getBean(APPLICATION_EVENT_MULTICASTER_BEAN_NAME, ApplicationEventMulticaster.class);
      if (logger.isTraceEnabled()) {
         logger.trace("Using ApplicationEventMulticaster [" + this.applicationEventMulticaster + "]");
      }
   }
   else {
       // 如果没有自己给一个默认的,并放入到容器中
      this.applicationEventMulticaster = new SimpleApplicationEventMulticaster(beanFactory);
      beanFactory.registerSingleton(APPLICATION_EVENT_MULTICASTER_BEAN_NAME, this.applicationEventMulticaster);
      if (logger.isTraceEnabled()) {
         logger.trace("No '" + APPLICATION_EVENT_MULTICASTER_BEAN_NAME + "' bean, using " +
               "[" + this.applicationEventMulticaster.getClass().getSimpleName() + "]");
      }
   }
}
三、 容器中有哪些监听器
一、容器创建对象,会调用refresh()
二、在创建其他对象的过程中,有一步registerListeners();
1、从容器中拿到所有的监听器,把他们注册到applicationEventMulticaster中;
2、如果上面的监听器没有,会通过监听器类获取对应的监听器名字并注册到派发器中
protected void registerListeners() {
   // Register statically specified listeners first.
   for (ApplicationListener<?> listener : getApplicationListeners()) {
      // 从容器中拿到所有的监听器,把他们注册到applicationEventMulticaster中,这里加入进去主要是在事件派发是,回调监听器的方法
      getApplicationEventMulticaster().addApplicationListener(listener);
   }

   // Do not initialize FactoryBeans here: We need to leave all regular beans
   // uninitialized to let post-processors apply to them!
    // 如果上面的监听器没有,会通过监听器类获取对应的监听器名字并注册到派发器中
   String[] listenerBeanNames = getBeanNamesForType(ApplicationListener.class, true, false);
   for (String listenerBeanName : listenerBeanNames) {
      getApplicationEventMulticaster().addApplicationListenerBean(listenerBeanName);
   }

   // Publish early application events now that we finally have a multicaster...
   Set<ApplicationEvent> earlyEventsToProcess = this.earlyApplicationEvents;
   this.earlyApplicationEvents = null;
   if (earlyEventsToProcess != null) {
      for (ApplicationEvent earlyEvent : earlyEventsToProcess) {
         getApplicationEventMulticaster().multicastEvent(earlyEvent);
      }
   }
}
四、注解@EventListener原理
一、使用EventListenerMethodProcessor处理器来解析方法上的@EventListener;
二、EventListenerMethodProcessor主要的就是实现了SmartInitializingSingleton里面的方法 afterSingletonsInstantiated()
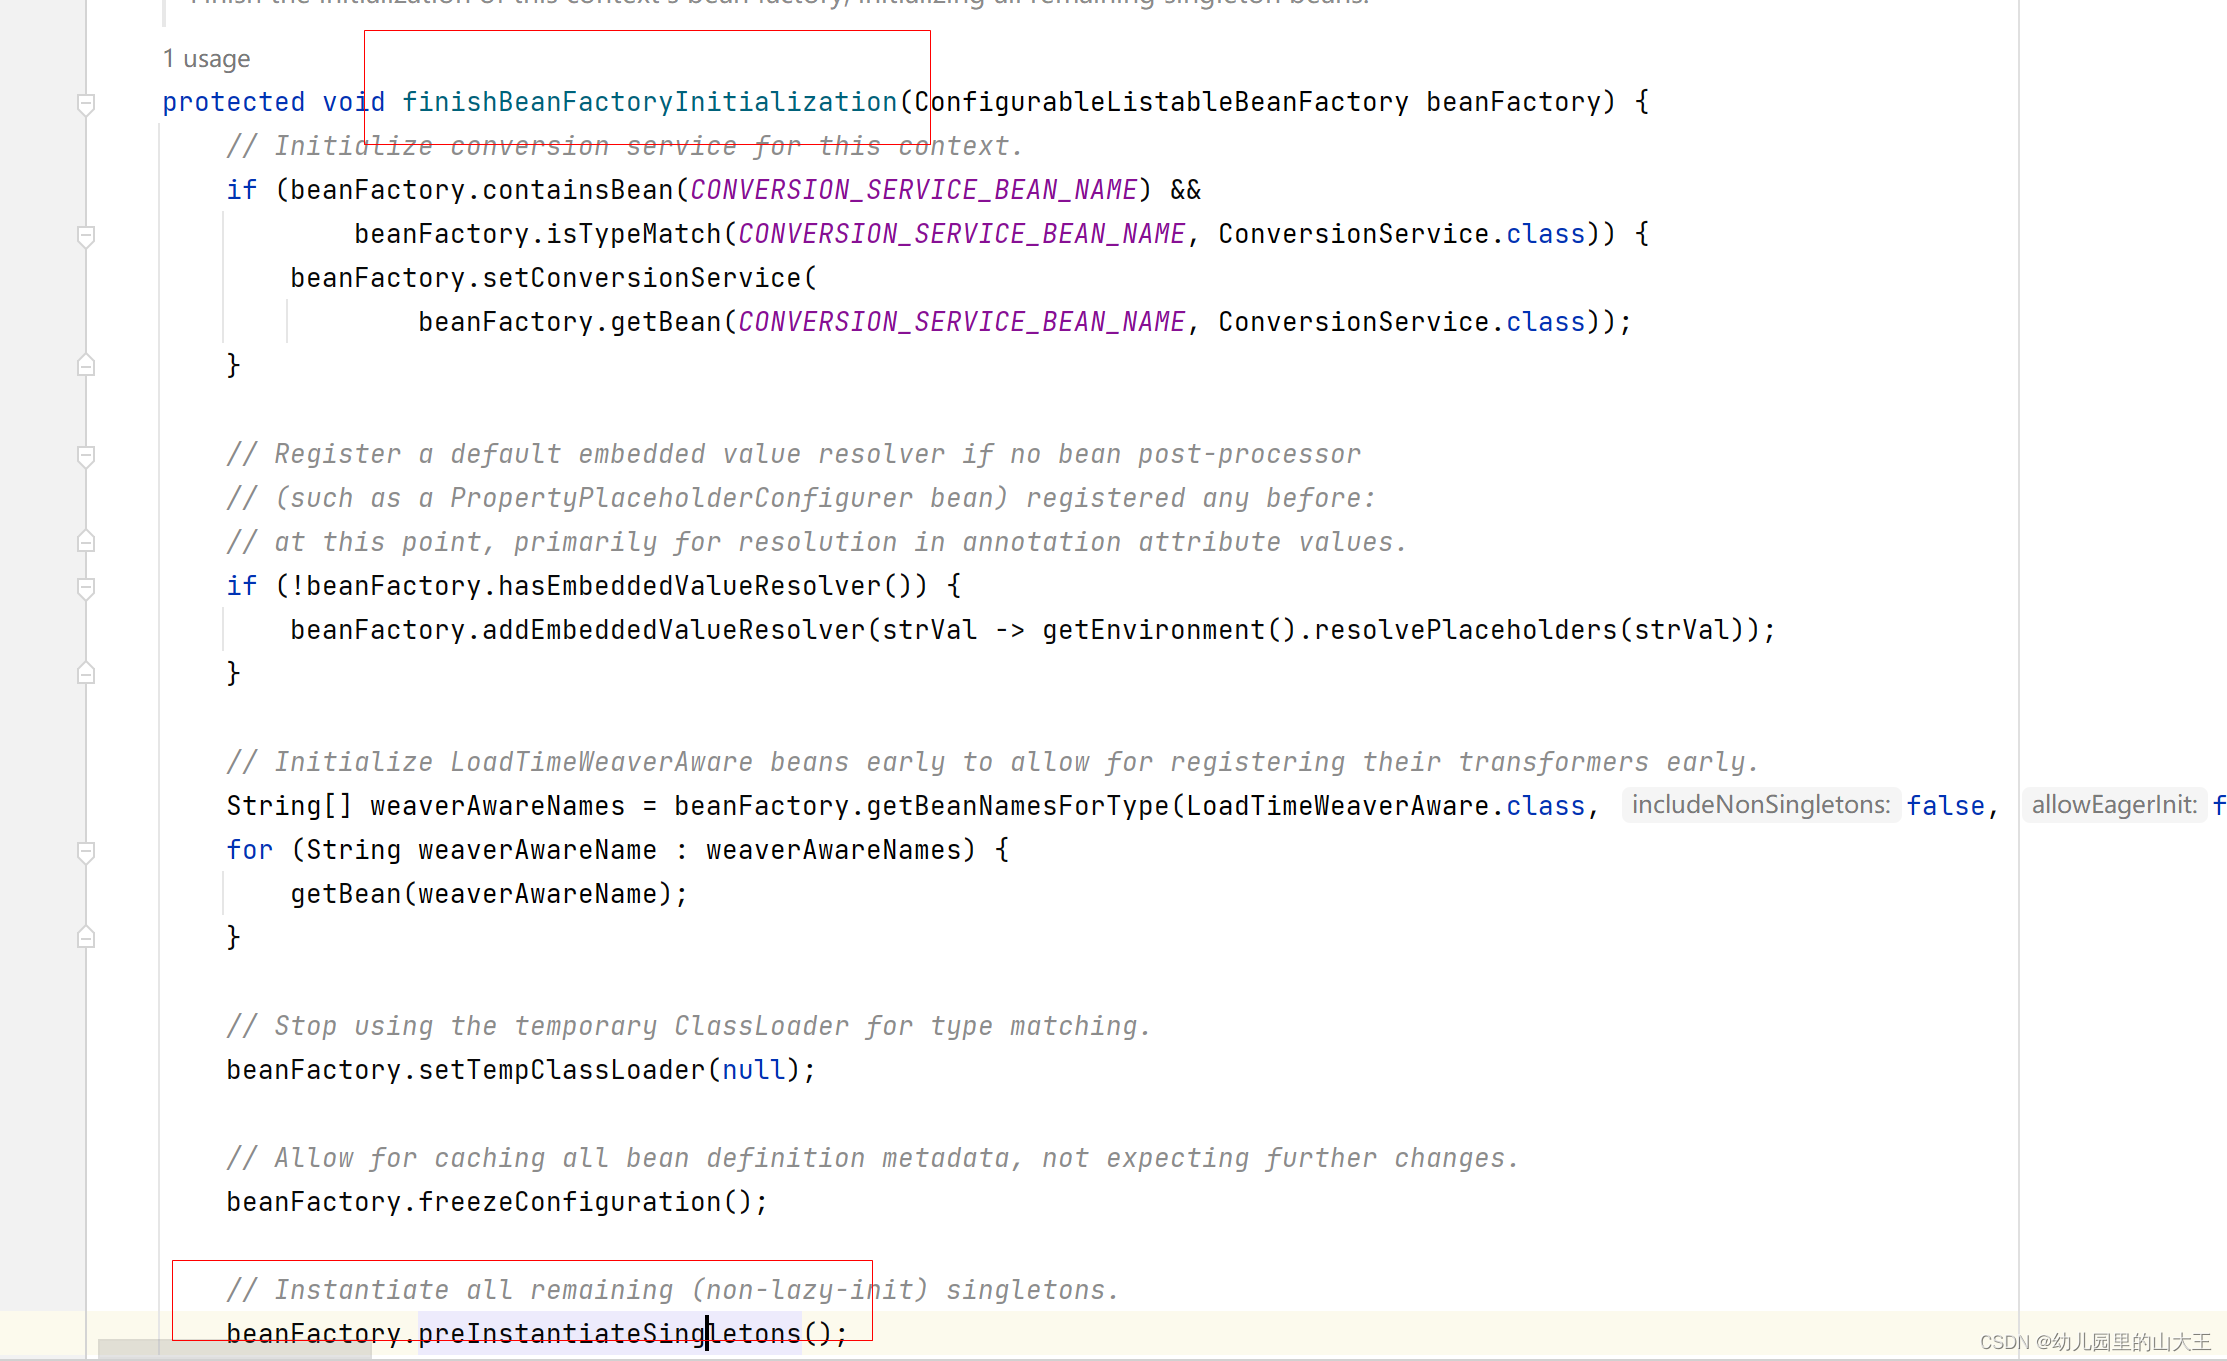
1、ioc容器创建对象并refresh()
2、然后在refresh()方法中会调用finishBeanFactoryInitialization(beanFactory);初始化剩下的单实例bean;
a、先创建所有的单实例bean;getBean();
b、获取所有创建好的单实例bean,判断是否是SmartInitializingSingleton类型的;
* 如果是就调用afterSingletonsInstantiated();
	public void preInstantiateSingletons() throws BeansException {
		if (logger.isTraceEnabled()) {
			logger.trace("Pre-instantiating singletons in " + this);
		}

		// Iterate over a copy to allow for init methods which in turn register new bean definitions.
		// While this may not be part of the regular factory bootstrap, it does otherwise work fine.
		List<String> beanNames = new ArrayList<>(this.beanDefinitionNames);

		// Trigger initialization of all non-lazy singleton beans...
		for (String beanName : beanNames) {
			RootBeanDefinition bd = getMergedLocalBeanDefinition(beanName);
			if (!bd.isAbstract() && bd.isSingleton() && !bd.isLazyInit()) {
				if (isFactoryBean(beanName)) {
					Object bean = getBean(FACTORY_BEAN_PREFIX + beanName);
					if (bean instanceof FactoryBean) {
						final FactoryBean<?> factory = (FactoryBean<?>) bean;
						boolean isEagerInit;
						if (System.getSecurityManager() != null && factory instanceof SmartFactoryBean) {
							isEagerInit = AccessController.doPrivileged((PrivilegedAction<Boolean>)
											((SmartFactoryBean<?>) factory)::isEagerInit,
									getAccessControlContext());
						}
						else {
							isEagerInit = (factory instanceof SmartFactoryBean &&
									((SmartFactoryBean<?>) factory).isEagerInit());
						}
						if (isEagerInit) {
							getBean(beanName);
						}
					}
				}
				else {
					getBean(beanName);
				}
			}
		}

		// Trigger post-initialization callback for all applicable beans...
		for (String beanName : beanNames) {
			Object singletonInstance = getSingleton(beanName);
			if (singletonInstance instanceof SmartInitializingSingleton) {
				final SmartInitializingSingleton smartSingleton = (SmartInitializingSingleton) singletonInstance;
				if (System.getSecurityManager() != null) {
					AccessController.doPrivileged((PrivilegedAction<Object>) () -> {
						smartSingleton.afterSingletonsInstantiated();
						return null;
					}, getAccessControlContext());
				}
				else {
					smartSingleton.afterSingletonsInstantiated();
				}
			}
		}
	}


 10万+
10万+

 被折叠的 条评论
为什么被折叠?
被折叠的 条评论
为什么被折叠?
 到【灌水乐园】发言


