


cache_t的结构
前面我们探究了class_data_bits_t,接下来我们探究cache_t这个结构,作为方法缓存,它的结构是什么样的呢?插入方式是什么样的呢?我们从源码看一下它的结构:
// objc-runtime-new.h
// returns: //如果没有缓存值,则缓存的IMP为nil,如果没有缓存值且缓存已预优化,则缓存为动态' value_on_constant_cache_miss '
// - the cached IMP when one is found
// - nil if there's no cached value and the cache is dynamic
// - `value_on_constant_cache_miss` if there's no cached value and the cache is preoptimized
extern "C" IMP cache_getImp(Class cls, SEL sel, IMP value_on_constant_cache_miss = nil);
// cache_t的结构 16字节
struct cache_t {
private:
    explicit_atomic<uintptr_t> _bucketsAndMaybeMask;  // 8字节 存放buckets的位置 和 MaybeMask
    union {                                           // 8字节 联合体
        struct {
            explicit_atomic<mask_t>    _maybeMask;    // 4字节  maybeMask buckets的长度
#if __LP64__
            uint16_t                   _flags;        // 2字节 64位上存在
#endif
            uint16_t                   _occupied;     // 2字节 缓存数
        };
        explicit_atomic<preopt_cache_t *> _originalPreoptCache; // 8字节 缓存数据
    };

 	......

 	void insert(SEL sel, IMP imp, id receiver);

	......

}
查看这个结构,我们最开始只是注意它的结构,还有insert这个插入方法。
cache_t由_bucketsAndMaybeMask(8字节)和union(8字节)两部分组成,所以在union位于中,_maybeMask、_occupied是我们需要关注的,我们文章后面会探究。
cache_t的insert
下面我们着重看一下insert这个方法,也就是缓存的插入:
// objc-cache.mm
// 缓存插入,核心代码
void cache_t::insert(SEL sel, IMP imp, id receiver)
{
    runtimeLock.assertLocked();

    // Never cache before +initialize is done //永远不要在+initialize完成之前缓存
    if (slowpath(!cls()->isInitialized())) {
        return;
    }

    if (isConstantOptimizedCache()) {
        _objc_fatal("cache_t::insert() called with a preoptimized cache for %s",
                    cls()->nameForLogging());
    }

#if DEBUG_TASK_THREADS
    return _collecting_in_critical();
#else
#if CONFIG_USE_CACHE_LOCK
    mutex_locker_t lock(cacheUpdateLock);
#endif

    ASSERT(sel != 0 && cls()->isInitialized());
    // 上面都是些判断条件 下面才是真正的核心插入
    // Use the cache as-is if until we exceed our expected fill ratio. //按原样使用缓存,直到超过预期填充率为止。
    mask_t newOccupied = occupied() + 1; // 获取当前缓存了多少方法 + 1
    unsigned oldCapacity = capacity(), capacity = oldCapacity; //获取buckets的最大容量,下面就是需不需要扩容的算法
    if (slowpath(isConstantEmptyCache())) { // 如果buckets最大容量为空的操作
        // Cache is read-only. Replace it. 缓存是只读的
        if (!capacity) capacity = INIT_CACHE_SIZE;  // 初始化buckets的最大容量 arm64架构下是2 x86架构下是4
        reallocate(oldCapacity, capacity, /* freeOld */false);  //alloc buckets 这里freeOld传的是false 不会释放旧的buckets,这里就是初始化了
    }
    else if (fastpath(newOccupied + CACHE_END_MARKER <= cache_fill_ratio(capacity))) { // 如果缓存数量小于等于 3/4 + 1个(x86)或者 7/8(arm64),什么也不做 CACHE_END_MARKER在x86为1 arm64为0
        // Cache is less than 3/4 or 7/8 full. Use it as-is.
    }
#if CACHE_ALLOW_FULL_UTILIZATION  // arm64 CACHE_ALLOW_FULL_UTILIZATION = 1 所以只在arm64下走
    else if (capacity <= FULL_UTILIZATION_CACHE_SIZE && newOccupied + CACHE_END_MARKER <= capacity) { // 在arm64下 如果buckets的最大容量 <= 8 并且 newOccupied新增之后没有超过buckets的最大容量 就不会扩容
        // Allow 100% cache utilization for small buckets. Use it as-is.
    }
#endif
    else {  // 这是扩容操作
        capacity = capacity ? capacity * 2 : INIT_CACHE_SIZE;  // 扩容为原来的2倍
        if (capacity > MAX_CACHE_SIZE) {  //最大扩容就是 1 << 16
            capacity = MAX_CACHE_SIZE;
        }
        reallocate(oldCapacity, capacity, true);  // 这里传入的就是freeOld = true 要释放旧的buckets
    }
    // 下面就是插入的操作了
    bucket_t *b = buckets();    // 获取buckets
    mask_t m = capacity - 1;    // buckets最大容量 - 1
    mask_t begin = cache_hash(sel, m);  // hash函数,保证获取的数大小,不超过buckets最大容量
    mask_t i = begin;  // 就从begin开始计算插入位置

    // Scan for the first unused slot and insert there. // 扫描第一个未使用的位置,进行插入
    // There is guaranteed to be an empty slot. // 这里肯定是一个空位置
    do {
        if (fastpath(b[i].sel() == 0)) {  // 大概率走这里,位置为空
            incrementOccupied(); // 缓存量 + 1
            b[i].set<Atomic, Encoded>(b, sel, imp, cls()); // 直接插入就返回了
            return;
        }
        if (b[i].sel() == sel) {  // 如果存储的方法 正好在这个位置 什么也不做,直接返回
            // The entry was added to the cache by some other thread
            // before we grabbed the cacheUpdateLock.
            return;
        }
    } while (fastpath((i = cache_next(i, m)) != begin)); // 线性探测的方式,寻找下一个位置

    bad_cache(receiver, (SEL)sel);
#endif // !DEBUG_TASK_THREADS
}
初始化和扩容
进入这个方法中,经过一系列判断之后,我们着重点到了mask_t newOccupied = occupied() + 1;这段代码以后。
// objc-cache.mm
// 获取当前缓存了多少方法数量
mask_t cache_t::occupied() const
{
    return _occupied;
}
occupied()获取当前缓存量,当方法进来后 +1,获取的newOccupied是为了判断是否需要扩容等操作。_occupied表示的就是当前缓存量。
// objc-cache.mm
// 获取缓存buckets的最大容量
unsigned cache_t::capacity() const
{
    return mask() ? mask()+1 : 0;
}

// 获取_maybeMask
mask_t cache_t::mask() const
{
    return _maybeMask.load(memory_order_relaxed);
}
capacity()就是获取buckets的最大容量,也就是可以缓存的最大量。通过和newOccupied进行比较,来判断是否需要扩容等操作。_maybeMask保存的就是buckets的最大容量 - 1。
接下来就进入到了扩容和初始化的操作,由于分架构,所以我们约定只考虑arm64和x86_64架构。
// objc-cache.mm
// 判断还没有缓存,正常情况下就是第一次进入的时候
bool cache_t::isConstantEmptyCache() const
{
    return
        occupied() == 0  &&
        buckets() == emptyBucketsForCapacity(capacity(), false);
}
第一个判断就是,在正常情况下,也就是第一次进入的时候,通过isConstantEmptyCache判断现在buckets是空的,存储量也是0,这时候就需要来初始化buckets等信息。
// objc-cache.mm
if (!capacity) capacity = INIT_CACHE_SIZE;  // 初始化buckets的最大容量 arm64架构下是2 x86架构下是4
reallocate(oldCapacity, capacity, /* freeOld */false);  //alloc buckets 这里freeOld传的是false 不会释放旧的buckets,这里就是初始化了

// 初始缓存bucket。INIT_CACHE_SIZE必须是2的幂
/* Initial cache bucket count. INIT_CACHE_SIZE must be a power of two. */
enum {
#if CACHE_END_MARKER || (__arm64__ && !__LP64__)  // x86 结构下CACHE_END_MARKER为1 arm64下为0
    // When we have a cache end marker it fills a bucket slot, so having a
    // initial cache size of 2 buckets would not be efficient when one of the
    // slots is always filled with the end marker. So start with a cache size
    // 4 buckets.
    INIT_CACHE_SIZE_LOG2 = 2,
#else
    // Allow an initial bucket size of 2 buckets, since a large number of
    // classes, especially metaclasses, have very few imps, and we support
    // the ability to fill 100% of the cache before resizing.
    INIT_CACHE_SIZE_LOG2 = 1,
#endif
    INIT_CACHE_SIZE      = (1 << INIT_CACHE_SIZE_LOG2),  // arm64架构下是2 x86架构下是4
    MAX_CACHE_SIZE_LOG2  = 16,
    MAX_CACHE_SIZE       = (1 << MAX_CACHE_SIZE_LOG2), // 1 << 16
    FULL_UTILIZATION_CACHE_SIZE_LOG2 = 3,
    FULL_UTILIZATION_CACHE_SIZE = (1 << FULL_UTILIZATION_CACHE_SIZE_LOG2),  // 8 在arm64下
};

// alloc buckets
ALWAYS_INLINE
void cache_t::reallocate(mask_t oldCapacity, mask_t newCapacity, bool freeOld)
{
    bucket_t *oldBuckets = buckets(); // 获取原始的buckets
    bucket_t *newBuckets = allocateBuckets(newCapacity); // 新alloc一个buckets

    // Cache's old contents are not propagated. // 缓存的旧内容不会被传播。
    // This is thought to save cache memory at the cost of extra cache fills. //这被认为是以额外的缓存填充为代价来节省缓存内存。
    // fixme re-measure this

    ASSERT(newCapacity > 0);
    ASSERT((uintptr_t)(mask_t)(newCapacity-1) == newCapacity-1);

    setBucketsAndMask(newBuckets, newCapacity - 1); // 设置buckets和_maybeMask 在设置设置buckets 并且会把缓存了多少方法置为0

    if (freeOld) {  // 如果是需要释放 就释放旧的buckets
        collect_free(oldBuckets, oldCapacity);
    }
}
在初始化中,初始化buckets的最大容量arm64架构下是2,x86架构下是4,最开始我们最大容量被设置成了2或者4。并且在reallocate方法中,我们传入的是freeOld = false,也就是初始化,我们不需要释放旧的buckets。在setBucketsAndMask方法中,我们为cache_t赋值信息,并且会把_occupied设置为0,也就是会把缓存方法清0,重新缓存。
这是关于第一个if判断做的事情,下面是第二个else if判断
// objc-cache.mm
#if __arm__  ||  __x86_64__  ||  __i386__

// objc_msgSend has few registers available.
// Cache scan increments and wraps at special end-marking bucket.
#define CACHE_END_MARKER 1

// Historical fill ratio of 75% (since the new objc runtime was introduced).
static inline mask_t cache_fill_ratio(mask_t capacity) {
    return capacity * 3 / 4;
}

#elif __arm64__ && !__LP64__

// objc_msgSend has lots of registers available.
// Cache scan decrements. No end marker needed.
#define CACHE_END_MARKER 0

// Historical fill ratio of 75% (since the new objc runtime was introduced).
static inline mask_t cache_fill_ratio(mask_t capacity) {
    return capacity * 3 / 4;
}

#elif __arm64__ && __LP64__

// objc_msgSend has lots of registers available.
// Cache scan decrements. No end marker needed.
#define CACHE_END_MARKER 0

// Allow 87.5% fill ratio in the fast path for all cache sizes.
// Increasing the cache fill ratio reduces the fragmentation and wasted space
// in imp-caches at the cost of potentially increasing the average lookup of
// a selector in imp-caches by increasing collision chains. Another potential
// change is that cache table resizes / resets happen at different moments.
static inline mask_t cache_fill_ratio(mask_t capacity) {
    return capacity * 7 / 8;
}

// Allow 100% cache utilization for smaller cache sizes. This has the same
// advantages and disadvantages as the fill ratio. A very large percentage
// of caches end up with very few entries and the worst case of collision
// chains in small tables is relatively small.
// NOTE: objc_msgSend properly handles a cache lookup with a full cache.
#define CACHE_ALLOW_FULL_UTILIZATION 1

#else
#error unknown architecture
#endif
在第二个判断中,也是分架构的。
在x86下,判断的是现有缓存量下+1,再+CACHE_END_MARKER(1,在x86下为1),也就是会+2,得到的数量去和最大缓存容量的3/4比较,如果<=,就什么也不做。
在arm64下,判断的是现有缓存量下+1,再+CACHE_END_MARKER(0,在arm64下为0),也就是会+1,得到的数量去和最大缓存容量的7/8比较,如果<=,就什么也不做。
当最大缓存容量是8时,x86下,进入第6个方法时,就会进入下一个判断,在arm64下,进入第8个方法时,才会进入下一个判断。
接下来的一个判断就只属于arm64了,如果缓存的最大容量 <= FULL_UTILIZATION_CACHE_SIZE(8,1 << 3) 并且新增之后没有超过缓存的最大容量,就什么也不做。
最后的else就是扩容操作了,扩容到原来的2倍,并且reallocate方法中,传入了freeOld = true,也就是会释放旧的数据。
真正的插入操作
接下来就是真正的插入操作了
// objc-cache.mm
bucket_t *b = buckets();    // 获取buckets
mask_t m = capacity - 1;    // buckets最大容量 - 1
mask_t begin = cache_hash(sel, m);  // hash函数,保证获取的数大小,不超过buckets最大容量
mask_t i = begin;  // 就从begin开始计算插入位置

// Class points to cache. SEL is key. Cache buckets store SEL+IMP. // 类指向缓存。SEL是key。Cache buckets存储SEL+IMP。
// Caches are never built in the dyld shared cache. //缓存从不构建在dyld共享缓存中。
// hash函数
static inline mask_t cache_hash(SEL sel, mask_t mask)
{
    uintptr_t value = (uintptr_t)sel;  // 将sel转换为数字
#if CONFIG_USE_PREOPT_CACHES
    value ^= value >> 7;
#endif
    return (mask_t)(value & mask);  // & mask 这样得到的数不会超过buckets最大容量
}
首先会获取到当前的buckets,通过cache_hash这个hash函数去获取缓存位置。这里是通过hash表来缓存方法的。通过& mask可以得到一个不会超过缓存最大容量的值,从这个值开始判断下面的操作。
// objc-cache.mm
do {
	if (fastpath(b[i].sel() == 0)) {  // 大概率走这里,位置为空
		incrementOccupied(); // 缓存量 + 1
		b[i].set<Atomic, Encoded>(b, sel, imp, cls()); // 直接插入就返回了
		return;
	}
	if (b[i].sel() == sel) {  // 如果存储的方法 正好在这个位置 什么也不做,直接返回
		// The entry was added to the cache by some other thread
		// before we grabbed the cacheUpdateLock.
		return;
	}
} while (fastpath((i = cache_next(i, m)) != begin)); // 线性探测的方式,寻找下一个位置

#if CACHE_END_MARKER
static inline mask_t cache_next(mask_t i, mask_t mask) {
    return (i+1) & mask;
}
#elif __arm64__
static inline mask_t cache_next(mask_t i, mask_t mask) {
    return i ? i-1 : mask;
}
#else
#error unexpected configuration
#endif
do-while循环去寻找位置,如果找到的位置是空(b[i].sel() == 0),就把数据插入在这个位置;如果这个位置的方法和插入的方法一样,什么也不做,直接返回;如果不符合上面的情况,就会进行线性探测,获取下一个位置cache_next,并且也是分架构的的,x86下是i + 1,arm64下是i - 1。
这样插入的操作就完成了。
buckets和bucket_t
接下来我们看一下缓存的内容,也就是buckets和bucket_t。
// objc-cache.mm
// 获取buckets
struct bucket_t *cache_t::buckets() const
{
    uintptr_t addr = _bucketsAndMaybeMask.load(memory_order_relaxed); // buckets地址存储在_bucketsAndMaybeMask中
    return (bucket_t *)(addr & bucketsMask); // 直接& bucketsMask就可以得到
}
我们可以通过代码来看一下:
LLPerson *p = [LLPerson new];
[p instanceMethod];

我们使用的x86的模拟器,bucketsMask = ~0ul,所以获取的buckets的地址就是_bucketsAndMaybeMask。
接下来我们看一下bucket_t。
// objc-runtime-new.h
struct bucket_t {
private:
    // IMP-first is better for arm64e ptrauth and no worse for arm64.
    // SEL-first is better for armv7* and i386 and x86_64.
#if __arm64__
    explicit_atomic<uintptr_t> _imp;
    explicit_atomic<SEL> _sel;
#else
    explicit_atomic<SEL> _sel;
    explicit_atomic<uintptr_t> _imp;
#endif

    // Compute the ptrauth signing modifier from &_imp, newSel, and cls.
    uintptr_t modifierForSEL(bucket_t *base, SEL newSel, Class cls) const {
        return (uintptr_t)base ^ (uintptr_t)newSel ^ (uintptr_t)cls;
    }

    // Sign newImp, with &_imp, newSel, and cls as modifiers.
    uintptr_t encodeImp(UNUSED_WITHOUT_PTRAUTH bucket_t *base, IMP newImp, UNUSED_WITHOUT_PTRAUTH SEL newSel, Class cls) const {
        if (!newImp) return 0;
#if CACHE_IMP_ENCODING == CACHE_IMP_ENCODING_PTRAUTH
        return (uintptr_t)
            ptrauth_auth_and_resign(newImp,
                                    ptrauth_key_function_pointer, 0,
                                    ptrauth_key_process_dependent_code,
                                    modifierForSEL(base, newSel, cls));
#elif CACHE_IMP_ENCODING == CACHE_IMP_ENCODING_ISA_XOR
        return (uintptr_t)newImp ^ (uintptr_t)cls;
#elif CACHE_IMP_ENCODING == CACHE_IMP_ENCODING_NONE
        return (uintptr_t)newImp;
#else
#error Unknown method cache IMP encoding.
#endif
    }

public:
    static inline size_t offsetOfSel() { return offsetof(bucket_t, _sel); }
    inline SEL sel() const { return _sel.load(memory_order_relaxed); }  获取bucket_t的sel

#if CACHE_IMP_ENCODING == CACHE_IMP_ENCODING_ISA_XOR
#define MAYBE_UNUSED_ISA
#else
#define MAYBE_UNUSED_ISA __attribute__((unused))
#endif
    inline IMP rawImp(MAYBE_UNUSED_ISA objc_class *cls) const {
        uintptr_t imp = _imp.load(memory_order_relaxed);
        if (!imp) return nil;
#if CACHE_IMP_ENCODING == CACHE_IMP_ENCODING_PTRAUTH
#elif CACHE_IMP_ENCODING == CACHE_IMP_ENCODING_ISA_XOR
        imp ^= (uintptr_t)cls;
#elif CACHE_IMP_ENCODING == CACHE_IMP_ENCODING_NONE
#else
#error Unknown method cache IMP encoding.
#endif
        return (IMP)imp;
    }
    // 获取bucket_t的imp
    inline IMP imp(UNUSED_WITHOUT_PTRAUTH bucket_t *base, Class cls) const {
        uintptr_t imp = _imp.load(memory_order_relaxed);
        if (!imp) return nil;
#if CACHE_IMP_ENCODING == CACHE_IMP_ENCODING_PTRAUTH
        SEL sel = _sel.load(memory_order_relaxed);
        return (IMP)
            ptrauth_auth_and_resign((const void *)imp,
                                    ptrauth_key_process_dependent_code,
                                    modifierForSEL(base, sel, cls),
                                    ptrauth_key_function_pointer, 0);
#elif CACHE_IMP_ENCODING == CACHE_IMP_ENCODING_ISA_XOR
        return (IMP)(imp ^ (uintptr_t)cls);
#elif CACHE_IMP_ENCODING == CACHE_IMP_ENCODING_NONE
        return (IMP)imp;
#else
#error Unknown method cache IMP encoding.
#endif
    }

    inline void scribbleIMP(uintptr_t value) {
        _imp.store(value, memory_order_relaxed);
    }

    template <Atomicity, IMPEncoding>
    void set(bucket_t *base, SEL newSel, IMP newImp, Class cls);
};
从bucket_t我们可以看到,这里面就是存储着sel和imp,那我们就通过代码读取一下:
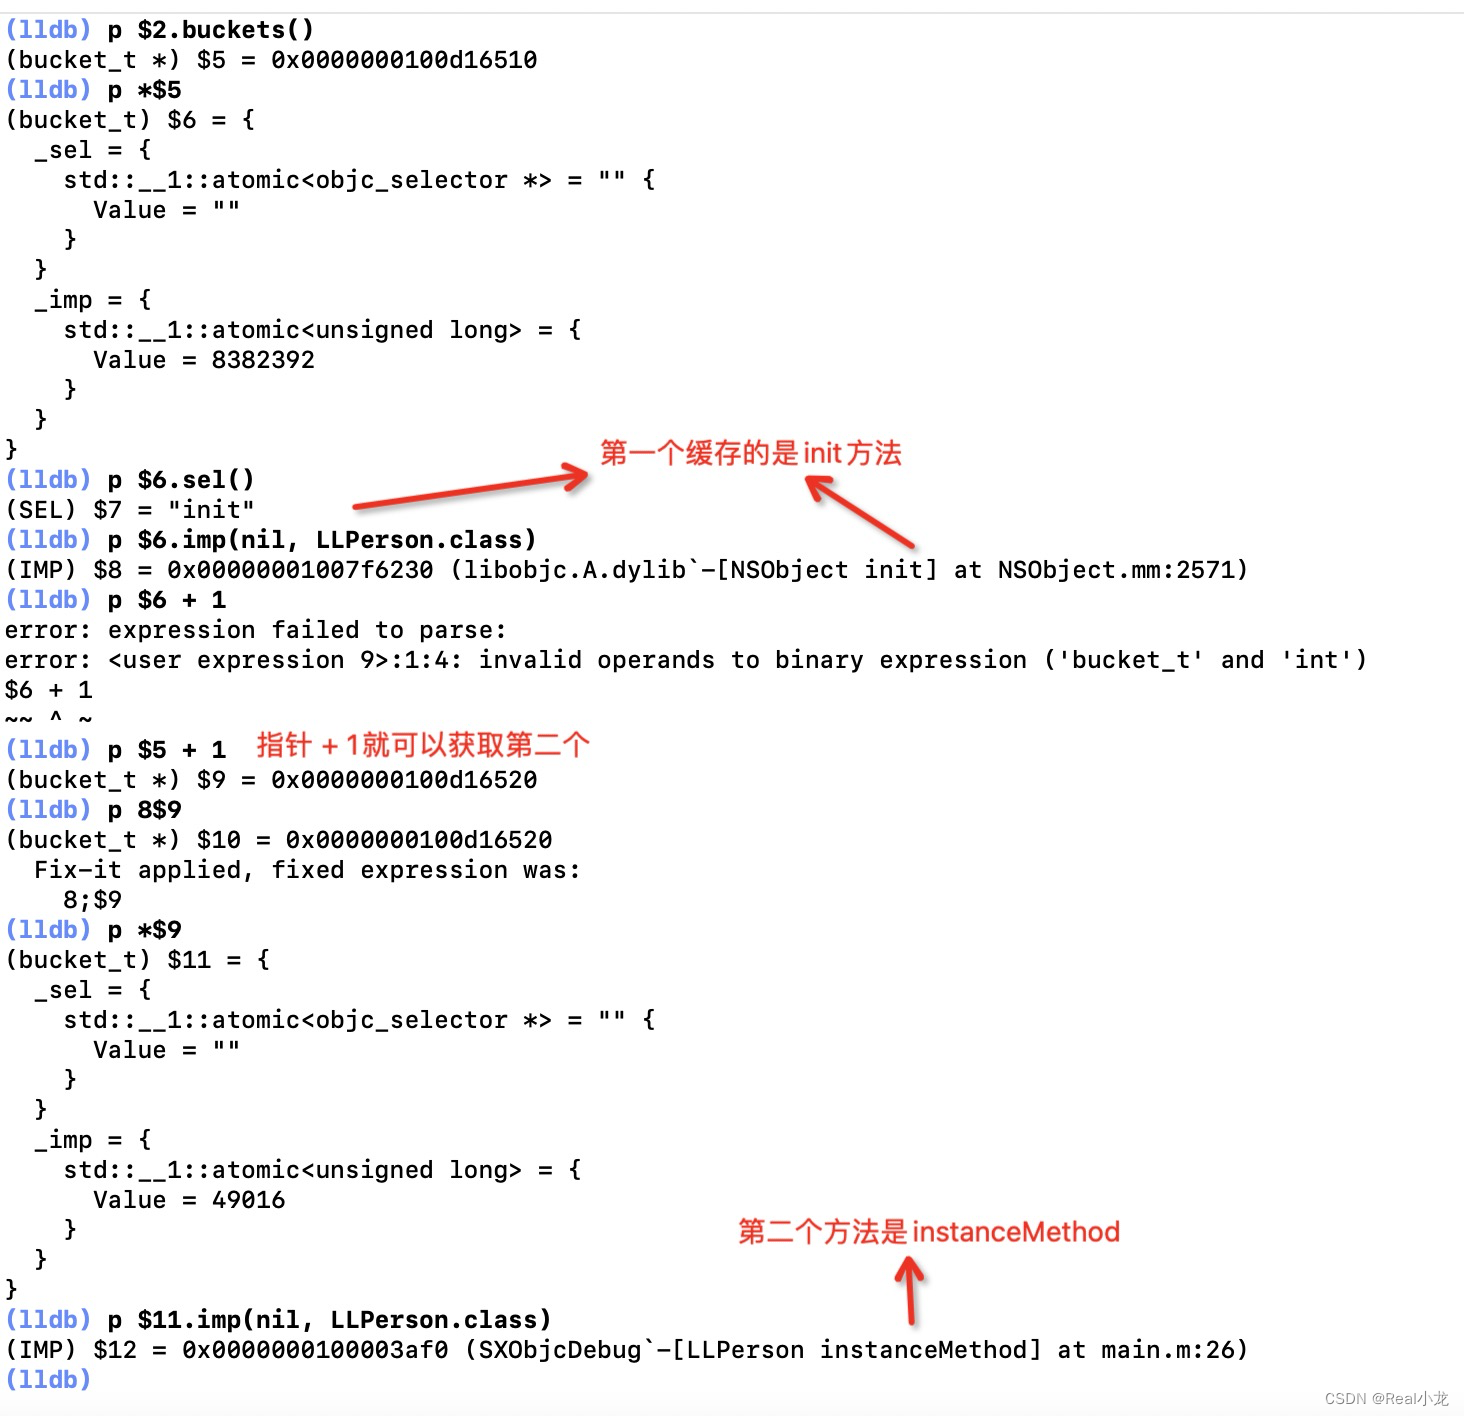
我们只调用了两个方法(init、instanceMethod),我们就读取了两个方法。
使用真机代码验证cache_t的信息
在真机上,我们可以尝试去模仿这些结构,获取缓存信息,看一下我们分析的是否是对的。
#import <objc/message.h>
#import "LLPerson.h"


typedef uint32_t mask_t;  // x86_64 & arm64 asm are less efficient

//preopt_cache_entry_t源码模仿
struct ll_preopt_cache_entry_t {
    uint32_t sel_offs;
    uint32_t imp_offs;
};

//preopt_cache_t源码模仿
struct ll_preopt_cache_t {
    int32_t  fallback_class_offset;
    union {
        struct {
            uint16_t shift       :  5;
            uint16_t mask        : 11;
        };
        uint16_t hash_params;
    };
    uint16_t occupied    : 14;
    uint16_t has_inlines :  1;
    uint16_t bit_one     :  1;
    struct ll_preopt_cache_entry_t entries;

    inline int capacity() const {
        return mask + 1;
    }
};

// bucket_t源码模仿
struct ll_bucket_t {
    IMP _imp;
    SEL _sel;
};

// cache_t源码模仿
struct ll_cache_t {
    uintptr_t _bucketsAndMaybeMask; // 8
    struct ll_preopt_cache_t _originalPreoptCache; // 8

    // 下面都是arm64的代码
    // How much the mask is shifted by.
    static constexpr uintptr_t maskShift = 48;

    // Additional bits after the mask which must be zero. msgSend
    // takes advantage of these additional bits to construct the value
    // `mask << 4` from `_maskAndBuckets` in a single instruction.
    static constexpr uintptr_t maskZeroBits = 4;

    // The largest mask value we can store.
    static constexpr uintptr_t maxMask = ((uintptr_t)1 << (64 - maskShift)) - 1;

    // The mask applied to `_maskAndBuckets` to retrieve the buckets pointer.
    static constexpr uintptr_t bucketsMask = ((uintptr_t)1 << (maskShift - maskZeroBits)) - 1;

    static constexpr uintptr_t preoptBucketsMarker = 1ul;

    // 63..60: hash_mask_shift
    // 59..55: hash_shift
    // 54.. 1: buckets ptr + auth
    //      0: always 1
    static constexpr uintptr_t preoptBucketsMask = 0x007ffffffffffffe;

    ll_bucket_t *buckets() {
        return (ll_bucket_t *)(_bucketsAndMaybeMask & bucketsMask);
    }

    uint32_t mask() const {
        return _bucketsAndMaybeMask >> maskShift;
    }

};

// class_data_bits_t源码模仿
struct ll_class_data_bits_t {
    uintptr_t objc_class;
};

// objc_class源码模仿
struct ll_objc_class {
    Class isa;
    Class superclass;
    struct ll_cache_t cache;
    struct ll_class_data_bits_t bits;
};


void test(Class cls) {
    //将cls的类型转换成自定义的源码ll_objc_class类型,方便后续操作
    struct ll_objc_class *pClass = (__bridge struct ll_objc_class *)(cls);

    struct ll_cache_t cache = pClass->cache;  //读取cache
    struct ll_bucket_t * buckets = cache.buckets();  // 获取buckets
    struct ll_preopt_cache_t origin = cache._originalPreoptCache;
    uintptr_t mask = cache.mask();

    NSLog(@"buckets里缓存方法的个数 = %u, buckets的长度 = %lu",origin.occupied,mask+1);

    //打印buckets
    for (int i = 0; i < mask + 1; i++ ) {
        SEL sel = buckets[i]._sel;
        IMP imp = buckets[i]._imp;
        NSLog(@"%@-%p",NSStringFromSelector(sel),imp);
    }

}
我们模仿了cache_t在arm64(真机)上的结构,进行真机演示:
        LLPerson *p = [LLPerson alloc];
        [p method1];
        test(LLPerson.class);
        [p method2];
        test(LLPerson.class);
        [p method3];
        test(LLPerson.class);
        [p method4];
        test(LLPerson.class);
        [p method5];
        test(LLPerson.class);
        [p method6];
        test(LLPerson.class);
        [p method7];
        test(LLPerson.class);
        [p method8];
        test(LLPerson.class);
        [p method9];
        test(LLPerson.class);
        [p method10];
        test(LLPerson.class);
        [p method11];
        test(LLPerson.class);
        [p method12];
        test(LLPerson.class);
        [p method13];
        test(LLPerson.class);
        [p method14];
        test(LLPerson.class);
        [p method15];
        test(LLPerson.class);
        [p method16];
        test(LLPerson.class);
        [p method17];
        test(LLPerson.class);
        [p method18];
        test(LLPerson.class);
        [p method19];
        test(LLPerson.class);
        [p method20];
        test(LLPerson.class);
        [p method21];
        test(LLPerson.class);
        [p method22];
        test(LLPerson.class);
        [p method23];
        test(LLPerson.class);
        [p method24];
        test(LLPerson.class);
        [p method25];
        test(LLPerson.class);
        [p method26];
        test(LLPerson.class);
        [p method27];
        test(LLPerson.class);
        [p method28];
        test(LLPerson.class);
        [p method29];
        test(LLPerson.class);
        [p method30];
        test(LLPerson.class);


通过打印,我们可以看到,这个结果符合我们在源码中梳理的顺序。
至此,cache_t的探索暂时告一段落。


 3670
3670


 被折叠的 条评论
为什么被折叠?
被折叠的 条评论
为什么被折叠?
 到【灌水乐园】发言


